Set up a Microsoft Copilot Studio MCP client
Set up a Microsoft Copilot Studio MCP client
To enable Microsoft Copilot Studio agents to use the tools provided by your Coveo Hosted MCP Server, you need to establish a connection between the Copilot Studio MCP client and your Hosted MCP Server.
There are two ways to connect a Copilot Studio agent to your Hosted MCP Server:
-
(Out-of-the-box setup) Connect your agent to the default Hosted MCP Server: This option is the recommended approach for most users. Use this when your Hosted MCP Server is invoked using the default endpoint (
mcp.cloud.coveo.com/mcp). It allows you to quickly connect your agent to your default Hosted MCP Server by adding the Coveo tool to your agent and authorizing the connection.
If your default Hosted MCP Server is invoked using a custom endpoint, use the custom setup instead. For more information, see About the default configuration.
-
(Custom setup) Connect your agent to a specific Hosted MCP Server: This option is for users who want to connect to a specific Hosted MCP Server using a custom endpoint, or who want more control over the connection configuration (for example, to use a specific authentication method). Use this when you want to connect using a custom endpoint or explicitly configure authentication.
This article provides step-by-step instructions for both options. After setup, your Copilot Studio agents can use tools from your Hosted MCP Server in all agent interactions.
Prerequisites
Before you begin, make sure that:
For all setups
-
You’ve created an agent in Microsoft Copilot Studio.
-
You’ve created an MCP Server in your Coveo organization.
-
You’re either a member of the Administrators group in your Coveo organization or you have the required privileges to edit a Hosted MCP Server configuration.
For custom setups only
Connect your agent to the default Hosted MCP Server (Out-of-the-box setup)
To connect your agent to the default Hosted MCP Server:
-
Access the Tools page for your agent.
-
Click Add a tool.
-
In the Add tool modal, click Model Context Protocol, and then select Coveo from the list of available MCP connectors.
-
In the Add tool modal, click the Connection dropdown list, and then select Create new connection.
-
In the Connect to Coveo modal that appears, click Create
-
To authorize the connection, log in to the Coveo Platform using the login method specified by your company.
-
In the Add tool modal, click Add and configure.
Your default Hosted MCP Server has been added to your agent as a tool. The Hosted MCP Server tool details appear on the Tools page for your agent.
Connect your agent to a specific Hosted MCP Server (Custom setup)
To connect your agent to a specific Hosted MCP Server:
-
Access the Tools page for your agent.
-
Click Add a tool.
-
In the Add tool modal, click Add new MCP.
-
In the Add a Model Context Protocol server modal, fill in the following fields:
-
Server name: Enter a name to identify the connection to your Hosted MCP Server (for example,
Coveo MCP Server). -
Server description: Enter a description for this server connection (for example,
Connection to the Hosted MCP Server that provides access to the Coveo tools). -
Server URL: Enter the endpoint of your Hosted MCP Server configuration.
-
Under Authentication:

Use the authentication method specified in your Hosted MCP Server configuration. If you’re unsure which authentication method to use, see Authentication methods.
For OAuth (Authenticated) authentication
-
Click OAuth 2.0.
-
In the Type box:
-
Select Manual.
-
In the Client ID field, enter
MsCopilotConnector. -
In the Client secret field, enter
MsCopilotConnector. -
In the Authorization URL field, enter the following URL:
https://platform.cloud.coveo.com/oauth/authorize -
In the Token URL template field, enter the following URL:
https://platform.cloud.coveo.com/oauth/token -
In the Refresh URL field, enter the following URL:
https://platform.cloud.coveo.com/oauth/token -
In the Scopes field, enter
full, search, id. -
Leave the Redirect URL field empty.
-
-
Click Create.
A message indicating that the tool has been successfully created appears.
-
In the Add a Model Context Protocol server modal, click Next to add the tool to your agent.
-
In the Add tool modal, click the Connection dropdown list, and then select Create new connection.
-
In the connection modal, click Create.
-
To authorize the connection, log in to the Coveo Platform using the login method specified by your company.
-
In the Add tool modal, click Add and configure.
Your Hosted MCP Server has been added to your agent as a tool. The Hosted MCP Server tool details appear on the Tools page for your agent.
For API key (Anonymous) authentication
-
Click API Key.
-
In the Type box:
-
Select Header (Default).
-
In the Header name field, enter
Authorization.
-
-
Click Create.
-
In the Add tool modal, click the Connection dropdown list, and then select Create new connection.
-
In the connection modal that appears:
-
Enter
Bearer <API_KEY>in the empty field.Where
<API_KEY>is the API key of your Hosted MCP Server configuration. -
Click Create.
-
-
In the Add tool modal, click Add and configure.
Your Hosted MCP Server has been added to your agent as a tool. The Hosted MCP Server tool details appear on the Tools page for your agent.
-
-
Test your agent
Use the Test your agent pane on the right side of the Tools page to confirm that your agent can access the tools provided by your Hosted MCP Server.
|
|
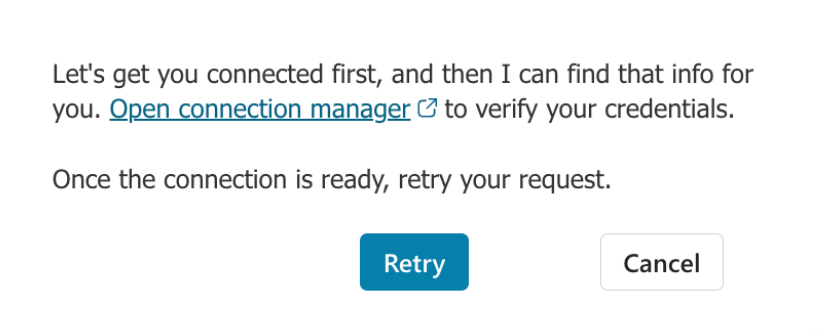
The first time you test your agent, you may be prompted to create a new connection to the Hosted MCP Server. If that occurs, click the Open connection manager link to verify your credentials. For more information, see the Manage connections. |
Manage connections
You may need to manage your connection the first time you test your agent. To manage your connection, you can use the connection manager in Microsoft Copilot Studio.
To open the connection manager
-
In the Test your agent pane, click the Open connection manager link if prompted to do so.
-
On the Manage your connections page, find the Coveo tool, go to the Status column, and then click Connect.
-
In the Create or pick a connection modal, click Submit.
The Status of the Coveo tool changes to Connected.
-
In the Test your agent pane, click Retry to test your agent again.
Your agent can now access the tools provided by your Hosted MCP Server.
What’s next?
-
For more information about the default Hosted MCP Server, see About the default configuration.
-
For more information about the Hosted MCP Server tools and capabilities, see Manage tools.