Add a Salesforce source
Add a Salesforce source
- Source features summary
- Prerequisites
- Add a Salesforce source
- Limitations regarding Salesforce securities
- Limitations regarding related files
- About object and field names
- Reauthorize the source
- Define a Salesforce object body
INVALID_QUERY_LOCATORerror- About legacy Salesforce sources
- Required privileges
- What’s next?
|
|
Due to the strengthened Salesforce security requirements for connected apps, Salesforce source authentication may expire more frequently than before, especially sources with longer content update intervals. Periodic user action is normal in this context. When authentication expires, the source’s Authentication subtab shows an "Authentication required" warning that references the Salesforce security enforcement changes. To restore access, reauthorize the source or launch a source refresh or rescan from the Sources (platform-ca | platform-eu | platform-au) page. When the source shows an authentication error on the Sources (platform-ca | platform-eu | platform-au) page, you must reauthorize the source. |
A Salesforce source enables you to index and search your Salesforce content through Coveo-powered search interfaces. You can index any Salesforce object and field, including standard objects (such as Accounts, Cases, and Opportunities), custom objects, Chatter feeds, Knowledge articles, and CRM content.
This article guides you through the process of creating a dedicated Salesforce crawling user, adding a Salesforce source, and configuring what content to index. The source can maintain your Salesforce security model, ensuring users only see search results for content they have access to in Salesforce.
|
|
Notes
|
Source features summary
The following table presents the main characteristics of a Salesforce source.
| Features | Supported | Additional information | |
|---|---|---|---|
Salesforce versions |
The Coveo for Salesforce connector is updated on a regular basis to use the latest Salesforce API version. However, when a new API version is released, it may take a few weeks for it to be officially supported. |
||
Indexable content |
|
indexing Salesforce commerce content requires a different approach. |
|
|
|||
|
A rescan or a rebuild is required to retrieve:
|
||
|
|||
Content security options |
Same users and groups as in your content system |
|
Some limitations apply. |
Specific users or groups |
|
||
Everyone |
|
||
Metadata indexing for search |
Examples of auto-populated default or standard source fields (no user-defined metadata required):
After a content update, inspect your item field values in the Content Browser. |
||
Indexable metadata |
The Salesforce source lets you choose the Salesforce object fields you want and indexes their values in After a content update, inspect your item field values in the Content Browser. |
||
Prerequisites
Before you create a Salesforce source, you must:
-
Ensure that your license allows you to create this source and that your organization hasn’t reached its source quota. You can review your quotas on the License & Usage (platform-ca | platform-eu | platform-au) page, along with your usage.
-
Create a dedicated Salesforce crawling user that meets the requirements:
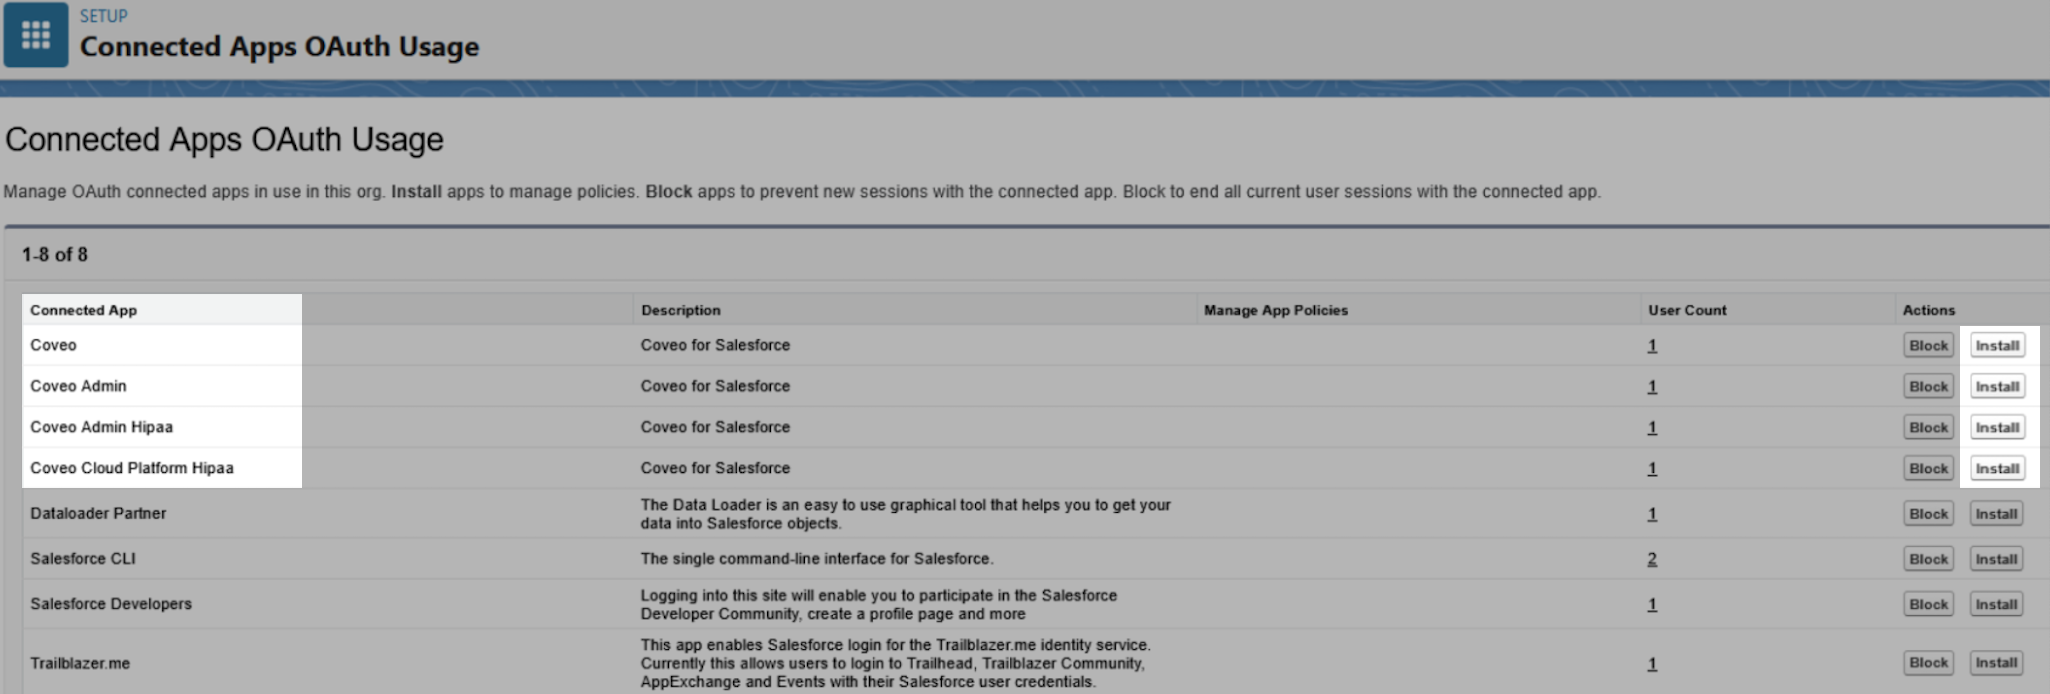
Step 1: Install the Coveo Connected Apps
Due to a September 2025 update to the Salesforce security policies, you must now install the Coveo Connected Apps that apply to your use case. These apps are required to fetch refresh tokens and to authenticate the Coveo crawling user.
-
Log in to your Salesforce organization using an Administrator account.
-
On the Setup page, enter
OAuthin the Quick Find box, then select Connected Apps OAuth Usage. -
On the Connected Apps OAuth Usage page, install the Coveo Connected Apps that apply to your use case:
-
If you use a Salesforce account to log in to the Coveo HIPAA Platform, find the Coveo Admin Hipaa Connected App, and then click Install under the Actions column. This Connected App must be installed in the organization that hosts the Salesforce users.
-
If you use a Salesforce account to log in to the standard (non-HIPAA) Coveo Platform, find the Coveo Admin Connected App, and then click Install under the Actions column. This Connected App must be installed in the organization that hosts the Salesforce users.
-
If you use the Salesforce connector in a HIPAA-compliant environment, find the Coveo Cloud Platform Hipaa Connected App, and then click Install under the Actions column. This Connected App must be installed in all the organizations that are crawled.
-
If you use the Salesforce connector in a standard (non-HIPAA) production environment, find the Coveo Connected App, and then click Install under the Actions column. This Connected App must be installed in all the organizations that are crawled.
-
Coveo Connected App compliance with Salesforce security policies
The Coveo Connected Apps comply with Salesforce’s enhanced security requirements for connected apps through the following OAuth security features:
-
PKCE (Proof Key for Code Exchange): Strengthens OAuth flows by binding the authorization request to the token exchange, protecting against interception attacks.
-
RTR (Refresh Token Rotation): Introduces single-use refresh tokens to mitigate session hijacking risks.
-
Refresh token idle timeout: Enforces a mandatory expiration for refresh tokens that are unused for 30 days.
-
Refresh token IP range allowlisting: Restricts token usage to designated static IP addresses for added security.
|
|
Due to the implementation of these security requirements, Salesforce source authentication may expire more frequently than before, especially sources with longer content update intervals. Periodic user action is normal in this context. When authentication expires, the source’s Authentication subtab shows an "Authentication required" warning that references the Salesforce security enforcement changes. To restore access, reauthorize the source or launch a source refresh or rescan from the Sources (platform-ca | platform-eu | platform-au) page. When the source shows an authentication error on the Sources (platform-ca | platform-eu | platform-au) page, you must reauthorize the source. |
Step 2: Create a Salesforce profile dedicated to the Coveo user
-
Log in to your Salesforce organization using an Administrator account.
-
On the Setup page, enter
Profilesin the Quick Find box, then select Profiles. -
On the Profiles page, click New Profile.
-
On the Clone Profile page:
-
In the Existing Profile box, select an existing profile, such as Read Only, to serve as a template for the new profile, depending on the permissions you want to grant to the Coveo crawler.
-
Take note of the User License (for example, Salesforce), as you’ll need it later.
-
In the Profile Name box, enter a name, such as
CoveoCrawler. -
Click Save.
-
-
On the page for your new profile, click Edit and, in the Administrative Permissions section, set the following permissions. If you’ve enabled the Enhanced Profile User Interface, click System Permissions, and then click Edit to set the following permissions.
-
Ensure that the API Enabled permission is selected.
-
Select the Manage Sharing, Modify Metadata Through Metadata API Functions, View All Data, View All Users, View All Profiles, and View Setup and Configuration permissions. See the requirements for more information about these permissions.
-
Select the Query All Files permission to index all the
ContentVersionobjects in your Salesforce organization. If you’ve enabled the Enhanced Profile User Interface, access the App Permissions section to set this permission. -
Optionally, as an additional security measure, in the Login IP Ranges section, enter Coveo’s IP range to restrict access for this profile.
-
Click Save.
-
Step 3: Create a Salesforce user dedicated to Coveo
Your Salesforce source will use this dedicated user account to access your Salesforce organization and index its content. Make sure to read the requirements for the dedicated Salesforce crawling user before proceeding.
-
Log in to your Salesforce organization using an Administrator account.
-
On the Setup page, enter
Usersin the Quick Find box, and then select Users. -
On the All Users page, click New User.
-
On the New User page:
-
Fill the required fields.
-
In the User License box, ensure that the license matches the license of your newly created profile (for example, Salesforce).
-
In the Profile box, select your newly created profile.
-
To index Classic Knowledge content, ensure that Knowledge User is checked.
-
Click Save.
-
Crawling user requirements
Your dedicated Salesforce crawling user must:
-
Not be an employee’s account. If this employee leaves the company or changes roles, their account could be terminated or have its permissions changed. This could break the connection to Coveo or impact indexing.
-
Not be used by multiple Salesforce sources simultaneously as this could break source authentication.

After duplicating or copying a Salesforce source configuration to another Coveo organization using the resource snapshot feature, re-authenticate the new source with a different crawling user.
-
Have access to all the Salesforce objects you want to query in your Salesforce organization. We strongly recommend granting the user the View All Data permission.
-
Have the following permissions, even if it has the Modify All Data or View All Data permission.
Permission Reason/comments API Enabled
Required to call Salesforce APIs.
Knowledge User
Required to index Classic Knowledge articles. This permission doesn’t apply when Lightning Knowledge is enabled.
Manage Sharing
Required to access the object sharing settings that are required to index securities.
Modify Metadata Through Metadata API Functions
Required to use the Salesforce Metadata API, which Coveo uses to index Salesforce item permissions, case settings, sharing settings, and other Salesforce setup configuration information.
Query All Files
Required to index all
ContentVersionrecords in your Salesforce organization. Without this permission, only theContentVersionrecords that have been specifically shared with the crawling user will be indexed. However, the Query All Files permission isn’t required if the Index related files option is enabled on applicable objects.View All Users
Required to view all users, regardless of their object sharing settings, and to index item securities.
View All Profiles
Required to view all profiles, regardless of their object sharing settings, and to index item securities.
View Setup and Configuration
Required to view the basic security objects such as
Roles,Profiles, andPermission Sets, and the object sharing configuration. Also required to index item securities.Permissions required on a per-object basis
This table provides a summary of the permissions that must be set for the crawling user depending on the Salesforce objects you want to index.
Permission Service Cloud objects Content objects Knowledge objects Chatter objects[1] API Enabled

Knowledge User[2]

Manage Sharing[3]
Modify All Data[4]
Optional
Optional
Optional
Optional
Modify Metadata Through Metadata API Functions[5]
Query All Files[6]
View All Data
Recommended
Recommended
Recommended
Recommended
View All Profiles
View All Users
View Setup and Configuration
1. To view the Chatter feed items created inside a community, a user must also be a member of that community.
2.The Knowledge User permission is required to index Classic Knowledge articles only. It doesn’t apply when Lightning Knowledge is enabled.
3.The Manage Sharing permission is required even if your crawling user has the Modify All Data permission.
4.Although the Modify All Data permission is no longer a requirement for the crawling user, you can continue to use this permission if it’s part of your existing integration.
5.If necessary, the DisableMetadataApiSecurities parameter can be used to bypass the crawling user’s Modify Metadata Through Metadata API Functions and Manage Sharing permission requirements to create a secured source. However, we strongly advise against using it. Enabling this parameter may cause some users to experience missing results in their Coveo-powered search interface.
6.The Query All Files permission is required even if your crawling user has the Modify All Data or the View All Data permissions.
-
Have access to all the fields you want to index in each Salesforce object. Make sure to validate the field-level security settings in your Salesforce organization.
-
Be a member of each library that contains the
ContentVersionrecords you want to index.
Add a Salesforce source
A Salesforce source allows you to index most types of Salesforce content in your Coveo organization. However, to index Salesforce commerce content, such as products, variants, and availabilities, use a REST API source instead and follow the commerce-specific instructions.
|
|
Leading practice
It’s best to create or edit your source in your sandbox organization first. Once you’ve confirmed that it indexes the desired content, you can copy your source configuration to your production organization, either with a snapshot or manually. Source re-authentication with a separate crawling account may be required in the production organization. See About non-production organizations for more information and best practices regarding sandbox organizations. |
Follow these steps to add a Salesforce source.
-
Make sure that your organization meets the prerequisites before adding this source.
-
On the Sources (platform-ca | platform-eu | platform-au) page, click Add source.
-
In the Add a source of content panel, click the Salesforce source tile.
-
Configure your source.
"Configuration" tab
On the Add a Salesforce source page, the Configuration tab is selected by default. It contains your source’s general and authentication information, as well as other parameters.
"Identification" subtab
The Identification subtab contains general information about the source.
Name
Enter a name for your source.
|
|
Leading practice
A source name can’t be modified once it’s saved, therefore be sure to use a short and descriptive name, using letters, numbers, hyphens ( |
Project
Use the Project selector to associate your source with one or more Coveo projects.
"Authentication" subtab
To allow Coveo to access your content, you must authenticate with Salesforce.
Click Authorize account, and then, in the window that opens, log in to your Salesforce organization with the dedicated Salesforce account you created earlier.
|
|
Due to the strengthened Salesforce security requirements for connected apps, Salesforce source authentication may expire more frequently than before, especially sources with longer content update intervals. Periodic user action is normal in this context. When authentication expires, the source’s Authentication subtab shows an "Authentication required" warning that references the Salesforce security enforcement changes. To restore access, reauthorize the source or launch a source refresh or rescan from the Sources (platform-ca | platform-eu | platform-au) page. When the source shows an authentication error on the Sources (platform-ca | platform-eu | platform-au) page, you must reauthorize the source. |
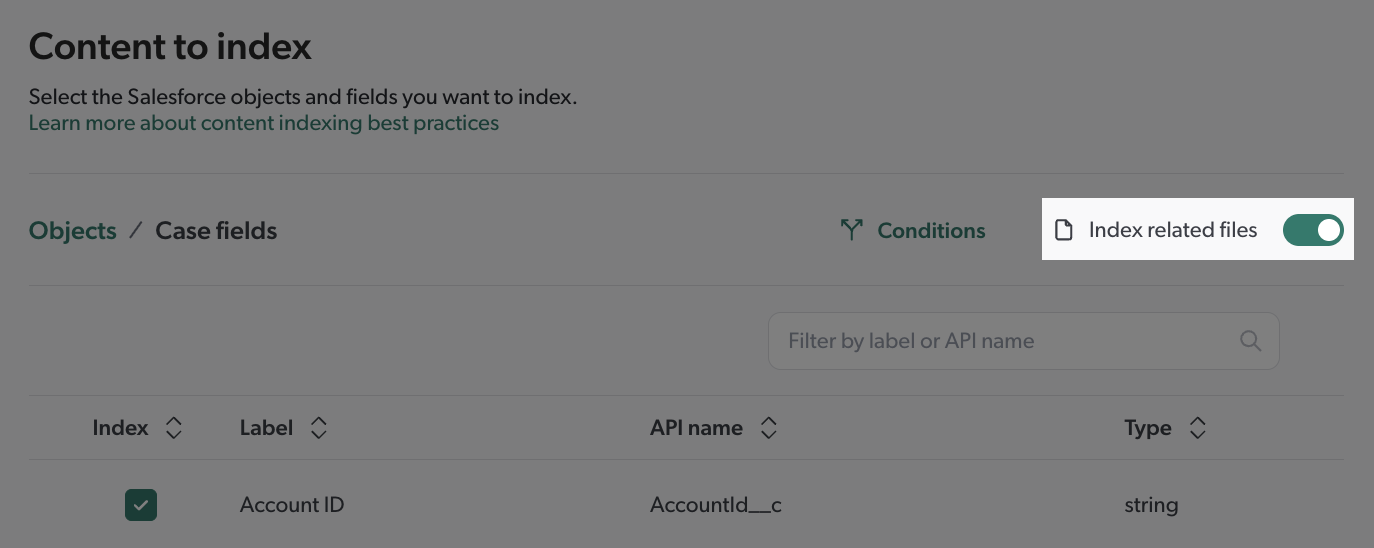
"Content to index" subtab
The Content to index subtab lets you select the Salesforce objects and fields you want to index.
|
|
Note
Your custom objects are only displayed when you’ve enabled its Allow Search field in Salesforce. |
When you click an object, you can then click View > Fields or Relationships in the Action bar. Like in the object list, select the fields or relationships you want to index.

The breadcrumb at the top of the table helps you navigate the content:

By default, indexing related files (also known as attached files or ContentVersion records) is enabled on applicable objects. However, make sure to read about the limitations.
|
|
Leading practice
Not all Salesforce data is useful to index. indexing large amounts of data can have an impact on your Coveo organization performance, overload the Salesforce API, and clutter search results with irrelevant items. Select only the Salesforce objects and fields that are relevant to your users' search needs to improve the search experience. Start indexing the key standard objects with pre-selected fields and test search results to identify essential information that’s missing. Then, only add other standard or custom objects and fields that you want to see in search results or use with the following Coveo features: You can also add conditions to only index a subset of the selected content. |
See Index Chatter feeds and Index Salesforce Knowledge for details about indexing these specific types of content.
Add a condition
When you select Salesforce objects, fields, or relationships to index, you can also define conditions to only index a subset of this content. Only the items that meet the defined conditions will be indexed.
-
Click an object, field, or relationship that you’ve decided to index, and then click Conditions in the Action bar.
-
To build a condition, select a Salesforce object field and an operator, and then enter a field value using the SOQL syntax. Only the content that meets the defined condition will be indexed.
 Notes
Notes-
String values must be entered in single quotes and datetime values must respect the
ISO 8601format. For example,'2017-08-21T20:09:26+00:00'. -
If you select the Includes or Excludes operator, using the following syntax to enter multiple field values in a single entry:
('value1','value2').
-
-
Once you’re satisfied with your conditions, click Apply.
"Items" tab
On the Items tab, you can specify how the source handles items based on their file type or content type.
File types
File types let you define how the source handles items based on their file extension or content type. For each file type, you can specify whether to index the item content and metadata, only the item metadata, or neither.
You should fine-tune the file type configurations with the objective of indexing only the content that’s relevant to your users.
Your repository contains .pdf files, but you don’t want them to appear in search results.
You click Extensions and then, for the .pdf extension, you change the Action by default and Action on error values to Ignore item.
For more details about this feature, see File type handling.
Content and images
If you want Coveo to extract text from image files or PDF files containing images, enable the appropriate option. The extracted text is processed as item data, meaning that it’s fully searchable and will appear in the item Quick view.
|
|
Note
When OCR is enabled, ensure the source’s relevant file type configurations index the item content. Indexing the item’s metadata only or ignoring the item will prevent OCR from being applied. |
See Enable optical character recognition for details on this feature.
"Content security" tab
|
|
|
Select who will be able to access the source items through a Coveo-powered search interface. For details on the content security options, see Content security.
Same users and groups as in your content system is the default and most secure option. Select it if you have secured content. This only allows anonymous and authenticated users to see search results for items to which they have access within Salesforce.
Alternatively, if you select Specific users and groups, you can specify which users or groups can or can’t access the source content through a Coveo-powered search interface. See Content security for more information on this option. In the Add a user of group panel that opens, the Standard view allows you to select security identities from the Email Security Provider. Switch to the Advanced view to select a different security identity provider and/or to enter additional information about the identity, depending on the selected provider.
"Access" tab
On the Access tab, specify whether each group (and API key, if applicable) in your Coveo organization can view or edit the current source.
For example, when creating a new source, you could decide that members of Group A can edit its configuration, while Group B can only view it.
For more information, see Custom access level.
Build the source
-
Finish adding or editing your source:
-
When you’re done editing the source and want to make your changes effective, click Add and build source/Save and rebuild source.
-
When you want to save your source configuration changes without starting a build/rebuild, such as when you know you want to make other changes soon, click Add source/Save. On the Sources (platform-ca | platform-eu | platform-au) page, click Launch build or Launch rebuild when you’re ready to make your changes effective and index your content.
-
-
On the Sources (platform-ca | platform-eu | platform-au) page, follow the progress of your source addition or modification.
-
Once the source is built or rebuilt, review its content in the Content Browser.
-
Optionally, consider editing or adding mappings.
|
|
Leading practice
The number of items that a source processes per hour (crawling speed) depends on various factors, such as network bandwidth and source configuration. See About crawling speed for information on what can impact crawling speed, as well as possible solutions. |
Limitations regarding Salesforce securities
The security of your Salesforce content is maintained in your Coveo organization. When you create a Salesforce source and select the Same users and groups as in your content system content security option, Coveo indexes not only your Salesforce content, but also its access permissions. This allows Coveo to replicate the Salesforce security model, so that, through a Coveo-powered search interface, end users can only see the Salesforce content they have access to in Salesforce.
For example, a support agent who has access to Accounts, Contacts, and Cases objects in Salesforce, but not to Campaigns, Leads, Opportunities, and Forecasts objects, will only see search results for Accounts, Contacts, and Cases when searching through a Coveo-powered search interface.
Coveo supports several Salesforce securities, but has some limitations, including the following:
-
Shared personal groups aren’t supported. A user can share content with a personal group. These sharing permissions can’t be indexed because they’re currently not reported by the Salesforce API. As a result, members of the personal group won’t see the shared content in Coveo organization results. This limitation is therefore not a security hole.
-
Field-level security isn’t supported. For Enterprise, Unlimited, and Developer Salesforce editions, visibility of individual fields can be granted or denied to users or groups to fine-tune the access control in a permission set or a profile. The Coveo organization index doesn’t include this information. As a result, a user who’s denied access to a field could see the content of this field in the Coveo organization results. Note however that this is also the case for Salesforce search results.
-
Login IP address and hours restrictions aren’t supported. The Coveo organization index doesn’t contain restrictions on login IP address or hours configured in Salesforce. As a result, your Salesforce users can access the Coveo organization search interfaces and review Salesforce content from any IP address at any time.
-
Frozen users aren’t supported, so they aren’t denied access to the search.
-
In Salesforce, if you rely on data categories to control Classic or Lightning KB record access, beware that these permissions can’t be indexed as this information isn’t available in the Salesforce API. Consequently, in search results, all users can view all KB articles under all data categories. Cases such as this one require custom manipulations to ensure content security.
NoteWhen standard Salesforce Sharing for Lightning Knowledge is enabled for Lightning KB record access, all Knowledge permissions are supported, including permissions set on Online, Draft, and Archived articles.
-
Coveo for Salesforce doesn’t currently support the Account Relationship Data Sharing Rules functionality that was introduced in the Salesforce Spring '19 Release. In addition, poorly implemented Apex Managed Sharing can generate large amounts of record sharing. In such cases, records may be rejected by the index.
-
When the organization-wide default is set to Controlled by Parent, a maximum master-detail relationship depth of two levels is supported. For example, when you index a sub-detail object, the detail parents are correctly determined, but the master parents are considered public because there are three levels (master-detail-subdetail).
Limitations regarding related files
-
Indexing related files only applies to Salesforce ContentVersion records.
-
You can’t filter which related files are included or excluded from the index. All ContentVersion records linked to indexed parent records are indexed by default. To obtain a list of all the IDs that act as parents of the ContentVersion record, access the
sfcontentversionlinkedentityidsfield. -
Folding isn’t possible at this time because the many-to-many relationship isn’t supported.
-
A source refresh doesn’t remove deleted related files from the index. A source rescan or rebuild is required to retrieve deleted related files.
-
Permissions on related files linked to Knowledge Base (KB) articles with data category permissions aren’t currently supported. Either index these files in a public source or don’t index files under Knowledge at all.
About object and field names
In Coveo for Salesforce, you often need to reference specific Salesforce objects and fields, either in result templates, in a search interface, or in custom code you want to implement.
In Coveo for Salesforce, Salesforce object names stay the same.
For example, the following query syntax expression, where you replace <YOUR_SALESFORCE_OBJECT> with the API name of the Salesforce object, filters the results to only include items from that object:
@objecttype=="<YOUR_SALESFORCE_OBJECT>"See Standard Objects and Custom Objects for lists of object API names.
Coveo adapts the Salesforce field names to ease the implementation and avoid potential confusion with other non-Salesforce fields. Coveo for Salesforce field names are built following this syntax:
sf + Relationship + Salesforce API field name
-
The
sfprefix indicates the field is exclusively used by Salesforce sources. -
Relationshipindicates the parent or child object associated to the field. See the About object relationships section for more information. When referring to a parent object, the singular form of the object name is used. When referring to a child object, the plural form of the object name is used. When the object is a top-level field (has no parent or child relationship), this value is skipped.Examples-
Since Account is a parent of Case, the field Name from the Account object associated to a case is
sfAccountName -
The Subject field for all the Case objects on an Account is
sfCasesSubject -
The Status field of the Case object is a top-level field, meaning its field is
sfStatus
-
-
Salesforce API Field Name. Custom fields end with__c.
When inspecting a Salesforce item in the Content Browser (platform-ca | platform-eu | platform-au), you can find the Coveo fields associated to this item, including those with the sf prefix.
About object relationships
Because Coveo fields incorporate object relationships in their syntax, it helps to understand these relationships when working with fields.
Top-level fields are directly associated to an object. For example, formula fields are top-level fields.
The parent relationship is only available when querying a child object. Multiple child records can be associated to the same parent record. For example, the Account object is a parent of the Case object, as cases belong to an account.
The child relationship is only available when querying a parent object. A single parent record can be associated to multiple child records. For example, the Account object has a Cases child relationship that lists all the cases for any particular account.
Reauthorize the source
|
|
Due to the strengthened Salesforce security requirements for connected apps, Salesforce source authentication may expire more frequently than before, especially sources with longer content update intervals. Periodic user action is normal in this context. |
Your Salesforce source uses the OAuth 2.0 authorization protocol and the authentication information specified in your source configuration to access your Salesforce content.
Authentication may start to fail for many reasons, such as:
-
The crawling account was disabled or deleted.
-
The crawling account’s permissions changed.
-
Coveo’s authorization to access the content was revoked.
-
Your source hasn’t indexed your content for a long time, and the refresh token it uses has expired.
An authentication error appears on the Sources (platform-ca | platform-eu | platform-au) page when your Salesforce source can no longer access your content.
To reauthorize the source
-
On the Sources (platform-ca | platform-eu | platform-au) page, click your source, and then click Edit in the Action bar.
-
On the source subpage, click the Authentication subtab.
-
Click Reauthorize, and then, in the window that opens, log in to your Salesforce organization with the dedicated Salesforce account used to index your content.
By default, the Also update the authentication token of the related security identity provider box is checked to ensure that the authentication of the linked security identity provider to your source is also updated. However, this security identity provider may be used by multiple sources. Before updating, ensure that doing so won’t impact other sources.
-
Click Save or Save and rebuild source.
Define a Salesforce object body
You can change what’s indexed as the body of your object by defining a mapping rule for the body field.
The body of your object is used both as the excerpt and as the quickview of an item in your search interface.
-
On the Sources (platform-ca | platform-eu | platform-au) page, click your source, and then click Mappings in the Action bar.
-
To add a mapping, click the Add dropdown menu, and then select Mapping.
-
In the panel that opens:
-
Under Field, select
body. -
Under Apply to, select the objects to which you want to apply the mapping rule.
-
Under Rules, enter the mapping rule to apply. Use the following syntax to display Salesforce field values:
%[<SALESFORCE_FIELD_API_NAME>]. See Mapping rule syntax reference if needed. If you enter more than one rule, Coveo will evaluate them in the order they appear, until one of them yields a non-empty value.ExampleYou want to change your
Accountobject to display the account description, number, and phone number.Under Rule, you enter the following mapping rule:
<html><div>%[Description]</div><div>Account Number: %[AccountNumber]</div><div>Phone Number: %[Phone]</div></html>As a result, the body of your
Accountobject displays as follows:Acme Corporation is a leading provider of road runner deterrents. Account Number: 001A000000fXyz123 Phone Number: +1-800-555-0199 -
Click Apply mapping.
-
-
Back in the Edit mappings panel, click Save and rebuild source if you’re done making changes. Coveo will launch a source rebuild, which is necessary to apply your changes.

Alternatively, click Save to close the panel without launching a rebuild. This option is especially useful when you plan on making additional changes in the short term. Since a source with several millions of items may take weeks to rebuild, you’ll save time and resources by rebuilding it only when necessary.
For details about mapping rules, see Manage source mappings and Add a body mapping.
INVALID_QUERY_LOCATOR error
Error with ID 'SALESFORCE_INVALID_QUERY': invalid query locator (INVALID_QUERY_LOCATOR) - This error can occur if a user is used more than once for sources that run in parallel. To avoid this error, make sure to use only one user per source or alternate the refresh schedule of your sources.
This error occurs when Coveo accesses your Salesforce organization with the same user credentials too many times, for instance when multiple Salesforce sources use the same crawling user and run content updates in parallel.
To prevent it, create a separate user account for Coveo to use for each of your Salesforce sources, as well as for each environment you’re deploying to (for example, development, staging, and production).
In addition, only select the Same users and groups as in your content system source content security option if you have secured content.
About legacy Salesforce sources
An alert on your source page indicates that you’re using a legacy Salesforce source:

Legacy Salesforce sources use an older technology. Coveo continues to support these sources so that your content indexing isn’t disrupted.
However, legacy sources don’t support the same features as newer Salesforce sources. To benefit from these features, switch to a newer Salesforce source.
Replace a legacy Salesforce source
-
Follow the steps on this page to create a new crawling user, and then create a new Salesforce source.
-
Copy your source mappings from the legacy source to the new source.
-
Once your new source has indexed all your content, update your search interfaces to use the new source instead of the legacy one.
-
Ensure that your new source follows the same update schedules as your legacy source.
-
Once you’re satisfied with your new source, delete your legacy source to avoid unnecessary indexing operations.
Required privileges
You can assign privileges to allow access to specific tools in the Coveo Administration Console. The following table indicates the privileges required to view or edit elements of the Sources (platform-ca | platform-eu | platform-au) page and associated panels. See Manage privileges and Privilege reference for more information.
|
|
Note
The Edit all privilege isn’t required to create sources. When granting privileges for the Sources domain, you can grant a group or API key the View all or Custom access level, instead of Edit all, and then select the Can create checkbox to allow users to create sources. See Can create ability dependence for more information. |
| Actions | Service | Domain | Required access level |
|---|---|---|---|
View sources, view source update schedules, and subscribe to source notifications |
Content |
Fields |
View |
Sources |
|||
Organization |
Organization |
||
Edit sources, edit source update schedules, and edit source mappings |
Organization |
Organization |
View |
Content |
Fields |
Edit |
|
Sources |
|||
View and map metadata |
Content |
Source metadata |
View |
Fields |
|||
Organization |
Organization |
||
Content |
Sources |
Edit |
What’s next?
You may manually edit the JSON configuration, but be warned that improperly configuring the JSON will make your source fail to build.
For more information on the different JSON configurations you can perform on your Salesforce source, see JSON Salesforce objects.
To start building Coveo-powered search interfaces that allow users to search your indexed Salesforce content, see integrate Coveo components.