Commerce catalog entity
Commerce catalog entity
This is for:
System AdministratorThe catalog entity is at the core of a Coveo for Commerce implementation. It establishes relationships between the catalog objects. A catalog entity also lets you standardize your commerce fields to ensure data reliability for Coveo Machine Learning (Coveo ML) models.
Creating a catalog entity is a requirement for enabling Coveo’s machine learning capabilities, maintaining your catalog data, and analyzing Coveo Analytics data through advanced commerce reporting.
|
|
The resource snapshots feature lets you copy configurations from one Coveo for Commerce organization to another, such as when you migrate from a sandbox to a production organization. It only copies the source configuration, not the source content. Use this feature to reuse your catalog entities and their catalog configurations, your Catalog sources, and your fields and field mappings. |
Add a catalog entity
There’s a 1:1 relationship between a catalog entity and a product source.
This means that each source you created to hold your products must have its own catalog entity.
However, sources that contain only items of the availability object type can be shared across multiple catalog entities.
To create a catalog entity:
-
On the Catalogs (platform-ca | platform-eu | platform-au) page of the Coveo Administration Console, click Add catalog.
-
Enter a suitable Name for your catalog entity (for example,
Barca_Sports_en_US). -
Under Object Types, select the catalog objects your catalog entity should include:
-
If your source only contains catalog product data objects (without items of the variant or availability object types), continue to step 4. Note that you can’t change the Object Types for a catalog entity once it’s created.
-
If your source contains items of the
variantobject type to handle different variations of a product, select Variants. Note that if you’re solely relying on product groupings to handle different variations of a product, you don’t need to select Variants. -
If your source contains items of the
availabilityobject type to control whether a product or variant is available in a specific channel (for example, a store or a warehouse), select the Availability checkbox.
-
-
Under Catalog Content, select the source that contains your catalog data objects. The source you select can only be used with a single catalog entity.
-
Depending on the way you’ve structured your data, your items of the
availabilityobject type might be in another source. In this case, from the dropdown menu, select that source. Otherwise, clear the Use a different source for availabilities checkbox. -
(Optional) Use the Project selector to associate this catalog with one or more projects.
-
To continue selecting a configuration for your catalog, click Next.
 Note
NoteIf you need to change the catalog structure, you must create a new catalog entity. For example, your catalog entity only had items of the Product catalog object, and now you want to add variants or availability channels.
Catalog configuration
A catalog configuration establishes the relationship between the different catalog objects. This configuration is re-usable across multiple catalog entities.
When configuring a catalog entity, you can either select an existing catalog configuration or create a new one.
To create a new catalog configuration:
-
Click Create a New Configuration.
-
Enter a suitable Configuration name, and then click Next.
-
Under Define your products, select the
objecttypefield value that identifies items as products in your catalog data (for example,Product).-
Under Select your Product ID metadata, select the metadata key that uniquely identifies each distinct product in your catalog data. Make sure to map this metadata key to the
permanentidfield in your source. See Mapping topermanentidfor details.
-
-
If your source contains items of the
Variantobject type, under Define your variants, select theobjecttypefield value that identifies items as variants in your catalog data (for example,Variant).-
Under Select your Variant ID metadata, select the metadata key that uniquely identifies each distinct variant in your catalog data.
-
-
Click Next.
-
If your data hierarchy contains items of the
Availabilityobject type, under Define your availabilities, select theobjecttypefield value that identifies items as availability channels in your catalog data (for example,Availability).-
Under Select your Availability ID metadata, select the metadata key that uniquely identifies each availability channel in your catalog data.
-
Under Select your Available SKUs metadata, select the multi-value metadata key that lists all sellable items IDs (such as values of
ec_product_idorec_variant_id), available from each distinct availability channel (for example,ec_available_items).
-
-
Click Next.
-
Under Map standard fields to your catalog, map the standard commerce fields to metadata keys from your catalog data. See the Commerce standard fields section for more information on this step.
-
Click Finish.
The catalog entity is now available on the Catalogs (platform-ca | platform-eu | platform-au) page.
Once your catalog entity is created, push your catalog data into the source once more. This ensures that the catalog entity is properly registered and ensures the proper functioning of Coveo ML models.
Commerce standard fields
In the Map standard fields to your catalog step of the catalog configuration, you’ll be asked to map the standard commerce fields to metadata from your index. This step is critical for:
-
Making sure that Coveo Personalization-as-you-go (PAYG) can build a product vector space that represents your content.
-
Tracking Coveo Analytics events using the Event Protocol. This ensures that commerce events are enriched with the required catalog data, such as
ec_item_group_id,ec_category, andec_brand.
|
|
catalog configuration mappings aren’t the same as source mappings, in which you map metadata from your source to Coveo fields. If you use a Catalog source to index your catalog data, the standard field mappings defined in the catalog configuration will overwrite any source mappings for the standard commerce fields. |
To map the standard commerce fields to your catalog entity, in the Associated Metadata column, select the metadata to associate to the standard fields.
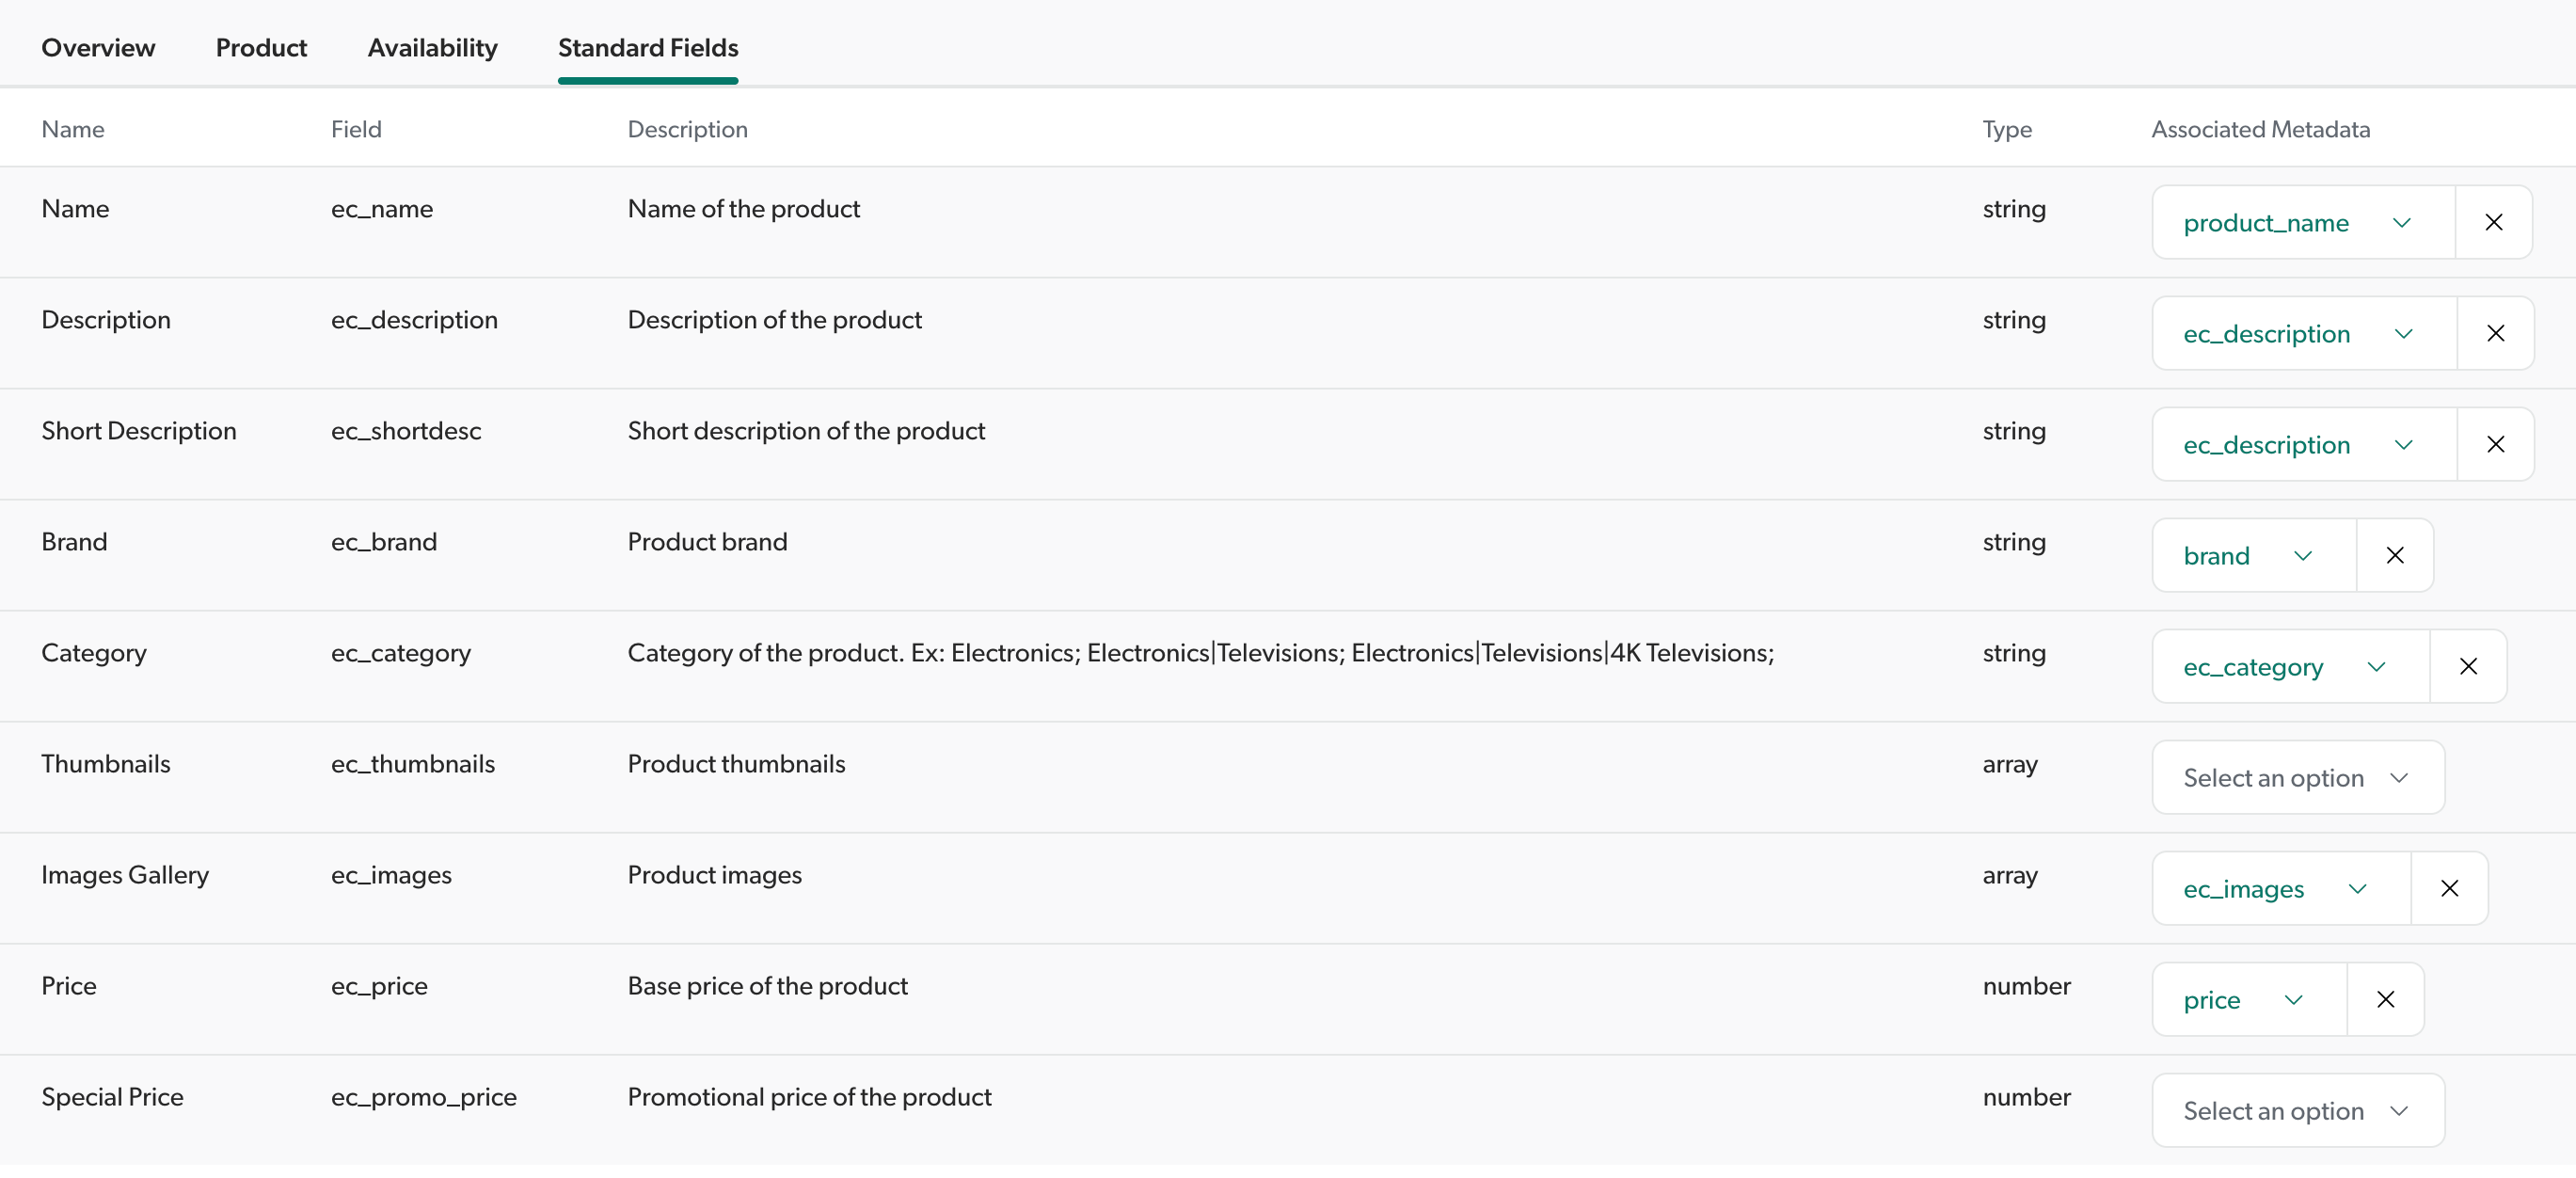
If you haven’t pushed your commerce data to your source yet, you won’t be able to see your metadata keys in the dropdowns of the Associated Metadata column. However, if you know the nomenclature of the metadata keys that you’ll be using, you can enter them in the Associated Metadata column.
When structuring your product, variant, and availability data, use the same field names as the standard commerce fields (prefixed with ec_, such as ec_price).
If your catalog data uses different names from those the standard fields expect, such as price, map the standard commerce fields to your metadata in the catalog configuration.
Edit a catalog entity
You can edit a catalog entity to change its name, the source it uses, the catalog configuration it’s associated with, or the associated facets.
-
On the Catalogs (platform-ca | platform-eu | platform-au) page, click the desired catalog entity, and then click Edit in the Action bar. This will open the Overview tab where you can:
-
Edit the Name.
-
Edit the Description.
-
Edit the Catalog Content, where you can update the source that contains your catalog data. Note that the source you select can only be used with a single catalog entity.
If your catalog entity has availability objects and the way you’ve structured your data has changed, your availability data might now be contained in another source. In this case, select the new source from the dropdown menu. Otherwise, clear the Use a different source for availabilities checkbox.
-
-
To review facet associations for this catalog entity, select the Facet Association tab. For more information, see the Facet Association section.
-
Click Save.
-
When you’re done editing your catalog entity, you must push your catalog data into the source once more. This ensures that the catalog entity is properly registered and ensures the proper functioning of Coveo ML models.
"Facet Association" tab
Using the Facet Association tab, you can quickly view which facetable field names exist for each catalog object type. The percentage shown represents the ratio of each field by catalog object type. By hovering over the percentage shown, you can see the number of documents that contain the associated field name.
|
|
Depending on your specific use case, if the percentages deviate from what you expect, this could be an indication that your data isn’t properly structured. |
In advanced use cases, your data structure may require having the same facetable fields on multiple catalog object types.
For example, you may want to use the same language field across all your items.
In this case, the value @language would need to appear on all catalog objects (Product, Variant, and Availability) to return matching results.
To access the Facet Association tab:
-
On the Catalogs (platform-ca | platform-eu | platform-au) page, click the desired catalog entity, and then click Edit in the Action bar.
-
Select the Facet Association tab.
-
Select the desired field, and then click Edit field in the Action bar. You’ll be sent to the Edit a field subpage, where you can edit the field options.
-
Click Save.
-
When you’re done editing your catalog entity, you must push your catalog data into the source once more. This ensures that the catalog entity is properly registered and ensures the proper functioning of Coveo ML models.
-
(Optionally) Click Refresh Field Cache in the upper-right corner.
This allows you to instantly update the field values you edited instead of waiting for them to update automatically through the staged refresh, which automatically detects the fields that you can use to generate facets every 15 minutes. The last update time appears at the lower right of the Facet Association tab.
Delete a catalog entity
On the Catalogs (platform-ca | platform-eu | platform-au) page, click the desired catalog entity, and then click Delete in the Action bar.
Project association prompts
A catalog is a resource you can associate with a project. Resources associated with a project can require confirmation when you modify them. These confirmation prompts help prevent accidental changes that could affect a Coveo implementation.
Deleting a resource always requires confirmation, whether it’s associated with a project or not. When the resource is associated with projects, the confirmation prompt lists those projects.
Edit a commerce catalog configuration
Depending on the structure you’ve created for your commerce environment, you may need to change or delete your configurations.
For example, if you need to redefine which objecttype field value identifies as a product in your index.
|
|
WARNING
Editing a configuration will impact all associated catalog entities. |
-
On the Catalogs (platform-ca | platform-eu | platform-au) page, click Manage configurations.
-
Click
 to edit the configuration.
For more information on how to configure a catalog configuration, refer to the Catalog configuration section.
Delete a commerce catalog configuration
|
|
Note
You can’t delete a catalog configuration without first deleting the associated catalog entities. Once the associated catalog entity is deleted, the previously associated configuration will remain in your Manage configurations interface until it’s manually deleted. |
-
On the Catalogs (platform-ca | platform-eu | platform-au) page, click Manage configurations.
-
Click
 next to the configuration you want to delete.
What’s next?
After configuring your catalog entity, you must associate it with the target tracking ID and locale (see Storefront associations).