Manage source mappings
Manage source mappings

Once you’ve created a source and indexed your content for the first time, you should review and customize the source mappings. The Coveo Platform uses these mappings to index important information about your content items. After defining mappings, you’ll be able to configure critical aspects of your Coveo-powered search interface, such as facets.
This article explains how source mappings transfer item metadata into Coveo fields. It also provides instructions for reviewing and customizing common and item-type-specific mappings after a source has been indexed.
About mappings
This section explains how mappings work, and how configuring them properly benefits your search interface.
For instructions on how to customize your mappings, jump to Manage mappings.
Item metadata
mappings define the information about your items that Coveo will store in your index. Coveo refers to this information as metadata, but other applications can give it different names, such as properties. In all cases, though, the metadata comes in key-value pairs.
For example, when indexing PDF documents, you’ll likely want to index metadata such as the title, author, creation date, and file size of each document. Typically, the metadata of a PDF is accessible through a properties panel and looks as follows:
Title: Project Planning
Author: John Smith
Created: 06/05/2023 10:34:21 AM
File Size: 988 KB
In this case, Title, Author, Created, and File Size are keys, while Project Planning, John Smith, 06/05/2023 10:34:21 AM, and 988 KB are values.
Keys are typically the same for all items of a certain type, but values often differ from one item to another.
How mappings transfer metadata to fields
Your Coveo index also stores information in key-value pairs.
When indexing an item, Coveo takes its metadata values and stores them in containers called fields.
Fields may have names similar to your metadata keys, such as title, author, date, and size.
Coveo indexes metadata according to mappings or mapping rules, i.e, instructions that tell Coveo to take the value of a certain key and to store it as the value of a certain field.
For example, when indexing PDF documents, you might want mappings that do the following:
| Take value of the … key | Store it in the … field |
|---|---|
|
|
|
|
|
|
|
|
Default fields and mappings
Depending on the type of content you index, Coveo may create fields and mappings for you. However, you should always review what’s indexed and in which field. You can customize your fields and rules as needed.
With native sources, Coveo does the bulk of the work for you by creating default fields and mappings when first indexing your content. For example, with a YouTube source, there’s no need to create fields for the video title, duration, and description, and then to create mappings to populate them with video metadata. Since the metadata keys are always the same for all YouTube sources, Coveo knows what to expect and can do it automatically.
With generic sources, the metadata key naming scheme is likely unique to your content system. As a result, Coveo doesn’t know in advance what metadata to expect from your source, and which fields should be populated with this data. You therefore need to manually create fields to store your content metadata. You can create mappings manually, or you can use automatic mapping.
For more information about the stage of the indexing pipeline where mappings are applied, see Mapping.
Automatic mapping
Every source JSON configuration includes the performFieldMappingUsingAllOrigins setting at the root level, under the All tab.
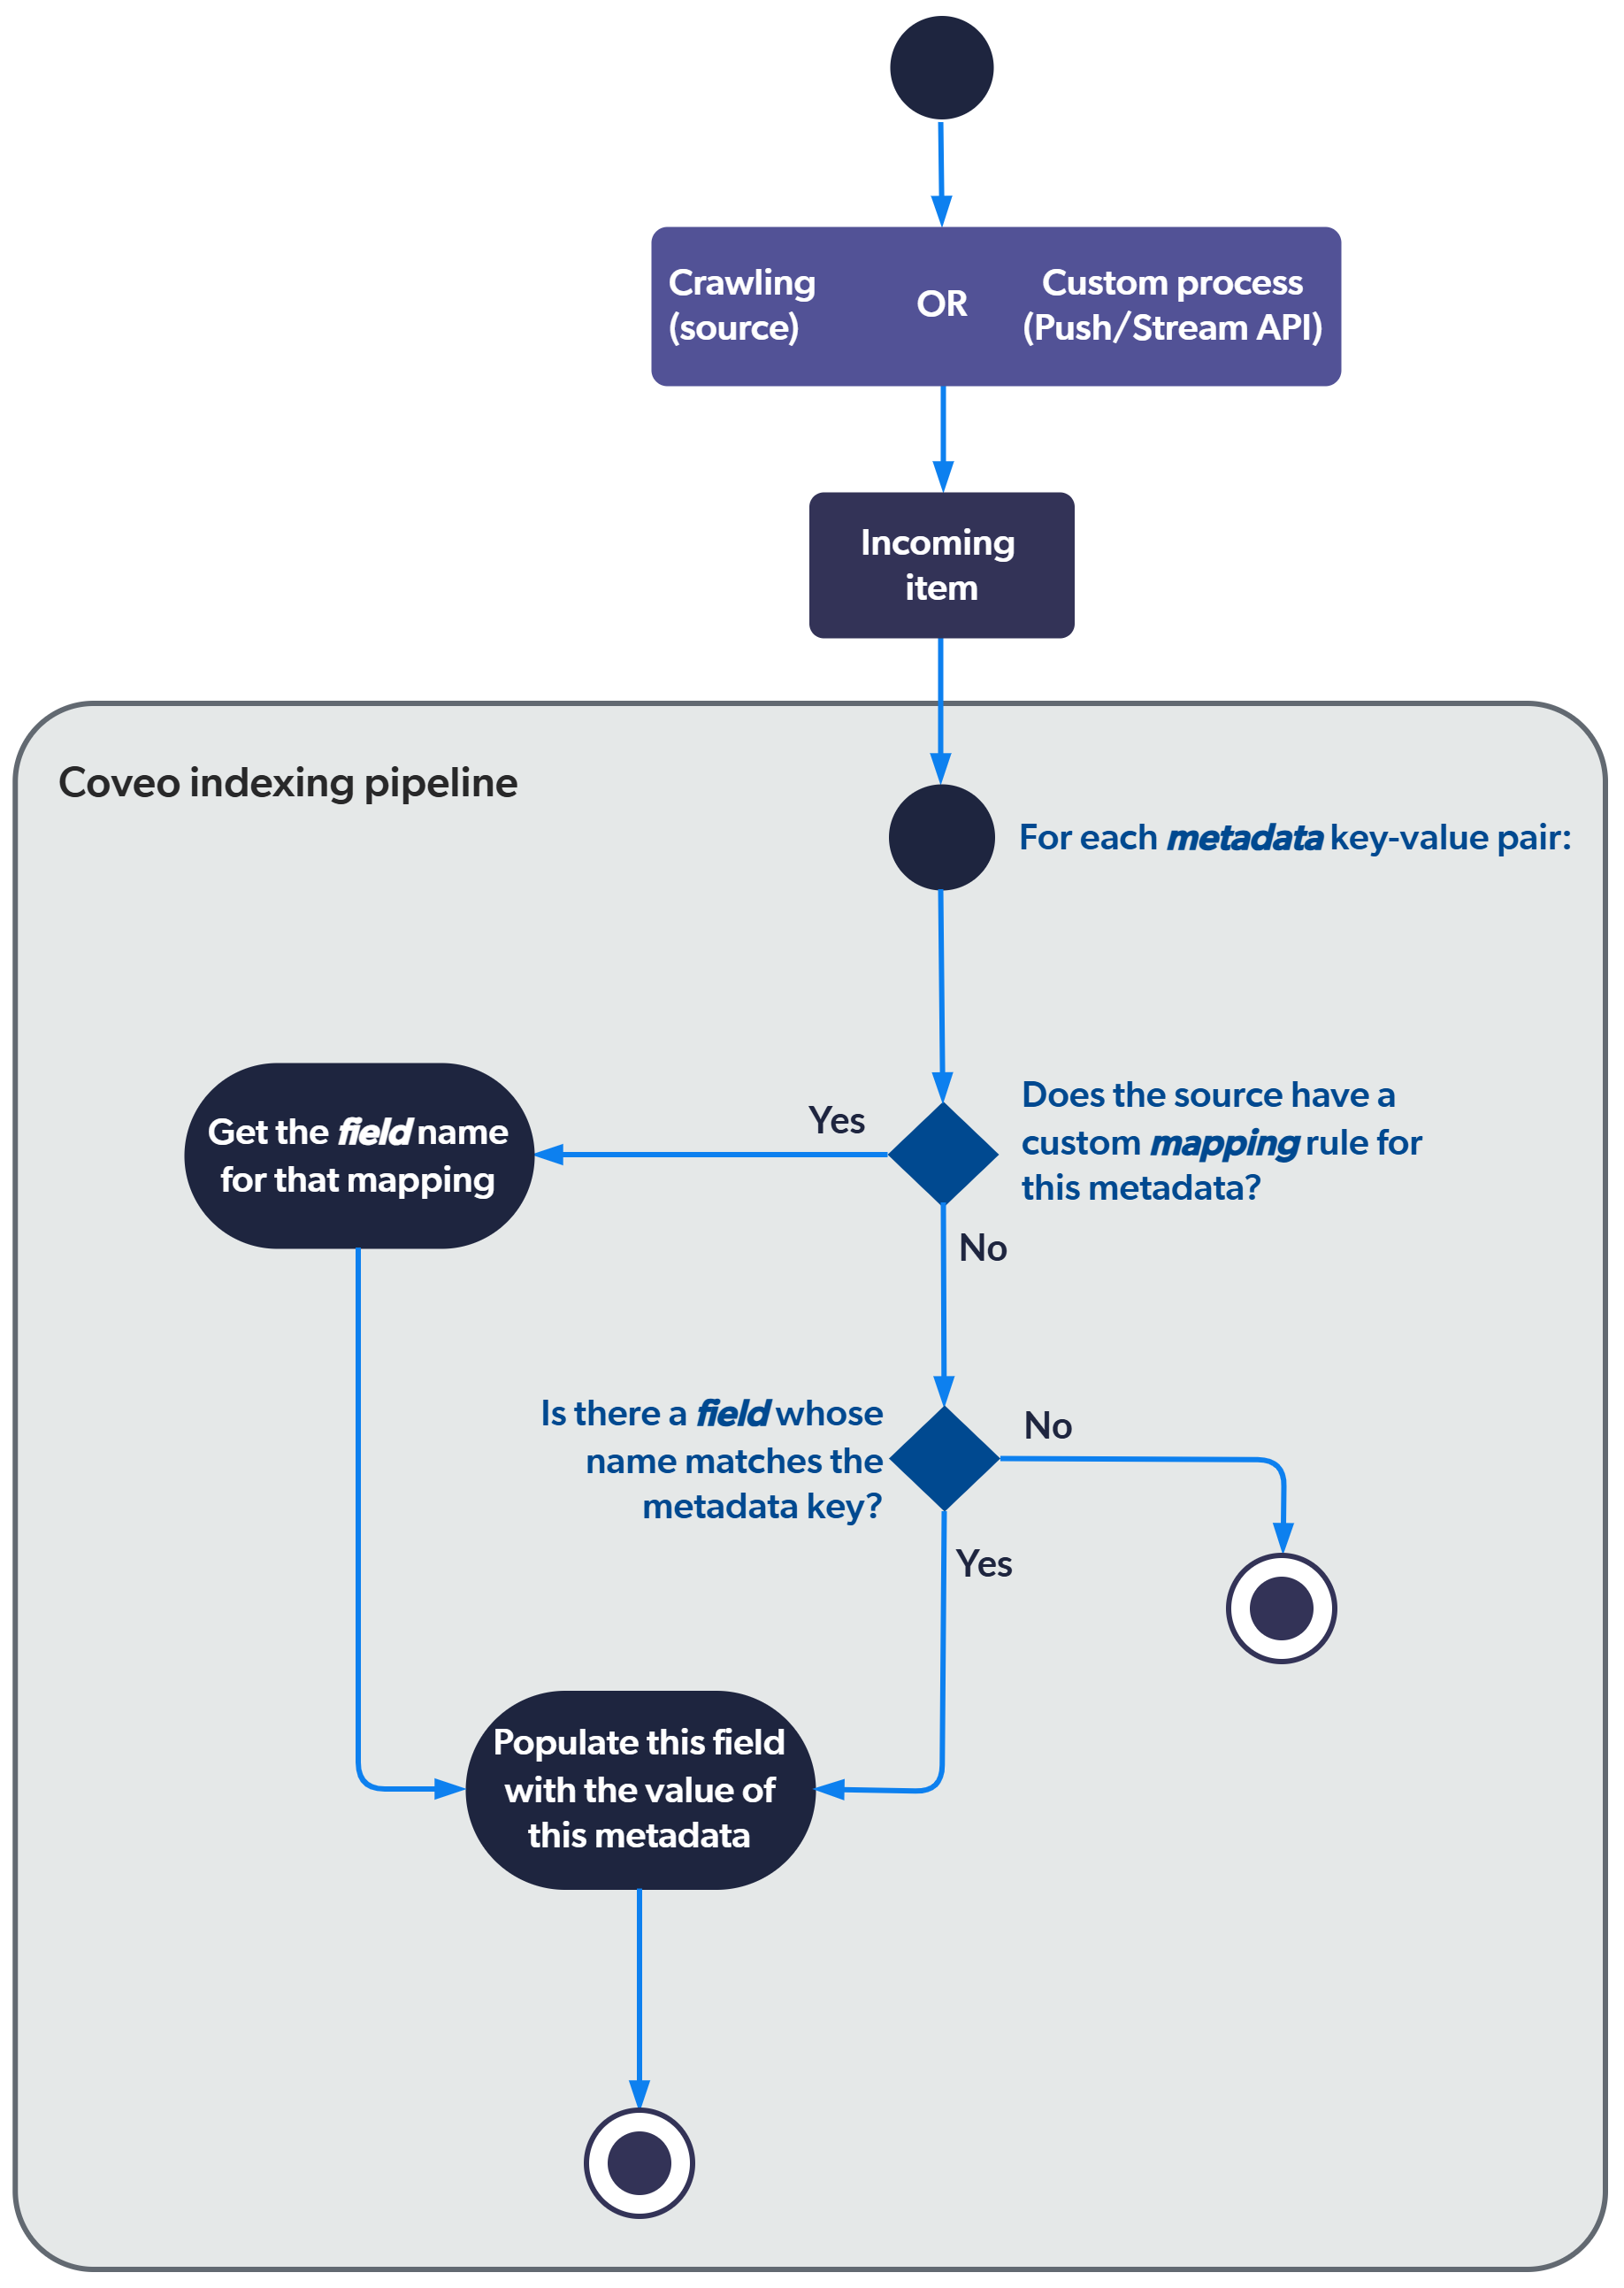
When set to true, Coveo automatically maps metadata to any existing field with a matching name, eliminating the need to create source mappings manually.
This is called automatic mapping.
The performFieldMappingUsingAllOrigins setting is especially useful in generic sources and is set to true by default in Push and Catalog sources, as well as in Database, REST API, and GraphQL API sources created after January 10, 2024.
To set it to true in sources created before this date, edit your source JSON configuration, and then launch a source rebuild.
You create a REST API source to index your company directory, which contains phone numbers under metadata key phone.
Then, you create a phone field.
Since the performFieldMappingUsingAllOrigins setting is set to true, Coveo automatically indexes the number under phone in the phone field.
However, any source mappings you configure take precedence over automatic mapping for the specified metadata.
The following diagram illustrates how the Coveo indexing pipeline handles metadata mapping when performFieldMappingUsingAllOrigins is enabled:

|
Note
Although Coveo automatically indexes the metadata, no mapping rule appears on the Edit mappings subpage. |
Item-type-specific mappings
When creating a mapping rule, you can specify one or multiple types of item your rule will apply to. For example, when indexing YouTube content, you could choose to apply a rule to playlists only.
Typically, the item type is indexed as the value of the filetype, documenttype, mappingtype, or objecttype fields.
So, before you customize your source mappings, use the Content Browser (platform-ca | platform-eu | platform-au) to inspect your source items and note the value that Coveo indexed in these fields.
Then, when customizing mappings, specifying this value will allow you to target all items of this type.
See Source item types for details.
Which mapping mechanism to use
Before choosing a mapping mechanism, use the Content Browser (platform-ca | platform-eu | platform-au) to inspect your source items and verify which metadata Coveo indexed and which fields contain the corresponding values.
Then, for metadata that isn’t indexed:
-
If you’re using a native source, avoid enabling automatic mapping. After an initial build, use the View and map metadata subpage to view and map any not indexed metadata you’d like to use to an existing or new field.
-
If you’re creating a new generic source of one of the following types: Push, Catalog, Database, REST API, or GraphQL API, choose the metadata names used by your source. Unlike native sources, these source types don’t impose predefined metadata names. Then, create Coveo fields with matching names to take advantage of the source’s default automatic mapping behavior.
-
If you want a mapping to apply only to items of specific types, follow the relevant instructions in the Manage mappings section.
For Push and Catalog sources, push your items again to apply the changes. For other source types, rebuild your source.
Navigating the "Edit mappings" subpage
The Edit mappings subpage is accessible from the Sources (platform-ca | platform-eu | platform-au) page of the Coveo Administration Console. Click the source of which you want to manage the mappings, and then click Mappings in the Action bar.
The subpage has a Common tab and a Specific tab.
"Common" and "Specific" tabs
The difference between the Common and Specific tabs is the items the displayed mapping rules apply to. The Common tab shows a list of rules that apply to all items of a source, while the Specific tab displays rules that apply to items of a specific type only.
For example, when indexing YouTube videos and playlists from your corporate channel, you could decide to apply a mapping rule to the playlists only.
The following shows a specific mapping rule created to populate the body field for playlist items, effectively overriding the common source mapping for the body field.

On the Specific tab, item types are listed with their number of mapping rules and the mapping Status.
|
|
Note
An item type must have at least one mapping rule.
If an item type has no mapping rule, its status will say |
Whether you’re on the Common tab or you’re viewing the mappings for a specific item type, the subpage shows a list of fields and the corresponding mapping rule, that is, what Coveo will store in each field. The subpage also displays information about the fields, that is, their type and whether some options are enabled.
"Edit with JSON" button
Click the Edit with JSON button to open the source mapping in JSON format. Any modification made in the Common and Specific tabs automatically updates the JSON accordingly, and vice versa.
You can also review the mappings of a source on the Mappings tab of the Edit configuration with JSON panel. Although the information is structured differently, the following instructions apply to both configuration screens:
Prerequisites
Before you start managing source mappings, ensure that:
-
You’ve created a source and indexed its content at least once.
-
You have the privileges required to view and edit the source and its mappings. See Required privileges.
Manage mappings
Look at the metadata that Coveo might already have indexed, either on the View and map metadata subpage or in the Content Browser (platform-ca | platform-eu | platform-au). Think of the information that your search interface end users will find relevant when searching your content and of the facets you intend to add to your search interface. Ask yourself:
-
Has all the relevant metadata been indexed?
-
Is the metadata indexed in the appropriate fields?
If the answer is no, you must customize your source mappings.

|
If you use a Catalog source to index your catalog data, don’t define source mappings for the standard commerce fields. The standard field mappings defined in the catalog configuration will overwrite any source mappings for the standard commerce fields. |
-
Determine whether you want to apply your mapping to some or all items of your source. Check the Content Browser (platform-ca | platform-eu | platform-au) for the properties of the items indexed by your source. The item type typically appears in the
filetype,documenttype,mappingtype, orobjecttypefields. -
Choose the option that matches your case:
To add a common mapping
-
On the Common tab of the Edit mappings subpage, click Add mapping at the top right.
-
In the Add a common mapping modal, do the following:
-
Under Field, select the field where Coveo will index your content metadata. You can also add a field if needed.
-
Under Rules, enter the mapping rule to apply. See Mapping rule syntax reference if needed. If you enter more than one rule, Coveo will evaluate them in the order they appear, until one of them yields a non-empty value.
-
Click Add mapping.
-
To edit a common mapping
-
On the Common tab of the Edit mappings subpage, select the field whose mapping you want to edit, and then click Edit mapping in the Action bar.
-
In the Edit common mapping modal, do the following:
-
Under Field, change the field where Coveo will index your content metadata, if necessary. You can also add a field if needed.
-
Under Rules, update the mapping rule to apply for the selected field, if necessary. See Mapping rule syntax reference if needed. If you configure more than one rule, Coveo will evaluate them in the order they appear, until one of them yields a non-empty value.
-
Click Apply mapping.
-
To add a mapping to an existing item type
-
On the Specific tab of the Edit mappings subpage, select the item type, and then click Add mapping in the Action bar.
-
In the Add a specific mapping that applies to this item type modal, do the following:
-
Under Field, select the field where Coveo will index your content metadata. You can also add a field if needed.
-
Under Rules, enter the mapping rule to apply. See Mapping rule syntax reference if needed. If you enter more than one rule, Coveo will evaluate them in the order they appear, until one of them yields a non-empty value.
-
Click Add mapping.
-
To add a mapping to multiple existing item types
-
On the Specific tab of the Edit mappings subpage, click Add mapping at the top right.
-
In the Add a specific mapping modal, do the following:
-
Under Field, select the field where Coveo will index your content metadata. You can also add a field if needed.
-
Under Select the applicable item types, select the item types.
-
Under Rules, enter the mapping rule to apply. See Mapping rule syntax reference if needed. If you enter more than one rule, Coveo will evaluate them in the order they appear, until one of them yields a non-empty value.
-
Click Add mapping.
-
To edit a mapping for a given item type
-
On the Specific tab of the Edit mappings subpage, select the item type, and then click View mappings in the Action bar.
-
Select the field whose mapping you want to edit, and then click Edit mapping in the Action bar.
-
In the Edit a specific mapping that applies to this item type modal, do the following:
-
Under Field, change the field where Coveo will index your content metadata, if necessary. You can also add a field if needed.
-
Under Rules, update the mapping rule to apply for the selected field, if necessary. See Mapping rule syntax reference if needed. If you configure more than one rule, Coveo will evaluate them in the order they appear, until one of them yields a non-empty value.
-
Click Apply mapping.
-
To add an item type and its first mapping
-
On the Specific tab of the Edit mappings subpage, click Add item type at the top right.
-
In the Add an item type modal, do the following:
-
Under Item type name, enter the name of the item type.
-
Under Field, select the field where Coveo will index your content metadata. You can also add a field if needed.
-
Under Rules, enter the mapping rule to apply. An item type can’t be created without a mapping rule. See Mapping rule syntax reference if needed. If you enter more than one rule, Coveo will evaluate them in the order they appear, until one of them yields a non-empty value.
-
Click Add item type and mapping.

To rename an existing item type later, select it on the Specific tab, and then click Edit item type in the Action bar.
-
-
-
When you’re done making changes, click Save and rebuild source. Coveo launches a source rebuild, which is necessary to apply your changes. Alternatively, click Save to keep your changes without rebuilding. This is useful when you want to make more mapping changes before the rebuild.
Required privileges
The following table indicates the privileges required to view or edit elements of the Sources (platform-ca | platform-eu | platform-au) page and associated panels. See Manage privileges and Privilege reference for more information.
| Actions | Service | Domain | Required access level |
|---|---|---|---|
View sources, view source update schedules, and subscribe to source notifications |
Content |
Fields |
View |
Sources |
View |
||
Organization |
Organization |
View |
|
Edit sources, edit source update schedules, and edit source mappings |
Content |
Fields |
Edit |
Sources |
Edit |
||
Organization |
Organization |
View |
|
View and map metadata |
Content |
Fields |
View |
Source metadata |
View |
||
Sources |
Edit |
||
Organization |
Organization |
View |
What’s next?
After rebuilding your source, verify that your mappings work as expected. In the Content Browser, open an item and, in the Fields tab, confirm that the expected metadata values were indexed.
If you need to adjust your mappings, see the Mapping rule syntax reference. If you need to add or configure a field, see Manage fields.