Review item properties
Review item properties
The Content Browser (platform-ca | platform-eu | platform-au) includes a Properties button that opens a panel allowing members with the required privileges to view the selected item fields, permissions, and its quickview.. The panel is useful for troubleshooting and ensures that items have the expected fields and values as well as the correct permissions so that restricted information can only be accessed by the authorized groups or member (see Coveo management of security identities and item permissions).
"Fields" tab
The Fields tab provides more information about the item. Each item comes with a certain number of fields that help you quickly grasp the item content. See Manage fields for details.
Access the "Fields" tab
-
Log in to Coveo (platform-ca | platform-eu | platform-au) as a member of a group with the required privileges to review content in the target Coveo organization, if not already done.
-
In the main menu on the left, under Content, select Content Browser.
-
On the Content Browser (platform-ca | platform-eu | platform-au) page, select the card of the item for which you want to inspect properties, and then click Properties in the Action bar.
-
In the panel that appears, select the Fields tab.
Open the item in its original system
-
In the Fields tab, in the Value column, next to fields that have clickable URIs (when defined) as values, click the link to open the item in its original system.
Review item fields and field values
The body of the Fields tab is essentially a table listing all fields defined on the item, except dictionary fields. See Review dictionary fields to learn how to inspect them. The available fields vary depending on the type of source as each type comes with built-in fields, and on the user-defined and system fields selected to be displayed in result cards.
-
The top of the tab displays the Item unique ID that uniquely identifies the item in the organization index, and also displays the Item URI.
The unique ID can be used when troubleshooting item permissions or fields, or when pushing items with API calls.
The item URI may be an item’s URL, or it may be built out of pieces of metadata by your source mapping rules.
-
Fields column indicates the field name that was entered when creating the field, or the name of the built-in and system fields.
 Note
NoteFields must meet the following requirements to be displayed in the column:
-
Contain a value (for example,
syslanguageis displayed only if the language of the item is recognized by Coveo). -
Have the Displayable in results option enabled.
-
-
Value column indicates the value for each field.
Review dictionary fields
Dictionary fields don’t appear in the Fields tab. However, you can access them through your developer tools.
-
On the Content Browser (platform-ca | platform-eu | platform-au) page, check the View all content box.
-
In the Content Browser preferences, check the Enable debug mode box.
-
Back in the Content Browser main page, open your developer tools (F12 in most browsers), and then select the Network tab.
-
Double-click an item card to open the item properties panel.
-
In your developer tools, select the call that starts with
v2?organizationId=, and then select the Preview tab.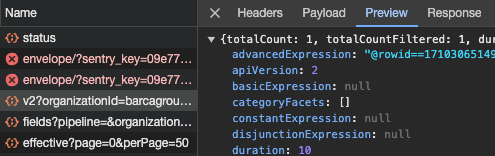
-
In the Preview tab, expand the
resultsarray, and then the0array. -
In the
0array, expand therawKeyValueEntriesobject. This object contains the selected item’s dictionary fields and their values.
"Permissions" tab
The Permissions tab helps you review which users, groups, and virtual groups are associated with a specific item, and whether those security identities are allowed or denied to view the item in search results (see Coveo management of security identities and item permissions).
|
|
Notes
|
The top of the tab displays the item permission status:
-
A user must be explicitly allowed and not denied to view this item in search results.
To view the selected item, a user must:
-
Be authenticated on the search page.
-
Have one of their security identities marked as allowed to access the item (see Basic secured search).
-
Have none of their security identities marked as denied to access the item.
-
-
All users can view this item in search results.
This item is public (see Public items and anonymous users). Users don’t have to be authenticated to view this item. Anyone that can access your search page can also access this item.
-
All users can view this item in search results, except explicitly denied users.
This item is public (see Public items and anonymous users). Users don’t have to be authenticated to view this item. Anyone that can access your search page can also access this item, except users that are explicitly marked as denied.
-
No user can currently view this item in search results. Review the Permission Details tab or contact Coveo Support to troubleshoot the issue.
Users must be authenticated to access this item, but no permission on the item has been found.
The table contains the following columns and values:
-
Identity Provider Name
The name of the security identity provider the Identity belongs to. You can see all identity providers on the Security Identities (platform-ca | platform-eu | platform-au) page (see Manage security identities).
-
Type
The type of the security identity, which can be either User, Group, or Virtual Group (see Coveo management of security identities and item permissions).
-
Identity
The name that uniquely represents the security identity.
Note@is a group that contains all known users of the Email identity provider. -
The state of the security identity. The possible states are the following:
State Details Action to take Not updated
Security identity not updated yet.
None. Wait for first automatic update (see Manage security identities). Contact Coveo Support if the update doesn’t start after a few days.
In error
Last update failed with an error. Relationships of the security identity are cleared.
Check Last update result for more information, solve issue, and update security identity again (see Last update result and Manage security identities).
Out of date
Last update failed, but the security identity has previously been updated successfully.
Check Last update result for more information, solve issue, and update security identity again (see Last update result and Manage security identities).
Disabled
Security identity may have been deleted in the corresponding indexed system. Relationships of the security identity are cleared.
None. Security identity will be re-enabled next time Coveo encounters it.
Up to date
Security identity successfully updated. No issue encountered.
None.
Click
 to expand an identity.
In the expansion, next to the Last update date, the Last update result displays a security provider message for troubleshooting:
to expand an identity.
In the expansion, next to the Last update date, the Last update result displays a security provider message for troubleshooting:Last update result Description Success
Security identity successfully updated. No issue encountered.
None
Security identity not updated yet.
Access denied
Security identity provider is denied access to the enterprise system.
Timed out
A timeout error occurred while calling the enterprise system to update the security identity.
Entity is invalid
Security identity is invalid (for example, inadequate format or configuration) or doesn’t exist in the enterprise system anymore.
Entity is unavailable
Security identity update failed.
Security provider is unavailable
Security identity provider not found.
Security provider is unreachable
Security identity provider can’t be reached.
Security provider isn’t ready
Security identity provider isn’t ready to provide the requested information. Try again later.
Unexpected error
An unexpected error occurred while updating the security identity. Contact Coveo Support for help.
-
Permissions
A green check mark indicates that the specified security identity is allowed to view the item in search results (see Coveo management of security identities and item permissions).
A red X indicates that the specified security identity isn’t allowed to view the item in search results.
When you select a security identity, the Browse relationships button appears in the Action bar. This button leads to the Security Identity Relationship Browser page, which lists the direct and indirect parents and children of the selected security identity in different tabs. This information is especially useful when investigating content access issues that are due to the effective permissions of an item. For details on this feature, see Browse the Relationships of an Identity.
Access the "Permissions" tab
-
Log in to Coveo (platform-ca | platform-eu | platform-au) as a member of a group with the required privileges to review the content and permissions in the target Coveo organization, if not already done.
-
In the main menu on the left, under Content, select Content Browser.
-
On the Content Browser (platform-ca | platform-eu | platform-au) page, select the card of the item for which you want to inspect properties, and then click Properties in the Action bar.
-
In the panel that appears, select the Permissions tab.
Review the state of the item permissions
-
In the Permissions tab, click the State dropdown menu, select one of the following options: All, Up to date, Not updated, Out of date, In error, or Disabled.
|
|
Note
By default, all permissions are listed regardless of their state. |
Review effective permissions on the item
-
In the Permissions tab, click the Permissions dropdown menu, select one of the following options: All, Allowed, or Denied, and then ensure item permissions are accurate.
By default, all identities are listed regardless or their permissions.
Navigate through permission pages
-
In the Permissions tab, at the lower right of the table, click the left and right arrow icons, or a page number to navigate through pages.
"Permission Details" tab
The Permission Details tab shows the permission model of the item in its original system the last time the item source was refreshed. It also allows you to inspect the access rights of a specific search interface user.
A permission model is composed of one or many permission levels that each contains one or many permission sets that each contains one or many security identities (users, groups, and virtual groups). This architecture defines who will be able to view the item in the search results, which a resulting security identity list is displayed in the Permissions Tab.
|
|
Note
If you think the permission model doesn’t accurately represent the item access rights, perform a source refresh, which may resolve the issue. If the problem persists, contact Coveo Support. |
The top of the table contains the following parameters and values:
-
Last Update
Date/time of the last system permission model refresh.
NoteThe Permission Details tab is updated each time the source of the item is refreshed (refresh, rescan or rebuild) and a content change.
-
State
The state of the permission model, which can be either Unknown, Valid, Pending, Incomplete, In error, or Warning.
Update result Description Action to take Valid Permission model updated. All identities in the permission model are valid and up to date. None Pending Permission model not updated yet. If the permission model is still not updated after several days, contact Coveo Support for help. Incomplete Permission model updated. However:
-
At least one allowed identity is disabled or isn't up to date.
OR
At least one permission level (except level 0) contains at least one denied identity that was not successfully updated.
The effective
Allowedpermissions may be incomplete.Check the Permissions tab to determine which identities are out of date, in error, or disabled. If you can't see the problematic identities, contact Coveo Support.
Warning The permission model has been updated, but at least one denied entity is out of date. The Deniedeffective permission list may therefore be incomplete. This issue requires immediate attention, as it can cause a security hole.Check the Permissions tab to determine which identities are out of date and solve this issue immediately. Contact Coveo Support for help. In error Permission model updated. However, permission level 0 contains at least one denied identity that was not successfully updated. The item won't be displayed in the search results to prevent security holes. Check the Permissions tab to determine which identities are out of date or in error. If you can't see the problematic identities, contact Coveo Support. -
The table lists the two components of a system permission model:
|
|
Note
When available, permission level and set names hint at the level or set origin in the item system (for example, Sharing Permissions, Administrator Set, etc.). Otherwise, Coveo generates names in the following format:
|
-
Permission Level
The name of the permission level that’s assigned to the item.
-
Permission Set
The name of the permission set contained in the selected permission level that are assigned to the item.
NoteA permission level can contain one or more permission sets.
Next to the permission set name, an icon (
 or
or  ) indicates whether this permission set allows users represented by an anonymous identity to access the item (see Permission sets and Public items and anonymous users).
For each permission set, the table lists the following information:
-
Identity Provider Name
The name of the security identity provider. You can see all identity providers on the Security Identities (platform-ca | platform-eu | platform-au) page (see Manage security identities).
-
Type
The type of the security identity, which can be either User, Group, or Virtual Group.
-
Identity
The name that uniquely represents the security identity.
Note@is a group that contains all known users of the Email identity provider. -
State
The state of the security identity, which can be either Up to date, Not updated, Out of date, In error, or Disabled (see State).
-
Permissions
A green check mark indicates that the specified security identity is allowed to view the item in search results (see Coveo management of security identities and item permissions).
A red X indicates that the specified security identity isn’t allowed to view the item in search results.
When you select a security identity, the Browse relationships button appears in the Action bar. This button leads to the Security Identity Relationship Browser page, which lists the direct and indirect parents and children of the selected security identity in different tabs. This information is especially useful when investigating content access issues that are due to the effective permissions of an item. For details on this feature, see Browse the Relationships of an Identity.
-
Access the "Permission Details" tab
-
Log in to Coveo (platform-ca | platform-eu | platform-au) as a member of a group with the required privileges to review the content and permissions in the target Coveo organization, if not already done.
-
In the main menu on the left, under Content, select Content Browser.
-
On the Content Browser (platform-ca | platform-eu | platform-au) page, select the card of the item for which you want to inspect properties, and then click Properties in the Action bar.
-
In the panel that appears, select the Permission Details tab.
Review permission levels and sets
-
In the Permission Details tab, in the Level column, select a permission level, and then in the Set column, select the permission set that you want to review (see Coveo management of security identities and item permissions).
Inspect the access rights of a user
|
|
Note
The Item Access Inspector is still a beta feature. Enhancements are to be expected in a future release. |
The Permission details tab includes a way to search for a specific search interface user and inspect its access rights for the selected item. This tab shows whether the desired user is allowed to see the selected item in a Coveo-powered search interface, and through which permission levels, permission sets, and security identity relationships they’re granted or denied access. This feature is therefore useful when troubleshooting permission issues, such as:
-
A user accessing an item they shouldn’t be able to access.
-
An item not being visible to a user when it should be.
For more information on sources that index permissions and on how Coveo handles these permissions, see Coveo management of security identities and item permissions.
Under Email, enter the email address representing the desired user, and then click Inspect. Under Access, you should see whether the user can access this item through your search interface, according to the item’s effective permissions. Possible results are:
-
Allowed, which means that the user is allowed to access the item. -
Denied, which indicates that the user is denied access to the item. -
Not allowed, which means that the user is not specified in the item’s effective permissions. Therefore, Coveo won’t show the item to this user in a search interface. -
Not found, which indicates that the provided email address is unknown to Coveo’s security identity cache. The corresponding user identity may have been recently created in your repository and not yet indexed by Coveo, or the email address you provided may be incorrect.
When the result is either Allowed or Denied, green check marks and red Xs appear in the item’s permission model to call attention to the levels, sets, and security identities through which the user is allowed/denied access to the item.
In the Level column, select a permission level, and then, in the Set column, select a permission set. The right portion of the panel then displays the security identities in this set to which the user is related. Click an identity to display the full permission path, that is, through which parent/child relationships the desired user ends up in the item’s effective permissions. See "Permission Details" tab for details on the information presented in this section.
"Quick view" tab
The Quick view tab helps you review item content without having to access its original system. The tab is only displayed when a preview is available for this item (see Access the "Quick view" tab).
Access the "Quick view" tab
-
Log in to Coveo (platform-ca | platform-eu | platform-au) as a member of a group with the required privileges to review content in the target Coveo organization, if not already done.
-
In the main menu on the left, under Content, select Content Browser.
-
On the Content Browser (platform-ca | platform-eu | platform-au) page, select the card of the item for which you want to inspect properties, and then click Properties in the Action bar.
-
In the panel that appears, select the Quick view tab.
NoteThe maximum supported item size is 10,000 bytes.
"Item JSON" tab
The Item JSON tab shows the item properties in JSON format, which is especially useful for troubleshooting purposes.
Access the "Item JSON" tab
-
Log in to Coveo (platform-ca | platform-eu | platform-au) as a member of a group with the required privileges to review content in the target Coveo organization, if not already done.
-
In the main menu on the left, under Content, select Content Browser.
-
On the Content Browser (platform-ca | platform-eu | platform-au) page, select the card of the item for which you want to inspect properties, and then click Properties in the Action bar.
-
In the panel that appears, select the Item JSON tab.
Search for a keyword
The Item JSON tab content can be pretty long. Therefore, you can use the implemented search feature to easily find item properties such as field names and values.
-
In the Item JSON tab, fill the Search box with the desired keyword(s):
-
Click anywhere in the JSON box.
-
Select Ctrl+F (Windows) or Command+F (Mac).
-
In the Search box that appears at the top of the JSON box, type the desired keyword(s).
OR
In the JSON box, select the keyword(s) you want to search, and then select Ctrl+F (Windows) or Command+F (Mac).
The selected keyword(s) automatically appears in the Search box.
-
-
Select Enter.
When present, the keyword occurrences are highlighted with a yellow background. The box content scrolls when needed to ensure that the first keyword occurrence is visible.
-
Repeat steps 1 and 2 to automatically scroll in the JSON box to review the other keyword occurrences.
|
|
Note
The search feature also supports regular expressions (regex). |