Push API tutorial 2: Manage secured content
Push API tutorial 2: Manage secured content
- Prerequisites
- Step 1: Secure your Push source content
- Step 2: Create a security identity provider
- Step 3: Add items to your source
- Step 4: Add security identities to your security identity provider
- Step 5: Validate the indexing status of the items
- Step 6: Delete the items
- Step 7: Disable the security identities
- What’s next?
In the previous tutorial, you created a public Push source in which you added, and then deleted, a simple item.
In this tutorial, you’ll configure your Push source to make it secure and create its associated security identity provider. You’ll then perform a small mock content update, followed by a small mock security identity update.
|
|
Note
This tutorial assumes that the permissions in the fictional content repository are entirely determined at the item level. |
Prerequisites
You need the setup described in the Push API Tutorials article.
Step 1: Secure your Push source content
With a secured content Push source, you can manage items with permission models. The index uses a permission model to determine whether a user can see a given item in their query results.
-
Access the Sources (platform-ca | platform-eu | platform-au) page in the Coveo Administration Console.
-
Click your Push source, and then click Edit in the Action bar.
-
On the Edit a Push source page, select the Content security tab.
-
Click Save.
Step 2: Create a security identity provider
The security identity provider of a secured source is a Coveo organization module whose main purpose is to crawl a specific secured enterprise system on a regular basis to retrieve its latest security identity relationships and forward this data to the security identity cache. For more information, see Security identity cache and provider. A security identity provider allows the items in a secured source to reference existing and valid security identities in their permission models. This ensures that only the users who are allowed to see a specific item in its original secured repository can see this item in their query results. See Typical Coveo secured search for more details.
You need to use the Security Cache API Create a security provider for an organization HTTP request to create the security identity provider.
|
|
Note
The Security Cache API |
To create the security identity provider
-
Click the relevant link to open the Security Cache API Swagger UI
Create a security provider for an organizationHTTP request page associated with your Coveo organization region: -
Click Authorize in the upper-right corner of the page, and then log in to the Coveo Platform using your Coveo organization administrator account.
-
In the
Create a security provider for an organizationHTTP request section, click Try it out. -
Under Parameters, set the organizationId value to your Coveo organization ID.
-
Under Request body, paste the following:
{
  "id" : "Push API Tutorial Security Identity Provider",
  "displayName" : "Push API Tutorial Security Identity Provider",
  "nodeRequired": false,
  "type": "EXPANDED",
  "referencedBy": [
    {
      "id": "<SOURCE_ID>",
      "type": "SOURCE"
    }
  ],
  "cascadingSecurityProviders": {
      "Email Security Provider": {
        "id": "Email Security Provider",
        "type": "EMAIL"
    }
  }
}
"type": "SOURCE"
}
],
"cascadingSecurityProviders": {
"Email Security Provider": {
"id": "Email Security Provider",
"type": "EMAIL"
}
}
}Replace <SOURCE_ID>with the ID of your secured Push source. -
Click Execute.
You should receive a 200 OK response, and the Response body section should contain information about the newly created security identity provider.
|
|
Note
Initially, your security identity provider has no means of automatically crawling its intended target secured content repository. You must eventually implement this behavior with your own code, but that’s beyond the scope of this tutorial. |
Step 3: Add items to your source
You’ll now send three Push API requests to add items to your Push source, using the Add or update an item request each time.
-
In your HTTP client, create a new PUT request using the Push API endpoint corresponding to your deployment region.
 Note
NoteThe Push API still uses region-specific endpoints. Use the endpoint that matches the primary deployment region of your Coveo organization.
US East region
PUT https://api.cloud.coveo.com/push/v1/organizations/{organizationId}/sources/{sourceId}/documents?documentId={documentId} HTTP/1.1

Content-Type: application/json
Accept: application/json
Authorization: Bearer {accessToken}
Canada region
PUT https://api-ca.cloud.coveo.com/push/v1/organizations/{organizationId}/sources/{sourceId}/documents?documentId={documentId} HTTP/1.1

Content-Type: application/json
Accept: application/json
Authorization: Bearer {accessToken}
Ireland region
PUT https://api-eu.cloud.coveo.com/push/v1/organizations/{organizationId}/sources/{sourceId}/documents?documentId={documentId} HTTP/1.1

Content-Type: application/json
Accept: application/json
Authorization: Bearer {accessToken}
Australia region
PUT https://api-au.cloud.coveo.com/push/v1/organizations/{organizationId}/sources/{sourceId}/documents?documentId={documentId} HTTP/1.1

Content-Type: application/json
Accept: application/json
Authorization: Bearer {accessToken}
HIPAA region
PUT https://apihipaa.cloud.coveo.com/push/v1/organizations/{organizationId}/sources/{sourceId}/documents?documentId={documentId} HTTP/1.1 Content-Type: application/json Accept: application/json Authorization: Bearer {accessToken} -
Configure the first HTTP request.

In the Coveo Push API Tutorials collection, all the necessary variables and payload have already been set for the three requests.
-
Set the
organizationIdandsourceIdpath parameters to the values you noted in the Push API Tutorials setup article. -
Use your API key as the
AuthorizationheaderaccessTokenvalue. -
Set the
documentIdquery parameter value tofile://folder/. This URI doesn’t exist, but that doesn’t matter as you’re only pushing dummy items for this tutorial. -
Use the following JSON as your request body. Its
permissionsproperty indicates that any anonymous user can see the item in their query results.{ "data": "", "permissions": [ { "allowAnonymous": true } ] }
-
-
Send the request. You should receive a
202response. -
For the second request, use the same endpoint and headers as in the first request. Complete the request configuration as follows:
-
Set the
documentIdquery parameter value tofile://folder/item1.txt. -
Use the following JSON as your request body. Its
permissionsproperty indicates that only usersasmith@example.comandbjones@example.comcan see the item in their query results. You’ll define these security identities in step 4.{ "data": "Item 1 raw textual data", "permissions": [ { "allowAnonymous": false, "allowedPermissions": [ { "identity": "asmith@example.com", "identityType": "User" }, { "identity": "bjones@example.com", "identityType": "User" } ] } ] }
-
-
Send the request.
-
For the third request, use the same endpoint and headers as in the previous requests. Complete the request configuration as follows:
-
Set the
documentIdquery parameter value tofile://folder/item2.txt. -
Use the following JSON as your request body. Its
permissionsproperty indicates that only the userasmith@example.comcan see this item in their query results. Becausebjones@example.comis listed in both allowed and denied permissions, this user is effectively denied access to the item in their query results.{ "data": "Item 2 raw textual data", "permissions": [ { "allowAnonymous": false, "allowedPermissions": [ { "identity": "asmith@example.com", "identityType": "User" }, { "identity": "bjones@example.com", "identityType": "User" } ], "deniedPermissions": [ { "identity": "bjones@example.com", "identityType": "User" } ] } ] }
-
-
Send the request.
You may have to wait several minutes before these three items become available in your source.
|
|
Note
You’ll learn how to push batches of items in Tutorial 3. This tutorial also covers how to include metadata and complex permission models. |
Step 4: Add security identities to your security identity provider
The permission models of the second and third items you pushed in step 3 reference two security identities: asmith@example.com and bjones@example.com.
However, these security identities haven’t been defined in the security identity provider you created in step 2.
As a result, after the Coveo indexing pipeline processes these items, the unknown security identities will cause errors.
The users won’t be able to see the items in their query results.
To fix this, you’ll now add the asmith@example.com and bjones@example.com security identities to the security identity provider using an Add or update a security identity request for each.
-
In your HTTP client, create a new PUT request using the Push API endpoint corresponding to your deployment region.
NoteThe Push API still uses region-specific endpoints. Use the endpoint that matches the primary deployment region of your Coveo organization.
US East region
PUT https://api.cloud.coveo.com/push/v1/organizations/{organizationId}/providers/{providerId}/permissions HTTP/1.1

Content-Type: application/json
Accept: application/json
Authorization: Bearer {accessToken}
Canada region
PUT https://api-ca.cloud.coveo.com/push/v1/organizations/{organizationId}/providers/{providerId}/permissions HTTP/1.1

Content-Type: application/json
Accept: application/json
Authorization: Bearer {accessToken}
Ireland region
PUT https://api-eu.cloud.coveo.com/push/v1/organizations/{organizationId}/providers/{providerId}/permissions HTTP/1.1

Content-Type: application/json
Accept: application/json
Authorization: Bearer {accessToken}
Australia region
PUT https://api-au.cloud.coveo.com/push/v1/organizations/{organizationId}/providers/{providerId}/permissions HTTP/1.1

Content-Type: application/json
Accept: application/json
Authorization: Bearer {accessToken}
HIPAA region
PUT https://apihipaa.cloud.coveo.com/push/v1/organizations/{organizationId}/providers/{providerId}/permissions HTTP/1.1 Content-Type: application/json Accept: application/json Authorization: Bearer {accessToken} -
Configure the request.
The Coveo Push API Tutorials collection comes with the securityIdentityProviderId variable set to the
idvalue specified in the body of the security identity provider creation request performed earlier. All the necessary variables and payload have already been set for this request.-
Set the
organizationIdandproviderIdpath parameter values. TheproviderIdvalue should bePush API Tutorial Security Identity Provider, that is, theidvalue in the body of the security identity provider creation request performed earlier. -
Use your API key as the
AuthorizationheaderaccessTokenvalue. -
Use the following JSON as your request body to define the
asmith@example.comuser security identity.{ "identity": { "name": "asmith@example.com", "type": "USER" } }
-
-
Send the request.
-
For the second request, use the same endpoint and headers as in the previous request.
-
Use the following JSON as your request body to define the
bjones@example.comuser security identity.{ "identity": { "name": "bjones@example.com", "type": "USER" } } -
Send the request.
You should receive a 202 response for both requests.
|
|
Note
You’ll learn how to define batches of security identities including aliases, groups, and granted identities in the next tutorial. |
Step 5: Validate the indexing status of the items
As a reminder, the table below summarizes the information and effective permissions on the items you pushed in step 3.
documentId |
data |
permissions |
|---|---|---|
file://folder/ |
"" |
Anonymous |
file://folder/item1.txt |
"Item 1 raw textual data" |
Anonymous |
file://folder/item2.txt |
"Item 2 raw textual data" |
Anonymous |
The Coveo Administration Console Content Browser is a powerful tool that lets you emulate the query results that security identities would see in a search interface. You’ll now use the Content Browser to validate the successful indexing of the three items, both in terms of their content and permissions.
-
Access the Sources (platform-ca | platform-eu | platform-au) page.
-
On the Push source row, click Open in Content Browser.

Note that with the View all content option enabled in the Content Browser, you can see all items in the results.
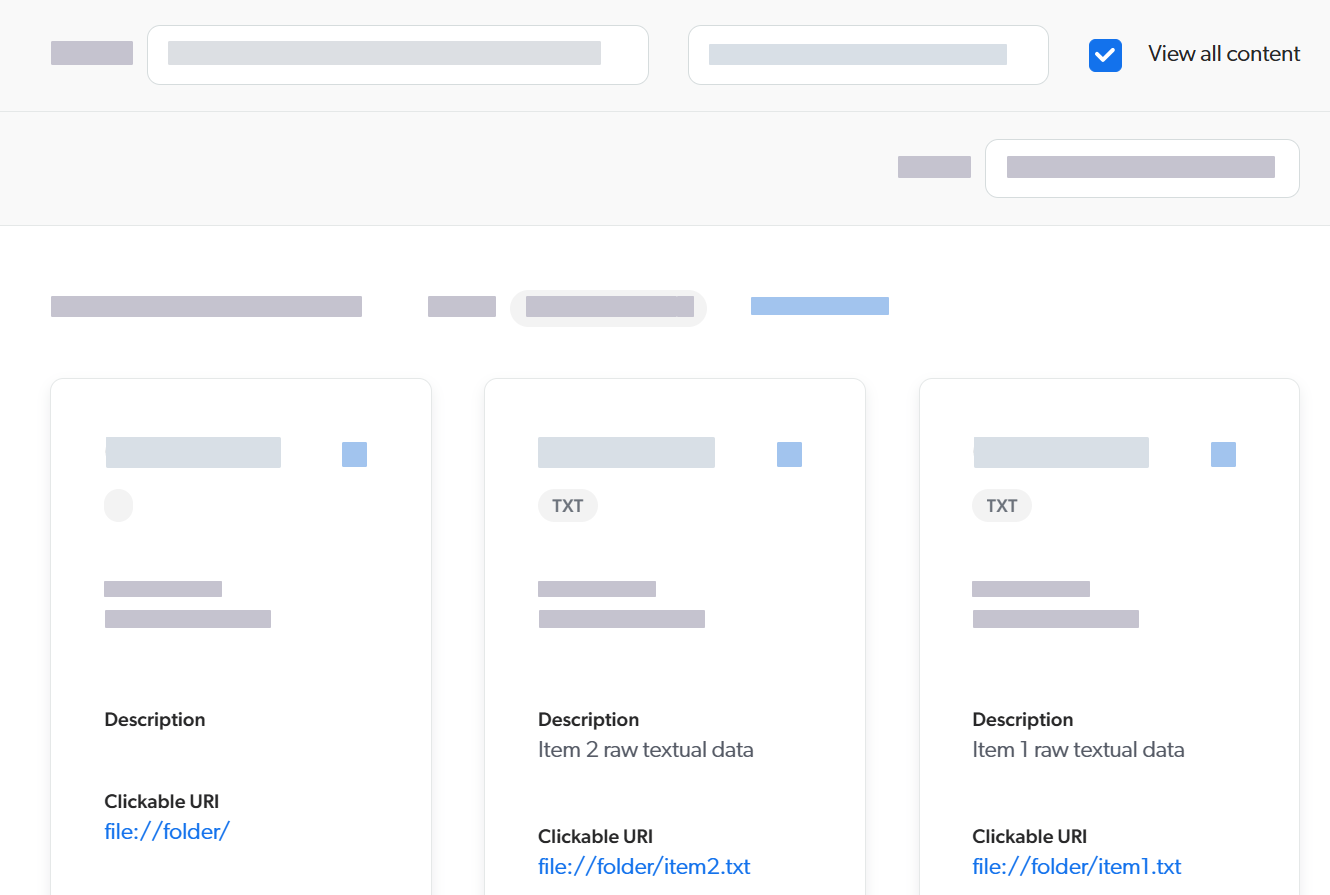
As a Coveo organization administrator, you have the
Allowedaccess level on theView all contentdomain and the privilege to bypass item permission models. -
On the Security Identities (platform-ca | platform-eu | platform-au) page, click your Push API security identity provider, and then click Browse identities in the Action bar.
-
Click
bjones@example.com, and then click Search as in the Action bar.You’re now impersonating
bjones@example.comand seeing the two items that this user would see in a search interface.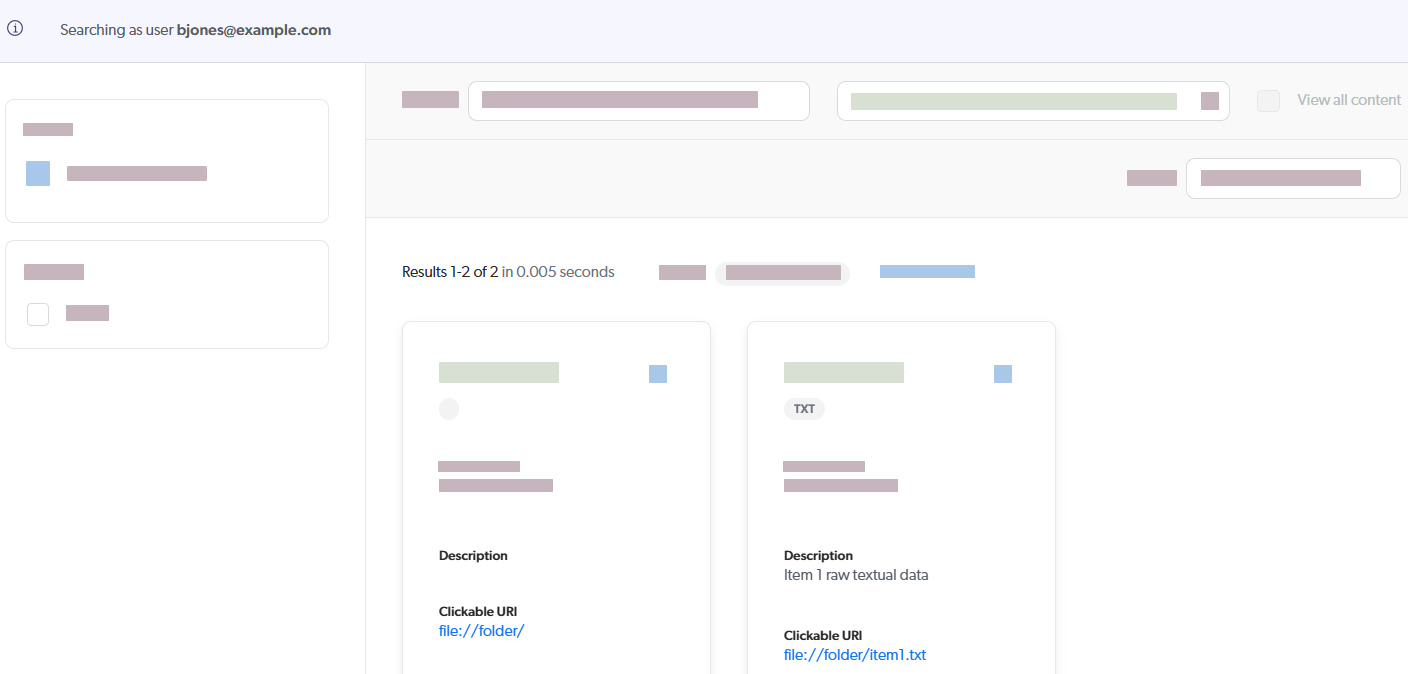
You can repeat the last steps to validate that asmith@example.com can see all three items.
Step 6: Delete the items
To begin the next tutorial with a clean source, you’ll now send a Delete an item and optionally its children request to delete the three items you added in this tutorial.
-
In your HTTP client, create a new DELETE request using the Push API endpoint corresponding to your deployment region.
NoteThe Push API still uses region-specific endpoints. Use the endpoint that matches the primary deployment region of your Coveo organization.
US East region
DELETE https://api.cloud.coveo.com/push/v1/organizations/{organizationId}/sources/{sourceId}/documents?documentId={documentId}&deleteChildren=true|false HTTP/1.1

Accept: application/json
Authorization: Bearer {accessToken}
Canada region
DELETE https://api-ca.cloud.coveo.com/push/v1/organizations/{organizationId}/sources/{sourceId}/documents?documentId={documentId}&deleteChildren=true|false HTTP/1.1

Accept: application/json
Authorization: Bearer {accessToken}
Ireland region
DELETE https://api-eu.cloud.coveo.com/push/v1/organizations/{organizationId}/sources/{sourceId}/documents?documentId={documentId}&deleteChildren=true|false HTTP/1.1

Accept: application/json
Authorization: Bearer {accessToken}
Australia region
DELETE https://api-au.cloud.coveo.com/push/v1/organizations/{organizationId}/sources/{sourceId}/documents?documentId={documentId}&deleteChildren=true|false HTTP/1.1

Accept: application/json
Authorization: Bearer {accessToken}
HIPAA region
DELETE https://apihipaa.cloud.coveo.com/push/v1/organizations/{organizationId}/sources/{sourceId}/documents?documentId={documentId}&deleteChildren=true|false HTTP/1.1 Accept: application/json Authorization: Bearer {accessToken} -
Configure the request.
In the Coveo Push API Tutorials collection, all the necessary variables have already been set for this request.
-
Set the
organizationIdandsourceIdpath parameter values. -
Use your API key as the
AuthorizationheaderaccessTokenvalue. -
Set the
documentIdquery parameter tofile://folder/and thedeleteChildrenquery parameter totrue. This deletes the item whosedocumentIdis the one you specified and all items whosedocumentIdvalues are nested under thedocumentIdof the parent. In this case, thefile://folderitem and all other items matchingfile://folder/*in the target source will be deleted.
-
-
Send the request.
You should receive a 202 response.
Shortly after, the Sources (platform-ca | platform-eu | platform-au) page should show your Push source with No items in the Content column.
Step 7: Disable the security identities
By default, when you perform a Push API request that includes the optional orderingId parameter, the service automatically sets orderingId to the current number of milliseconds since the Unix epoch.
Each individual Push API request receives its own timestamp value.
The item orderingid field value, which you see when inspecting the item in the Content Browser, reflects the timestamp of the last Push API request that modified it.
You can compare the mandatory orderingId parameter value used in a Delete old items or Delete old security identities HTTP request to the optional orderingId parameter value used in other Push API HTTP requests.
To begin the next tutorial with a clean security identity provider, you’ll now disable the security identities using the Delete old security identities request.
-
In your HTTP client, create a new DELETE request using the Push API endpoint corresponding to your deployment region.
NoteThe Push API still uses region-specific endpoints. Use the endpoint that matches the primary deployment region of your Coveo organization.
US East region
DELETE https://api.cloud.coveo.com/push/v1/organizations/{organizationId}/providers/{providerId}/permissions/olderthan?orderingId={orderingId} HTTP/1.1

Accept: application/json
Authorization: Bearer {accessToken}
Canada region
DELETE https://api-ca.cloud.coveo.com/push/v1/organizations/{organizationId}/providers/{providerId}/permissions/olderthan?orderingId={orderingId} HTTP/1.1

Accept: application/json
Authorization: Bearer {accessToken}
Ireland region
DELETE https://api-eu.cloud.coveo.com/push/v1/organizations/{organizationId}/providers/{providerId}/permissions/olderthan?orderingId={orderingId} HTTP/1.1

Accept: application/json
Authorization: Bearer {accessToken}
Australia region
DELETE https://api-au.cloud.coveo.com/push/v1/organizations/{organizationId}/providers/{providerId}/permissions/olderthan?orderingId={orderingId} HTTP/1.1

Accept: application/json
Authorization: Bearer {accessToken}
HIPAA region
DELETE https://apihipaa.cloud.coveo.com/push/v1/organizations/{organizationId}/providers/{providerId}/permissions/olderthan?orderingId={orderingId} HTTP/1.1 Accept: application/json Authorization: Bearer {accessToken} -
Configure the request.
You need to set the Coveo Push API Tutorials collection orderingId variable value to the 13-digit current number of milliseconds since the Unix epoch.
-
Set the
organizationIdandproviderIdpath parameters. TheproviderIdvalue should bePush API Tutorial Security Identity Provider, that is, theidvalue in the body of the security identity provider creation request performed earlier. -
Use your API key as the
AuthorizationheaderaccessTokenvalue. -
Set the
orderingIdquery parameter value. Use the 13-digit current number of milliseconds since the Unix epoch. You can get it from https://currentmillis.com/.
-
-
Send the request.
Afterward, refresh your security identity provider.