Push API Tutorial 3: Using Batch Calls to Manage Complex Secured Content
Push API Tutorial 3: Using Batch Calls to Manage Complex Secured Content
In the previous tutorial, you configured a secured Push source along with its associated security identity provider, and you learned how to push simple secured items and security identities individually.
You also learned how to delete an item and its children, as well as how to delete items or security identities based on the orderingId value of the last operation that was performed on them.
In this tutorial, you’ll create fields in your index. You’ll then use Push API batch operations, first to simulate a security identity update with different types of security identities, and then to push items that include coherent metadata and complex permission models. Finally, you’ll use the Coveo Administration Console to validate whether everything is working as expected.
Prerequisites
For this tutorial, you need:
-
The setup described in the Push API Tutorials article.
-
The source to be empty. If necessary, use the
DELETE /sources/{sourceId}/documents/olderthanPush API HTTP request to delete all remaining items. This HTTP request works the same way as the request you used to disable the security identities in step 7 of tutorial 2.
Optionally, use the Run in Postman shared HTTP requests.
If you do, set the appropriate the values for the organizationId, securityIdentityProviderId, and apiKey environment variables in Postman in order for the API requests to execute successfully (see Manage Globals).
Step 1: Create fields
Fields let you store and leverage item metadata, allowing you to create facets, define custom query result sort criteria, etc.
Fields are index-wide data containers, which implies that any source can populate a given field with item metadata.
For example, the title standard field in your index typically gets populated by item metadata from many sources.
By default, a Push source automatically attempts to map incoming item metadata to a field of the same name in your index.
Therefore, the names of the fields you’re about to create are the same as the metadata keys you’ll use when pushing items to your source.
These fields use the mmeps prefix.
|
|
While prefixing a field doesn’t change the fact that it’s an index-wide container, it allows you to quickly identify which fields are tied to a specific source. |
-
On the Fields (platform-ca | platform-eu | platform-au) page, click Add field.
-
Enter the following information for your first field:
Field Name:
mmepsyearType:
StringDescription:
The year in which the movie was released. -
Click Add field.
-
Repeat the process to add the following fields:
Field name Type Description Options mmepssummaryStringA summary of the movie.
mmepsisseriesStringWhether the movie is part of a series.
mmepsmpaafilmratingStringThe MPAA film rating for the movie. Can be 'G', 'PG', 'PG-13', 'R', 'NC-17', or 'UR'.
Facet
mmepsbudgetDecimalThe budget of the movie, in million USD.
mmepscriticsaverageInteger 64The average score that was given to the movie by critics, on a discrete scale of 1 to 100.
Use cache for computed fields
mmepsdirectorStringThe director of the movie.
Facet
Sortable
Free text search
Use cache for sort
Use cache for nested queriesmmepscastoverviewStringThe list of principal actors that appear in the movie.
Multi-value facet
Free text search
Use cache for nested queriesmmepsthumbnaillinkStringThe URI of the thumbnail image for the movie.
mmepstrailerlinkStringThe URI of the movie trailer.
|
|
Note
Some fields have the |
Step 2: Add a batch of items
You’ll now use a batch operation to add several items at once in your secured Push source. This a three-step process:
Create the file container
-
Perform a
POST /filesHTTP request. -
Store the values of the
uploadUriandfileIdfrom the response. You’ll need these values in the next steps.
Upload the batch of items to the container
In the JSON below, each element in the addOrUpdate array represents a movie entry to add to your secured Push source.
Every entry contains standard metadata (for example, documenttype), as well as custom metadata (for example, mmepsdirector, mmepsyear).
This metadata will populate fields in your index according to the default Push API mapping behavior.
Since you’re pushing items to a secured source, each item must also have a permission model.
The item permission models can have many permission levels, each of which can have several permission sets.
You’ll define the security identities on which these permission models rely in step 3.
|
|
Note
Permission levels are always evaluated sequentially. As soon as a security identity is explicitly allowed by all permission sets of a lower permission level, it can’t be denied by any higher permission levels. See Permission levels for more details. |
-
(Optional) Update the status of your Push source to
REBUILD.If you do this, remember to set it back to
IDLEafter you push your batch of items. -
Perform a
PUT uploadUrirequest. The request endpoint is theuploadUrivalue you stored in the previous step and the request body is provided below.Request body
{
  "addOrUpdate": [
    {
      "documenttype": "Movie Entry",
      "filename": "Gone-with-the-Wind.html",
      "permanentid": "gone9301020eenednc838389d2d",
      "sourcetype": "Push",
      "title": "Gone with the Wind",
      "mmepsdirector": "Victor Fleming",
      "mmepsyear": "1939",
      "mmepssummary": "A manipulative woman and a roguish man conduct a turbulent romance during the American Civil War and Reconstruction periods.",
      "mmepsisseries": false,
      "mmepsmpaafilmrating": "G",
      "mmepsbudget": 3.9,
      "mmepscriticsaverage": 97,
      "mmepscastoverview": [
        "Thomas Mitchell",
        "Barbara O'Neil",
        "Vivien Leigh",
        "Evelyn Keyes",
        "Ann Rutherford"
      ],
      "mmepsthumbnaillink": "https://images-na.ssl-images-amazon.com/images/M/MV5BYWQwOWVkMGItMDU2Yy00YjIzLWJkMjEtNmVkZjE3MjMwYzEzXkEyXkFqcGdeQXVyNjU0OTQ0OTY@._V1_SY1000_CR0,0,652,1000_AL_.jpg",
      "clickUri": "https://www.youtube.com/watch?v=8mM8iNarcRc",
      "data": "<html><head> <style>body{font-family: 'Lato', 'Helvetica Neue', Helvetica, Arial, sans-serif, sans-serif; font-size: 15px; color: #373737;}a{text-decoration: none; color: #009DDC; cursor: pointer;}a:hover{text-decoration: underline;}.left-column{float: left; width: 200px; padding: 5px 15px;}.right-column{overflow: hidden; padding: 5px 10px 10px 15px;}.style-summary{word-wrap: break-word;}.style-title h1{color: #67768B; text-transform: uppercase; white-space: normal; margin: 0px;}.director-year{color: #67768B;}.rating{width: 60px; text-align: center; border-width: 1px; border-style: solid; border-radius: 5px;}.rating span{margin: 0px; border-radius: 5px; display: block;}.rating span.g-rating{color: black; background: white;}.duration{font-size: 12px;}.trailer{border-bottom: 1px solid #BCC3CA; padding: 16px 0px 16px 0px;}</style></head><body> <div class='left-column'> <img src='https://images-na.ssl-images-amazon.com/images/M/MV5BYWQwOWVkMGItMDU2Yy00YjIzLWJkMjEtNmVkZjE3MjMwYzEzXkEyXkFqcGdeQXVyNjU0OTQ0OTY@._V1_SY1000_CR0,0,652,1000_AL_.jpg' width='200'> </div><div class='right-column'> <div class='style-title'> <h1>Gone with the Wind</h1> </div><div class='director-year'> <p>Victor Fleming - 1939</p></div><div class='duration'> <p>3h58</p></div><div class='rating'> <span class='g-rating'>G</span> </div><div class='summary'> <p>A manipulative woman and a roguish man conduct a turbulent romance during the American Civil War and Reconstruction periods.</p></div><div class='trailer'> <a href='https://www.youtube.com/watch?v=8mM8iNarcRc'>View trailer</a> </div></div></body></html>",
      "fileExtension": ".html",
      "documentId": "file://movie-entries/1939/Gone-with-the-Wind.html",
      "permissions": [
        {
          "name": "MPAA Default Permissions",
          "permissionSets": [
            {
              "allowAnonymous": false,
              "allowedPermissions": [
                {
                  "identity": "Everyone",
                  "identityType": "Group"
                }
              ],
              "deniedPermissions": []
            }
          ]
        }
      ]
    },
    {
      "documenttype": "Movie Entry",
      "filename": "The-Man-Who-Knew-Too-Much.html",
      "permanentid": "the940203m3mf0m0gv03333n4",
      "sourcetype": "Push",
      "title": "The Man Who Knew Too Much",
      "mmepsdirector": "Alfred Hitchcock",
      "mmepsyear": "1956",
      "mmepssummary": "A family vacationing in Morocco accidentally stumble on to an assassination plot and the conspirators are determined to prevent them from interfering.",
      "mmepsisseries": false,
      "mmepsmpaafilmrating": "PG",
      "mmepsbudget": 1.2,
      "mmepscriticsaverage": 91,
      "mmepscastoverview": [
        "James Stewart",
        "Doris Day",
        "Brenda de Branzie",
        "Bernard Miles",
        "Ralph Truman"
      ],
      "mmepsthumbnaillink": "https://images-na.ssl-images-amazon.com/images/M/MV5BNjQ2OWFhMjItYmFmNC00OGQzLWE1ZTMtZGQwZDM3YWUzMDgxL2ltYWdlL2ltYWdlXkEyXkFqcGdeQXVyMDI2NDg0NQ@@._V1_SY1000_CR0,0,656,1000_AL_.jpg",
      "mmepstrailerlink": "https://www.youtube.com/watch?v=Qw0OYSBI71U",
      "data": "<html><head> <style>body{font-family: 'Lato', 'Helvetica Neue', Helvetica, Arial, sans-serif, sans-serif; font-size: 15px; color: #373737;}a{text-decoration: none; color: #009DDC; cursor: pointer;}a:hover{text-decoration: underline;}.left-column{float: left; width: 200px; padding: 5px 15px;}.right-column{overflow: hidden; padding: 5px 10px 10px 15px;}.summary{word-wrap: break-word;}.title h1{color: #67768B; text-transform: uppercase; white-space: normal; margin: 0px;}.director-year{color: #67768B;}.rating{width: 60px; text-align: center; border-width: 1px; border-style: solid; border-radius: 5px;}.rating span{margin: 0px; border-radius: 5px; display: block;}.rating span.pg-rating{color: black; background: yellow;}.duration{font-size: 12px;}.trailer{border-bottom: 1px solid #BCC3CA; padding: 16px 0px 16px 0px;}</style></head><body> <div class='left-column'> <img src='https://images-na.ssl-images-amazon.com/images/M/MV5BNjQ2OWFhMjItYmFmNC00OGQzLWE1ZTMtZGQwZDM3YWUzMDgxL2ltYWdlL2ltYWdlXkEyXkFqcGdeQXVyMDI2NDg0NQ@@._V1_SY1000_CR0,0,656,1000_AL_.jpg' width='200'> </div><div class='right-column'> <div class='title'> <h1>The Man Who Knew Too Much</h1> </div><div class='director-year'> <p>Alfred Hitchcock - 1956</p></div><div class='duration'> <p>2h</p></div><div class='rating'> <span class='pg-rating'>PG</span> </div><div class='summary'> <p>A family vacationing in Morocco accidentally stumble on to an assassination plot and the conspirators are determined to prevent them from interfering.</p></div><div class='trailer'> <a href='https://www.youtube.com/watch?v=Qw0OYSBI71U'>View trailer</a> </div></div></body></html>",
      "fileExtension": ".html",
      "documentId": "file://movie-entries/1956/The-Man-Who-Knew-Too-Much.html",
      "permissions": [
        {
          "name": "MPAA Default Permissions",
          "permissionSets": [
            {
              "allowAnonymous": false,
              "allowedPermissions": [
                {
                  "identity": "Adults",
                  "identityType": "Group"
                },
                {
                  "identity": "Teenagers",
                  "identityType": "Group"
                },
                {
                  "identity": "PreTeenagers",
                  "identityType": "Group"
                }
              ],
              "deniedPermissions": []
            }
          ]
        },
        {
          "name": "Parental Approval Permissions",
          "permissionSets": [
            {
              "name": "First Parent Decision",
              "allowedPermissions": [
                {
                  "identity": "alice@example.com",
                  "identityType": "User"
                }
              ],
              "deniedPermissions": []
            },
            {
              "name": "Second Parent Decision",
              "allowedPermissions": [],
              "deniedPermissions": [
                {
                  "identity": "alice@example.com",
                  "identityType": "User"
                }
              ]
            }
          ]
        }
      ]

    },
    {
      "documenttype": "Movie Entry",
      "filename": "Spartacus.html",
      "permanentid": "spartacus3929393mnfvb30849923ncnv",
      "sourcetype": "Push",
      "title": "Spartacus",
      "mmepsdirector": "Stanley Kubrick",
      "mmepsyear": "1960",
      "mmepssummary": "The slave Spartacus leads a violent revolt against the decadent Roman Republic.",
      "mmepsisseries": false,
      "mmepsmpaafilmrating": "PG-13",
      "mmepsbudget": 12.0,
      "mmepscriticsaverage": 87,
      "mmepscastoverview": [
        "Kirk Douglas",
        "Laurence Olivier",
        "Jean Simmons",
        "Charles Laughton",
        "Peter Ustinov"
      ],
      "mmepsthumbnaillink": "https://images-na.ssl-images-amazon.com/images/M/MV5BMjc4MTUxN2UtMmU1NC00MjQyLTk3YTYtZTQ0YzEzZDc0Njc0XkEyXkFqcGdeQXVyNjU0OTQ0OTY@._V1_SY999_CR0,0,660,999_AL_.jpg",
      "mmepstrailerlink": "https://www.youtube.com/watch?v=tFLCEDLCSHA",
      "data": "<html><head> <style>body{font-family: 'Lato', 'Helvetica Neue', Helvetica, Arial, sans-serif, sans-serif; font-size: 15px; color: #373737;}a{text-decoration: none; color: #009DDC; cursor: pointer;}a:hover{text-decoration: underline;}.left-column{float: left; width: 200px; padding: 5px 15px;}.right-column{overflow: hidden; padding: 5px 10px 10px 15px;}.summary{word-wrap: break-word;}.title h1{color: #67768B; text-transform: uppercase; white-space: normal; margin: 0px;}.director-year{color: #67768B;}.rating{width: 60px; text-align: center; border-width: 1px; border-style: solid; border-radius: 5px;}.rating span{margin: 0px; border-radius: 5px; display: block;}.rating span.pg-13-rating{color: white; background: purple;}.duration{font-size: 12px;}.trailer{border-bottom: 1px solid #BCC3CA; padding: 16px 0px 16px 0px;}</style></head><body> <div class='left-column'> <img src='https://images-na.ssl-images-amazon.com/images/M/MV5BMjc4MTUxN2UtMmU1NC00MjQyLTk3YTYtZTQ0YzEzZDc0Njc0XkEyXkFqcGdeQXVyNjU0OTQ0OTY@._V1_SY999_CR0,0,660,999_AL_.jpg' width='200'> </div><div class='right-column'> <div class='title'> <h1>Spartacus</h1> </div><div class='director-year'> <p>Stanley Kubrick - 1960</p></div><div class='duration'> <p>3h17</p></div><div class='rating'> <span class='pg-13-rating'>PG-13</span> </div><div class='summary'> <p>The slave Spartacus leads a violent revolt against the decadent Roman Republic.</p></div><div class='trailer'> <a href='https://www.youtube.com/watch?v=tFLCEDLCSHA'>View trailer</a> </div></div></body></html>",
      "documentId": "file://movie-entries/1960/Spartacus.html",
      "fileExtension": ".html",
      "permissions": [
        {
          "name": "MPAA Default Permissions",
          "permissionSets": [
            {
              "allowAnonymous": false,
              "allowedPermissions": [
                {
                  "identity": "Adults",
                  "identityType": "Group"
                },
                {
                  "identity": "Teenagers",
                  "identityType": "Group"
                }
              ],
              "deniedPermissions": [
                {
                  "identity": "YoungChildren",
                  "identityType": "Group"
                }
              ]
            }
          ]

        },
        {
          "name": "Parental Approval Permissions",
          "permissionSets": [
            {
              "name": "First Parent Decision",
              "allowedPermissions": [
                {
                  "identity": "bob@example.com",
                  "identityType": "User"
                },
                {
                  "identity": "david@example.com",
                  "identityType": "User"
                },
                {
                  "identity": "chloe@example.com",
                  "identityType": "User"
                }
              ],
              "deniedPermissions": []
            },
            {
              "name": "Second Parent Decision",
              "allowedPermissions": [
                {
                  "identity": "bob@example.com",
                  "identityType": "User"
                },
                {
                  "identity": "david@example.com",
                  "identityType": "User"
                }
              ],
              "deniedPermissions": []
            }
          ]
        }
      ]
    },
    {
      "documenttype": "Movie Entry",
      "filename": "Dangerous-Liaisons.html",
      "permanentid": "dangerous3920934n209823ncnvvn83",
      "sourcetype": "Push",
      "title": "Dangerous Liaisons",
      "mmepsdirector": "Stephen Frears",
      "mmepsyear": "1988",
      "mmepssummary": "A scheming widow and her manipulative ex-lover make a bet regarding the corruption of a recently married woman.",
      "mmepsisseries": false,
      "mmepsmpaafilmrating": "R",
      "mmepsbudget": 14.0,
      "mmepscriticsaverage": 74,
      "mmepscastoverview": [
        "Glenn Close",
        "John Malkovich",
        "Michelle Pfeiffer",
        "Swoosie Kurtz",
        "Keanu Reeves"
      ],
      "mmepsthumbnaillink": "https://images-na.ssl-images-amazon.com/images/M/MV5BMDZmODc0MWQtYWVjOS00OGFiLWExNjItOTMyN2Q5ZTFmYzUzXkEyXkFqcGdeQXVyMTAwMzUyOTc@._V1_.jpg",
      "mmepstrailerlink": "https://www.youtube.com/watch?v=FbB2oBlP2uI",
      "data": "<html> <head> <style>body{font-family: 'Lato', 'Helvetica Neue', Helvetica, Arial, sans-serif, sans-serif; font-size: 15px; color: #373737;}a{text-decoration: none; color: #009DDC; cursor: pointer;}a:hover{text-decoration: underline;}.left-column{float: left; width: 200px; padding: 5px 15px;}.right-column{overflow: hidden; padding: 5px 10px 10px 15px;}.summary{word-wrap: break-word;}.title h1{color: #67768B; text-transform: uppercase; white-space: normal; margin: 0px;}.director-year{color: #67768B;}.rating{width: 60px; text-align: center; border-width: 1px; border-style: solid; border-radius: 5px;}.rating span{margin: 0px; border-radius: 5px; display: block;}.rating span.r-rating{color: white; background: red;}.duration{font-size: 12px;}.trailer{border-bottom: 1px solid #BCC3CA; padding: 16px 0px 16px 0px;}</style> </head> <body> <div class='left-column'> <img src='https://images-na.ssl-images-amazon.com/images/M/MV5BMDZmODc0MWQtYWVjOS00OGFiLWExNjItOTMyN2Q5ZTFmYzUzXkEyXkFqcGdeQXVyMTAwMzUyOTc@._V1_.jpg' width='200'> </div><div class='right-column'> <div class='title'> <h1>Dangerous Liaisons</h1> </div><div class='director-year'> <p>Stephen Frears - 1988</p></div><div class='duration'> <p>1h59</p></div><div class='rating'> <span class='r-rating'>R</span> </div><div class='summary'> <p>A scheming widow and her manipulative ex-lover make a bet regarding the corruption of a recently married woman.</p></div><div class='trailer'> <a href='https://www.youtube.com/watch?v=FbB2oBlP2uI'>View trailer</a> </div></div></body></html>",
      "documentId": "file://movie-entries/1988/Dangerous-Liaisons.html",
      "fileExtension": ".html",
      "permissions": [
        {
          "name": "MPAA Default Permissions",
          "permissionSets": [
            {
              "allowAnonymous": false,
              "allowedPermissions": [
                {
                  "identity": "Adults",
                  "identityType": "Group"
                },
                {
                  "identity": "Teenagers",
                  "identityType": "Group"
                }
              ],
              "deniedPermissions": [
                {
                  "identity": "YoungChildren",
                  "identityType": "Group"
                },
                {
                  "identity": "PreTeenagers",
                  "identityType": "Group"
                }
              ]
            }
          ]
        },
        {
          "name": "Parental Approval Permissions",
          "permissionSets": [
            {
              "name": "First Parent Decision",
              "allowedPermissions": [],
              "deniedPermissions": []
            },
            {
              "name": "Second Parent Decision",
              "allowedPermissions": [],
              "deniedPermissions": []
            }
          ]
        }
      ]
    },
    {
      "documenttype": "Movie Entry",
      "filename": "The-Evil-Dead.html",
      "permanentid": "th33vil39mmdmd93mc393309534m",
      "sourcetype": "Push",
      "title": "The Evil Dead",
      "mmepsdirector": "Sam Raimi",
      "mmepsyear": "1981",
      "mmepssummary": "Five friends travel to a cabin in the woods, where they unknowingly release flesh-possessing demons.",
      "mmepsisseries": true,
      "mmepsmpaafilmrating": "NC-17",
      "mmepsbudget": 0.35,
      "mmepscriticsaverage": 70,
      "mmepscastoverview": [
        "Bruce Campbell",
        "Ellen Sandweiss",
        "Richard DeManincor",
        "Betsy Baker",
        "Theresa Tilly"
      ],
      "mmepsthumbnaillink": "https://images-na.ssl-images-amazon.com/images/M/MV5BODc2MmVjZmUtNjAzMS00MDNiLWIyM2YtOGEzMjg0YjRhMzRmXkEyXkFqcGdeQXVyMTQxNzMzNDI@._V1_UX182_CR0,0,182,268_AL_.jpg",
      "mmepstrailerlink": "https://www.youtube.com/watch?v=jgw4ZdC2XTE",
      "data": "<html><head> <style>body{font-family: 'Lato', 'Helvetica Neue', Helvetica, Arial, sans-serif, sans-serif; font-size: 15px; color: #373737;}a{text-decoration: none; color: #009DDC; cursor: pointer;}a:hover{text-decoration: underline;}.left-column{float: left; width: 200px; padding: 5px 15px;}.right-column{overflow: hidden; padding: 5px 10px 10px 15px;}.summary{word-wrap: break-word;}.title h1{color: #67768B; text-transform: uppercase; white-space: normal; margin: 0px;}.director-year{color: #67768B;}.rating{width: 60px; text-align: center; border-width: 1px; border-style: solid; border-radius: 5px;}.rating span{margin: 0px; border-radius: 5px; display: block;}.rating span.nc-17{color: white; background: black;}.duration{font-size: 12px;}.trailer{border-bottom: 1px solid #BCC3CA; padding: 16px 0px 16px 0px;}</style></head><body> <div class='left-column'> <img src='https://images-na.ssl-images-amazon.com/images/M/MV5BODc2MmVjZmUtNjAzMS00MDNiLWIyM2YtOGEzMjg0YjRhMzRmXkEyXkFqcGdeQXVyMTQxNzMzNDI@._V1_UX182_CR0,0,182,268_AL_.jpg' width='200'> </div><div class='right-column'> <div class='title'> <h1>The Evil Dead</h1> </div><div class='director-year'> <p>Sam Raimi - 1981</p></div><div class='duration'> <p>1h25</p></div><div class='rating'><span class='NC-17'>NC-17</span> </div><div class='summary'> <p>Five friends travel to a cabin in the woods, where they unknowingly release flesh-possessing demons.</p></div><div class='trailer'> <a href='https://www.youtube.com/watch?v=jgw4ZdC2XTE'>View trailer</a> </div></div></body></html>",
      "documentId": "file://movie-entries/1981/The-Evil-Dead.html",
      "fileExtension": ".html",
      "permissions": [
        {
          "name": "MPAA Default Permissions",
          "permissionSets": [
            {
              "allowAnonymous": false,
              "allowedPermissions": [
                {
                  "identity": "Adults",
                  "identityType": "Group"
                }
              ],
              "deniedPermissions": [
                {
                  "identity": "YoungChildren",
                  "identityType": "Group"
                },
                {
                  "identity": "PreTeenagers",
                  "identityType": "Group"
                },
                {
                  "identity": "Teenagers",
                  "identityType": "Group"
                }
              ]
            }
          ]
        }
      ]
    },
    {
      "documenttype": "Movie Entry",
      "filename": "1900.html",
      "permanentid": "19002ndndn3n39293092553ncf859802ncsdg",
      "sourcetype": "Push",
      "title": "1900",
      "mmepsdirector": "Bernardo Bertolucci",
      "mmepsyear": 1976,
      "mmepssummary": "The epic tale of a class struggle in twentieth century Italy, as seen through the eyes of two childhood friends on opposing sides.",
      "mmepsisseries": false,
      "mmepsmpaafilmrating": "UR",
      "mmepsbudget": 9.0,
      "mmepscriticsaverage": 85,
      "mmepscastoverview": [
        "Robert De Niro",
        "Gérard Depardieu",
        "Dominique Sanda",
        "Francesca Bertini",
        "Laura Betti"
      ],
      "mmepsthumbnaillink": "https://upload.wikimedia.org/wikipedia/en/thumb/0/07/1900_Bertolluci.jpg/220px-1900_Bertolluci.jpg",
      "mmepstrailerlink": "https://www.youtube.com/watch?v=uGyH6Tt6qwY",
      "data": "<html><head> <style>body{font-family: 'Lato', 'Helvetica Neue', Helvetica, Arial, sans-serif, sans-serif; font-size: 15px; color: #373737;}a{text-decoration: none; color: #009DDC; cursor: pointer;}a:hover{text-decoration: underline;}.left-column{float: left; width: 200px; padding: 5px 15px;}.right-column{overflow: hidden; padding: 5px 10px 10px 15px;}.summary{word-wrap: break-word;}.title h1{color: #67768B; text-transform: uppercase; white-space: normal; margin: 0px;}.director-year{color: #67768B;}.rating{width: 60px; text-align: center; border-width: 1px; border-style: solid; border-radius: 5px;}.rating span{margin: 0px; border-radius: 5px; display: block;}.rating span.ur{color: white; background: blue;}.duration{font-size: 12px;}.trailer{border-bottom: 1px solid #BCC3CA; padding: 16px 0px 16px 0px;}</style></head><body> <div class='left-column'> <img src='https://upload.wikimedia.org/wikipedia/en/thumb/0/07/1900_Bertolluci.jpg/220px-1900_Bertolluci.jpg' width='200'> </div><div class='right-column'> <div class='title'> <h1>1900</h1> </div><div class='director-year'> <p>Bernardo Bertolucci - 1976</p></div><div class='duration'> <p>5h17</p></div><div class='rating'><span class='ur'>UR</span> </div><div class='summary'> <p>The epic tale of a class struggle in twentieth century Italy, as seen through the eyes of two childhood friends on opposing sides.</p></div><div class='trailer'> <a href='https://www.youtube.com/watch?v=uGyH6Tt6qwY'>View trailer</a> </div></div></body></html>",
      "documentId": "file://movie-entries/1976/1900.html",
      "fileExtension": ".html",
      "permissions": [
        {
          "name": "MPAA Default Permissions",
          "permissionSets": [
            {
              "allowAnonymous": false,
              "allowedPermissions": [
                {
                  "identity": "Adults",
                  "identityType": "Group"
                }
              ],
              "deniedPermissions": []
            }
          ]
        },
        {
          "name": "Additional Rating Permissions",
          "permissionSets": [
            {
              "allowAnonymous": false,
              "allowedPermissions": [],
              "deniedPermissions": [
                {
                  "identity": "YoungChildren",
                  "identityType": "Group"
                },
                {
                  "identity": "PreTeenagers",
                  "identityType": "Group"
                }
              ]
            }
          ]
        },
        {
          "name": "Parental Approval Permissions",
          "permissionSets": [
            {
              "name": "First Parent Decision",
              "allowedPermissions": [
                {
                  "identity": "chloe@example.com",
                  "identityType": "User"
                },
                {
                  "identity": "erin@example.com",
                  "identityType": "User"
                }
              ],
              "deniedPermissions": [
                {
                  "identity": "frank@example.com",
                  "identityType": "User"
                }
              ]
            },
            {
              "name": "Second Parent Decision",
              "allowedPermissions": [
                {
                  "identity": "chloe@example.com",
                  "identityType": "User"
                },
                {
                  "identity": "erin@example.com",
                  "identityType": "User"
                },
                {
                  "identity": "frank@example.com",
                  "identityType": "User"
                }
              ],
              "deniedPermissions": []
            }
          ]
        }
      ]
    }
  ],
  "delete": []
}
Details on the item permissions
The first permission level is based on the default MPAA film rating. The second permission level is based on some other form of film rating, should a movie not yet have been rated by the MPAA. The third permission level contains parental approval information, and it’s further divided into two permission sets (one for each parent).
For example, the movie whose title is 1900, the last item in the JSON, is unrated by the MPAA.
That is, it doesn’t have any mmepsmpaamovierating metadata.
As a result, the first permission level, which is based on the MPAA film rating, only allows adults (Grace, Henry, and yourself). Permissions for young children, pre-teens, and teenagers are still unknown at this level.
The second permission level is based on some other form of film rating. It explicitly denies young children (Alice and Bob) and pre-teens (Chloe and David). Permissions for teenagers (Erin and Frank) are still unknown at this level.
The third permission level, which contains parental approval information, indicates that:
-
Chloe, a pre-teen, is explicitly allowed by both permission sets, that is, both of her parents.
However, since pre-teens were explicitly denied in the previous permission level, Chloe won’t be able to see the
1900movie entry in her query results. -
Erin, a teenager, is also explicitly allowed by both permission sets.
Since teenager permissions were unknown in previous permission levels, Erin will be able to see the
1900movie entry in her query results. -
Frank, also a teenager, is explicitly denied in the first permission set and explicitly allowed in the second one.
Since he isn’t allowed in all of the permission sets at this permission level (that is, one of his parents doesn’t want him to see this movie entry), Frank won’t be able to see the
1900movie entry in his query results.
In conclusion, the only users who are allowed to see the 1900 movie entry in their query results are Erin, Grace, Henry, and yourself.
Push the container to the Push source
Perform a PUT /sources/…/batch HTTP request.
Use the fileId value that you obtained when you created the file container in the query string and the sourceId in the endpoint path.
You may have to wait several minutes before these items become available in your source.
Step 3: Add a batch of security identities
Whenever you use the Push API to add, update, or delete items in a secured Push source, you should ensure that the security identity definitions to which these items refer in their permission models are up to date in the security identity cache of your Coveo organization. Otherwise, certain users may not be able to see some of the items for which they should have access. Even worse, other users may be able to see items for which they should no longer have access.
In this step, you’ll use a batch operation to define several security identities at once. The items that you added in your secured Push source in step 2 refer to these security identities in their permission models.
Adding a batch of security identities uses a three-step process similar to the one used to add a batch of items, that is:
Create the file container
-
Perform a
POST /filesHTTP request. -
Store the values of the
uploadUriandfileIdfrom the response. You’ll need these values in the next steps.
Upload the batch of security identities to the container
The JSON below defines nine users (Alice, Bob, Chloe, David, Erin, Frank, Grace, Henry, and yourself), four groups (YoungChildren, PreTeenagers, Teenagers, and Adults), and one granted identity (Everyone).
Every user belongs to a single group and each group also has the Everyone granted identity.
The JSON also defines an alias to your own security identity in Coveo. For this to work, you must replace <MyEmailAddress> towards the end of this JSON with the actual email address with which you authenticate in Coveo.
|
|
Typically, you should define an alias relationship between each user security identity and its corresponding security identity in the Email Security Provider (see About the email security provider). This means that you’ll normally define each user in the |
Perform a PUT uploadUri request.
The request endpoint is the uploadUri value you stored in the previous step and the request body is provided below.
|
|
Request body |
Replace <MyEmailAddress> with the email address you use when authenticating in Coveo. |
Push the container to the security identity provider
Perform a PUT /providers/…/batch HTTP request.
Use the fileId value that you obtained when you created the file container in the query string.
Step 4: Validate item field values, effective permissions, and data
You’ll now use the Coveo Administration Console to verify that the metadata of the items you just pushed has populated the fields in your index as expected, and that the permission models of your items are being evaluated correctly.
-
On the Sources (platform-ca | platform-eu | platform-au) page.
-
On the Push source row, click Open in Content Browser.

The six items that you pushed in your source should appear in the result list.
-
Click the result whose title is
1900, and then click Properties in the Action bar.A panel should open in which the Fields tab is selected by default. You should see a list of fields and their values for this item.
-
You can now validate that the fields you created in step 1 were properly populated with the item metadata you pushed in step 2.
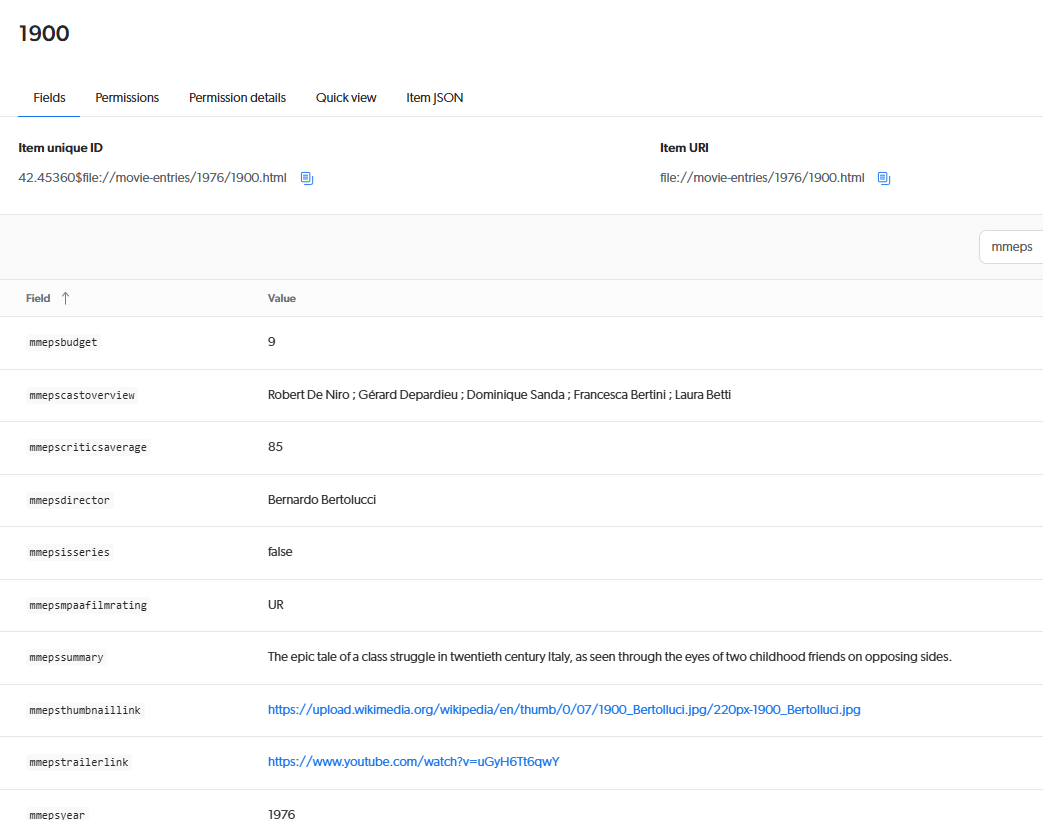
Note that the
titlefield was also populated, even though you didn’t create this field in step 1;titleis a default field.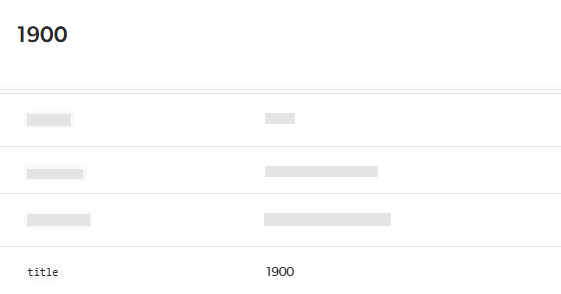
-
In the header of the panel, select the Permissions tab.
You should see the list of permissions for the
1900item. As explained in step 2:-
The only allowed users are Erin, Grace, Henry, and yourself.
-
The
YoungChildrenandPreTeenagersgroups, as well as the user Frank, are explicitly denied.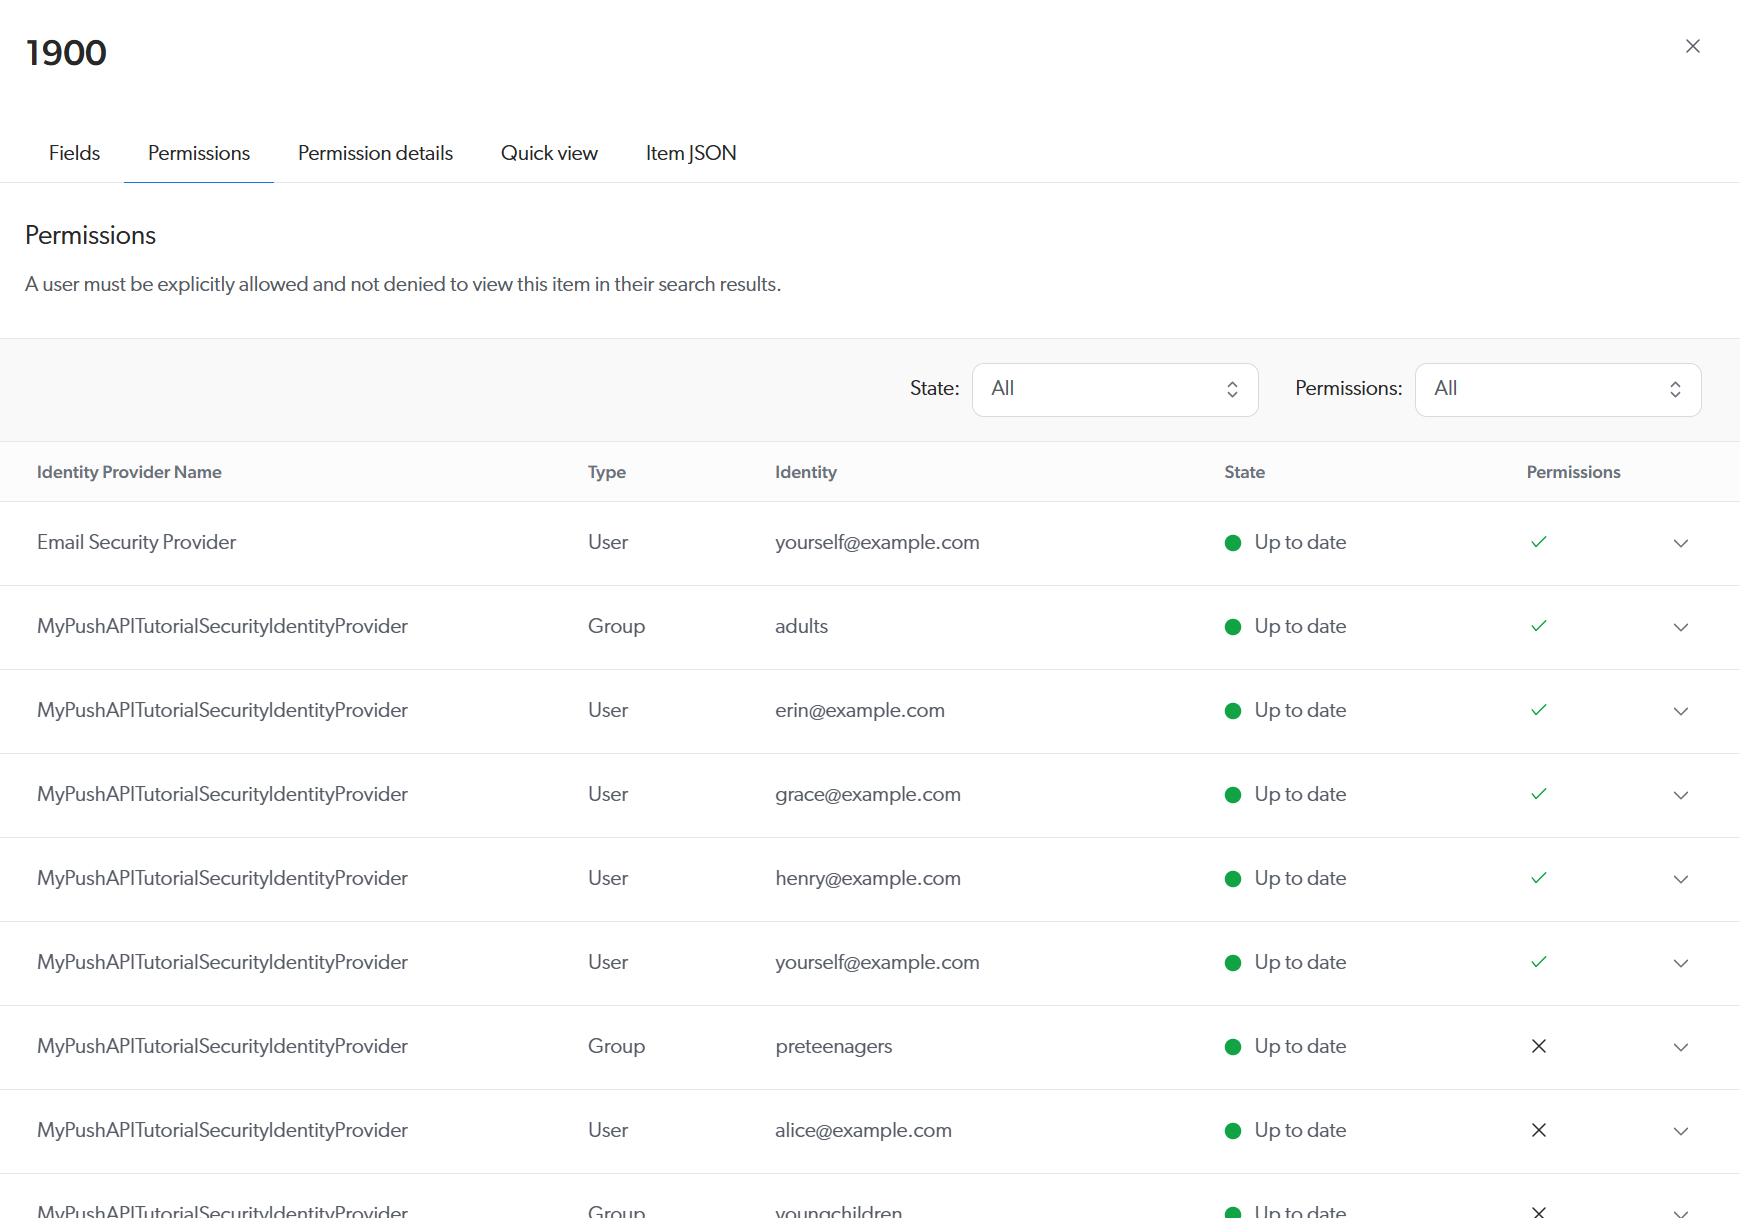
-
-
In the header of the panel, select the Permission details tab.
You should see that this item has three permission levels. The first two levels have only one permission set, whereas the last one has two. As explained in step 2:
-
Permission Level 0 (that is,
Mpaa default permissions) explicitly allows theAdultsgroup. -
Permission Level 1 (that is,
Additional rating permissions) explicitly denies theYoungChildrenandPreTeenagersgroups. -
Permission Level 2 (that is,
Parental approval permissions) explicitly allows the user Erin, and denies the user Frank.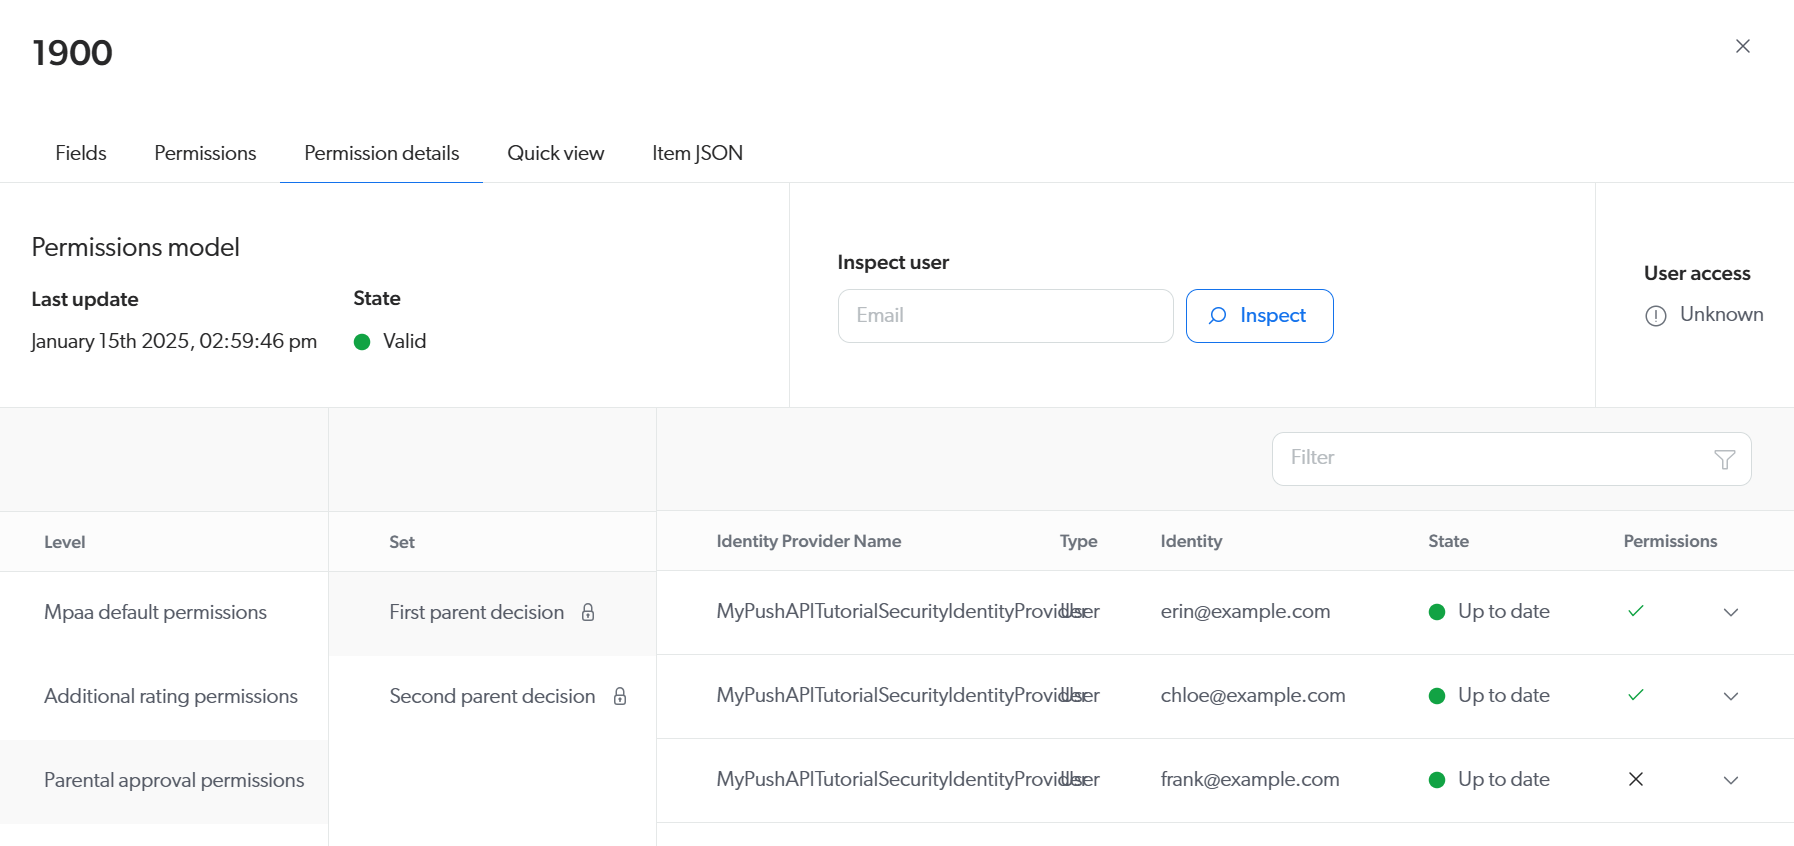
-
-
In the header of the panel, select the Quick view tab.
The HTML and CSS that was provided as the value of the
dataproperty for this item should render as expected.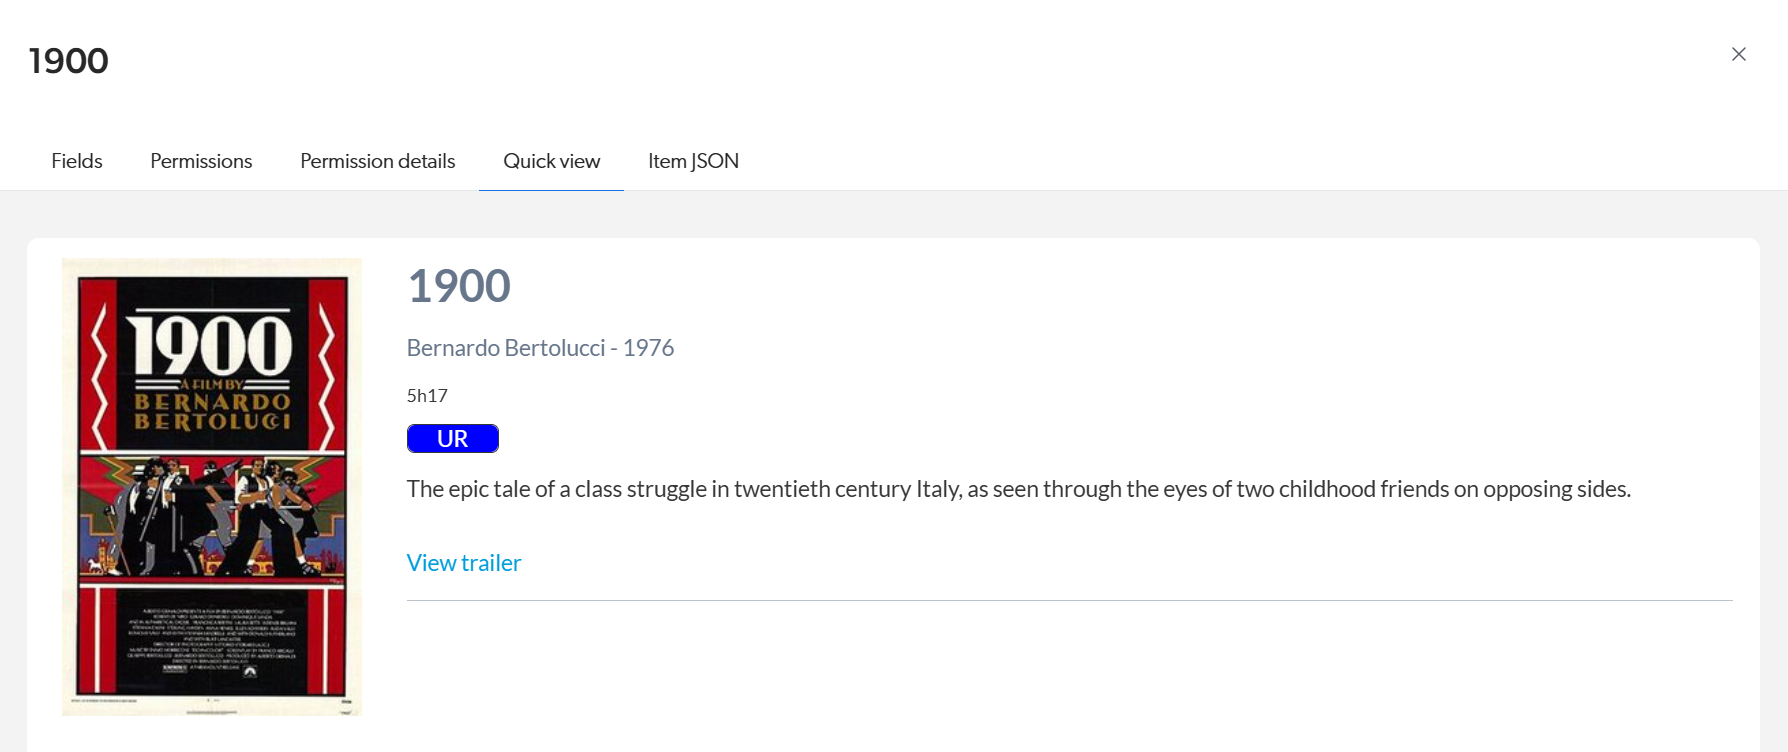
You can validate the other items that you added in your secured Push source the same way.