Push API usage example
Push API usage example
Assuming that you’ve created a secured content Push source, along with a security identity provider for your secured Push source, you can then use the Push API to add a raw text item with access permissions to your source.
This article details the different components of a secured content Push source and sample requests to add a secured item and its associated security identities.
Adding a secured item
The following sample request adds a secured item to a secured content Push source in the US East deployment region using the Add or update an item HTTP request.
PUT https://api.cloud.coveo.com/push/v1/organizations/mycoveocloudv2organizationg8tp8wu3/sources/mysourceidg3c5d1r2/documents?documentId=file%3A%2F%2Ffolder%2Fmytext.txt HTTP/1.1
Content-Type: application/json
Accept: application/json
Authorization: Bearer **********-****-****-****-************Request body:
{
  "author": "Alice Smith",
  "date": "2017-11-08T12:18:41.666Z",
  "documenttype": "Text",
  "filename": "mytext.txt",
  "language": [
    "English"
  ],
  "permanentid": "sample95829alice84720permanent93829id",
  "sourcetype": "Push",
  "title": "My Text",
  "fileExtension": ".txt",
  "data": "This is a sample text written by Alice Smith.",
  "permissions": [
    {
      "allowAnonymous": false,
      "allowedPermissions": [
        {
          "identity": "AlphaTeam",
          "identityType": "Group"
        }
      ],
      "deniedPermissions": [
        {
          "identity": "bob@example.com",
          "identityType": "User"
        }
      ]
    }
  ]
}
In the above example, several pieces of metadata are pushed along with the item (for example, author, date, and documenttype).
This metadata will be mapped to the corresponding fields in the index.
For more details about the Push source metadata mapping process, see About Push source item metadata.
The data property contains the item body itself.
Alternatively, you can push the body of an item in other ways, depending on your specific needs.
Finally, the item has a set of permissions.
You must specify a permission model when adding an item to a secured Push source that doesn’t have a global permission model in its configuration.
In this example, all security identities that are members of the AlphaTeam group can access the item, except for user bob@example.com.
Security identity definition
You must define the security identities that an item permission model refers to, so that allowed users can access an item with access permissions in their query results.
The following request defines the AlphaTeam group in the security identity provider associated with the secured content Push source.
PUT https://api.cloud.coveo.com/push/v1/organizations/mycoveocloudv2organizationg8tp8wu3/providers/mysecurityidentityprovider8d9s8d/permissions HTTP/1.1
Content-Type: application/json
Accept: application/json
Authorization: Bearer **********-****-****-****-************Request body:
{
  "identity": {
    "name": "AlphaTeam",
    "type": "GROUP"
  },
  "members": [
    {
      "name": "alice@example.com",
      "type": "USER"
    },
    {
      "name": "bob@example.com",
      "type": "USER"
    },
    {
      "name": "david@example.com",
      "type": "USER"
    }
  ]
}
See IdentityBody model for details.
Security identity to Email Security Provider user mapping
Currently, the group members (that is, alice@example.com, bob@example.com, and david@example.com) are not recognized by the provider.
The recommended way to fix this issue is to create an alias relationship between each of those group members and the corresponding user in the Email Security Provider.
In addition to enabling your provider to detect those users, this will allow them to access content across many secured enterprise systems.
The following request defines an alias for user alice@example.com.
You should perform similar requests to define aliases for users bob@example.com and david@example.com.
PUT https://api.cloud.coveo.com/push/v1/organizations/mycoveocloudv2organizationg8tp8wu3/providers/mysecurityidentityprovider8d9s8d/mappings HTTP/1.1
Content-Type: application/json
Accept: application/json
Authorization: Bearer **********-****-****-****-************Request body:
{
  "Identity": {
    "Name": "alice@example.com",
    "Type": "USER"
    },
    "Mappings": [
      {
        "Name": "alice@example.com",
        "Type": "USER",
        "Provider": "Email Security Provider"
      }
    ]
}
See MappedIdentityBody model for details.
Validating the push requests
After the Push API processing delay, you can validate the success of your push requests by navigating to the Content Browser (platform-ca | platform-eu | platform-au) of the Coveo Administration Console. The item should appear.
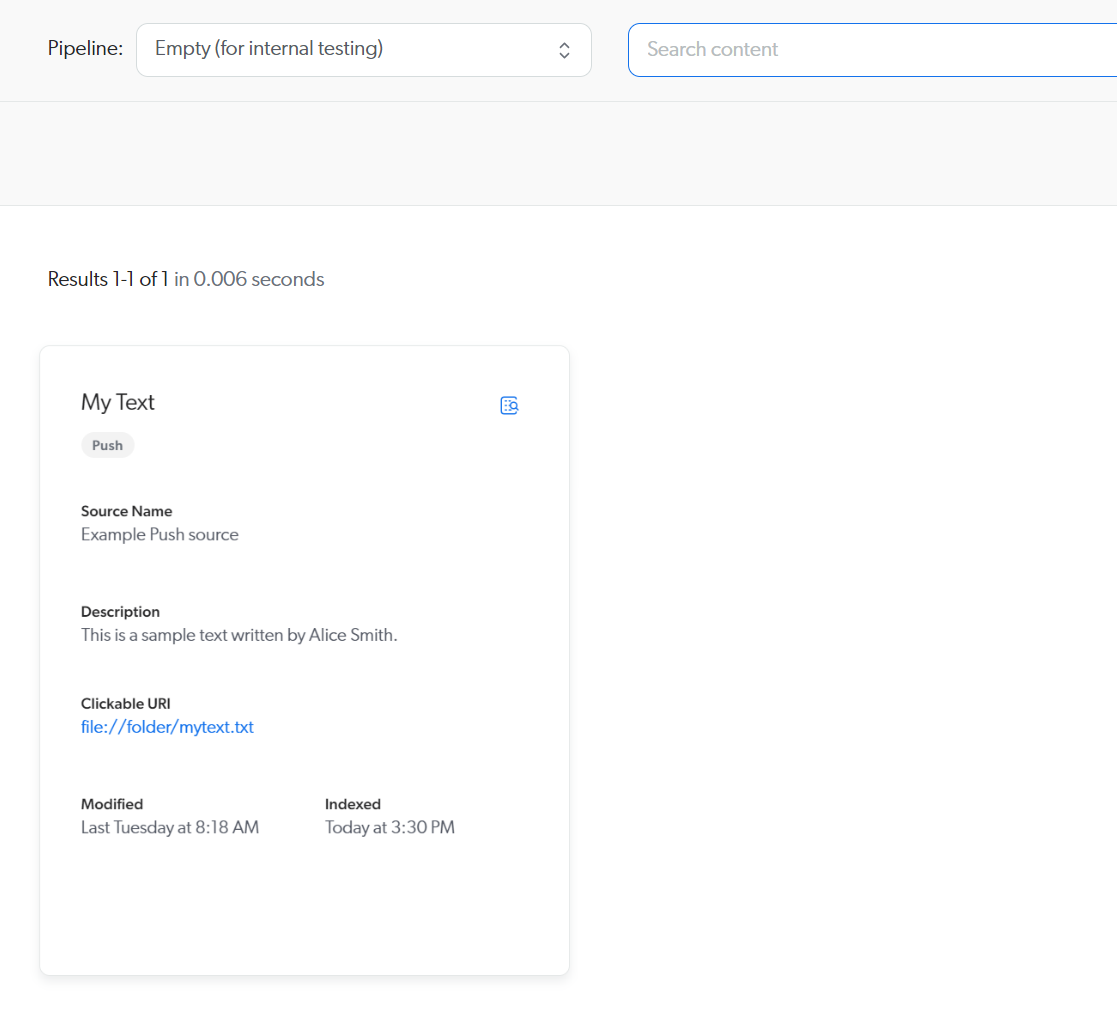
You can double-click the item to inspect its properties.
In particular, you can validate the security identities.
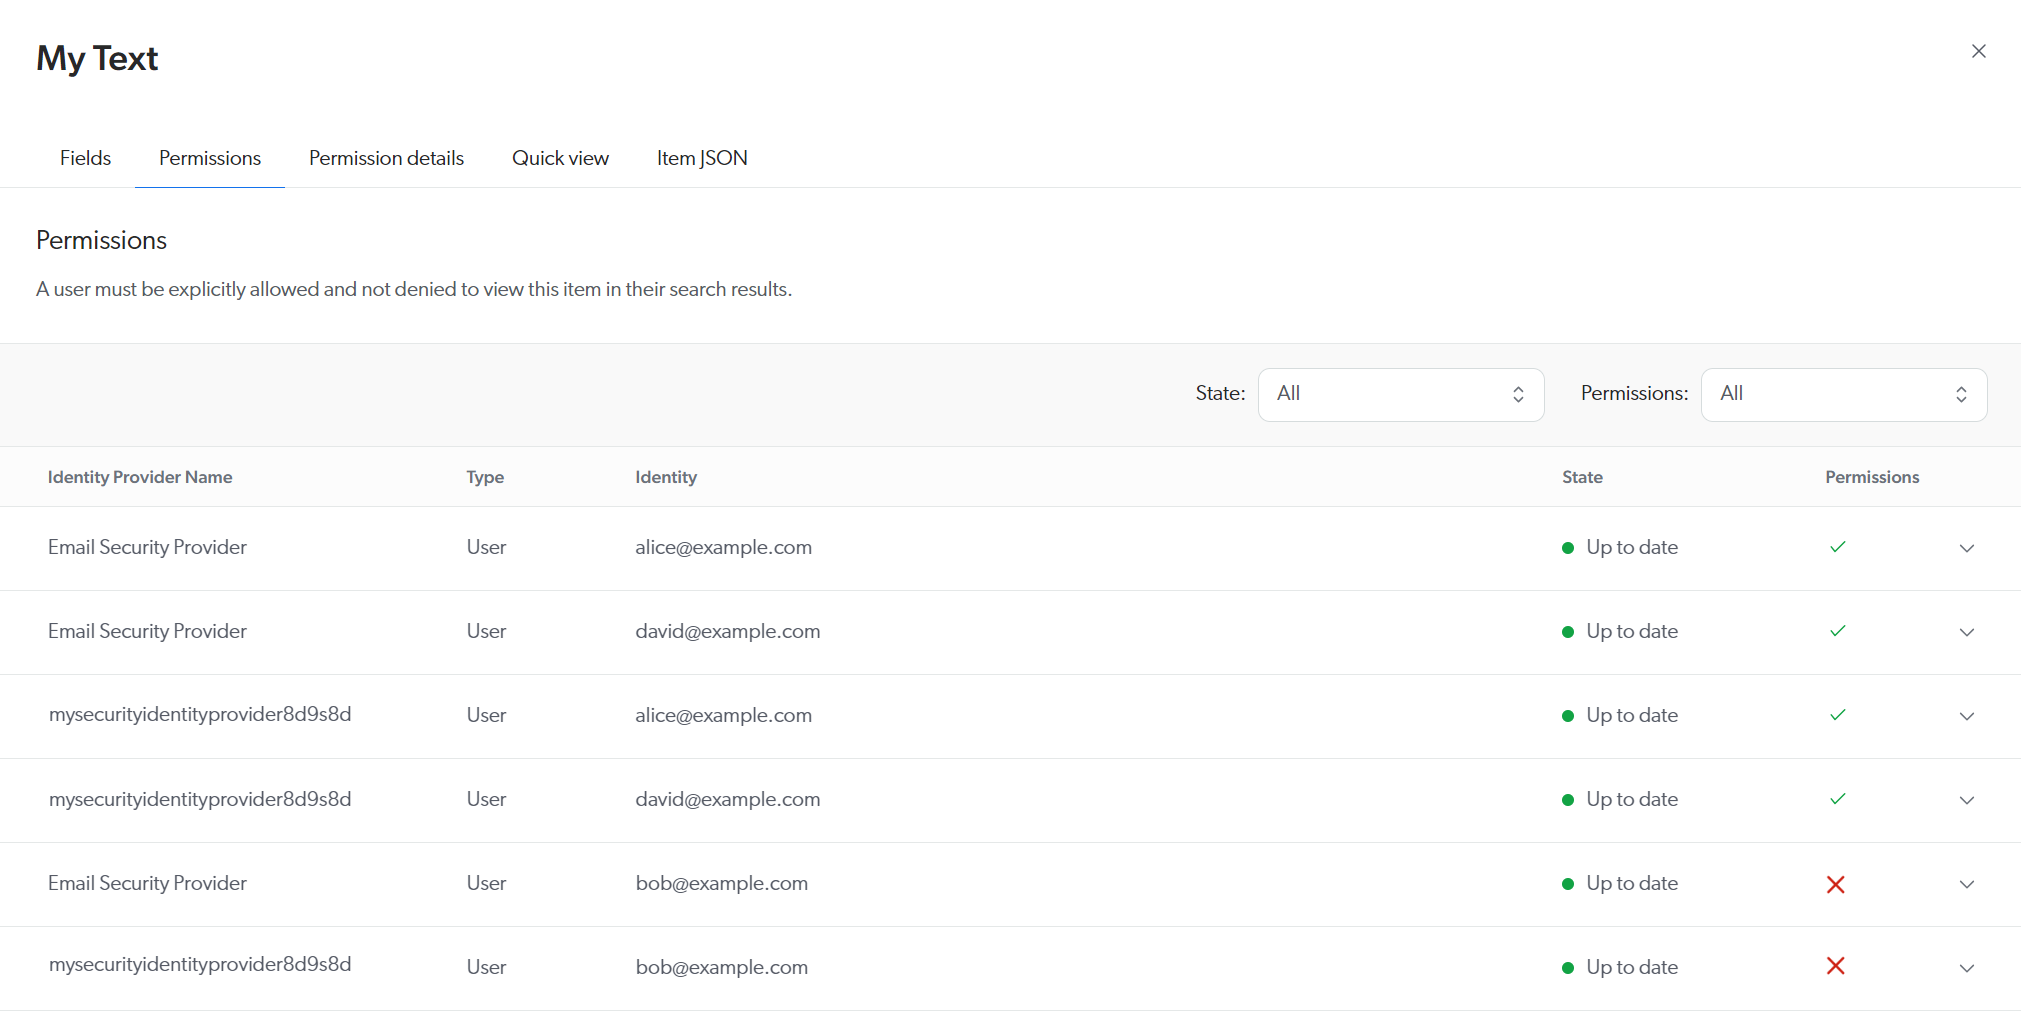
The image below shows that alice@example.com and david@example.com both have access to the item, while bob@example.com doesn’t, as expected.
Moreover, you can see that the alias relationships for alice@example.com and david@example.com are functional, the access being granted under Email Security Provider as well as under mysecurityidentityprovider8d9s8d.
In contrast, bob@example.com is denied access in both providers.
|
|
Note
A successful Push API response only confirms that the request was accepted for processing—it doesn’t guarantee that the operation was completed successfully. Failures can still occur downstream in the Coveo indexing pipeline. For example, an item may be rejected due to validation rules or unsupported content. Many downstream failures can only be observed through the Log Browser (platform-ca | platform-eu | platform-au) in the Coveo Administration Console. 
See Troubleshooting Push source issues for complete troubleshooting. |
What’s next?
In this example, each item and security identity is pushed individually. However, the Push API also allows you to manage items and security identities in batches.
A good way to learn about this feature is to do the Push API tutorial.
The Push API tutorials also introduce you to more advanced concepts, such as creating complex permission models.