Index metadata
Index metadata
Once you’ve created a source and it’s done indexing your content for the first time, you should focus your attention on the metadata you want to index. This will later allow you to configure critical aspects of your Coveo-powered search interface, such as facets.
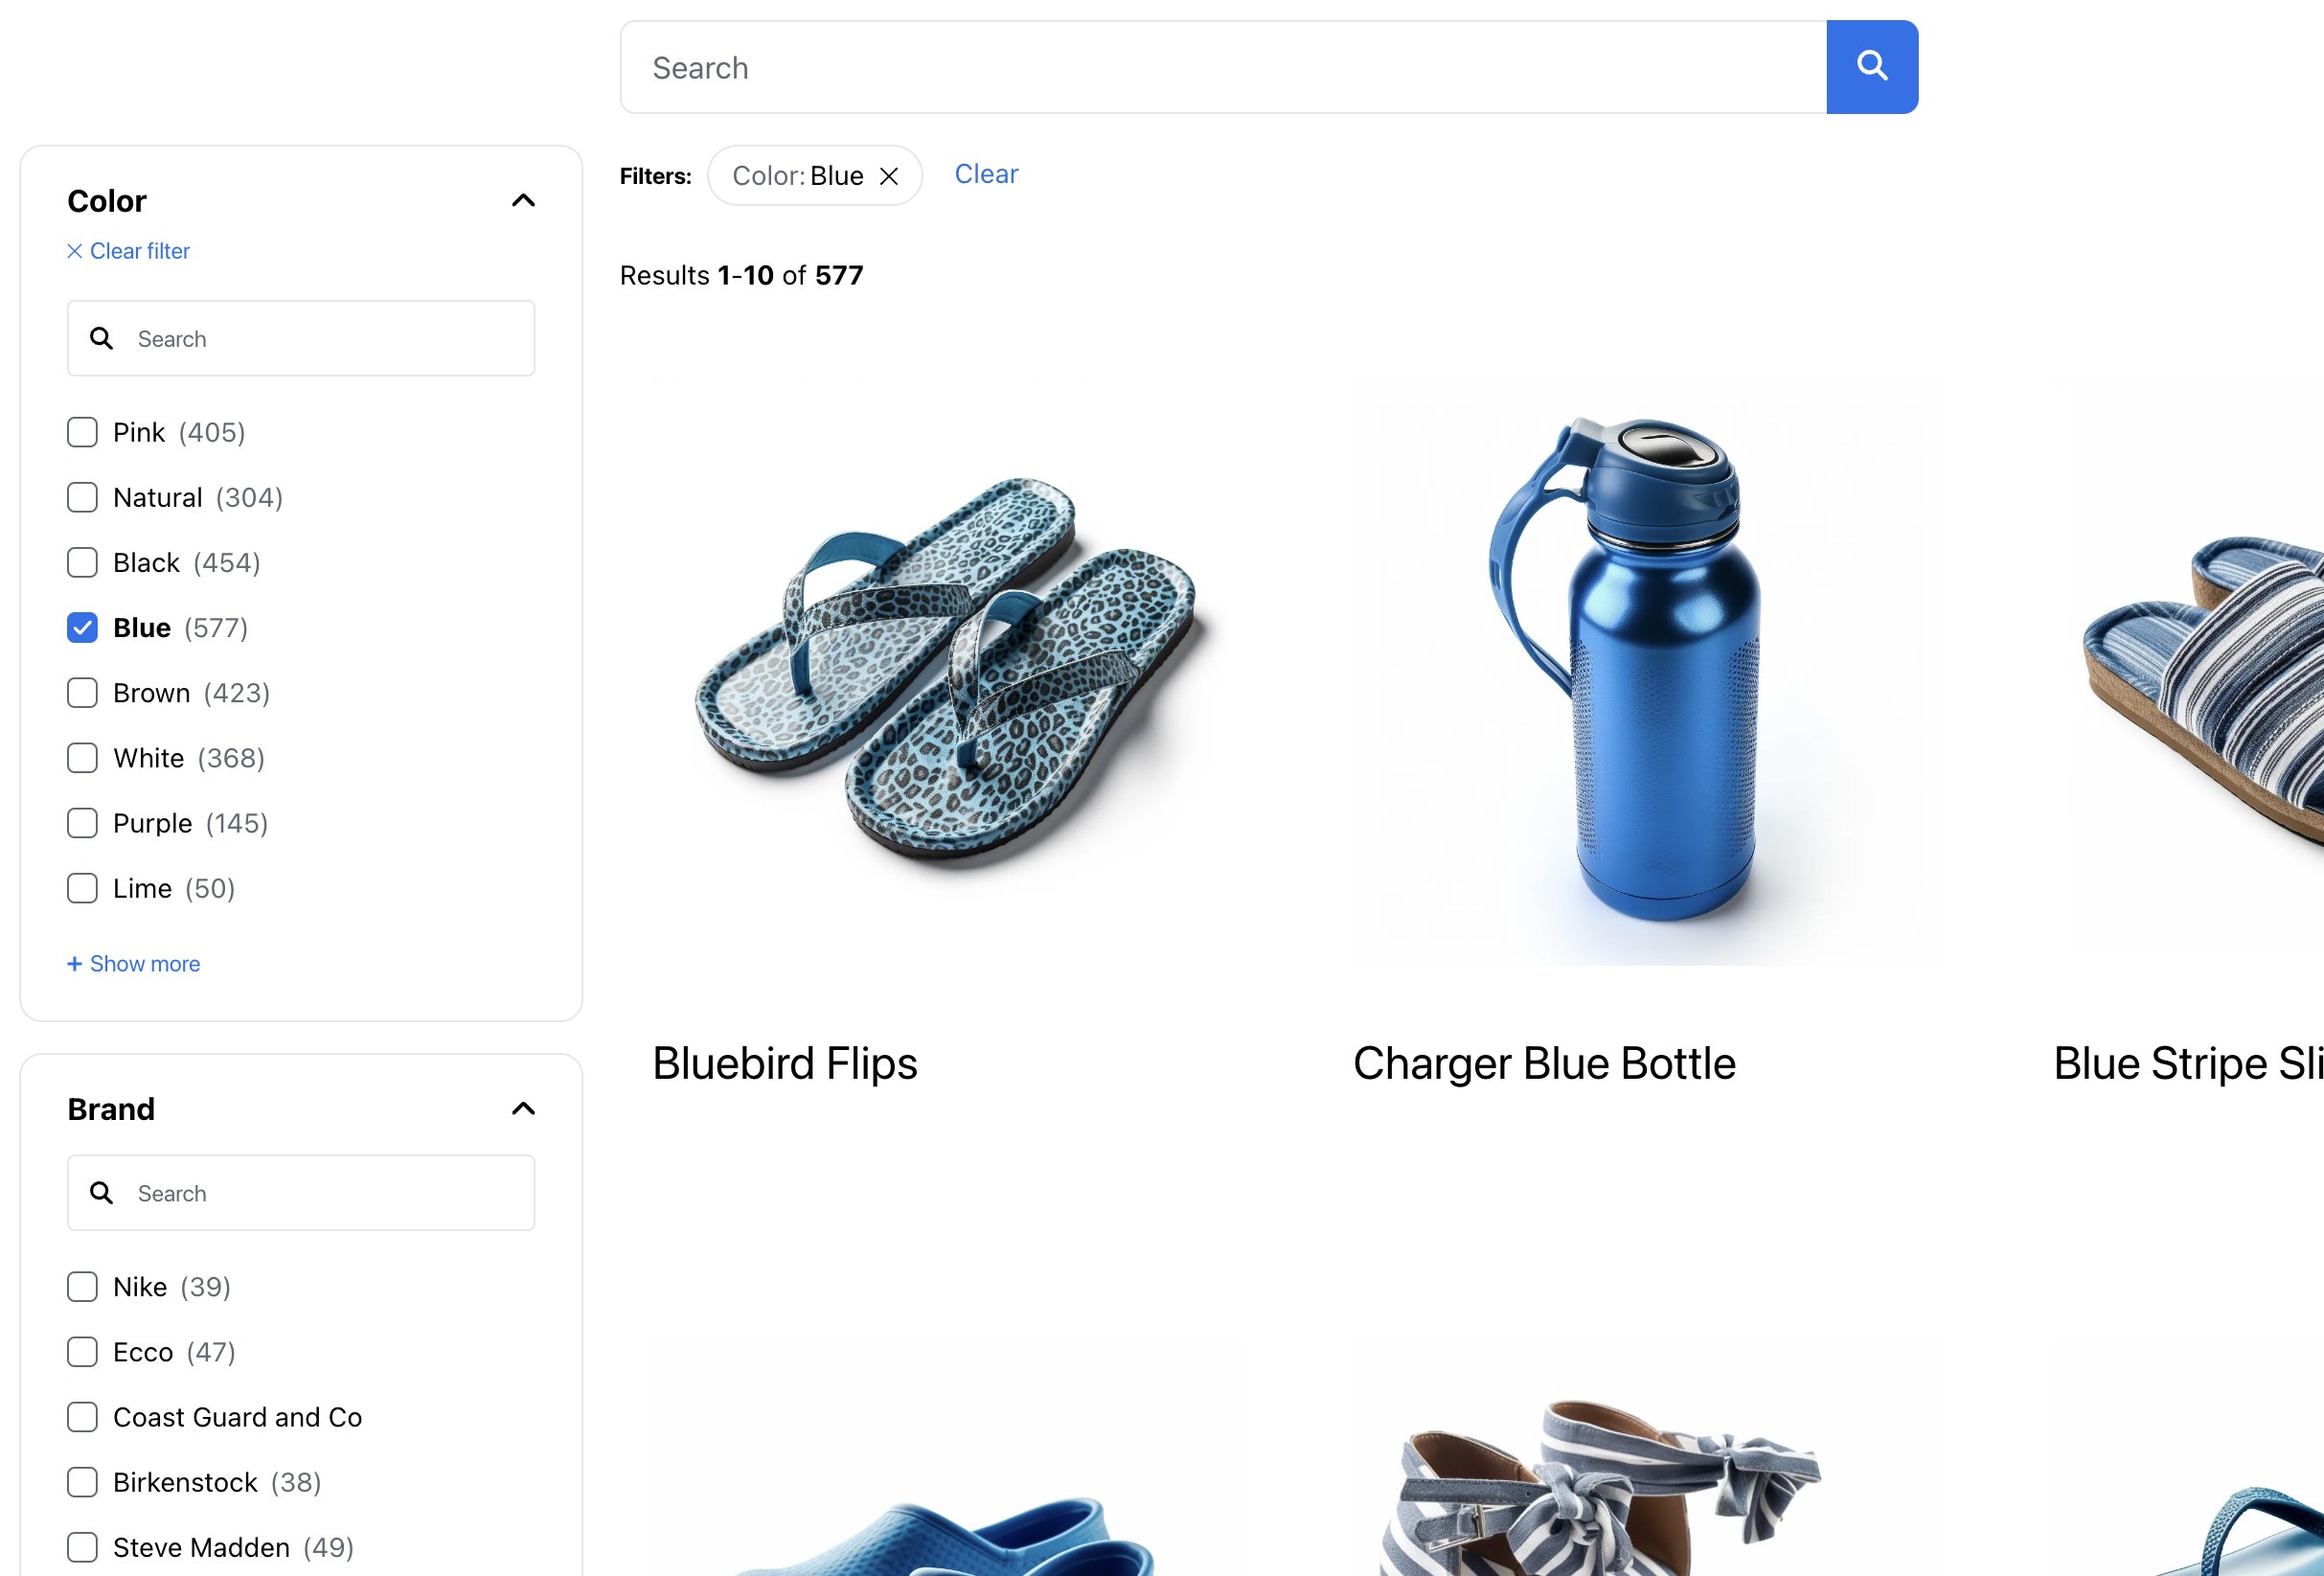
For example, on a sports equipment retailer website, facets could let customers search by color and brand. Selecting a color would narrow the products down to only those matching this criteria.
It’s therefore crucial to index your metadata, as this impacts your end user’s experience.
From metadata to facets
Facets are based on the content indexed in the fields of your items. This means that, before you create a facet for a specific piece of metadata, you must ensure that this metadata is indexed in a field.
In general, there are three steps to using content repository data as facet values in a Coveo-powered search interface:
1 Extract the metadata you want to use as a facet from your content repository.
2 Create a source mapping and a field to store the extracted metadata.

Step 1: Extract metadata
Extracting metadata begins with determining what piece of information in your content repository you want to use as filtering criteria. You should be able to look at your content repository items and identify the metadata values you want to index. Typically, each repository item (or each item in a subset of your repository items) will expose a value (or a set of values) for a given metadata.
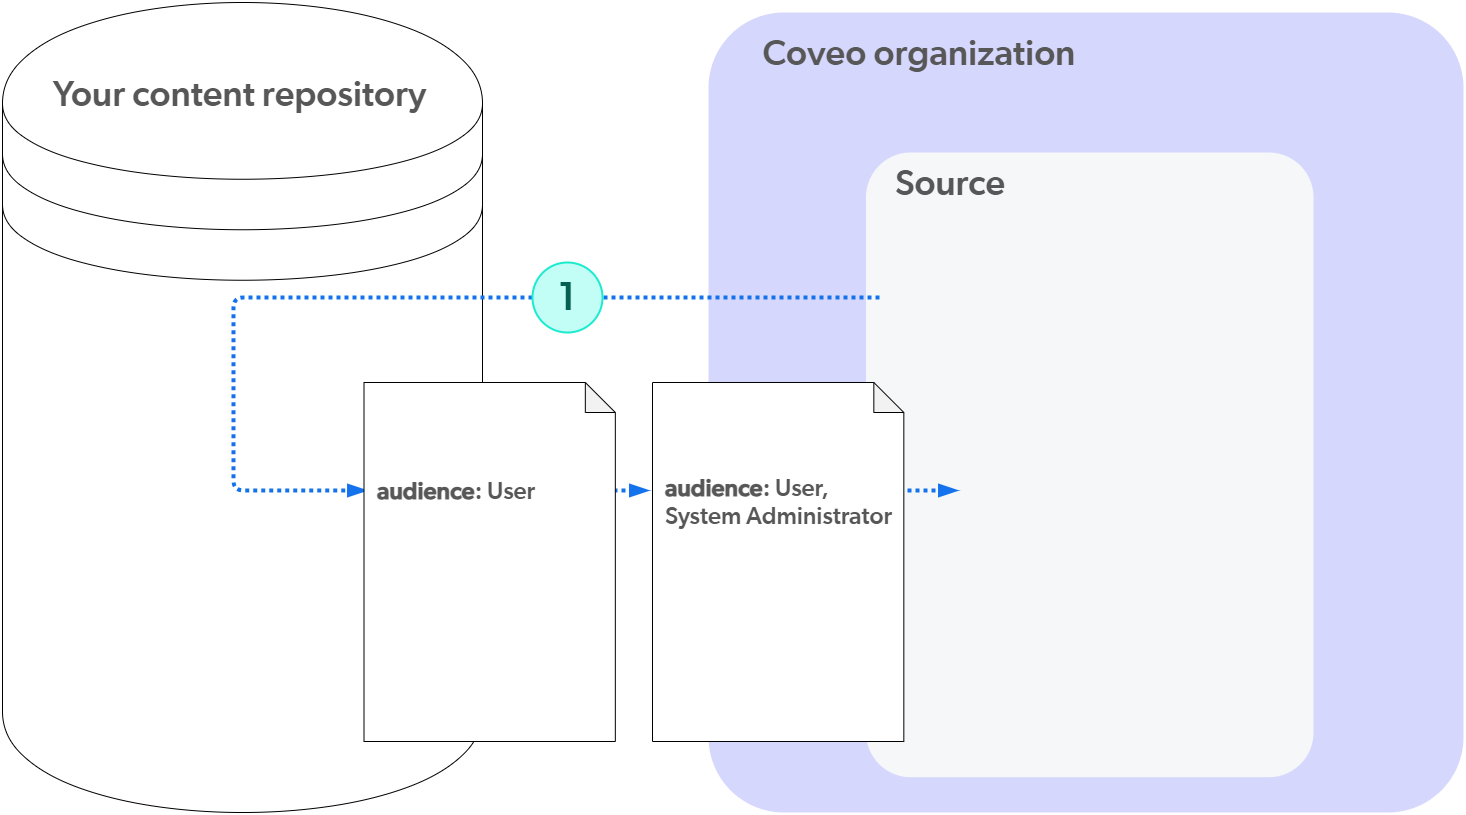
For example, if a portion of your company’s website is dedicated to software documentation, you might want to index the audience metadata of those pages, where each page would contain values such as User, System Administrator, or both.
You might need to configure your source to extract custom metadata from your content repository. However, since Coveo sources automatically extract basic metadata as well as metadata that’s inherent to the source type, you should check if the metadata you want to use is already extracted before configuring your source to extract custom metadata.
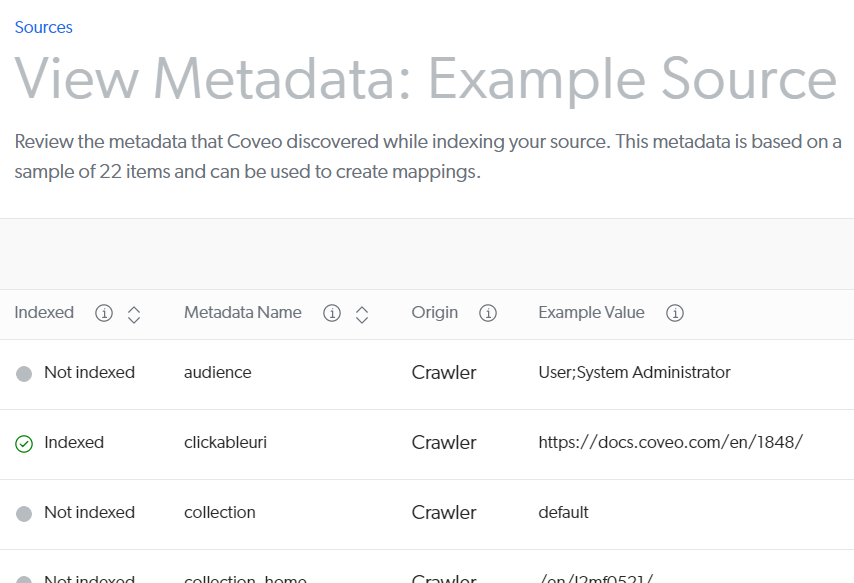
To determine which metadata is automatically extracted, access the View and map metadata subpage. On the Sources (platform-ca | platform-eu | platform-au) page, click your source, and then click More > View and map metadata.
Review the Metadata name and Example value columns to identify whether the metadata you want to use is already extracted. You can expand a metadata row to show additional extracted values.
If the desired metadata is already extracted, you can move on to step 2. If the desired metadata isn’t already extracted, configure your source to extract custom metadata.
Extract custom metadata
The way to extract custom metadata varies from one source type to the next. The following table lists methods you can use with common source types:
| Source type | Custom metadata extraction methods |
|---|---|
Define metadata key-value pairs in the |
|
REST API |
In the JSON configuration (REST API | GraphQL API) of the source, define metadata names (REST API | GraphQL API) and specify where to locate the metadata values in the JSON API response Coveo receives. |
Add |
|
|
|
|
For the complete list of source types, see Choosing the right connector.
As you add custom metadata extraction configurations, rebuild your source and review the View and map metadata subpage to ensure that the metadata is being extracted as expected.
About default field values
Default fields are fields that Coveo creates for each item in your source. These fields are used to store metadata that is generally automatically extracted from your content repository. You can find a list of the default fields in Field origin.
Default fields can be filled at three different stages of the Coveo indexing pipeline:
-
During the crawling or push process
-
When applying a pre-conversion indexing pipeline extension (IPE)
-
When applying a post-conversion IPE
The metadata saved in a field during the crawling/push process may be overwritten by the converter at the processing stage.
For example, let’s say the author field is populated during the crawling process with Mary Johnson.
Then, when the converter processes the item, it may find a different value for the author field in the content of the item, such as John Smith, under the author metadata.
The converter will then overwrite the author field with this new value, and John Smith will be indexed in the author field.
However, if you want to keep the value saved at an earlier stage, you can specify it in your mapping rule.
For example, in the above scenario, the %[author:crawler] mapping rule would ensure that the author field is populated with Mary Johnson.
Conversely, fields populated with a post-conversion IPE are not overwritten by the converter, as the post-conversion IPE step occurs after the processing stage.
Values indexed in the following default fields can’t be overwritten at all: orderingid, primaryid, rowid, source, transactionid, and urihash.
It is strongly discouraged to use a system field as a dictionary field.
Custom metadata you’re extracting isn’t showing on the View and map metadata subpage?
When you visit the View and map metadata subpage, Coveo creates a summary of the available metadata, based on a sample of the indexed content at that time. The sample might not yet include your custom metadata if you visit the View and map metadata subpage at the beginning of a build or rebuild operation. It may only be a matter of time before the sample includes your custom metadata. During a rebuild, click Refresh at the top of the View and map metadata subpage to get an updated summary.
If only a small subset of the entire content contains the custom metadata you would like to extract, the sample might not even include it at the end of the rebuild.
Not seeing your custom metadata on the View and map metadata subpage doesn’t prevent you from creating your mapping and field. Step 2 guides you accordingly.
Step 2: Create a source mapping and a field
Metadata values must be indexed in fields. The bridge between a piece of metadata and a field is a source mapping. A mapping consists mainly of two pieces of information:
-
A mapping rule (which specifies an incoming piece of metadata).
-
A reference to the receiving field.
The actual receiving field may already exist. You can also create it as part of the mapping creation process.
A source mapping instructs the Coveo Platform which field will receive the incoming metadata.
|
|
Note
For a more detailed explanation of how mappings work, see About mappings. |
If your metadata appears on the View and map metadata subpage, you can create a mapping directly from there. Otherwise, you can use the fallback method to create your mapping.
Create a mapping for metadata appearing on View and map metadata
-
On the View and map metadata subpage, if the metadata you want to index doesn’t already show as Indexed, click it.
 Note
NoteIf your metadata shows as Indexed, a mapping and a field already exist for that metadata. To determine which field the metadata is indexed in or to edit the mapping, see Review indexed metadata.
-
Click Add to index in the Action bar.
-
In the Apply a mapping… panel, unless you already have a field that you want to use, click Add field.
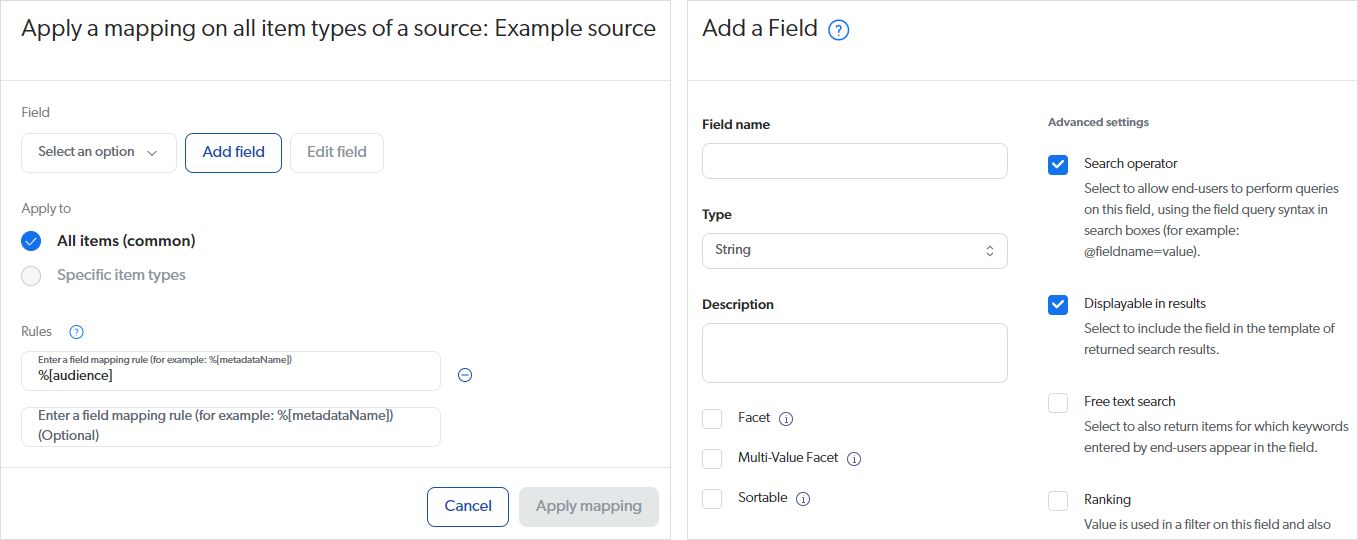
-
In the Add a field panel, enter a name for the field and configure its settings. For example, if you’re indexing the
audiencemetadata of a document and the audience can contain multiple values, select Multi-value facet.
NoteApart from the Type setting, you can edit the field options later if needed.
-
When you’re done, click Add field.
-
Back in the Apply a mapping… panel, use the Select an option dropdown menu to select the field you just created.
-
Under Apply to, leave the default All items (common) value.
NoteYou can edit this setting later if you decide to apply the mapping to only a subset of the items of your source.
-
Under Rules, Coveo suggests a mapping rule (for example,
%[audience]or%[audience:crawler]) based on the metadata name you selected. You can edit this rule now or later if needed. -
Click Apply mapping.
Fallback method for creating a mapping
-
On the Sources (platform-ca | platform-eu | platform-au) page, click your source, and then click Mappings in the Action bar.
-
Follow the Edit mappings panel mapping creation procedure.
Review indexed metadata
When the View and map metadata subpage shows metadata as Indexed, this means a mapping and a field already exist for that metadata.
To determine which field the metadata is indexed in
-
On the View and map metadata subpage, click the metadata, and then click Mappings in the Action bar.
-
In the Edit mappings panel, in the Rule column, locate the mapping rule that references your metadata name (for example,
%[audience]or%[audience:crawler]).The associated field is shown in the Field column.
To edit that mapping
-
Click the mapping, and then click Edit in the Action bar.
-
Perform the necessary changes, and then click Apply mapping.
Step 3: Reference the field in a facet
Once your source is rebuilt, ensure that your mappings work as expected in the Content Browser (platform-ca | platform-eu | platform-au). In the Fields tab of your item properties, check that the desired metadata values have been properly indexed. Adjust your mapping rules if necessary.
The process of creating a facet, and other ways you can use indexed metadata in a search interface is covered in the Build a search UI section.
Required privileges
The following table lists the privileges required to perform the actions described in this article.
| Actions | Service | Domain | Required access level |
|---|---|---|---|
View sources, view source update schedules, and subscribe to source notifications |
Content |
Fields |
View |
Sources |
|||
Organization |
Organization |
||
Edit sources, edit source update schedules, and edit source mappings |
Organization |
Organization |
View |
Content |
Fields |
Edit |
|
Sources |
|||
View and map metadata |
Content |
Source metadata |
View |
Fields |
|||
Organization |
Organization |
||
Content |
Sources |
Edit |