Add a Sitemap source
Add a Sitemap source
Members with the required privileges can use a Sitemap source to make the content of webpages listed in a sitemap file or sitemap index file searchable.
A sitemap file can be added to a website and is required when using a Sitemap source. The file contains a list of the website’s URLs along with their respective metadata which include the LMD (last-modified-date). This enables the Sitemap source to perform refresh updates, which the Web source doesn’t support. For this reason, although a Sitemap source requires the extra step of adding a sitemap file, it offers better performance than the Web source.
Source key characteristics
The following table presents the main characteristics of a Sitemap source.
| Features | Supported | Additional information | |
|---|---|---|---|
Indexable content |
Webpages (URL) |
||
Sitemap file format |
|
Sitemap files and sitemap index files must respect the Sitemap protocol. Strict validations can be enforced by enabling the ParseSitemapInStrictMode option. |
|
Compressed HTTP responses |
|
The source automatically handles compressed web server HTTP responses with the following |
|
|
To be refreshed, an item in the sitemap file must have a last-modification date[1] (for example, the |
||
|
Takes place every day by default. |
||
|
|||
|
|||
|
|||
|
|||
Basic authentication |
|
Supported HTTP authentication schemes:
|
|
Form authentication |
|
||
|
A variety of basic and advanced rules may be used to ignore the webpages you don’t want to index. |
||
Automatic mapping of metadata to fields that have the same name |
Disabled by default.
To enable, access the JSON configuration of your source, and set |
||
Automatically indexed metadata |
Examples of auto-populated default or standard source fields (no user-defined metadata required):
The |
||
Extracted but not indexed metadata |
The source automatically extracts the |
||
Custom metadata extraction |
Available using the following source features: |
||
|
The Sitemap source crawler can execute JavaScript in a webpage to dynamically render content before indexing the page. |
||
|
If you choose to render JavaScript content, you can also specify whether the crawler should traverse and index attached Shadow DOM content. |
||
|
Exclude irrelevant sections in pages and extract metadata. |
||
|
Available at an extra charge. Contact Coveo Sales to add this feature to your Coveo organization license. |
||
Limitations
-
The last-modification attribute must specify the modification time in W3C DateTime format, that is,
YYYY-MM-DDThh:mm:ss. Moreover, unless you specify a time zone, you must express the modification time in Coordinated Universal Time (UTC). -
Multi-factor authentication (MFA) and CAPTCHA aren’t supported.
-
The Sitemap source crawler can handle up to 200 cookies for the same domain, and a total of 3000 cookies. If the crawled sites add more cookies than supported, the crawler will drop older cookies, which can cause issues (for example, if a dropped cookie is required for authentication).
-
Indexing page permissions isn’t supported.
-
The Sitemap source doesn’t support
robots.txtfile directives or<meta name="robots">tags. -
The Coveo indexing pipeline can handle web pages up to 512 MB only. Larger pages are indexed by reference (that is, their content is ignored by the Coveo crawler, and only their metadata and path are searchable). Therefore, no search result Quick view is available for these larger items.
-
JavaScript usage and limitations:
-
The Execute JavaScript on pages and Add time for the crawler to wait before considering a page as fully rendered settings only pertain to webpage content retrieval for indexing. When authenticating, the Sitemap crawler applies the Loading delay or the custom login sequence wait delay values.
-
JavaScript-rendered sitemaps are supported provided that the
Content-Typeof the targeted sitemap file isapplication/xhtml+xmlortext/html. -
Content in pop-up windows and elements that require interaction aren’t indexed.
-
When the Execute JavaScript on pages option is enabled, the source doesn’t support the
UseProxyparameter.
-
-
The
UseProxyparameter can’t be used in combination with Form authentication.
Leading practices
-
Make sure you have the right to crawl public content if you don’t own the website. Crawling sites that you don’t own nor have the right to crawl could create reachability issues.
Some sites use infrastructure components such as CDN/Caching providers (for example, Akamai, Cloudflare, and Varnish) that can affect Coveo’s ability to retrieve content. If you’re unfamiliar with these mechanisms, learn about them before you configure your source. For example, a CDN/Caching provider can detect the Coveo crawler and block it from further crawling.
-
Always try authenticating without a custom login sequence first. You should only start working on a custom login sequence when you’re sure your form authentication details (that is, login address, user credentials, confirmation method) are accurate and that the standard form authentication process doesn’t work.
-
It’s best to create or edit your source in your sandbox organization first. Once you have confirmed that it indexes the desired content, you can copy your source configuration to your production organization, either with a snapshot or manually.
See About non-production organizations for more information and best practices regarding sandbox organizations.
-
Though it’s possible to index multiple domains by configuring the source outside the main user interface, doing so is a bad practice. Always create one source per domain. This helps:
-
Prevent the crawler from using your source authentication credentials on an external site.
-
Reduce the number and complexity of crawling and scraping rules.
-
Optimize source configurations for each site.
-
Avoid having a rebuild/rescan issue on one site cause the deletion of indexed items associated with the other sites.
-
-
The number of items that a source processes per hour (crawling speed) depends on various factors, such as network bandwidth and source configuration. See About crawling speed for information on what can impact crawling speed, as well as possible solutions.
-
Break down large sitemap files into multiple sitemap files.
-
Group your source and the other implementation resources together in a project. See Manage projects.
Prerequisites
Ensure that your license allows you to create this source and that your organization hasn’t reached its source quota. You can review your quotas on the License & Usage (platform-ca | platform-eu | platform-au) page, along with your usage.
Add a Sitemap source
Follow these steps to add a Sitemap source using the desired content retrieval method:
-
Make sure that your organization meets the prerequisites before adding this source.
-
On the Sources (platform-ca | platform-eu | platform-au) page, click Add source.
-
In the Add a source of content panel, select the Cloud (
 ) or Crawling Module (
 ) tab, depending on your content retrieval context.
With the latter, you must install the Crawling Module to make your source operational.
) tab, depending on your content retrieval context.
With the latter, you must install the Crawling Module to make your source operational.
-
In the Add a new Sitemap source / Add a new Crawling Module Sitemap source panel, fill in the following fields.
Name: Use a short and descriptive name, using only letters, numbers, hyphens (-), and underscores (_). The source name can’t be modified once it’s saved.
Sitemap URLs: Enter the direct URL of your sitemap file, not the website address. Otherwise, the source can interpret the address as an HTML sitemap page and crawl the links it contains.
Examples of sitemap URLs-
Public website sitemap:
http://myorgwebsite.com/sitemap.xml -
Public website sitemap compressed with GZIP:
http://myorgwebsite.com/sitemap.xml.gz
 Notes
Notes-
If the sitemap URL is an HTML page that uses JavaScript to generate a sitemap or redirect to a sitemap or sitemap index, enable JavaScript execution on pages in the source’s advanced settings.
-
The
ParseSitemapInStrictModeJSON parameter dictates the extent of validation the Sitemap source applies on sitemap and sitemap index files, and on their referenced URLs. -
The Sitemap source only crawls pages listed in a sitemap file. It doesn’t crawl links in the listed web pages themselves.
Crawling Module: If you’re creating a Crawling Module Sitemap source, select the installed Crawling Module instance.
Project: Specify the projects you want to associate your source with.
NoteAfter source creation, you can update your Coveo project selection under the Identification subtab.
-
-
Click Next.
-
Select who has permission to access the content through the search interface and click Add source.
NoteThis information is editable later in the Content security tab.
-
Configure your source.
|
|
Note
You can save your source settings at any time by clicking Save. |
"Configuration" tab
The Configuration tab lets you manage the crawling rules, web scraping configurations, advanced settings, and authentication methods of your source. These configuration groups are presented in subtabs.
"Crawling rules" subtab
The Crawling rules subtab lets you define the specific pages to index.
Sitemap URLs
Enter the direct URL of your sitemap file, not the website address. Otherwise, the source can interpret the address as an HTML sitemap page and crawl the links it contains.
-
Public website sitemap:
http://myorgwebsite.com/sitemap.xml -
Public website sitemap compressed with GZIP:
http://myorgwebsite.com/sitemap.xml.gz
|
|
Notes
|
Exclusions and inclusions
Add exclusion and inclusion rules to crawl only specific items based on their URL.

The following diagram illustrates how the Sitemap crawler applies the exclusion and inclusion rules. This flow applies to all pages, including the sitemap URLs. You must therefore pay attention to not filter out your sitemap URLs.

|
|
About the "Include all non-excluded pages" option

The Include all non-excluded pages option automatically adds an "include all" inclusion rule in the background.
This ensures that all sitemap URLs meet the |
You can use any of the six types of rules:
-
is and a URL that includes the protocol. For example,
https://myfood.com/. -
contains and a string found in the URL. For example,
recipes. -
begins with and a string found at the beginning of the URL and which includes the protocol. For example,
https://myfood. -
ends with and a string found at the end of the URL. For example,
.pdf. -
matches wildcard rule and a wildcard expression that matches the whole URL. For example,
https://myfood.com/recipes*. -
matches regex rule and a regex rule that matches the whole URL. For example,
^.*(company-(dev|staging)).*html.?$.
When using regex rules, make sure they match the desired URLs with a testing tool such as Regex101.
"Web scraping" subtab
The Web scraping subtab lists and lets you manage web scraping configurations for your source.
When the crawler is about to index a page, it checks whether it must apply web scraping configurations that have been defined. The crawler considers the Pages to target rules of each of your web scraping configurations, starting with the configuration at the top of your list. The crawler will either apply the first matching configuration or all matching configurations.
Indexing irrelevant page sections and not extracting custom metadata reduces the quality of search results. With this in mind, all new Sitemap sources are created with a default web scraping configuration that excludes typical repetitive elements found in web pages that shouldn’t be indexed.

Existing Sitemap sources without a web scraping configuration prompt you to add the default configuration when you access the Web scraping subtab.

|
|
When no web scraping configuration is defined:
|
The Sitemap source features two web scraping configuration management modes: UI-assisted mode and Edit with JSON mode.
UI-assisted mode
You can add (+), edit (![]() ), and delete (
), and delete (![]() ) one web scraping configuration at a time with a user interface that makes many technical aspects transparent.
UI-assisted mode is easier to use and more mistake-proof than Edit with JSON mode.
) one web scraping configuration at a time with a user interface that makes many technical aspects transparent.
UI-assisted mode is easier to use and more mistake-proof than Edit with JSON mode.
This is now the recommended mode for all web scraping configurations.
When you add or edit a web scraping configuration using UI-assisted mode, the Add/Edit a web scraping configuration panel is displayed. See Configurations in UI-assisted mode for more details.
Edit with JSON mode
The Edit with JSON button gives access to the aggregated web scraping JSON configuration of the source. Adding, editing, and deleting configurations directly in the JSON requires more technical skills than using UI-assisted mode.
When you add or edit a web scraping configuration in Edit with JSON mode, the Edit a web scraping JSON configuration panel is displayed. See Configurations in Edit with JSON mode for more details.
Single-match vs multi-match
The Sitemap source can apply web scraping configurations in two ways: single-match or multi-match.
In single-match mode, the crawler applies only the first matching web scraping configuration. In multi-match mode, the crawler applies all matching web scraping configurations.
The animation below demonstrates the application of three web scraping configurations on a culinary website featuring news articles and recipe pages, in single-match mode (left) and multi-match mode (right).

Sitemap sources created before mid-December 2023 were created in single-match mode. All new Sitemap sources are created in multi-match mode.
Coveo converted existing single-match sources containing zero or one web scraping configuration to multi-match mode. We recommend you convert any remaining single-match Sitemap source to multi-match mode. If a Sitemap source is currently in single-match mode, the Web scraping subtab displays a banner prompting you to convert to multi-match mode.

To convert a source to multi-match mode
-
In the Web scraping subtab, click Switch to multi-match mode.
-
Confirm you want to convert the source to multi-match mode. A green You’re currently in multi-match mode banner will then appear.
-
Click Save.
Once your source is fully converted, the Web scraping subtab no longer shows the green banner and the subtab description reflects the multi-match mode behavior.

"Advanced settings" subtab
The Advanced settings subtab lets you customize the Coveo crawler behavior. All advanced settings have default values, which are adequate in most use cases.
Execute JavaScript on pages
Only enable this option when any of the following are true, as it can significantly increase the time needed to crawl pages:
-
The website content you want to consider for indexing is dynamically rendered by JavaScript.
-
A sitemap URL you specified is an HTML page that uses JavaScript to generate or redirect to a sitemap or sitemap index file.
If you enable Execute JavaScript on pages, you’ll have the following options:
-
Add time for the crawler to wait before considering a page as fully rendered: The default value of this setting is
0, which means that the crawler doesn’t wait after the page is loaded to retrieve its content. If the JavaScript takes longer to execute than normal or makes asynchronous calls, consider increasing this value to ensure that pages with longer rendering times are indexed with their dynamically rendered content. -
Enable Shadow DOM content retrieval: When you enable this option, the crawler builds a flattened DOM tree by combining the light DOM and the Shadow DOM. It then processes the resulting structure as it would any other web page.
NoteThe crawler adds a custom attribute to the shadow root elements in the flattened DOM, allowing these elements to be targeted using a special web scraping CSS selector.

Building the composed DOM can significantly slow down indexing. Enable this option only if the Shadow DOM contains valuable content you need to index.
User Agent string
The user agent string that the Sitemap source crawler uses to identify itself when requesting pages from your web server.
The default value is Mozilla/5.0 AppleWebKit/537.36 (KHTML, like Gecko) (compatible; Coveobot/2.0;+http://www.coveo.com/bot.html).
Extract JSON-LD metadata
If you have JSON-LD metadata in your HTML pages that you want to index, enable the Extract JSON-LD metadata option.
When enabled, JSON-LD objects in the webpage are extracted, flattened, and represented in jsonld.parent.child metadata format in your Coveo organization.
Given the following JSON-LD script tag in a webpage:
<script id="jsonld" type="application/ld+json">
   {
      "@context": "https://schema.org",
      "@type": "NewsArticle",
      "url": "http://www.bbc.com/news/world-us-canada-39324587",
      "publisher": {
          "@type": "Organization",
          "name": "BBC News",
          "logo": "http://www.bbc.co.uk/news/special/2015/newsspec_10857/bbc_news_logo.png?cb=1"
      },
      "headline": "Canada Strikes Gold in Olympic Hockey Final"
   }
</script>
On an indexing action, the Sitemap connector would extract BBC News as the value for the jsonld.publisher.name metadata.
To index this metadata, you would therefore need to use %[jsonld.publisher.name] as the mapping rule for your field.
Time the crawler waits between requests to your server
Indicate the number of milliseconds between consecutive HTTP requests to the website server. The default value is 1000 milliseconds, which represents a crawling rate of one page per second.
"Authentication" subtab
The Authentication settings, used by the source crawler, emulate the behavior of a user authenticating to access restricted website content. If authentication is required, select the authentication type your website uses, whether Basic authentication or Form authentication. Then, provide the corresponding login details.
|
|
Whether you use Basic or Form authentication, limit your source crawling scope to one domain that you own. This reduces the risk of exposing your authentication credentials. |
|
|
Note
Manual form authentication is now only available on legacy sources. We recommend you migrate existing Manual form authentication sources to Form authentication. |
Basic authentication
When selecting Basic authentication, enter the credentials of an account on the website you’re making searchable. See Source credentials leading practices.
|
|
When Execute JavaScript on pages is enabled on the source, basic authentication significantly impacts indexing performance. |
If your sitemap contains a link to a page of a different domain or subdomain that also requires basic authentication, the Sitemap source will provide the credentials you entered when challenged.
|
|
To prevent exposing your credentials, provide username and password information only when the site uses a communication protocol secured with TLS or SSL (HTTPS). You are responsible for ensuring that your Sitemap links requiring basic authentication credentials use HTTPS for increased security. The basic authentication credentials you enter will be provided, regardless of whether the link requiring these credentials uses HTTP or HTTPS. |
Form authentication
You can choose between two form authentication workflows:
Force authentication disabled (recommended)
With Force authentication disabled, the workflow typically goes as follows:
-
Coveo’s crawler requests a protected page.
-
The web server redirects the crawler to the Login page address.
-
Using the configured Validation method, the crawler determines it’s not authenticated. This automatically triggers the next step.
-
The crawler performs a standard login sequence using the provided Login details, or the Custom login sequence if one is configured.
-
After successful authentication, the web server responds by redirecting back to the requested protected page and returning cookies.
-
The crawler follows the server redirect to get the protected page and indexes that page.
-
The crawler requests the other pages using the cookies.
This is the default and recommended workflow as it emulates human behavior the best and ensures crawler re-authentication, when needed.
Force authentication enabled
With Force authentication enabled, the workflow typically goes as follows:
-
The crawler performs a standard login sequence using the provided Login details, or the Custom login sequence if one is configured.
-
After successful authentication, the web server responds with cookies that the crawler will use to request other pages.
-
The crawler requests the first URL from the web server using the cookies and indexes that page.
-
The crawler requests other pages using the cookies.
If the crawler loses authentication at some point (for example, if a cookie expires), it has no way of knowing it must re-authenticate unless you have a proper authentication status validation method. As a result, you may notice at some point that your source has indexed some, but not all, protected pages.
Only use Force authentication when no reliable authentication status validation method can be configured.
|
|
Note
The crawler can interact with Shadow DOM elements in your login pages. If this is required, make sure the form authentication loading delay allows the Shadow DOM time to load before the crawler begins to interact with the page. |
Username and password
Enter the credentials required to access the secured content. See Source credentials leading practices.
Login page address
Enter the URL of the website login page where the username and password are to be used.
Loading delay
Enter the maximum time the crawler should allow for JavaScript to execute and go through the login sequence before timing out.
Validation method
The crawler uses the validation method after requesting a page from the web server to know if it’s authenticated or not. When the validation method reveals that the crawler isn’t authenticated, the crawler immediately tries to re-authenticate.
To configure the validation method
-
In the dropdown menu, select your preferred authentication status validation method.
-
In the Value(s) field, specify the corresponding URL, regex or text.
-
For Cookie not found (recommended):
Enter the name of the cookie returned by the server after successful authentication. If this cookie isn’t found, the crawler will immediately authenticate (or re-authenticate).
ExampleASP.NET_SessionId -
For Redirection to URL (recommended):
Enter the URL where users trying to access protected content on the website are redirected to when they’re not authenticated. If the crawler is redirected to this URL, it will immediately authenticate (or re-authenticate).
Examplehttps://mycompany.com/login/failed.html -
For Text not found in page [1]:
Enter the text that appears on the page after successful authentication. If this text isn’t found on the page, the crawler will immediately authenticate (or re-authenticate).
ExampleWhen a user successfully logs in, the page shows a "Hello, <USERNAME>!" greeting text. If the login username you specified was
jsmith@mycompany.com, the text to enter would be:Hello, jsmith@mycompany.com!ExampleLog out -
For Text found in page [1]:
Enter the text that appears on the page when a user isn’t authenticated. If this text is found on the page, the crawler will immediately authenticate (or re-authenticate).
Examples-
An error has occurred. -
Your username or password is invalid.
-
-
For URL matches regex [1]:
Enter a regex rule that matches the URL where users trying to access protected content are redirected to when they’re not authenticated. If the crawler is redirected to a URL that matches this regex, it will immediately authenticate (or re-authenticate).
Example.+Account\/Login.* -
For URL doesn’t match regex [1]:
Enter a regex rule that matches the URL where users trying to access protected content are redirected to after successful authentication. If the crawler isn’t redirected to a URL that matches this regex, it will immediately authenticate (or re-authenticate).
-
Force authentication
Select this option if you want Coveo’s first request to be for authentication, regardless of whether it is actually required.
|
|
You should only force authentication if you have no reliable authentication status validation method. |
Custom login sequence
The default login sequence for Web and Sitemap sources supports various third-party login pages, such as OneLogin, Google, Salesforce, and Microsoft.
The default login sequence also tries to detect and log in to first-party login forms.
The login process uses the first <form> element that meets all requirements.
Form requirements for the default login sequence
The form must contain the following elements:
User identity field: A visible <input> element whose id or name attribute value is either user, email, login, id, or name (case-insensitive).
Password field: A visible <input> element whose type attribute value is password (case-insensitive).
Submit element: A visible form submit element. The source looks for the following element types, in this order:
-
An
<input>element whosetypeattribute value issubmitorbutton. -
A
<button>element whosetypeattribute value issubmit. -
An
<a>element whoseidattribute value contains the word "submit" (case-insensitive).
The default login sequence uses the first element of each type in the form.
If the web page doesn’t meet the requirements for the default login sequence, or if your form requires specific actions during the login process, you must configure a custom login sequence.
|
|
Ensure that the default source login sequence fails before you configure a custom login sequence. |
Post-login sequence
The Sitemap source also supports post-login sequences to handle actions that need to be performed after logging in to a website.
Post-login sequences are configured using the postLoginSequence section of the FormAuthenticationConfiguration parameter in the source JSON configuration.
Example
After logging into a Salesforce site that you want to crawl using a Sitemap source, you encounter the following Salesforce platform infrastructure popup:
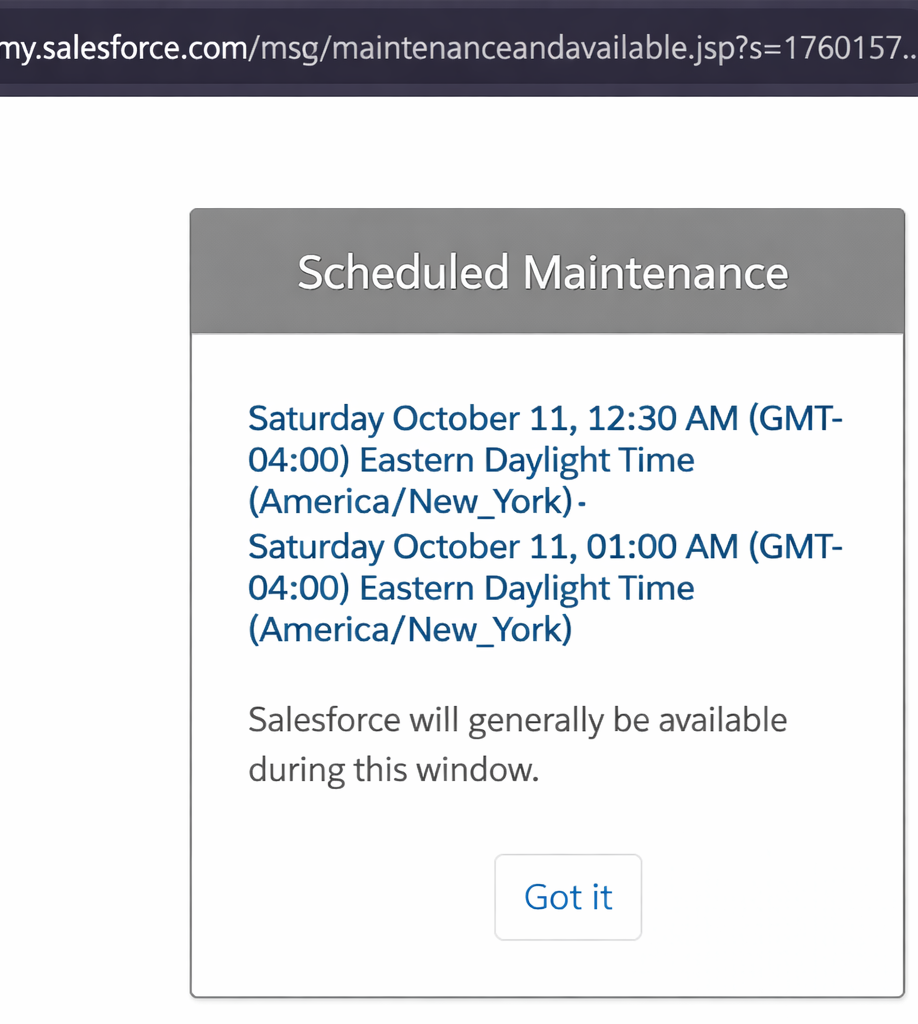
You inspect the button using your browser developer tools and see the following HTML markup:
<button
  type="button"
  class="maintenance-confirm-button"
  onclick="window.history.back();">
  Got it
</button>
To emulate a user clicking Got it, you configure your source as follows:
-
On the Sources (platform-ca | platform-eu | platform-au) page, click your source, and then click More > Edit configuration with JSON in the Action bar.
-
In the Edit configuration with JSON panel, use the search tool (
 ) to locate the
 FormAuthenticationConfigurationparameter. Itsvalueobject currently looks as follows:"value": "{\"authenticationFailed\":{\"method\":\"CookieNotSet\",.....\"customLoginSequence\":{}}" -
Remove the
}"at the end of thevalueobject so that you get:"value": "{\"authenticationFailed\":{\"method\":\"CookieNotSet\",.....\"customLoginSequence\":{} -
Append the following JSON snippet immediately after
\"customLoginSequence\":{}to configure the post-login action:,\"postLoginSequence\":{\"name\":\"Handle maintenance page\",\"url\":\"*\",\"urlContainsValue\":\"maintenanceandavailable.jsp\",\"steps\":[{\"name\":\"Dismiss maintenance modal\",\"waitDelayInMilliseconds\":500,\"actions\":[{\"type\":\"click\",\"elementIdentifier\":{\"identifier\":\"maintenance-confirm-button\",\"type\":\"default\",\"findType\":\"classname\"}}]}]}}"Example: Final FormAuthenticationConfiguration parameter value
"FormAuthenticationConfiguration": {
    "sensitive": false,
    "value": "{\"authenticationFailed\":{\"method\":\"CookieNotSet\",\"values\":[\"sid\"]},\"inputs\":[],\"formUrl\":\"https://somedomain.my.salesforce.com/apex/RedirectPage?siteType=lwr&basePath=/sitesDemo\",\"enableJavaScript\":true,\"forceLogin\":false,\"javaScriptLoadingDelayInMilliseconds\":1000,\"customLoginSequence\":{},\"postLoginSequence\":{\"name\":\"Handle maintenance page\",\"url\":\"*\",\"urlContainsValue\":\"maintenanceandavailable.jsp\",\"steps\":[{\"name\":\"Dismiss maintenance modal\",\"waitDelayInMilliseconds\":500,\"actions\":[{\"type\":\"click\",\"elementIdentifier\":{\"identifier\":\"maintenance-confirm-button\",\"type\":\"default\",\"findType\":\"classname\"}}]}]}}"
  },
This post-login action configuration can be translated as the following instruction to the source crawler: "When a page whose URL contains
maintenanceandavailable.jspis encountered, wait 500 milliseconds, and then click the element with the class namemaintenance-confirm-button."For more details on the post-login action parameters, see Configure an action.
-
Click Save.
"Crawling Module" subtab
If your source is a Crawling Module source, and if you have more than one Crawling Module linked to this organization, select the one with which you want to pair your source. If you change the Crawling Module instance paired with your source, a successful rebuild is required for your change to apply.
"Identification" subtab
The Identification subtab contains general information about the source.
Name
The source name. It can’t be modified once it’s saved.
Project
Use the Project selector to associate your source with one or more Coveo projects.
"Items" tab
On the Items tab, you can specify how the source handles items based on their file type or content type.
File types
File types let you define how the source handles items based on their file extension or content type. For each file type, you can specify whether to index the item content and metadata, only the item metadata, or neither.
You should fine-tune the file type configurations with the objective of indexing only the content that’s relevant to your users.
Your repository contains .pdf files, but you don’t want them to appear in search results.
You click Extensions and then, for the .pdf extension, you change the Action by default and Action on error values to Ignore item.
For more details about this feature, see File type handling.
|
|
With file type handling, using the If there are some items for which you only need to index basic metadata, make sure you don’t have a web scraping rule that matches those items. This will prevent unnecessary processing and potential issues with retrieving protected page content. |
Content and images
If you want Coveo to extract text from image files or PDF files containing images, enable the appropriate option. The extracted text is processed as item data, meaning that it’s fully searchable and will appear in the item Quick view.
|
|
Note
When OCR is enabled, ensure the source’s relevant file type configurations index the item content. Indexing the item’s metadata only or ignoring the item will prevent OCR from being applied. |
See Enable optical character recognition for details on this feature.
"Content security" tab
Select who will be able to access the source items through a Coveo-powered search interface. For details on the content security options, see Content security.
"Access" tab
On the Access tab, specify whether each group (and API key, if applicable) in your Coveo organization can view or edit the current source.
For example, when creating a new source, you could decide that members of Group A can edit its configuration, while Group B can only view it.
For more information, see Custom access level.
Build the source
-
Finish adding or editing your source:
-
When you’re done editing the source and want to make your changes effective, click Add and build source/Save and rebuild source.
-
When you want to save your source configuration changes without starting a build/rebuild, such as when you know you want to make other changes soon, click Add source/Save. On the Sources (platform-ca | platform-eu | platform-au) page, click Launch build or Launch rebuild when you’re ready to make your changes effective and index your content.
-
-
On the Sources (platform-ca | platform-eu | platform-au) page, follow the progress of your source addition or modification.
-
Once the source is built or rebuilt, review its content in the Content Browser.
Index metadata
To use metadata values in search interface facets or result templates, the metadata must be mapped to fields. Coveo automatically maps only a subset of the metadata it extracts. You must map any additional metadata to fields manually.
|
|
Note
Not clear on the purpose of indexing metadata? Watch this video. |
-
On the Sources (platform-ca | platform-eu | platform-au) page, click your source, and then click More > View and map metadata in the Action bar.
-
Review the default metadata that your source is extracting from your content.
-
Map any currently not indexed metadata that you want to use in facets or result templates to fields.
-
Click the metadata and then, at the top right, click Add to index.
-
In the Apply a mapping on all item types of a source panel, select the field you want to map the metadata to, or add a new field if none of the existing fields are appropriate.
NoteFor advanced mapping configurations, like applying a mapping to a specific item type, see Manage mappings.
-
Click Apply mapping.
-
-
Return to the Sources (platform-ca | platform-eu | platform-au) page.
-
To reindex your source with your new mappings, click your source, and then click More > Rebuild in the Action bar.
-
Once the source is rebuilt, review your item field values. They should now include the values of the metadata you selected to index.
-
On the Sources (platform-ca | platform-eu | platform-au) page, click your source, and then click More > Open in Content Browser in the Action bar.
-
Select the card of the item for which you want to inspect properties, and then click Properties in the Action bar.
-
In the panel that appears, select the Fields tab.
-
-
If needed, extract and map additional metadata.
More on custom metadata extraction
To extract custom metadata, you can use the following methods:
-
Configure web scraping configurations that contain metadata extraction rules using CSS or XPath selectors.
-
Extract JSON-LD
<script>tag metadata. -
Extract
<meta>tag content using theIndexHtmlMetadataJSON parameter.
Then, rebuild and map each extracted custom metadata to a field, as you did for the default metadata.
Troubleshooting
After a rebuild, you may notice that your source isn’t indexing as expected. For example, there may be missing or extra items, or the values of some fields may not meet your requirements.
To help you troubleshoot, refer to the list of common issues and solutions when using the Sitemap source.
Required privileges
You can assign privileges to allow access to specific tools in the Coveo Administration Console. The following table indicates the privileges required to view or edit elements of the Sources (platform-ca | platform-eu | platform-au) page and associated panels. See Manage privileges and Privilege reference for more information.
|
|
Note
The Edit all privilege isn’t required to create sources. When granting privileges for the Sources domain, you can grant a group or API key the View all or Custom access level, instead of Edit all, and then select the Can create checkbox to allow users to create sources. See Can create ability dependence for more information. |
| Actions | Service | Domain | Required access level |
|---|---|---|---|
View sources, view source update schedules, and subscribe to source notifications |
Content |
Fields |
View |
Sources |
|||
Organization |
Organization |
||
Edit sources, edit source update schedules, and edit source mappings |
Organization |
Organization |
View |
Content |
Fields |
Edit |
|
Sources |
|||
View and map metadata |
Content |
Source metadata |
View |
Fields |
|||
Organization |
Organization |
||
Content |
Sources |
Edit |
Migrate from manual form authentication
If you’re using manual form authentication, you’ll see a "Manual form authentication deprecation" warning when viewing the Authentication subtab. You’ll want to migrate to form authentication. To do so, we recommend you create a duplicate of your source and configure form authentication on the duplicate. When the duplicate is configured and fully tested, you can copy its configuration to the original source.
If you’re using a sandbox organization and a snapshot-based phased rollout, the alternative is to copy your original source and related resources configurations to your sandbox using the resource snapshots feature. Once your sandbox source authentication configurations updated and fully tested, you can use a snapshot to apply your changes to your production organization source.
Though the following procedure uses the source duplicate method, steps 3 to 8 inclusively are common to both methods.
To migrate from manual form authentication to form authentication
-
On the Sources (platform-ca | platform-eu | platform-au) page, click your source, and then click More > Duplicate in the Action bar.
-
Name your duplicate.
-
Click your duplicate source, and then click Edit in the Action bar.
-
Select the Authentication subtab.
-
Select the Form authentication radio button.
The following fields will be populated automatically using your existing manual form authentication settings: Username, Password, Login page address, Validation method and Value(s), Force authentication.
-
Rebuild your duplicate source.
-
Make sure that your duplicate source contains properly indexed content. Things you should check for:
-
Your duplicate source contains the same number of items as the original source.
-
For pages that are authentication protected in your website, make sure the Quick view of the corresponding items in your duplicate source shows the content of the actual website page. If form authentication fails, the item Quick view may display the content of your form authentication login page instead of the actual website page.
-
-
If form authentication is failing, consider making the following adjustments to your duplicate source form authentication configuration:
-
Changing the Validation method and associated Value(s) to a more reliable combination.
-
Increasing the Loading delay.
-
Setting up a custom login sequence.
Contact Coveo Support if you need help.
-
-
When you’re sure the authentication configuration on your duplicate source works, apply the changes to the original source.
-
On the Sources (platform-ca | platform-eu | platform-au) page, click your duplicate source, and then click More > Edit configuration with JSON in the Action bar.
-
Copy the
FormAuthenticationConfigurationJSON object. The object looks like the following:"FormAuthenticationConfiguration": { "sensitive": false, "value": "{\"authenticationFailed\":{\"method\":\"RedirectedToUrl\",\"values\":[\"https://something.com/Account/Login\"]},\"inputs\":[], \"formUrl\":\"https://something.com/Account/Login\",\"enableJavaScript\":true,\"forceLogin\":false,\"javaScriptLoadingDelayInMilliseconds\":2000,\"customLoginSequence\":{}}" } -
On the Sources (platform-ca | platform-eu | platform-au) page, click your original source, and then click More > Edit configuration with JSON in the Action bar.
-
Replace the
FormAuthenticationConfigurationobject with the one from your duplicate source. -
Click Save.
-
What’s next?
-
If you’re using the Crawling Module to retrieve your content, consider subscribing to deactivation notifications to receive an alert when a Crawling Module component becomes obsolete and stops the content crawling process.