Custom login sequence
Custom login sequence
A custom login sequence is a configuration that lets administrators build custom form authentication processes. Web and Sitemap sources provide a user interface to help you create and edit a custom login sequence.
|
|
The standard Coveo form authentication login sequence can handle many use cases without a custom login sequence, including several authentication provider login pages (for example, OneLogin, Google, Salesforce, Microsoft). Even if the login page doesn’t match a known authentication provider, the standard Coveo form authentication often successfully detects, fills, and submits a login form. Always try authenticating without a custom login sequence first. You should only start working on a custom login sequence when you’re sure that your form authentication details are accurate and that the standard form authentication process fails. |
Add login sequence conditions and steps
The default Custom login sequence section configuration is the following:
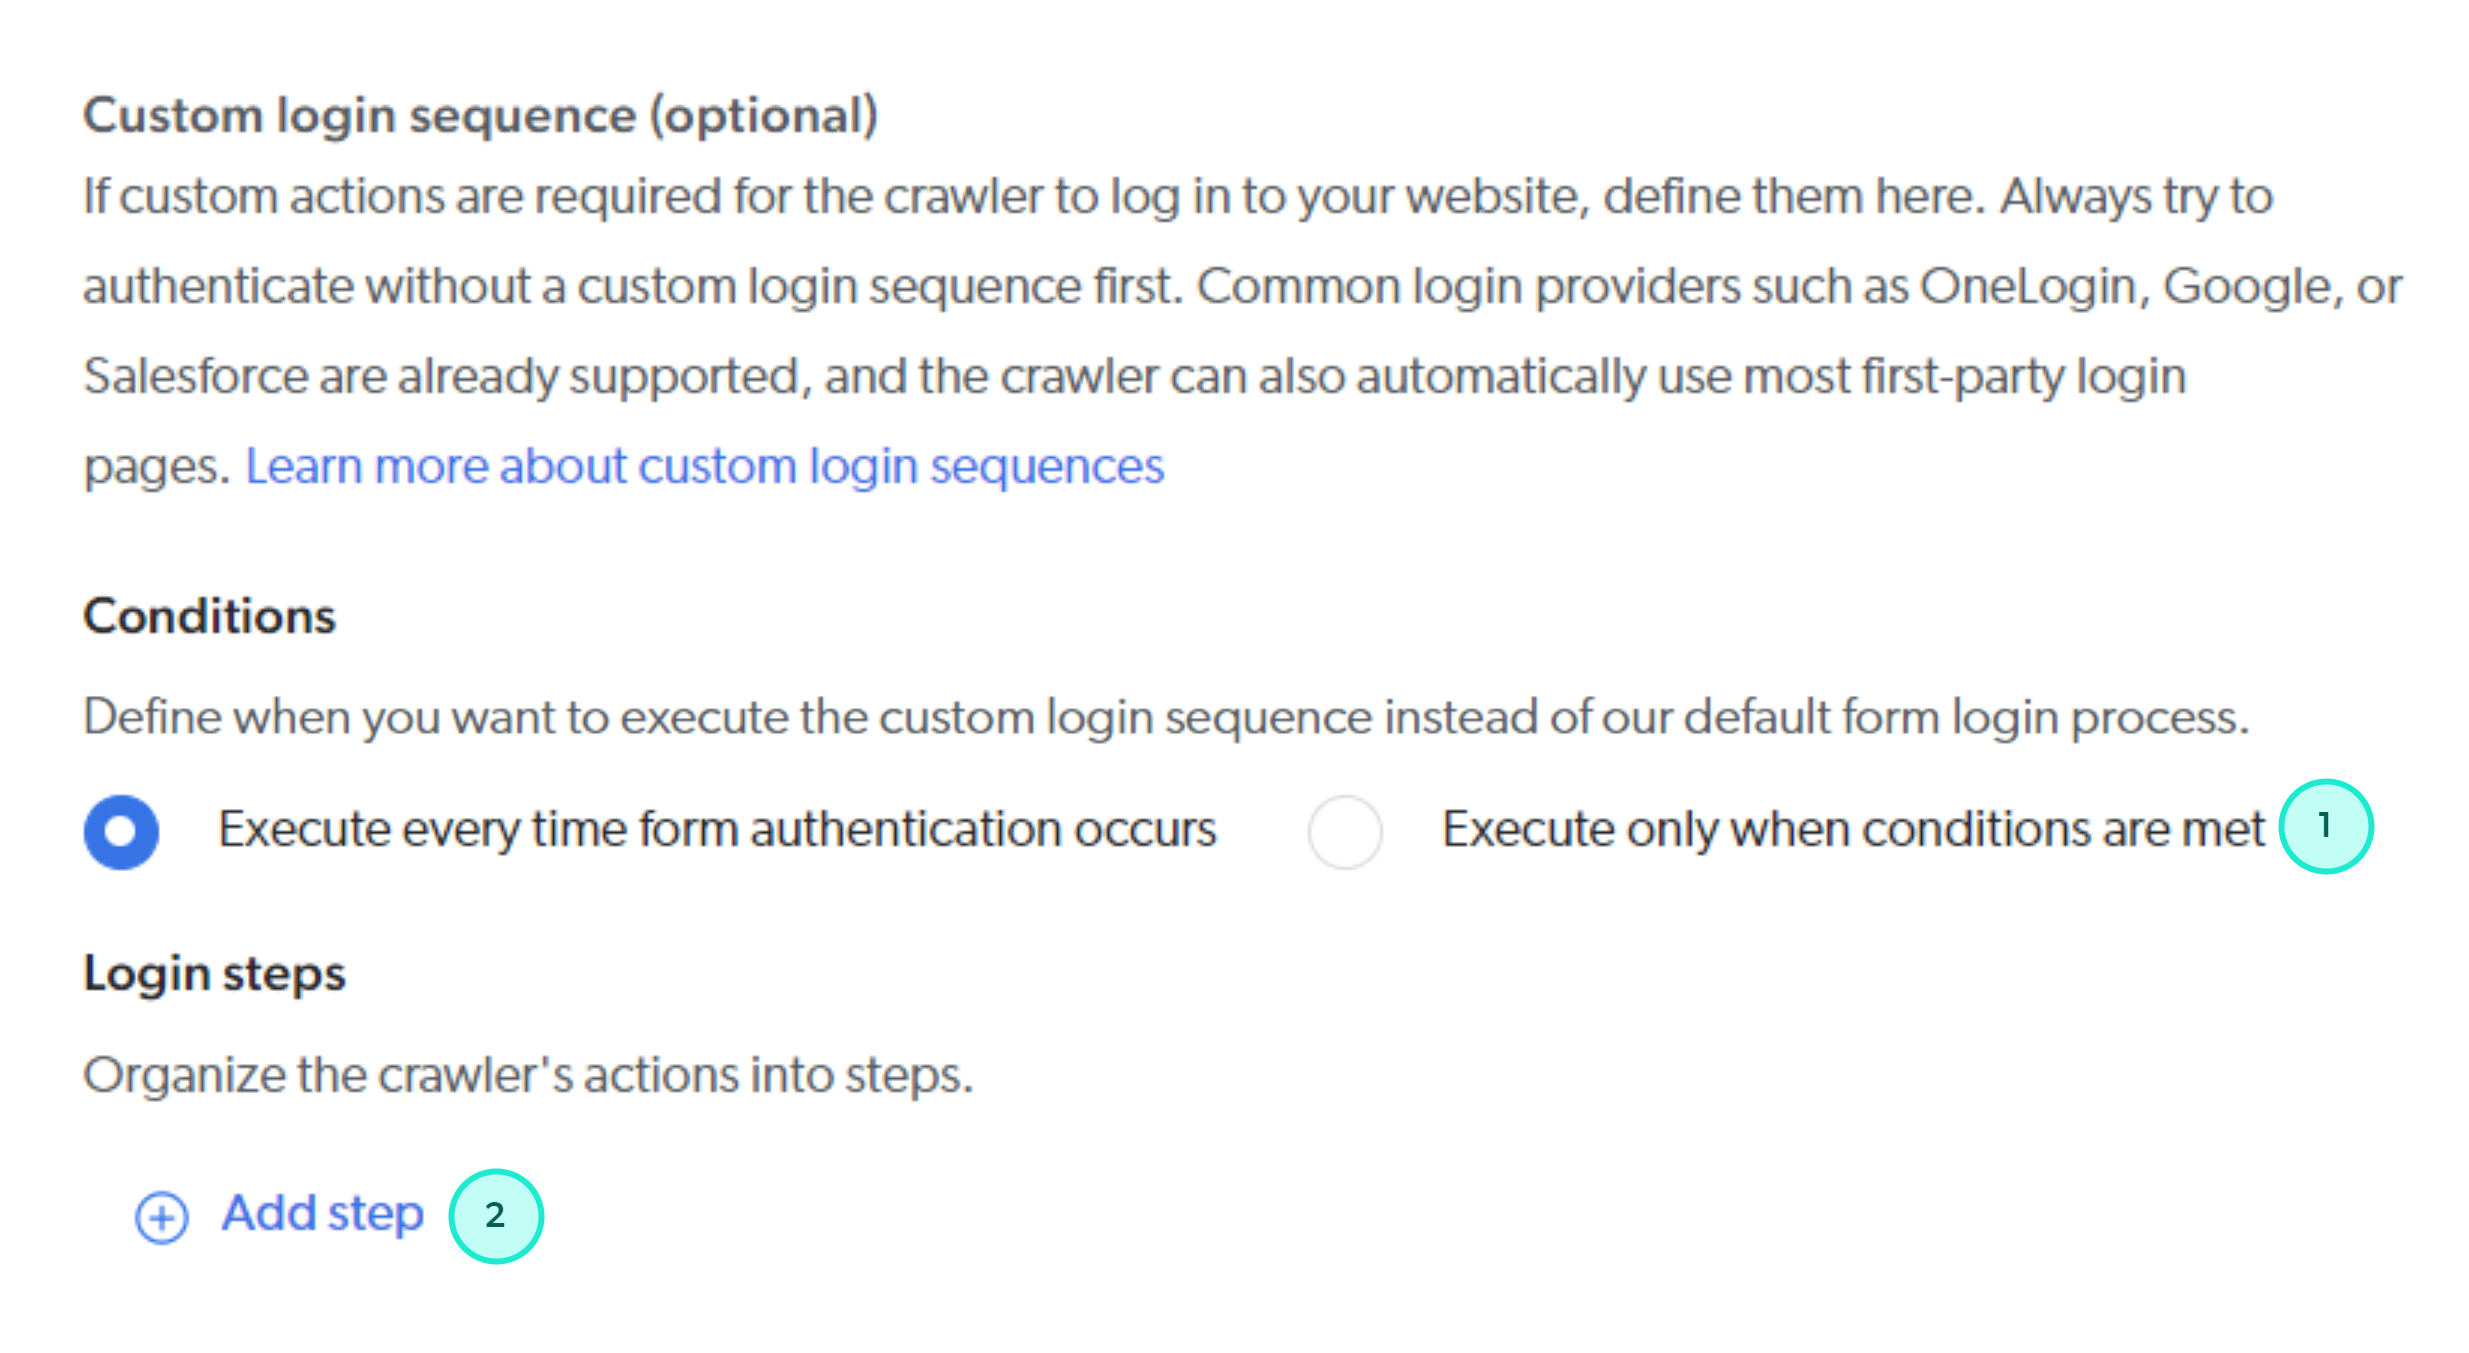
You can:
1 Add conditions that must be met for your custom login sequence to be executed. When these conditions aren’t met, the source will perform the standard Coveo form authentication process.
2 Add a step to the custom login sequence. When no steps are defined, the crawler attempts form authentication without a custom login sequence.
As you add steps, the Login steps section displays the steps you’ve added in the order in which they will be executed.
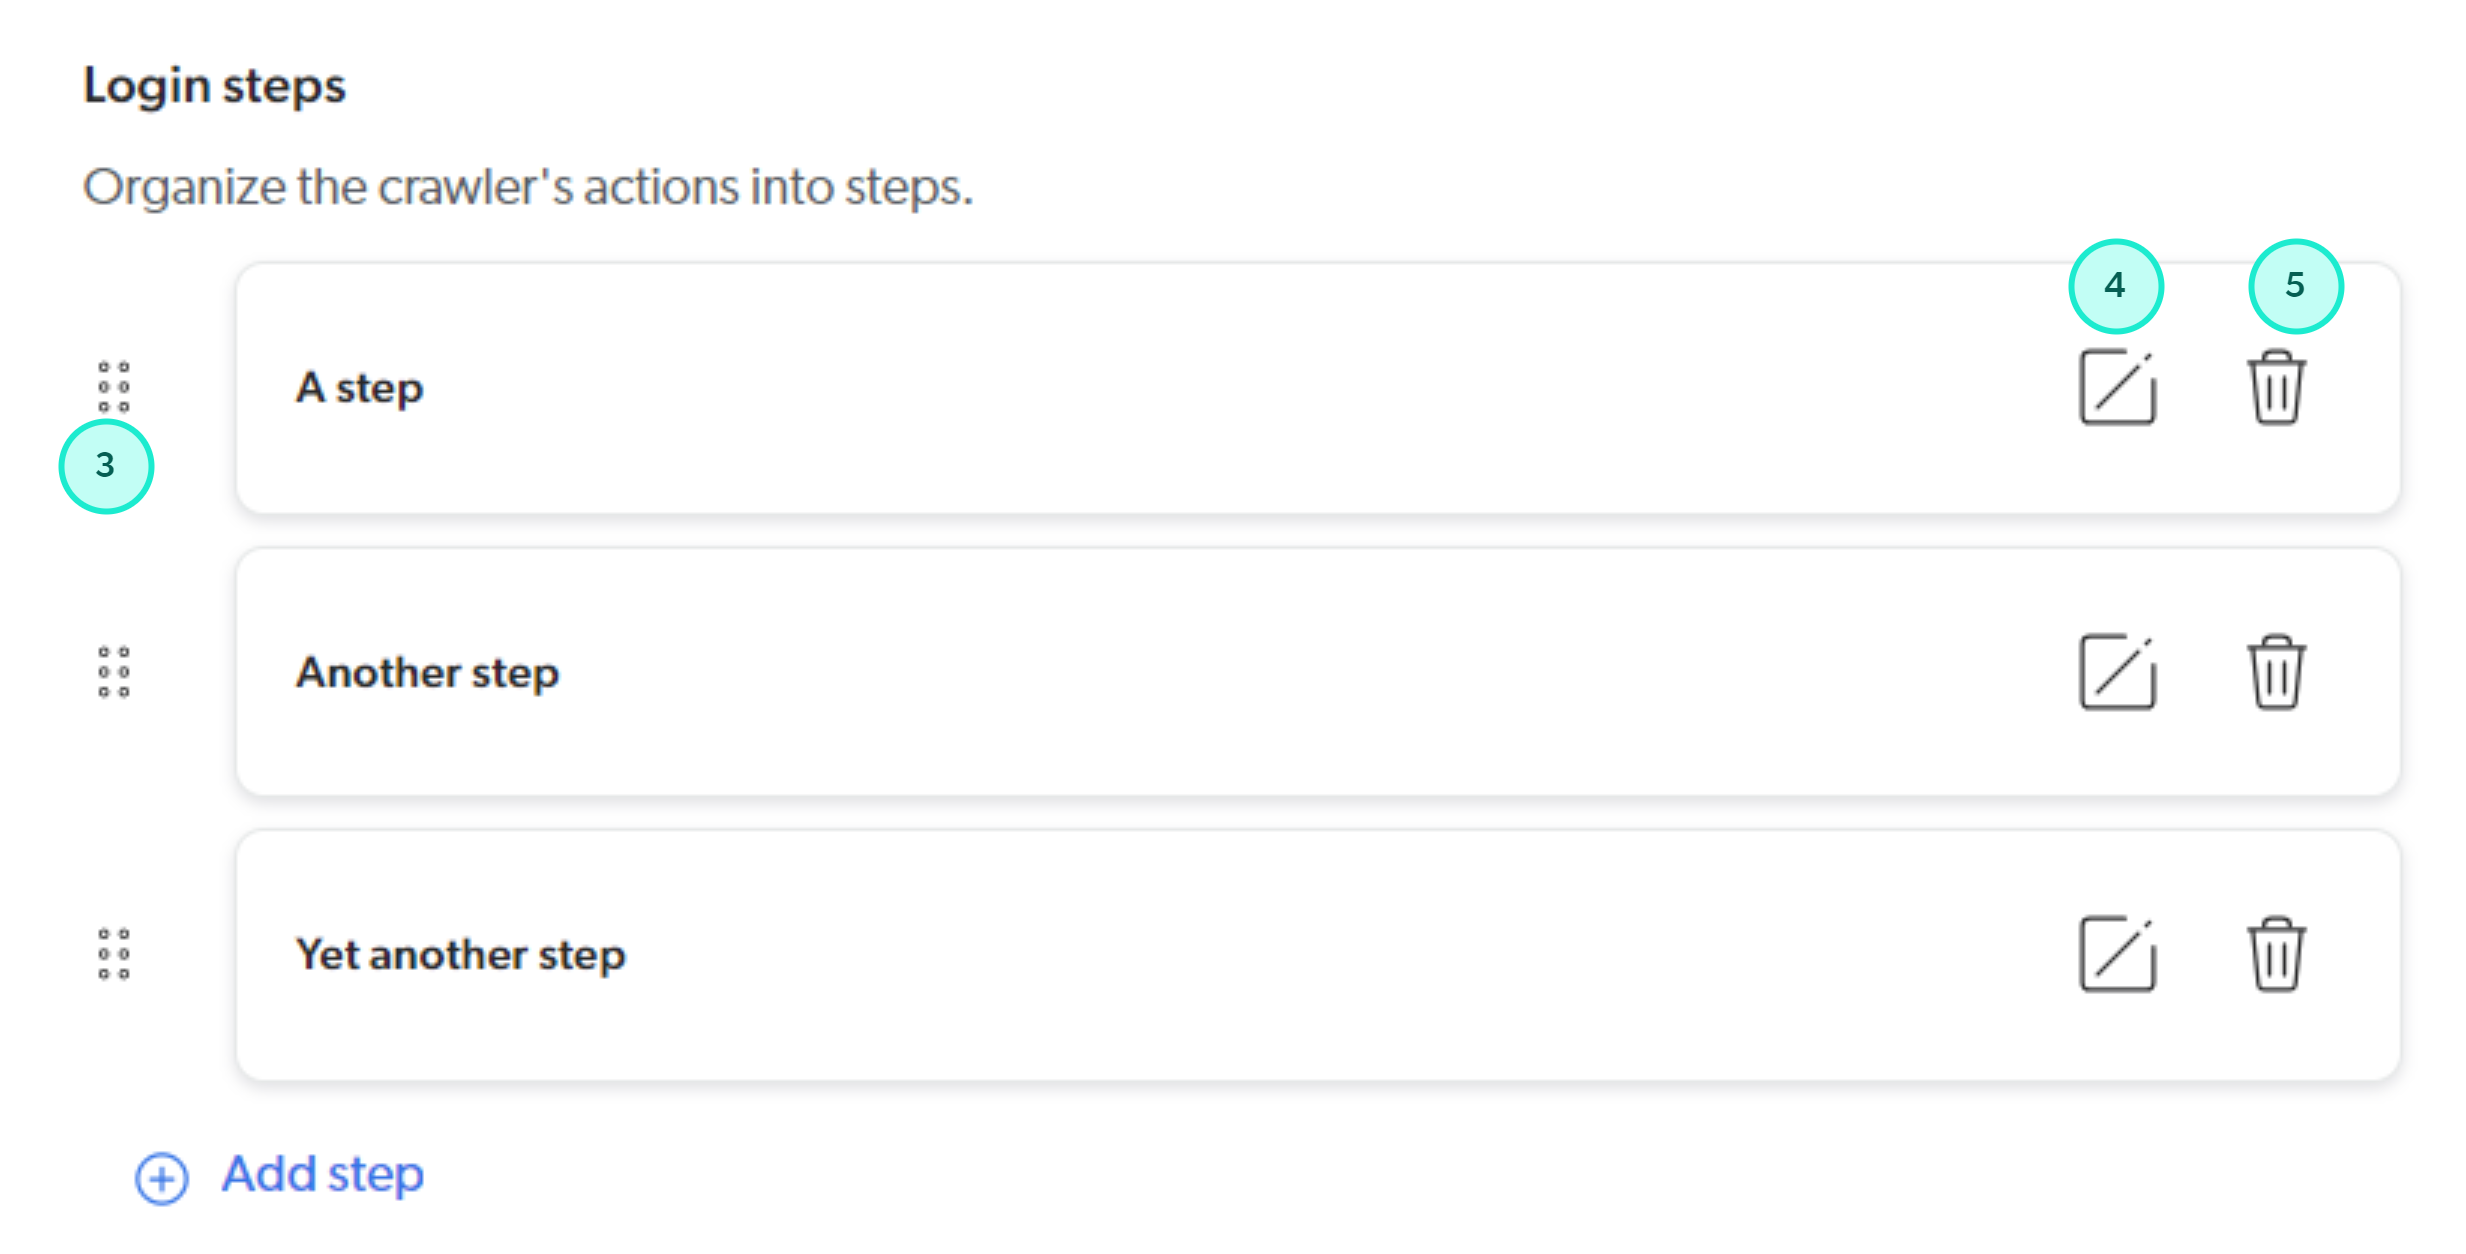
At this stage of the custom login sequence configuration process, you can also:
3 Change the order of steps in the custom login sequence by dragging them up or down.
4 Edit a step in the custom login sequence.
5 Remove a step from the custom login sequence.
Add a step
When you add a step to the login sequence, the Add a custom login sequence step panel appears with a default action configuration that remains to be completed.
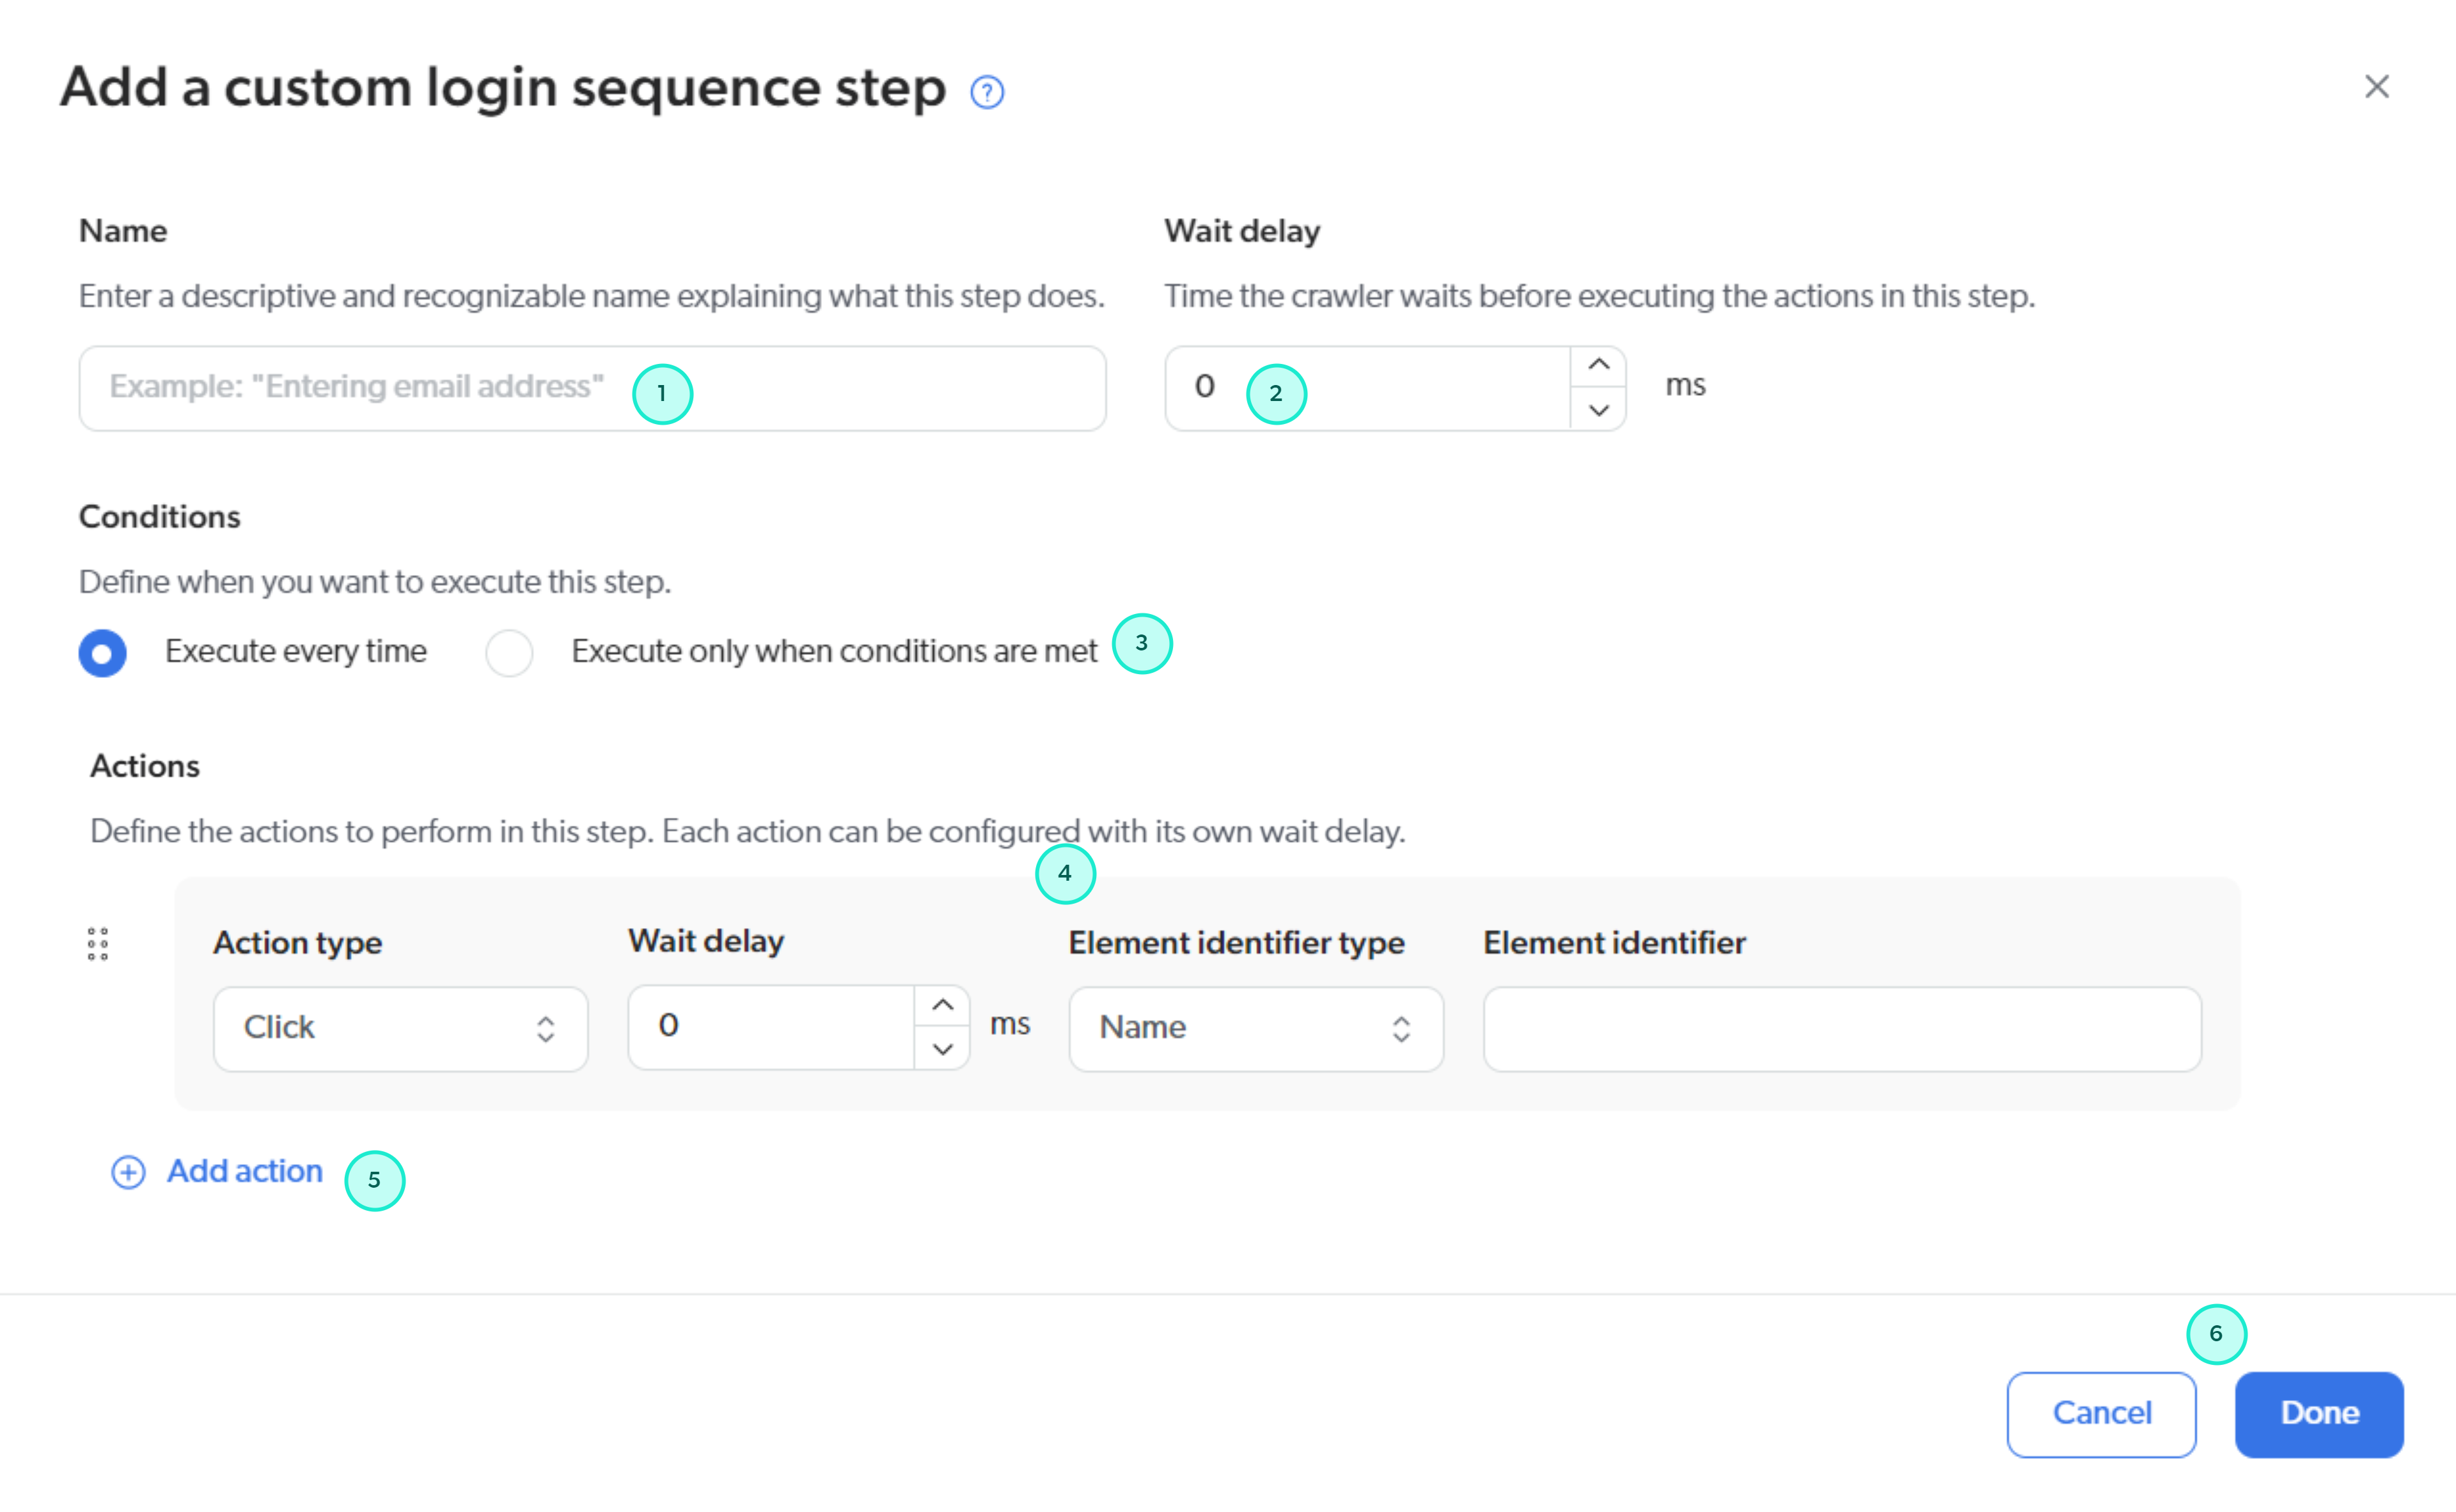
At this stage, you can:
1 Name the step.
2 Set the wait time in milliseconds before executing the step.
3 Add conditions that must be met for the step to be executed. Use step conditions to handle periodically displayed pop-up windows and visual elements (for example, a "Verify your identity" page).
4 Configure actions in the step.
5 Add an action to the step.
6 Save or cancel your step configuration changes.
Configure an action
A fully defined action configuration has between 2 and 6 parameters, depending on the action type. These parameters are:
Action type
The keyboard or pointer action to perform.
|
|
Note
With many action types, the target element must meet certain preconditions before the action is actually attempted. The source first tries to scroll into view the target element, if necessary. Then, the source ensures the element is in view, displayed, and can be interacted with, before executing the action. |
Options
-
Click: Simulates a mouse click on an element. For interactability preconditions to be met, the target element must have a height and width greater than 0. -
JavaScript click: Simulates a mouse click on an element, but it doesn’t check preconditions. -
Clear: Checks preconditions, and then clears the content of the input element. -
Type: Checks preconditions, and then types the text specified in the Value field into the target input element. When you selectUsernamein the Element type menu, the source automatically uses the username specified in the form authentication credentials as the Value. When you selectPasswordin the Element type menu, the source automatically uses the password specified in the form authentication credentials as the Value. -
Press tab: Simulates pressing theTabkey.Press tabcan often be used to set the focus on the password input element after filling out the username input element. -
Press space: Simulates pressing theSpacekey. -
Press enter: Simulates pressing theEnterkey. -
Submit form: Checks preconditions, and then performs the action of submitting the form.Leading practiceThe
Clickaction type is recommended overSubmit form. -
Press key: Simulates pressing a key on the keyboard.Leading practiceUse
Press tab,Press space, orPress enterinstead ofPress keywhen possible.
Wait delay
The time in milliseconds to wait before executing the action.
Element identifier type
The method to use to find the target HTML element.
Options
-
Name: Used to select an element based on itsnameattribute value. -
ID: Used to select an element based on itsidattribute value. -
Tag name: Used to select an element based on the tag name. -
Class name: Used to select an element based on itsclassattribute value. -
CSS selector: Used to select an element by specifying a CSS selector. -
XPath: Used to select an element by specifying an XPath expression.
Element identifier
The value to use to identify the target form element based on the selected Element identifier type.
For example, if you select ID as the Element identifier type, you must specify the id attribute value of the target form element in the Element identifier field.
Element type
The type of the form element.
Options
-
Default: UseDefaultfor all non-username, non-password elements used in the login sequence. -
Username: Used to identify the<input>element in which users enter their username or email address to authenticate with. When used in aTypeaction, the source automatically types the form authentication username in the<input>element. -
Password: Used to identify the<input>element in which users enter their password. When used in aTypeaction, the source automatically types the form authentication password in the<input>element.
Value
The text to type in the input field when the Action Type is Type.
When you select Username or Password as the Element type, the source automatically uses the credentials specified in the form authentication login details as the Value.
Manage actions
As you add actions to a step, the Actions section displays the actions you’ve added in the order in which they will be executed.

At this stage, you can:
1 Change the order of actions in the step by dragging them up or down.
2 Remove an action from the step.
Custom login sequence limitations
Custom login sequences have the following limitations:
Example 1: Custom login sequence for a Web source using the Microsoft Online login page
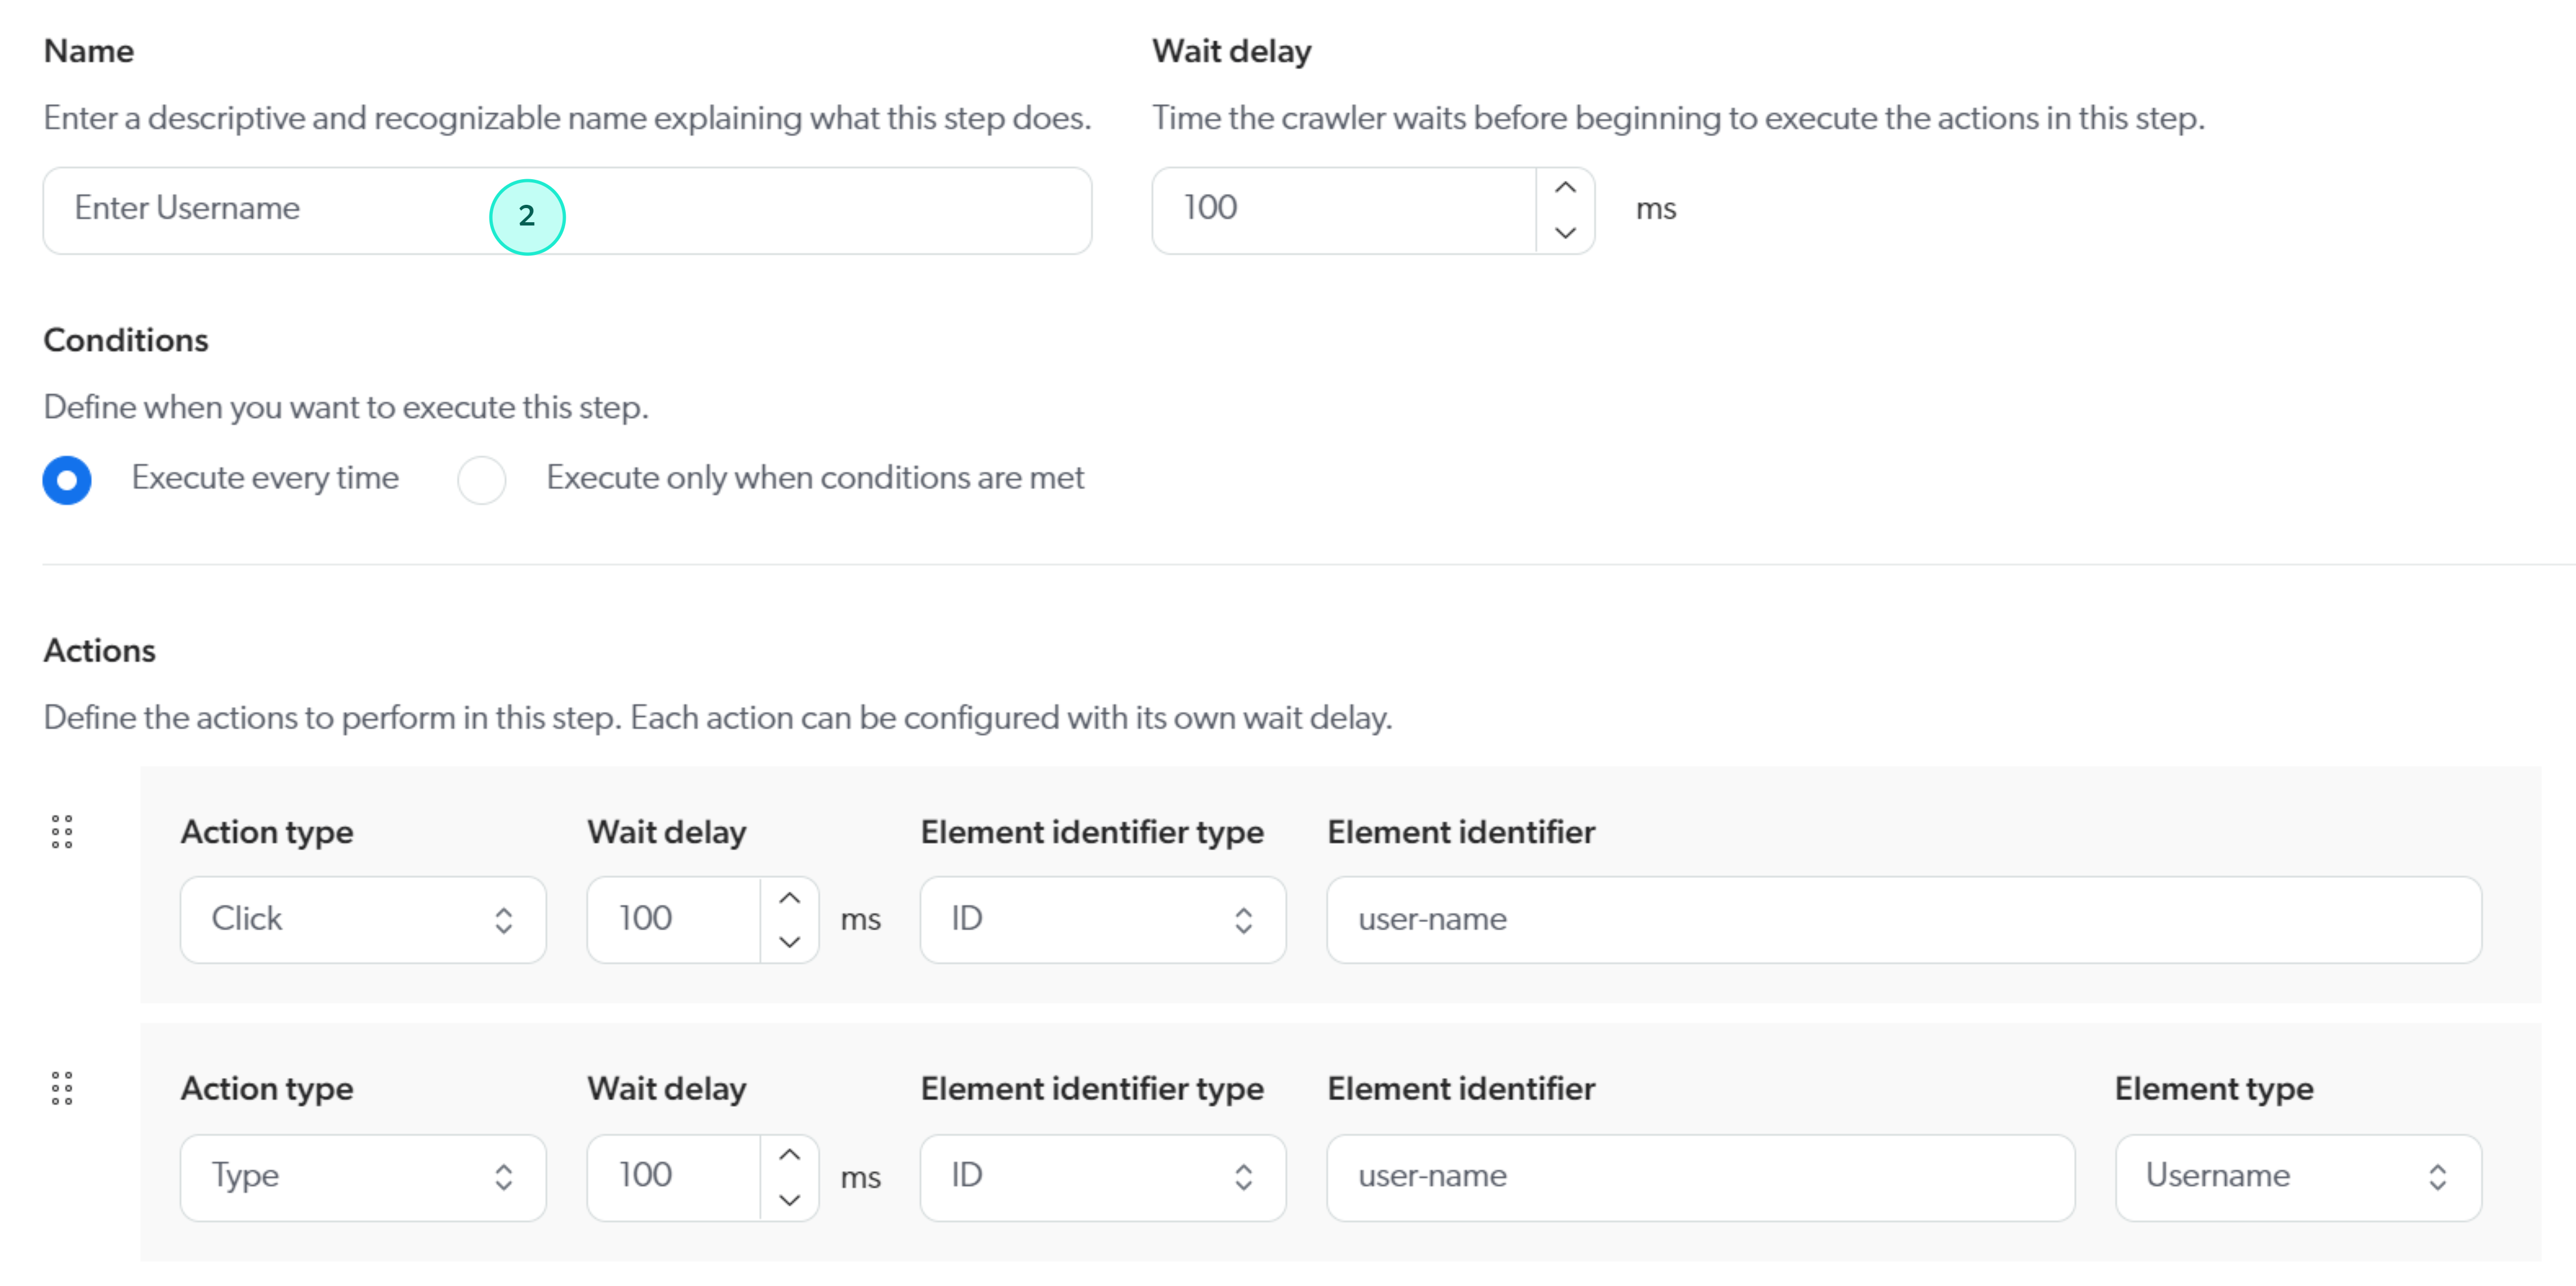
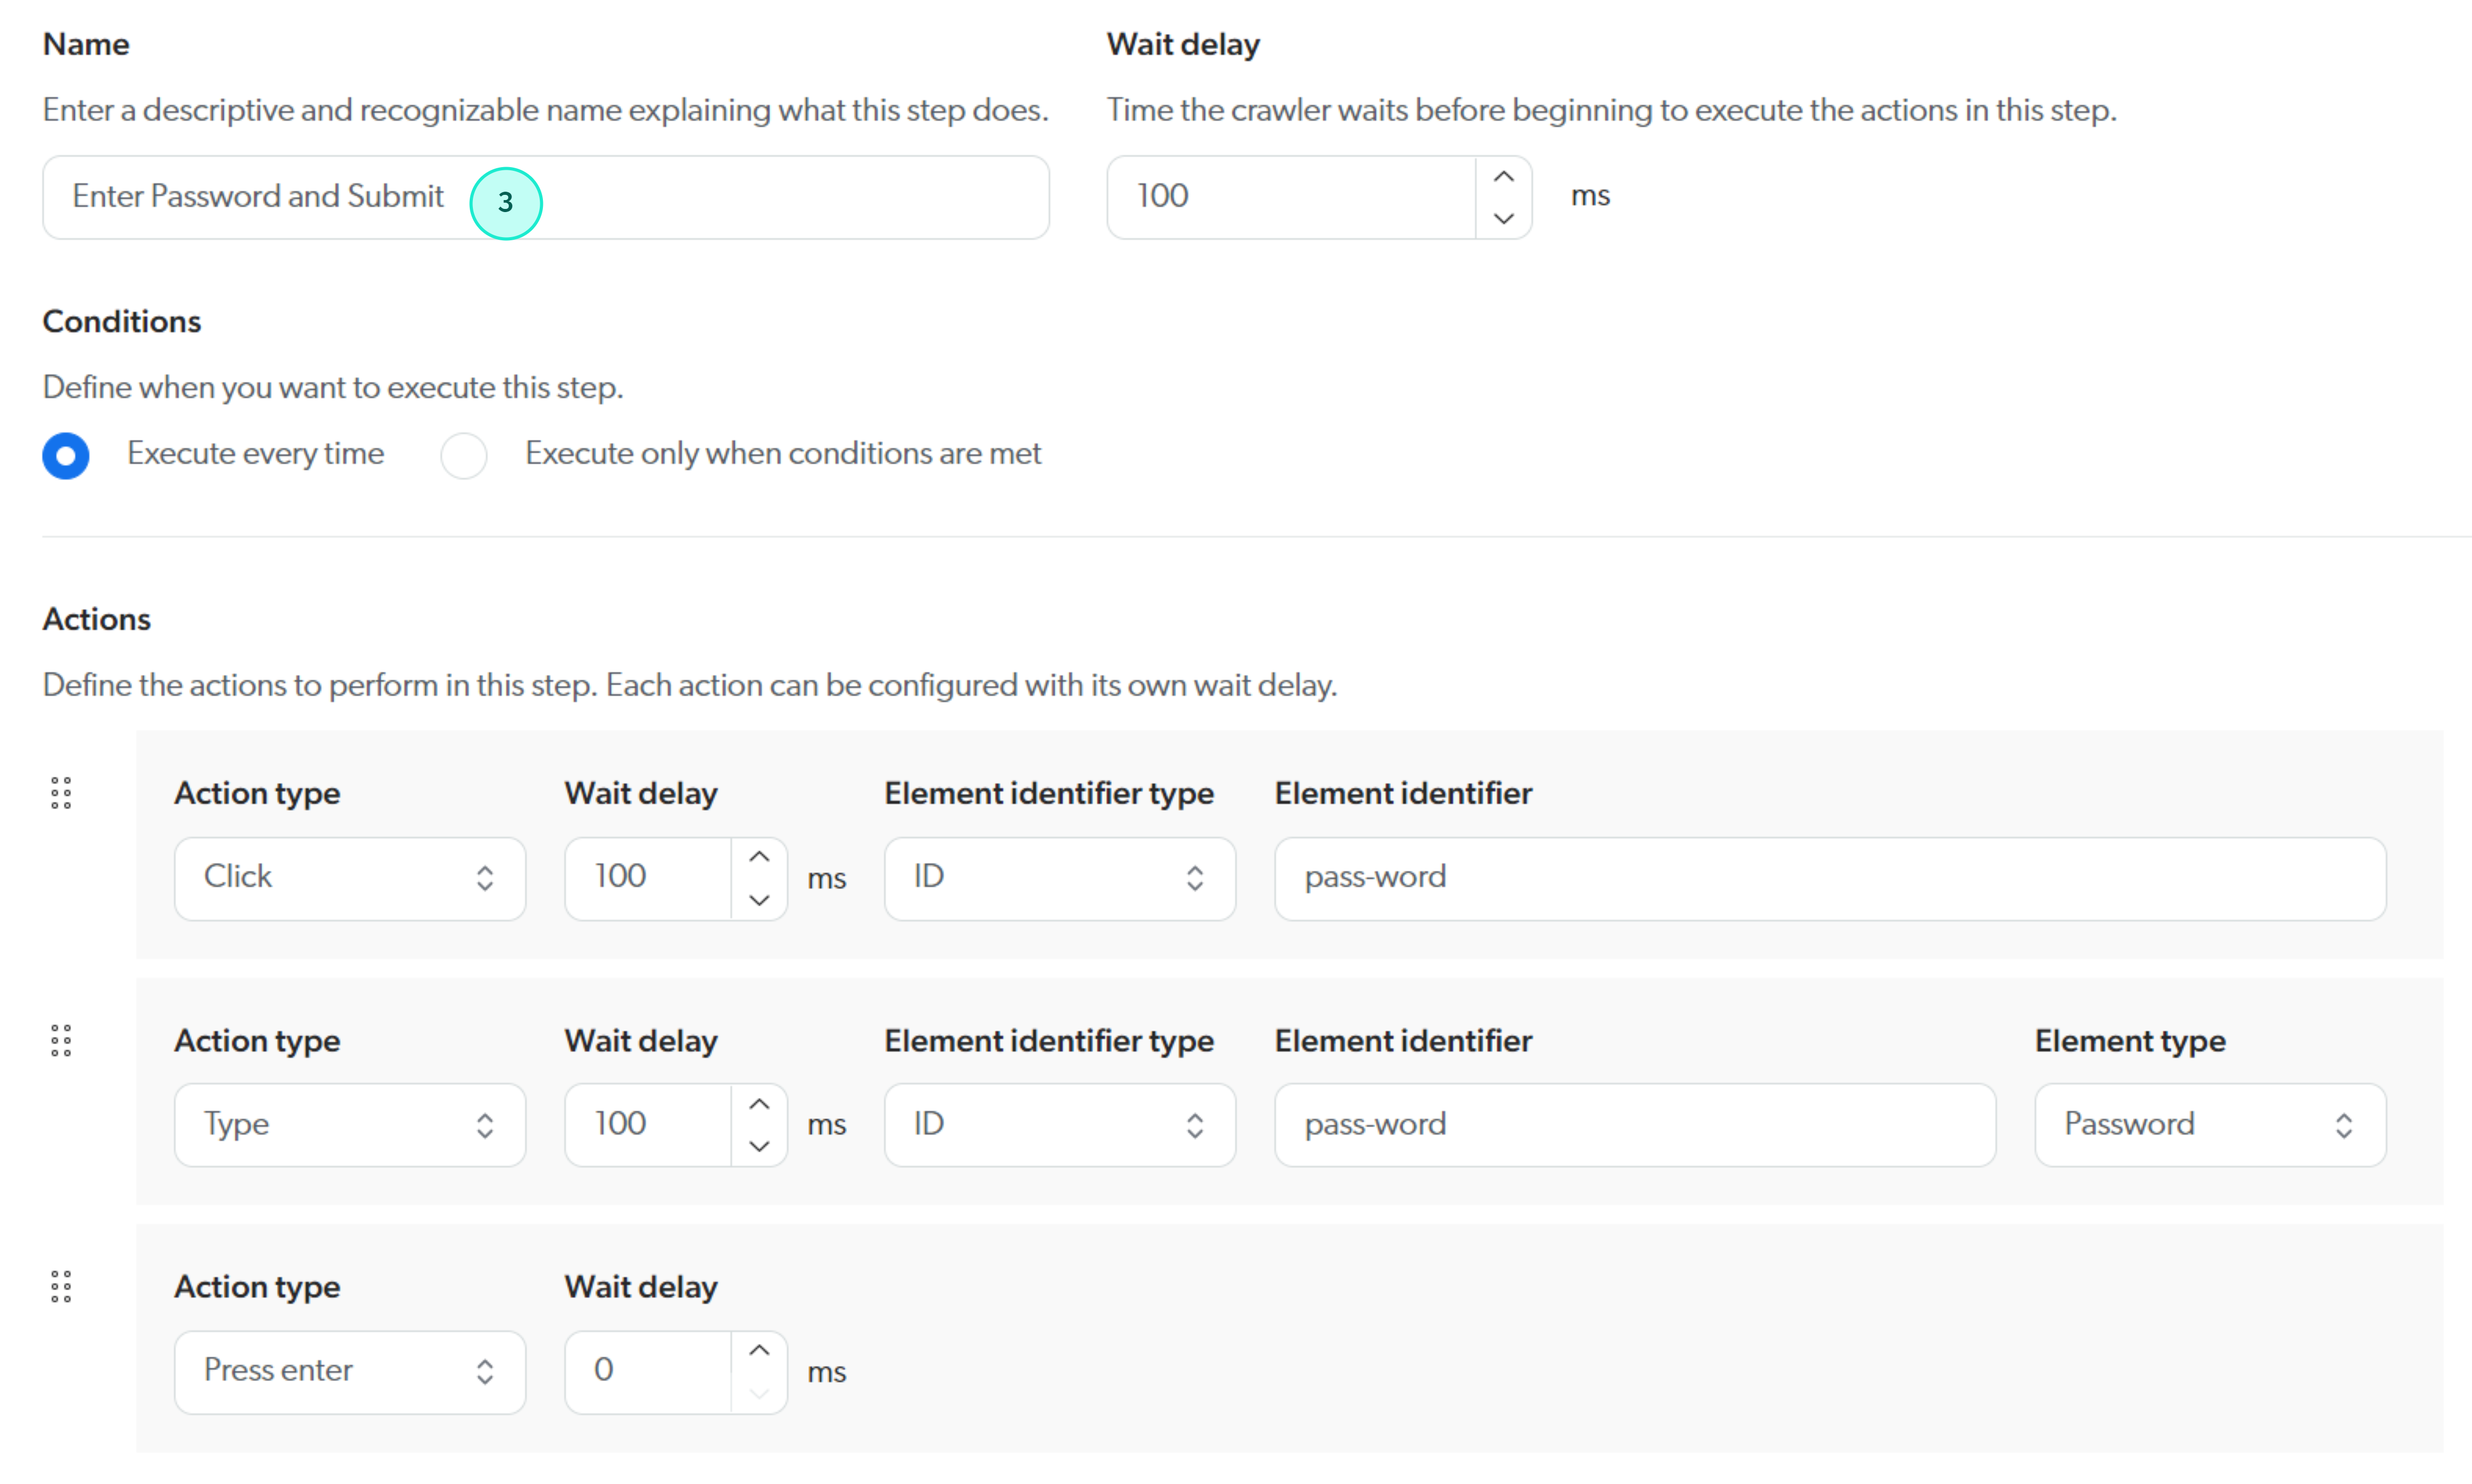
The following example shows a custom login sequence for a source using the Microsoft Online login page. This is for demonstration purposes only, as the standard Coveo form authentication process already handles the Microsoft Online login page.
|
|
Note
This example uses Wait delay values to ensure the crawler waits for the input elements to load before executing actions. Consider the time required for your login sequence elements to load and adjust the Wait delay values accordingly. |
Custom login sequence conditions and steps
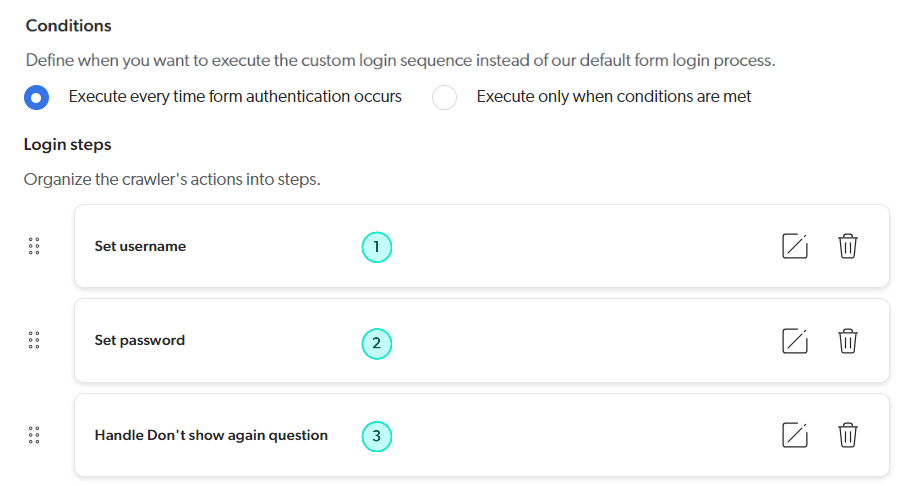
Step configurations
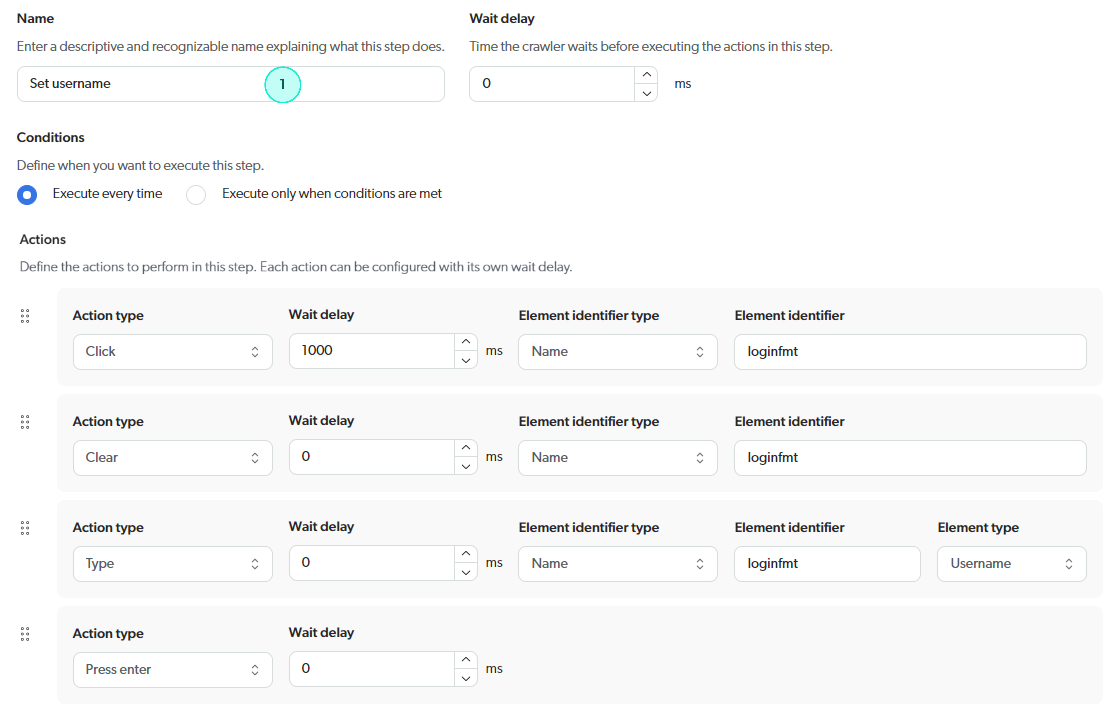
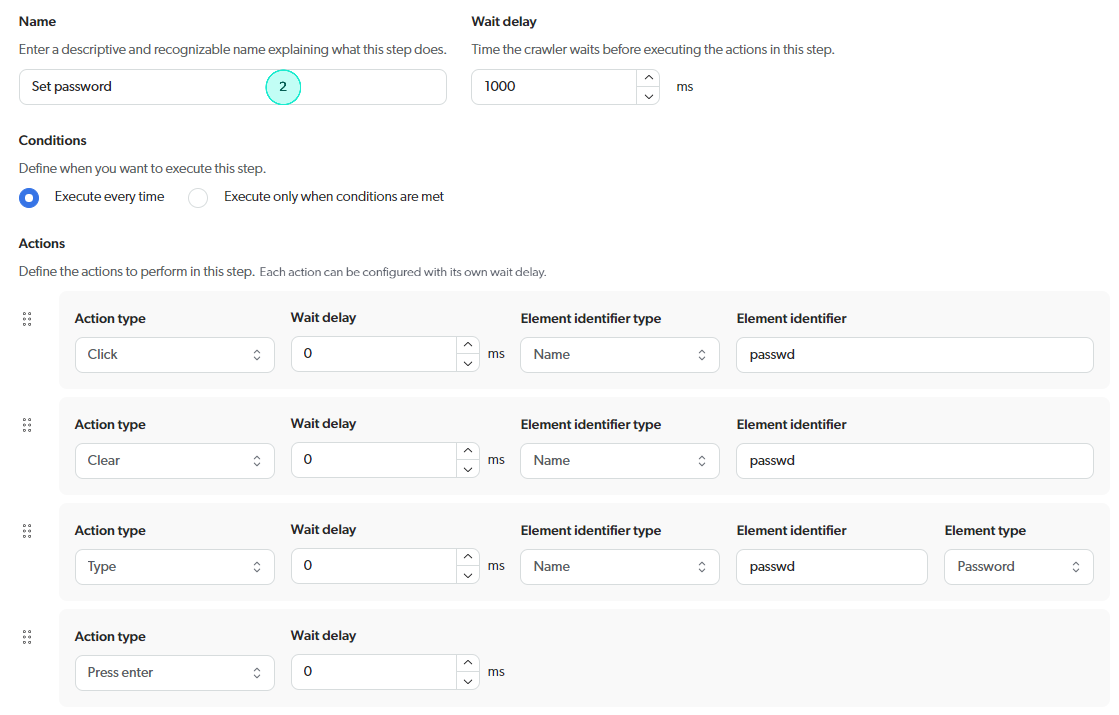
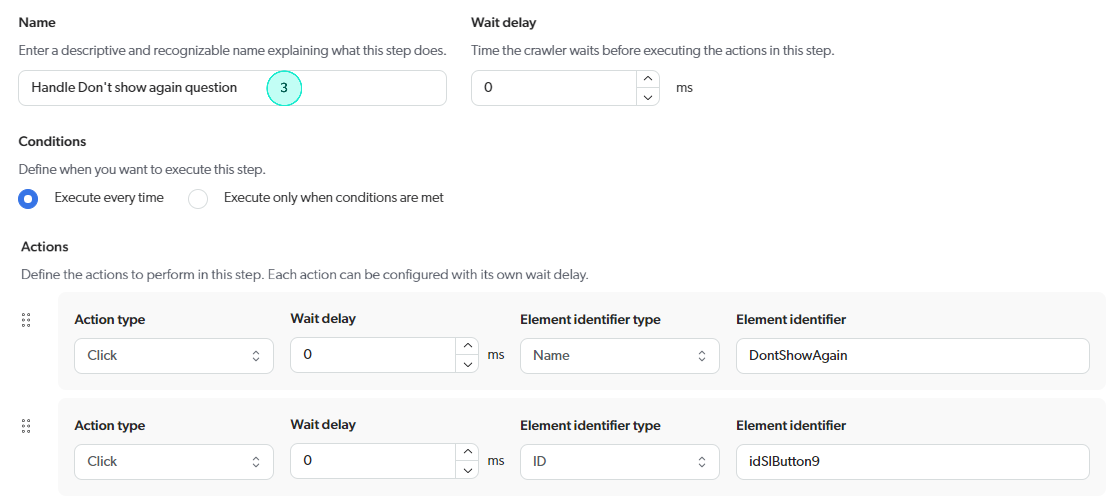
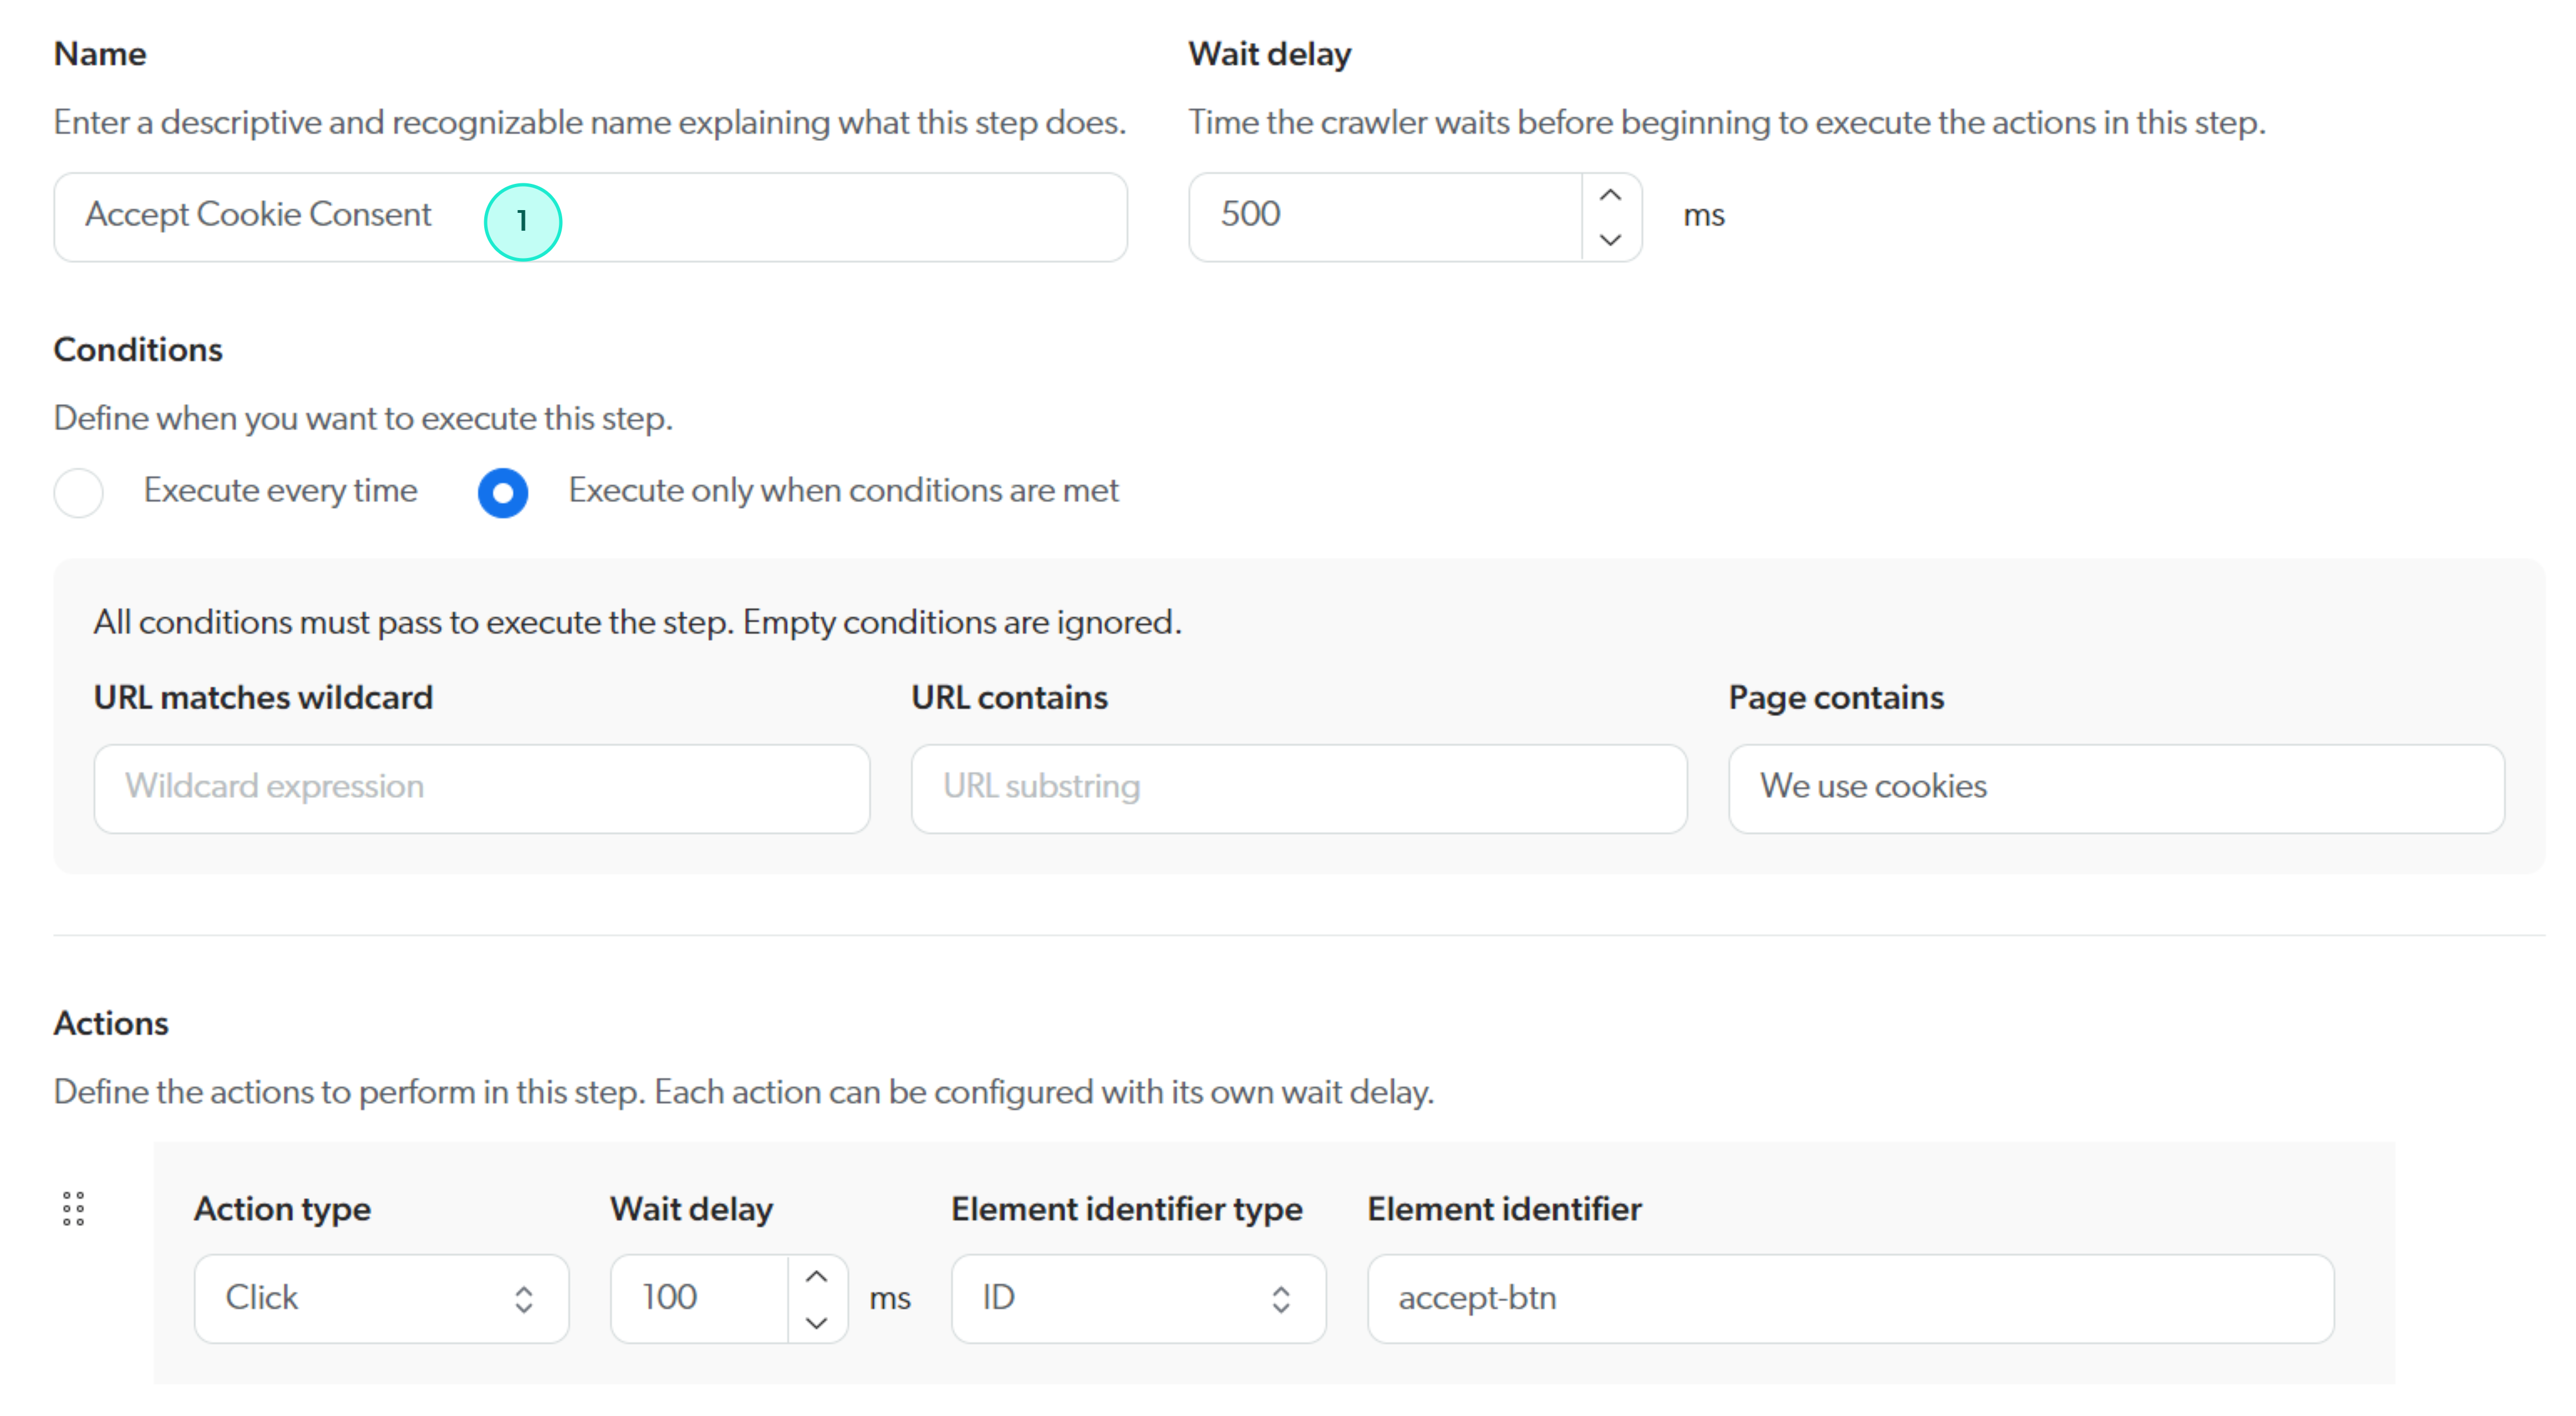
Example 2: Custom login sequence with a cookie consent step
In the following example, an authentication page located at https://example.com/auth/manual?lang=en includes a cookie consent overlay.
The input fields in the login form become accessible after cookie consent has been accepted.
The image below illustrates the authentication page with the cookie consent overlay, along with the HTML markup of the elements used in the custom login sequence.
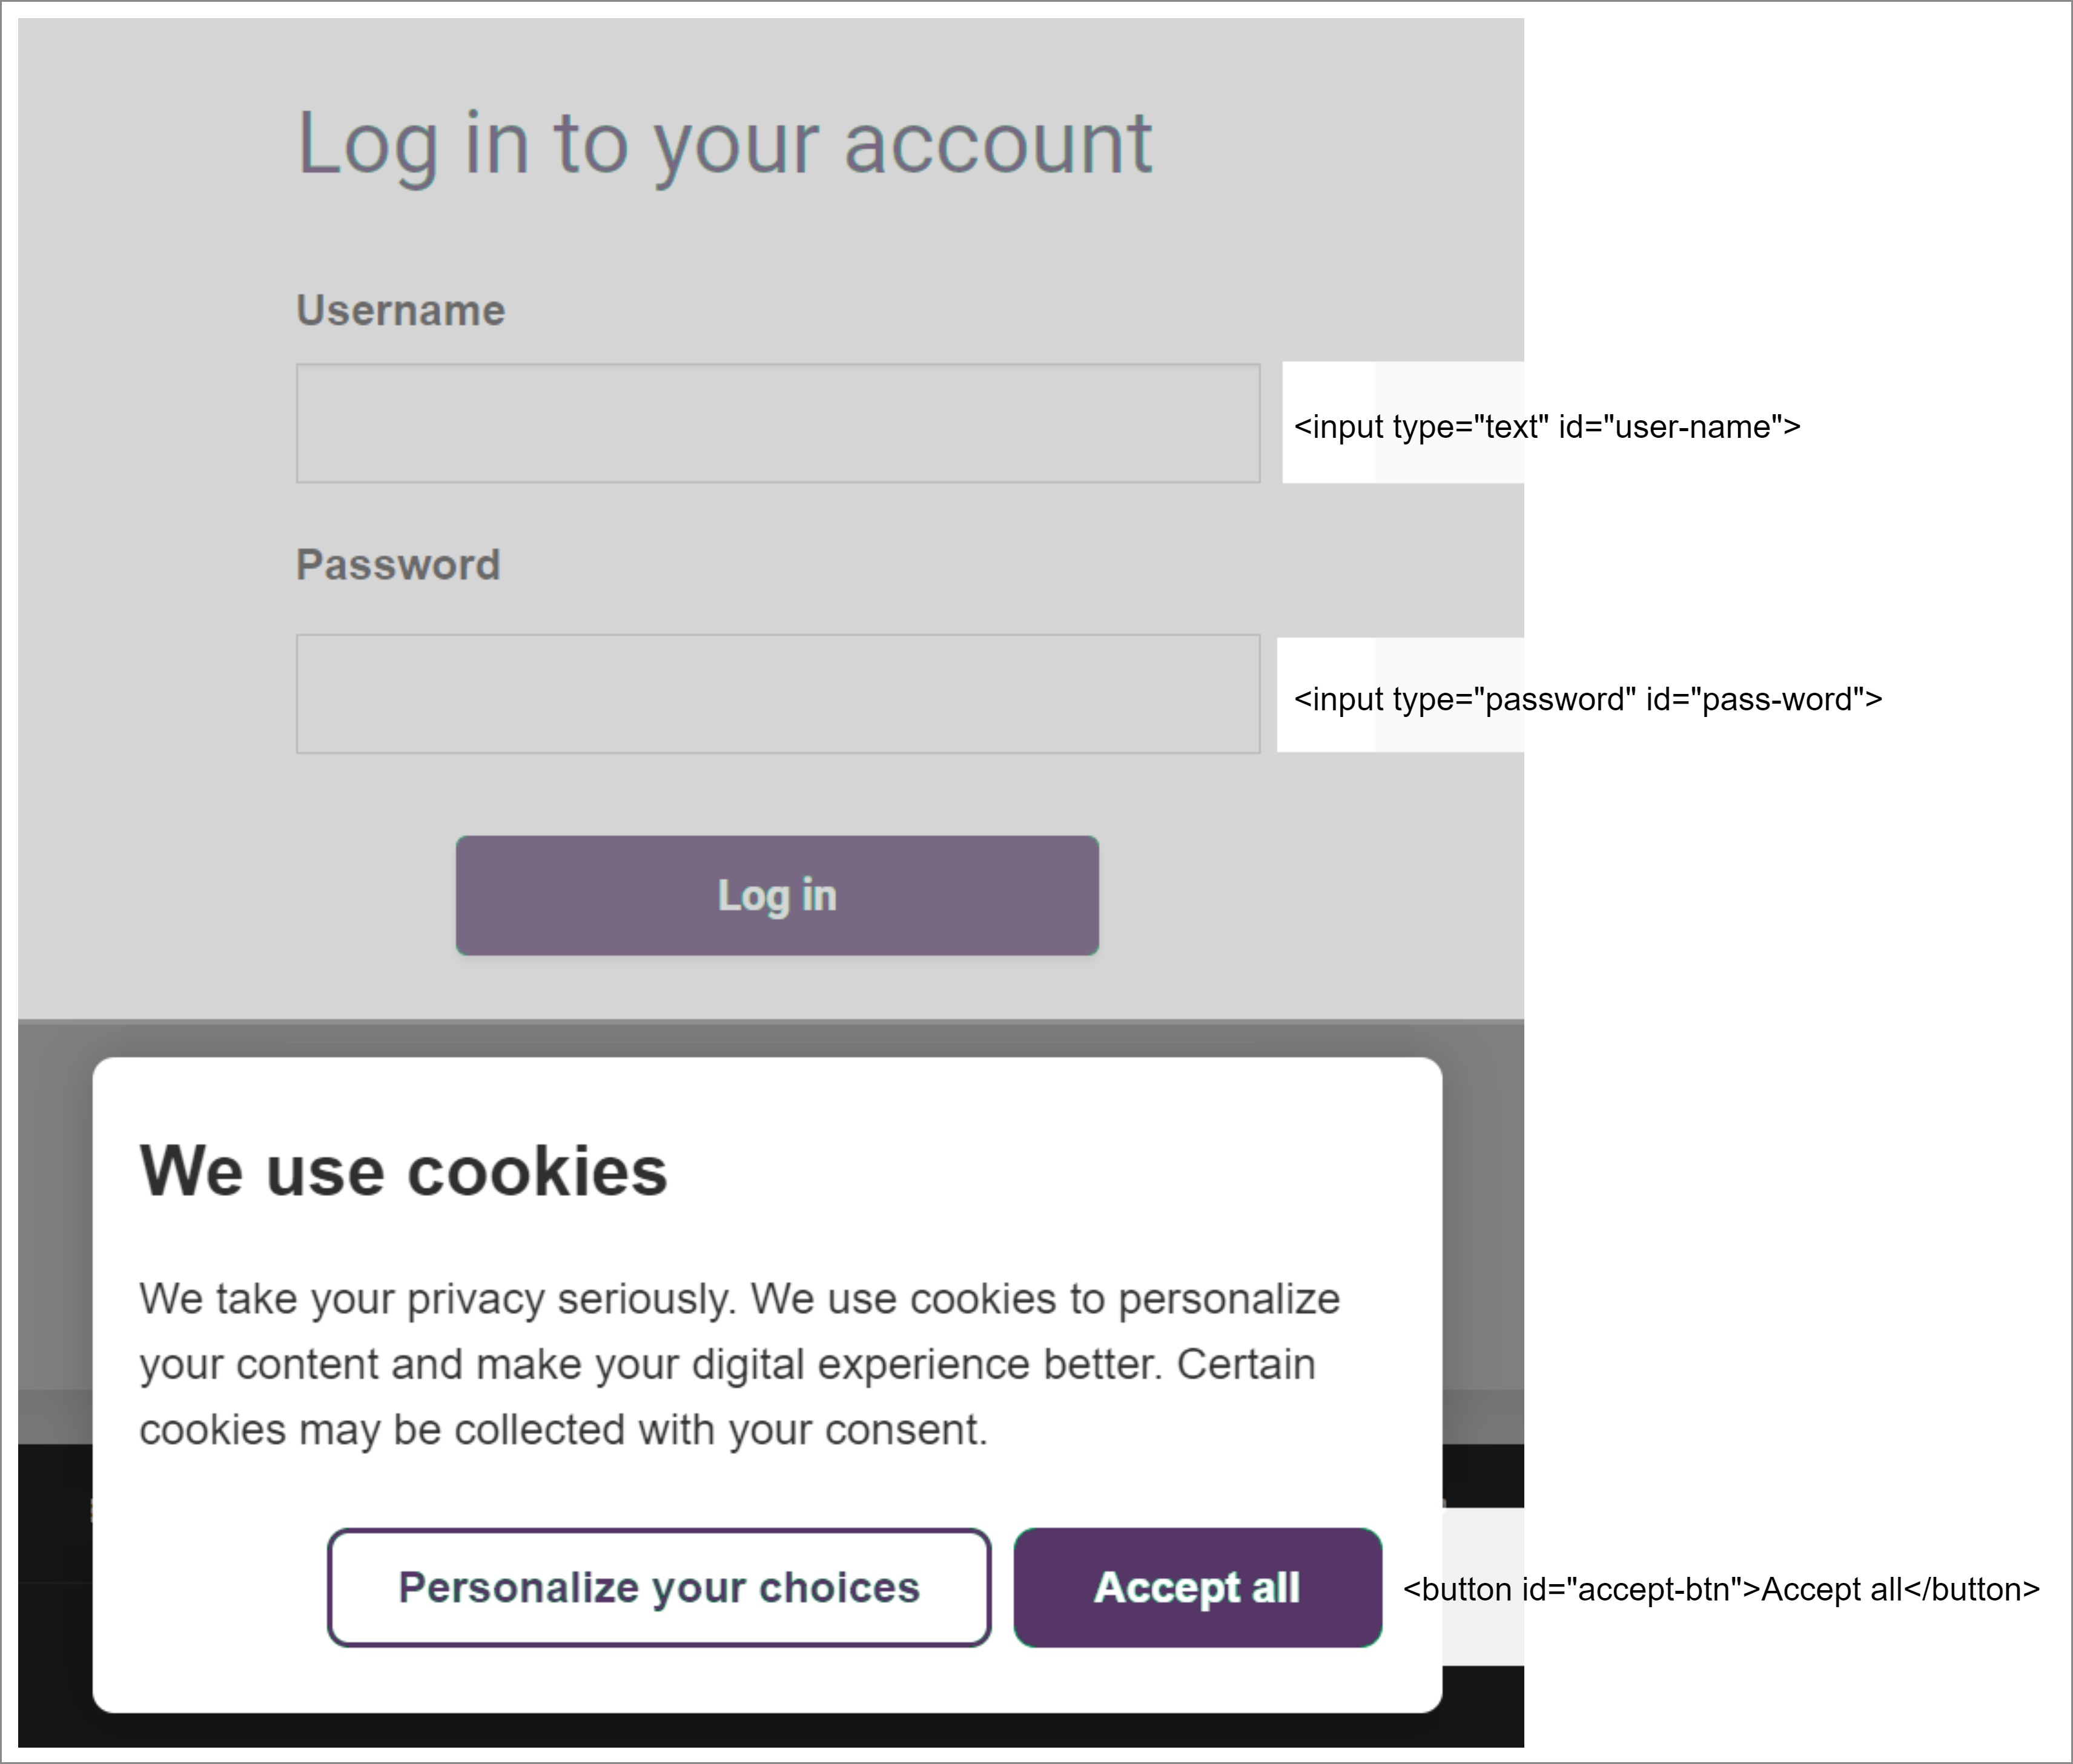
The cookie consent overlay is only displayed the first time the crawler accesses the authentication page.
If the crawler accesses the page again during the content update operation, the cookie consent overlay won’t appear.
As a result, the Accept Cookie Consent step in the custom login sequence is made conditional on the presence of text displayed in the cookie consent overlay.
Custom login sequence conditions and steps
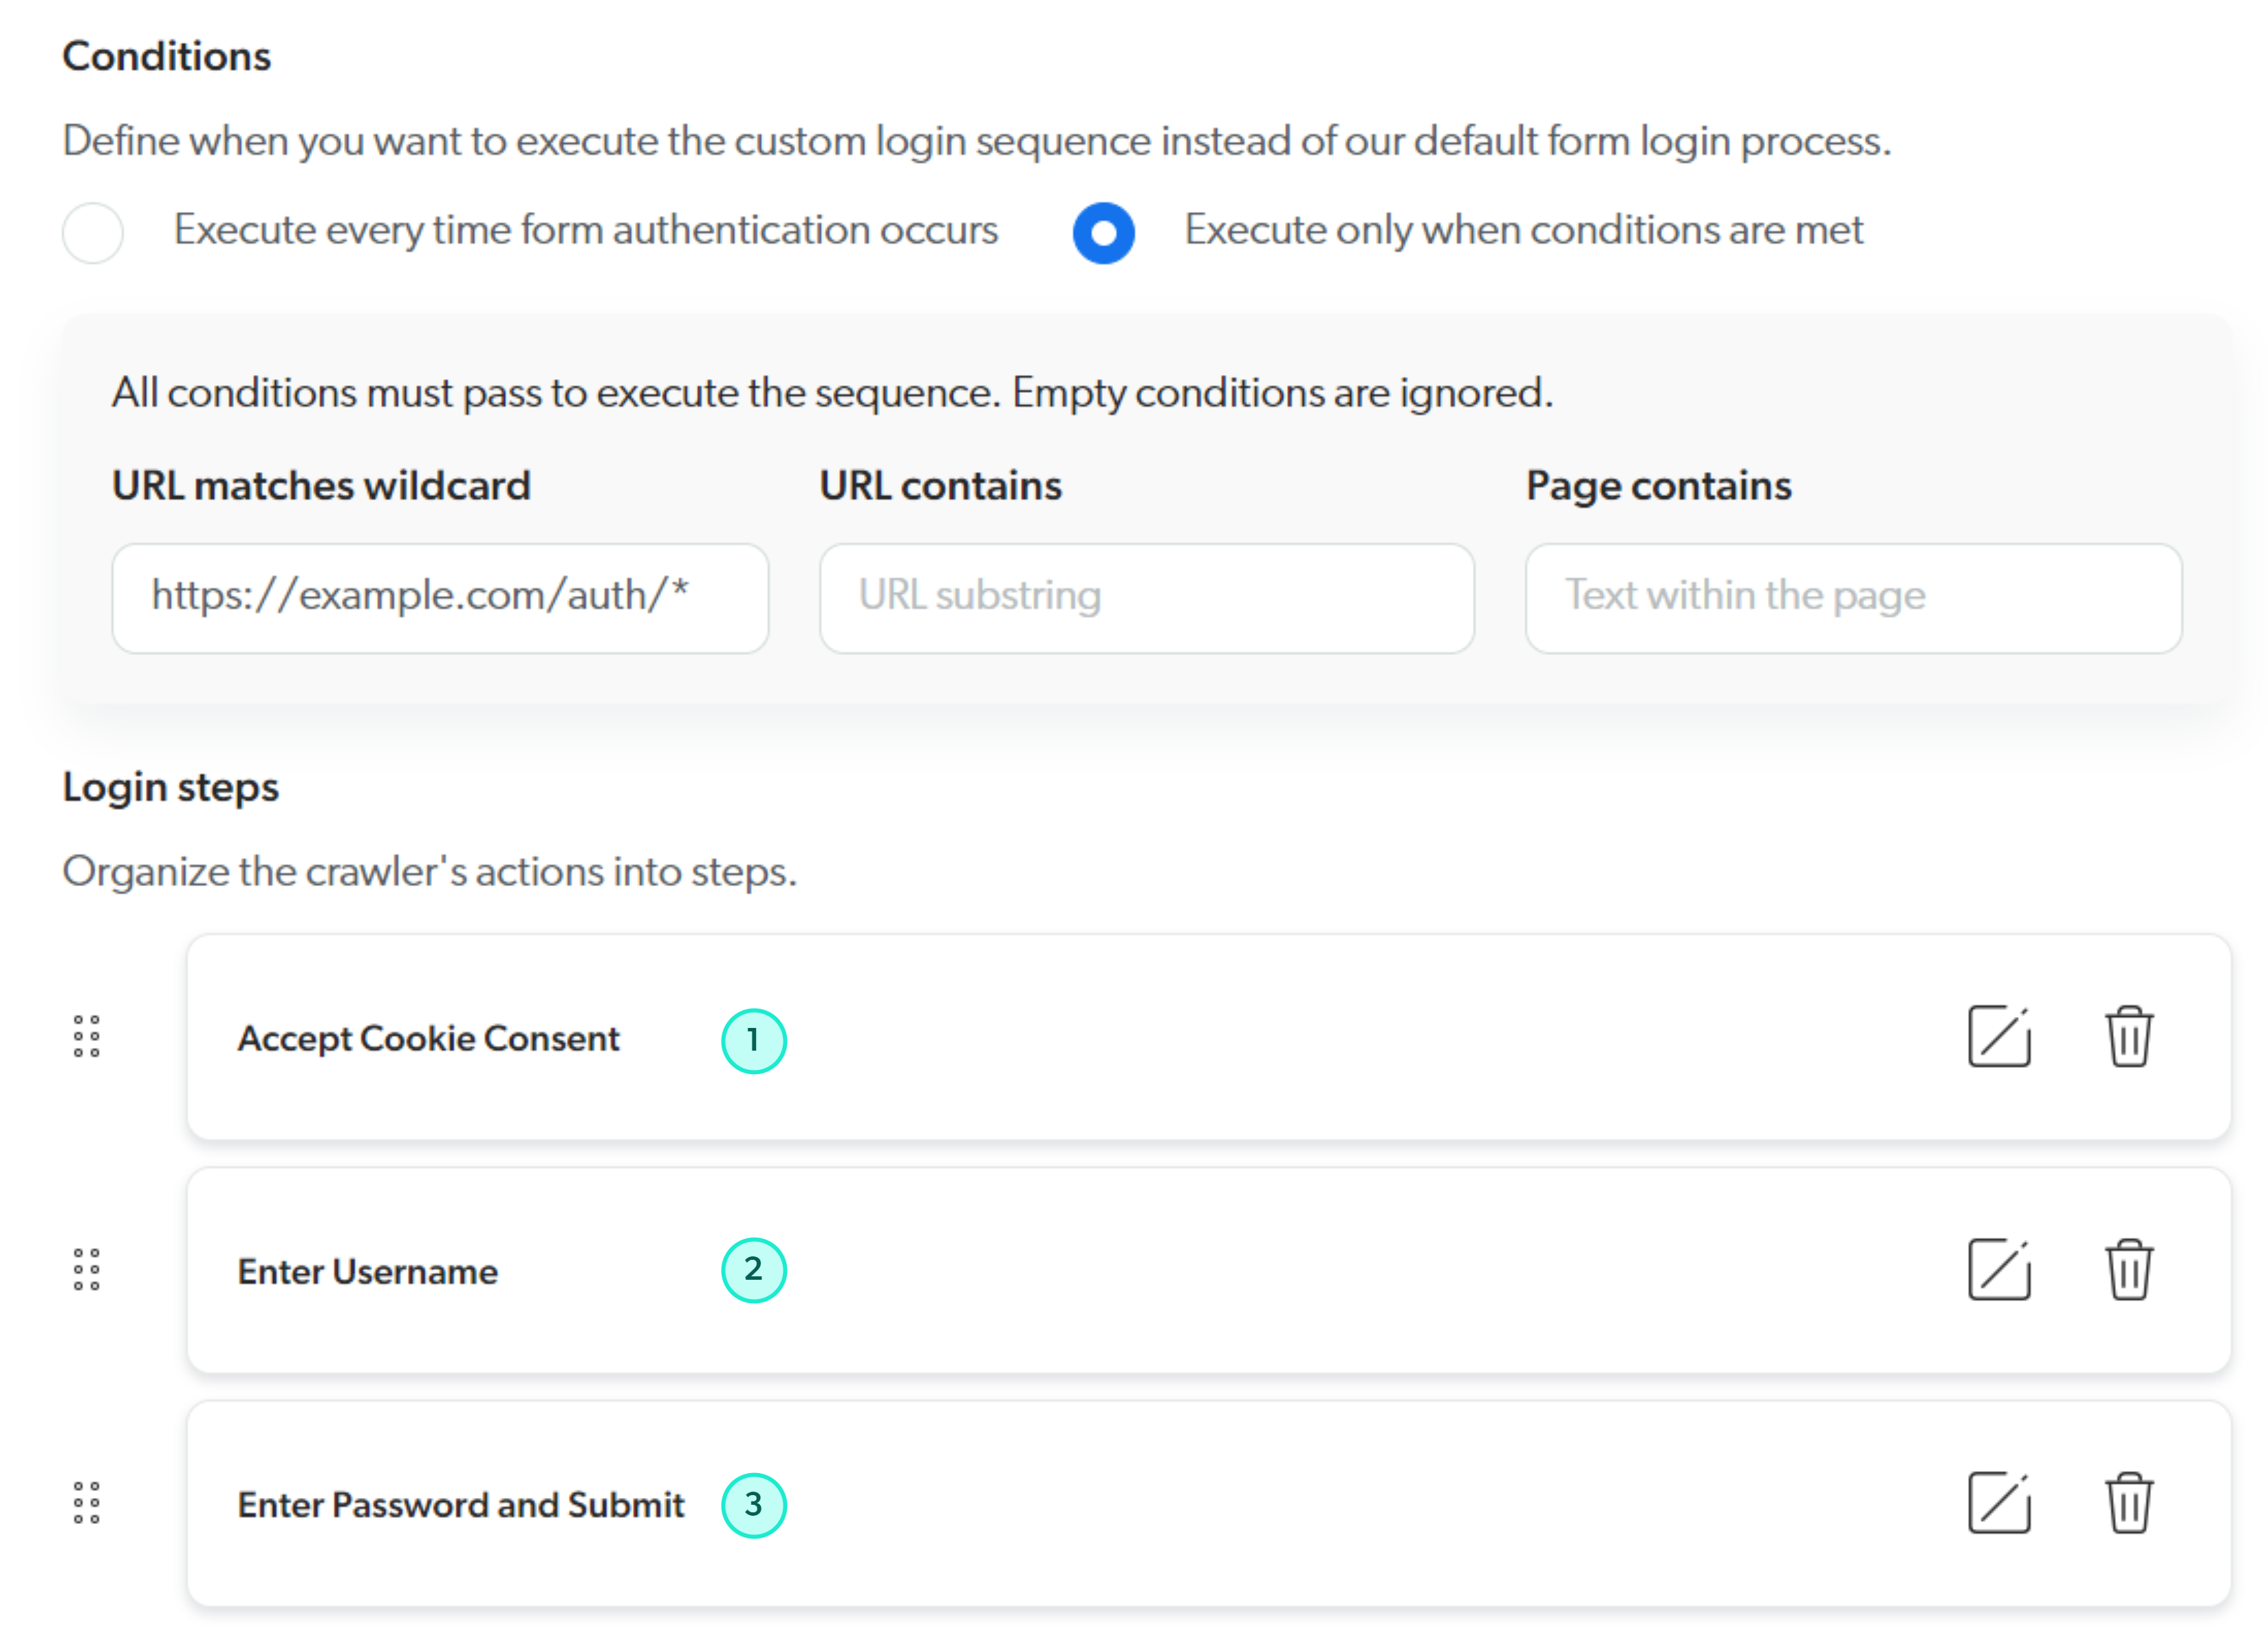
Step configurations
