Add a SharePoint Online source
Add a SharePoint Online source
You can index SharePoint Online or OneDrive content to make it searchable using a SharePoint Online source. This article presents the main characteristics of a SharePoint Online source, the authentication methods you can use to connect to your SharePoint Online tenant, and the steps to add a SharePoint Online source.
SharePoint Online tenants typically hold large volumes of content. Follow the SharePoint Online source configuration leading practices to optimize indexing performance.
|
|
Notes
|
Source key characteristics
The following table presents the main characteristics of a SharePoint Online source.
| Features | Supported | Additional information | |
|---|---|---|---|
SharePoint Online version |
Latest cloud version |
||
Indexable content |
Sites, sub-sites, user profiles, personal websites, lists, list items, list item attachments, document libraries, document sets, documents, web parts, and microblog posts and replies. |
If you select Specific URLs or User profiles in the Content section, some additional items will be indexed. To retrieve user profiles, the source must dig through your SharePoint Online instance, including your host site collection and the items it contains. The items it encounters in the process are retrieved and indexed as well. |
|
|
Takes place every hour by default. |
||
|
Takes place every week by default. |
||
|
|||
Content security options |
|
||
|
|||
|
|||
Automatic mapping of metadata to fields that have the same name |
This setting is disabled by default and not recommended for this source type. |
||
Automatically indexed metadata |
Examples of auto-populated default or standard source fields (no user-defined metadata required): • • • • • • • • • • • • • After a content update, inspect your item field values in the Content Browser. |
||
Extracted but not indexed metadata |
The SharePoint Online source extracts some of the site, list, list item, and file-level metadata that the SharePoint Online APIs make available. |
||
Custom metadata extraction |
Add columns to your list and libraries. The SharePoint Online source automatically extracts the metadata in these columns during content updates. |
||
Prerequisites
Before you create a SharePoint Online source, you must:
-
Ensure that your license allows you to create this source and that your organization hasn’t reached its source quota. You can review your quotas on the License & Usage (platform-ca | platform-eu | platform-au) page, along with your usage.
-
Determine the authentication method you want to use. See Authentication and site access for an overview of the available authentication methods and their main advantages.
-
Complete the prerequisites for your authentication method:
-
If you’re using custom domains in SharePoint Online, configure your Microsoft 365 DNS records.
Authentication and site access
A SharePoint Online source uses the OAuth 2.0 authorization protocol to access your SharePoint Online site content, and the source must authenticate through an Azure Active Directory application. You can choose to authenticate the Azure Active Directory application via a client certificate using app-only permissions, or using a delegated SharePoint Online user account (crawling account). The authentication method you choose depends mainly on your individual needs and corporate policy.
|
|
Notes
|
App authentication using certificate (recommended)
The main advantages of App authentication using certificate are:
-
It provides a higher throttling rate limit than User delegated access using OAuth 2.0, and is recommended for indexing large amounts of data.
-
It enables parallel refreshes, which improve content freshness by indexing latest changes even when the source is performing a long rescan operation.
-
It allows more flexibility than User delegated access using OAuth 2.0 in terms of content access.
-
You can grant the source permission to access all site content, Team sites, personal sites, and user profiles in your SharePoint Online tenant without having to provide individual access to each site. The content that’s actually crawled and indexed depends on your source Content to index subtab settings.
-
You can grant the source with access to only a subset of site collections using the
Sites.Selectedpermission (instead ofSites.FullControl.All).
-
-
It provides easier setup, as you don’t need to create and manage a crawling account in SharePoint Online, assign the account appropriate roles and permissions, and grant the account access to content.
App authentication using certificate prerequisites
If you choose to authenticate using a certificate, you must perform the following before creating your SharePoint Online source:
-
Create the Azure Active Directory application and assign the required permissions.
-
Add the client certificate to the Azure Active Directory application.
Create a client certificate
Your SharePoint Online source uses the client certificate to authenticate the Azure Active Directory application to crawl your SharePoint Online tenant.
-
Create a CA-signed certificate using a trusted certificate authority (recommended), or a self-signed certificate using the method of your choice.
 Note
NoteThe certificate file format must be
.cer,.pem, or.cert. You’ll need the certificate file when adding the certificate to your Azure Active Directory application. -
Export the certificate as a password-protected
.pfxfile. Depending on how you created the certificate file, the.pfxfile may be created for you automatically.
NoteYou’ll need the
.pfxfile and password when creating your SharePoint Online source.
Create the Azure Active Directory application
The Azure Active Directory application that you create for use with your source grants Coveo the permissions to crawl your SharePoint Online tenant. Create the application and assign the required permissions as follows:
-
Access your Azure portal with an administrator account, and create (register) an Azure Active Directory application.
Notes-
Select Accounts in this organizational directory only for the Supported account type option when creating the application.
-
Once you register the application, you’re taken to the application Overview page in Azure. Take note of the Application (client) ID and Directory (tenant) ID as you’ll need them when creating your SharePoint Online source.
-
-
Grant the Azure Active Directory application the required crawling permissions as follows:
-
If you’re currently on your application’s page in Azure, proceed to the next step. Otherwise, access your Azure portal with an administrator account, click App registration, and then click the application you created previously.
-
Click API permissions.
-
If the User.Read permission is added by default, click the permission, and then click Remove permission.
-
For each of the following required permissions, click Add a permission, and then in the Microsoft APIs tab:
-
Click Microsoft Graph, click Application permissions, and then add the following permissions:
-
Team.ReadBasic.All(if you plan to index only Team sites) -
Sites.Read.All(recommended) orSites.Selected
-
Click SharePoint, click Application permissions, and then add the following permissions:
-
Sites.FullControl.All(recommended) orSites.SelectedSites.Selectedisn’t compatible with the All sites and Hub sites content retrieval options.
If you select theSites.Selectedscope, grant the applicationFullControlaccess on a per-site basis, for each site you want to index. See Controlling app access on specific SharePoint site collections is now available in Microsoft Graph and Use Sites.Selected Permission with FullControl rather than Write or Read for further details.
Create only one application per tenant when using
Sites.Selected. Then re-use the certificate for all sites to crawl across all sources that target the same tenant.
You can’t target a set of sites using one application and another set of sites in the same tenant using another application. A security provider for the tenant is created when the first source is created. If you create a second source to capture content from the same tenant, the second source will use the same security provider as the first.
-
-
-
-
Once you’ve added all the required permissions, grant tenant-wide admin consent to the application.
NoteYou must have the appropriate user role to be authorized to consent on behalf of the organization.
Add the client certificate to the Azure Active Directory application
Follow the Microsoft documentation to add your certificate to the Azure Active Directory application.
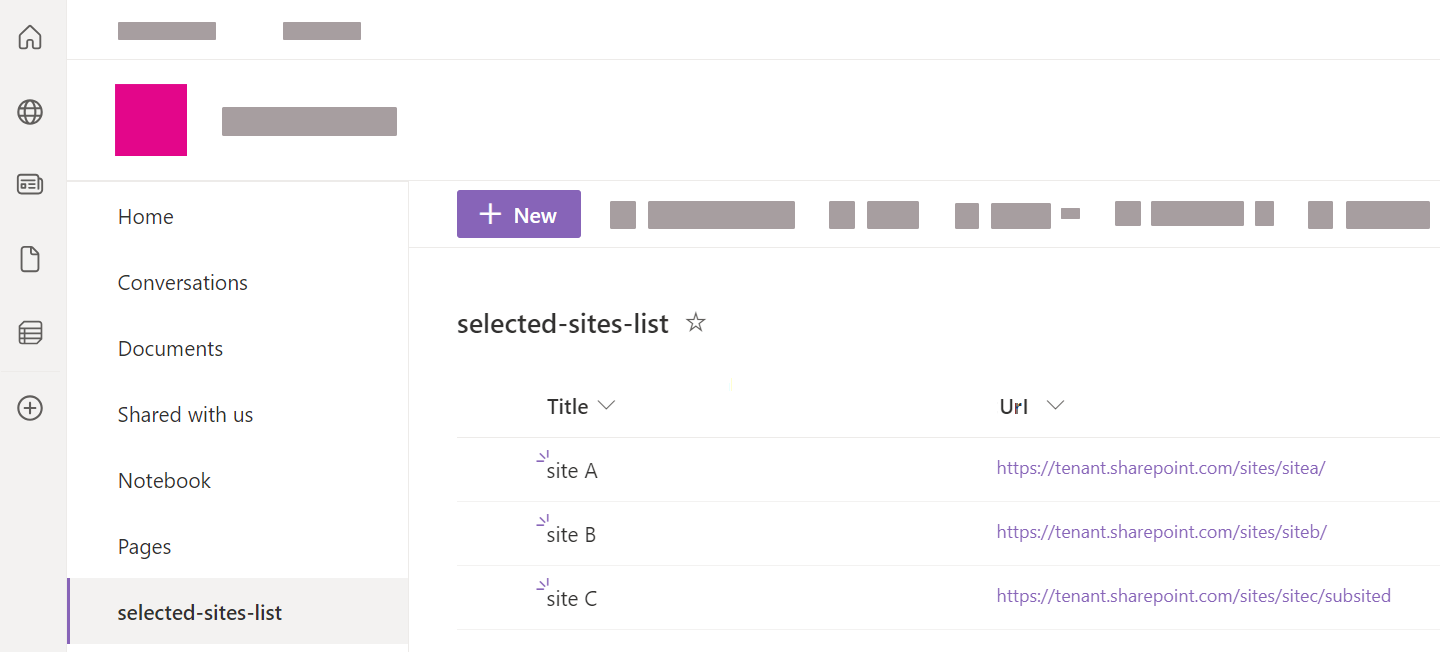
(Optional) Create a selected sites list in SharePoint Online
With App authentication using certificate, to use the Selected sites list URL option, you need to create a list of the selected site collections you’ve granted your application access to. You can then reference the URL of this list in your SharePoint Online source.
To create the list in SharePoint Online
-
In your SharePoint Online tenant, access one of the sites that your application has access to.
-
Go to Site Contents.
-
Click + New > List.
-
Enter a descriptive Name for the list (for example,
selected-sites-list), and optionally, a Description. Then click Create. -
In the list, click + Add column.
-
Select the
Hyperlinkcolumn type, and then click Next. -
For the Name field, type
Url(with that precise casing), and then click Save. -
For each site collection that you want to index, add a new list item, and then enter the site URL in the Url column.
Azure application permissions with App authentication using certificate
To work with Microsoft APIs (CSOM and REST), Coveo must authenticate via an Azure Active Directory application that has the proper permissions. The access token is then limited to these permissions, which are necessary to successfully crawl SharePoint Online.
You must provide tenant-wide admin consent for the permissions in the Azure Active Directory application that’s used to authenticate your source. Typically, you provide consent when creating the Azure Active Directory application for use with Coveo, but you can do so at a later time.
|
|
Notes
|
The following table provides a description of the permissions that you must grant the application when using App authentication using certificate.
| API | Permission | Justification | |||
|---|---|---|---|---|---|
SharePoint |
Allows Coveo to retrieve permissions of crawled items, such as sites, users, lists, and documents.
|
||||
Grants Coveo the permission to access only a specified subset of site collections. Grant the application the
|
|||||
Grants Coveo the permission to crawl user profiles.
|
|||||
Microsoft Graph |
Grants Coveo the permission to crawl site content.
|
||||
Grants Coveo the permission to access only a specified subset of site collections. |
|||||
Coveo requires this permission to fetch:
|
|||||
Coveo uses this permission to obtain the ID of a group (represents an Azure Active Directory group, which can be an Office 365 group, or a security group), and then a list of the group members. |
|||||
When |
User delegated access using OAuth 2.0
For User delegated access using OAuth 2.0, the Azure Active Directory application is automatically created in your SharePoint tenant when you create the source, and is linked to the permissions of the crawling account that you create.
|
|
Note
The Azure Active Directory application appears as SharePoint Online Connector in your Azure portal Enterprise applications page. |
The main advantages of User delegated access using OAuth 2.0 are:
-
It provides a way to give the crawling account, and by association your source, access to crawl only specific sites and user profiles.
-
It provides a way to grant the crawling account with minimal permissions when accessing site content.
However, an important drawback of User delegated access using OAuth 2.0 is that it’s more prone to throttling than App authentication using certificate.
User delegated access using OAuth 2.0 prerequisites
If you decide to use User delegated access using OAuth 2.0, perform the following before creating your SharePoint Online source:
-
Create a SharePoint Online user account (crawling account) with appropriate roles and permissions.
Azure application permissions with user delegated access using OAuth 2.0
A SharePoint Online source uses the OAuth 2.0 authorization protocol. To work with Microsoft APIs (CSOM and REST), Coveo must authenticate via an Azure Active Directory application that has the proper permissions. The access token is then limited to these permissions, which are necessary to successfully crawl SharePoint Online.
You must provide tenant-wide admin consent for the permissions in the Azure Active Directory application that’s used to authenticate your source. Provide admin consent directly from your SharePoint Online source panel when creating your source (requires SharePoint Global Admin credentials), or from your Azure portal after creating your source.
|
|
Note
The Azure Active Directory application that’s automatically created in your SharePoint Online tenant after you create your source appears as SharePoint Online Connector in your Azure portal’s Enterprise applications page. |
|
|
Notes
|
The following table lists the permissions that are automatically assigned to the application when using User delegated access using OAuth 2.0.
| API | Permission | Justification | ||||
|---|---|---|---|---|---|---|
SharePoint |
|
Allows Coveo to retrieve permissions of crawled items, such as sites, users, lists, and documents.
|
||||
|
Grants Coveo the permission to crawl user profiles.
|
|||||
Microsoft Graph |
|
Grants Coveo the permission to crawl site content.
|
||||
|
Coveo requires this permission to fetch:
|
|||||
|
Coveo uses this permission to obtain the ID of a group (represents an Azure Active Directory group, which can be an Office 365 group, or a security group), and then list the group members. |
|||||
When |
Domain Name System records configuration for Microsoft 365
Regardless of the chosen authentication method, if you’re using custom domains in SharePoint Online, you must configure your Domain Name System (DNS) records for Microsoft 365.
-
Access the Domains page of your Office 365 admin center.
-
Select your corporate domain (not
company.onmicrosoft.com) checkbox. -
On the domain page, in the DNS records section, take note of the DNS records.
-
On the domain page, in the DNS records section, click Check health to ensure that the DNS records were correctly configured.
Add a SharePoint Online source
A SharePoint Online source indexes cloud content. To retrieve on-premises (server) content, see Add or edit a SharePoint Server source instead.
|
|
Leading practice
It’s best to create or edit your source in your sandbox organization first. Once you’ve confirmed that it indexes the desired content, you can copy your source configuration to your production organization, either with a snapshot or manually. Source re-authentication with a separate crawling account may be required in the production organization. See About non-production organizations for more information and best practices regarding sandbox organizations. |
Follow these steps to add a SharePoint Online source.
-
Make sure that your organization meets the prerequisites before adding this source.
-
On the Sources (platform-ca | platform-eu | platform-au) page, click Add source.
-
In the Add a source of content panel, click the SharePoint Online source tile.
-
Configure your source.
"Configuration" tab
On the Add a SharePoint Online Source page, the Configuration tab is selected by default. It contains your source’s general and authentication information, as well as other parameters.
"Identification" subtab
The Identification subtab contains general information about the source.
Name
Enter a name for your source.
|
|
Leading practice
A source name can’t be modified once it’s saved, therefore be sure to use a short and descriptive name, using letters, numbers, hyphens ( |
Project
Use the Project selector to associate your source with one or more Coveo projects.
"Content to index" subtab
The Content to index subtab lets you define the content that you want to make available as search results.
|
|
Note
For implementations using the Quickview component in a Coveo JavaScript Search Framework result template, and ASPX list items in SharePoint Online, the Quick view is supported only for ASPX list items (pages) of type |
Content
Select whether you want to index SharePoint Online, User profiles, Personal sites, or OneDrive for Business content.
SharePoint Online content
Select this content type to scope the SharePoint Online content you want to index.
The options are:
-
Specific URLs
Select this option to index specific site collections, subsites, or lists by specifying their URLs.
Examples of URLs-
For a specific site:
https://contoso.sharepoint.com/sites/support -
For a specific list:
https://contoso.sharepoint.com/sites/support/Lists/contacts/AllItems.aspx
Notes-
For User delegated access using OAuth 2.0, the crawling account must have access to the specified sites.
-
A specific folder in a list isn’t supported.
-
-
Select this option to index content you’ve granted the SharePoint Online source access to by referencing a custom list of site collections. The list must be in a site that the SharePoint Online source also has access to.
 Optimal configuration
Using the Selected sites list URL option in conjunction with App authentication using certificate and the
Sites.Selectedapplication permission is an optimal configuration, both in terms of indexing performance and content access. -
Hub site URLs
Select this option to index the content of all sites associated with the hub sites you reference. This includes all subsites and lists in the associated sites.
NoteFor User delegated access using OAuth 2.0, the crawling account must have access to the hub site and the associated sites. If the crawling account has access only to a subset of the associated sites, only these sites will be indexed and searchable.
-
All sites
With App authentication using certificate, all sites in your SharePoint Online tenant can be indexed. With User delegated access using OAuth 2.0, only the sites that the crawling account is allowed to access can be indexed.
Notes-
This option corresponds only to top-level site collections and their associated content. It doesn’t include personal site content.
-
To index only Teams sites
-
Select the All sites option.
-
Set the
IndexOnlyTeamSitesparameter totruein the source JSON configuration. -
Ensure that your authentication method grants the Microsoft Graph
Team.ReadBasic.Allpermission.
-
-
User profiles
Select this content type to index only the user profiles in your SharePoint Online tenant.
|
|
Note
For User delegated access using OAuth 2.0, the crawling account must be set as an owner in the personal sites for the user profiles that you want to index. |
Personal sites
Select this content type to only index personal sites, which includes site collections and OneDrive documents.
|
|
Notes
|
OneDrive for Business
Select this content type to only index the document libraries in OneDrive, including the My Files content of users' personal sites.
To index all content of users' personal sites (all site collections) in addition to document libraries, select the Personal sites option. However, if you only want to index user documents, use the OneDrive for Business option to limit the crawling scope.
|
|
Notes
|
Exclusions and inclusions
Add exclusion and inclusion rules to crawl only specific items based on their URL.

The following diagram illustrates how the SharePoint Online crawler applies the exclusion and inclusion rules. This flow applies to all items, including the starting URLs. You must therefore pay attention to not filter out your starting URLs.

|
|
About the "Include all non-excluded items" option

The Include all non-excluded items option automatically adds an "include all" inclusion rule in the background.
This ensures that all starting URLs meet the With SharePoint Online content, the following are common configuration patterns:
|
You can use any of the six types of rules:
-
is and a URL that includes the protocol. For example,
https://myfood.com/. -
contains and a string found in the URL. For example,
recipes. -
begins with and a string found at the beginning of the URL and which includes the protocol. For example,
https://myfood. -
ends with and a string found at the end of the URL. For example,
.pdf. -
matches wildcard rule and a wildcard expression that matches the whole URL. For example,
https://myfood.com/recipes*. -
matches regex rule and a regex rule that matches the whole URL. For example,
^.*(company-(dev|staging)).*html.?$.
When using regex rules, make sure they match the desired URLs with a testing tool such as Regex101.
Exclusion and inclusion configuration examples
The following examples illustrate how to configure exclusion and inclusion rules for your SharePoint Online source. For demonstration purposes only, some of the examples use the All sites content option. You should try to use another content option whenever possible to limit the scope of your source.
Example 1: Using the All sites content option with exclusions
You want to index all site collections in your SharePoint Online tenant, except for the HR (https://mytenant.sharepoint.com/sites/HR) site collection.
Possible solution
-
SharePoint Online content option: All sites
-
Exclusions:
https://mytenant.sharepoint.com/sites/HR*(type:matches wildcard rule) -
Inclusions: Include all non-excluded items[1]
Example 2: Using the All sites content option with inclusions
You want to index all top level site collections in your SharePoint Online tenant whose names start with B (that is, their URLs begin with https://mytenant.sharepoint.com/sites/B).
Possible solution
-
SharePoint Online content option: All sites
-
Exclusions: none
-
Inclusions:
-
https://mytenant.sharepoint.com/sites/B*(type:matches wildcard rule) -
sharepoint://online*(type:matches wildcard rule)[2]
-
Example 3: Using the Hub site URLs content option
You have a hub site, SiteA (https://mytenant.sharepoint.com/sites/SiteA).
Sites SiteB (https://mytenant.sharepoint.com/sites/SiteB) and SiteC (https://mytenant.sharepoint.com/sites/SiteC) are associated with SiteA.
You want to index the content of SiteA and SiteB, but exclude the content of SiteC
Possible solution 1
-
SharePoint Online content option: Hub site URLs (set URL to
https://mytenant.sharepoint.com/sites/SiteA) -
Exclusions:
https://mytenant.sharepoint.com/sites/SiteC*(type:matches wildcard rule) -
Inclusions: Include all non-excluded items[3]
Possible solution 2
-
SharePoint Online content option: Hub site URLs (set URL to
https://mytenant.sharepoint.com/sites/SiteA) -
Exclusions: none
-
Inclusions:
-
https://mytenant.sharepoint.com/sites/SiteA*(type:matches wildcard rule) -
https://mytenant.sharepoint.com/sites/SiteB*(type:matches wildcard rule) -
sharepoint://online*(type:matches wildcard rule)[3]
-
Additional exclusion filters
There are three other ways to exclude content from being indexed:
-
Using a metadata value condition.
-
Defining a rolling period to exclude older content.
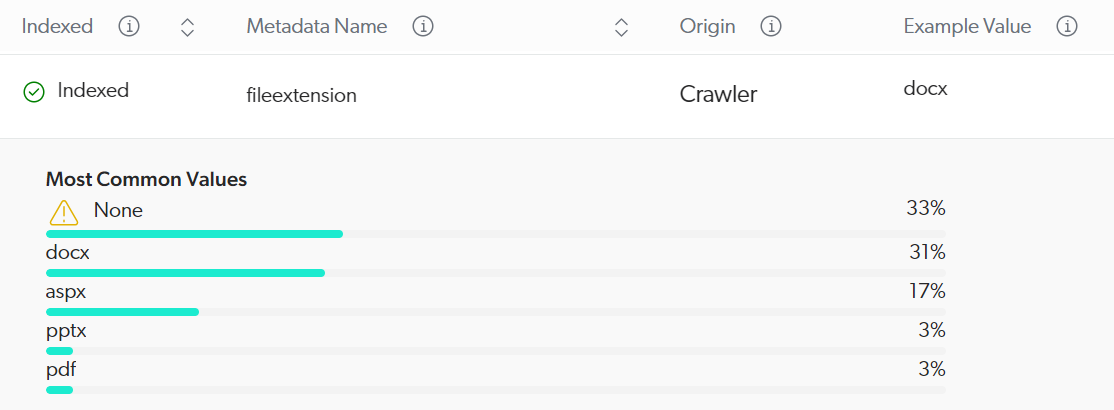
Exclude items on a metadata value basis
You can define a condition based on metadata values to prevent items from being crawled.
Conditions must reference metadata names using the %[METADATA_NAME] syntax, where METADATA_NAME is replaced with the actual metadata name.
Metadata names and values are case-sensitive.
The View and map metadata subpage lists metadata names available in your source.
Given metadata-based exclusion is applied at the crawling stage of the Coveo indexing pipeline, make sure you select a metadata name whose Origin value is Crawler.
You can’t use a metadata name that’s listed twice: once with the Crawler origin and once with the converter origin.
The condition may be a single expression or a combination of expressions.
The following operators are supported: AND, OR, Exists, NOT, ==, >, and <.
Parentheses are also supported to specify operation order.
|
|
The |
The following table gives examples of conditions and their effects:
| Condition | Matches items that | Indexing result |
|---|---|---|
|
Have a |
All items with a |
|
Don’t have a |
All items that don’t have a |
|
Have the |
All items with a |
|
Don’t have the |
All items with a |
|
Have the |
All items whose |
Exclude template types
You can configure your SharePoint Online source to ignore specific SharePoint list template types when indexing items.
Enter the list template types to ignore by adding a separate entry for each template type.
You don’t want your source to index DocumentLibrary and Tasks template-type items.
Therefore, you enter the following:

Exclude older content
You can configure your SharePoint Online source to index only items that were created or modified within a specified time range. To configure this rolling period, set the amount and period.
You want your source to index only items that were modified in the last two years, so you configure the rolling period as follows:
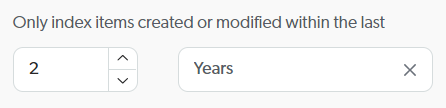
To disable the rolling period, set the amount to 0.
Configuring a rolling period has the following effects during source updates:
| Update type | Effects |
|---|---|
Your source is emptied, then only items modified within the rolling window are added to your source. |
|
The connector crawls the entire content your source targets, and:
|
|
The connector crawls items that have been modified/added since the last source update and items whose last modified date is outside the rolling window, and:
|
Additional content
If you selected All sites, Hub site URLs, Specific URLs, Personal sites, or Selected sites list URL in the Content section, select whether to index the following:
Folders
Select this option to index list folders and document sets.
A SharePoint folder is only a container for items. By default, this option isn’t enabled, which means Coveo indexes the items in folders, but not the folders themselves.
Unapproved items
Select this option to retrieve unapproved items, which are items with a Draft or Pending approval status, from lists where moderation is activated.
If an unapproved version exists for an item that’s already Approved, your source indexes the unapproved item instead of the approved item.
As a result, the unapproved item appears in Coveo search results.
If this option is disabled, your source indexes only approved items.
In a list where moderation is active, a document named Meeting Notes is Approved and indexed by Coveo.
This document version is 1.0.
However, a coworker edits Meeting Notes, thereby creating version 1.1, and the document status becomes Draft.
Then, your SharePoint Online source is rescanned.
If Unapproved items is enabled in your source, version 1.0 is deleted from the Coveo index and is replaced with the draft version 1.1.
If Unapproved items is disabled in your source, Coveo indexes version 1.0 as version 1.1 isn’t yet Approved.
In lists where moderation is deactivated, this option doesn’t apply.
Coveo indexes the latest version of an item, be it Approved, Draft, or Pending.
|
|
Note
For SharePoint lists that require documents to be checked out before editing, Coveo doesn’t index a document while it’s checked out regardless of the |
"Authentication" subtab
Your SharePoint Online source must authenticate to SharePoint Online using app authentication with a certificate or user delegated access to retrieve your tenant content.
If you select App authentication using certificate
-
Enter your SharePoint Online Tenant name. It appears in your tenant URL. For example, for
https://mycompany.sharepoint.com, entermycompany. -
Enter your SharePoint Online Tenant ID.
-
Enter the Client ID, which identifies the Azure Active Directory application that you created for use with your source.
-
Enter your Certificate password.
-
Click Upload certificate or Upload and replace existing certificate to select and upload your PFX certificate.
|
|
Note
Source authentication errors may occur due to configuration or connectivity issues. If this happens, verify the following:
|
If you select User delegated access using OAuth 2.0
-
Click Authorize account.
-
Enter your SharePoint Online Tenant name, and then click Sign In.
ExampleIf the SharePoint Online tenant URL is
https://mycompany.sharepoint.com, then the tenant name ismycompany. -
Provide admin consent using SharePoint Online user credentials that have the Global Admin role by following the steps detailed here, or proceed to the next step to provide consent from your Azure portal after creating your source.
NoteYou can switch your source to the crawling account after you provide admin consent.
-
Enter the Email and Password of a SharePoint account with the Global Admin role.
-
Select Consent on behalf of your organization.
-
Click Accept.
-
To switch the source to the crawling account, click Authorize account again, enter your SharePoint Online Tenant name, click Sign In, and then proceed to the next step.
-
-
Enter the email and password of the crawling account that you created earlier and that has access to the desired SharePoint Online content, and then click Sign in.
|
|
Note
Your source authentication may eventually fail. You’ll then need to reauthorize the source. |
|
|
Note
When you create two SharePoint Online sources retrieving content with the same tenant, they share their security providers, which increases the speed of the security identities refresh operation. You must, however, use the same limited administrator credentials for both sources. |
"Items" tab
On the Items tab, you can specify how the source handles items based on their file type or content type.
File types
File types let you define how the source handles items based on their file extension or content type. For each file type, you can specify whether to index the item content and metadata, only the item metadata, or neither.
You should fine-tune the file type configurations with the objective of indexing only the content that’s relevant to your users.
Your repository contains .pdf files, but you don’t want them to appear in search results.
You click Extensions and then, for the .pdf extension, you change the Action by default and Action on error values to Ignore item.
For more details about this feature, see File type handling.
Content and images
If you want Coveo to extract text from image files or PDF files containing images, enable the appropriate option. The extracted text is processed as item data, meaning that it’s fully searchable and will appear in the item Quick view.
|
|
Note
When OCR is enabled, ensure the source’s relevant file type configurations index the item content. Indexing the item’s metadata only or ignoring the item will prevent OCR from being applied. |
See Enable optical character recognition for details on this feature.
"Content security" tab
Select who will be able to access the source items through a Coveo-powered search interface. For details on the content security options, see Content security.
|
|
Note
When using the Same users and groups as in your content system content security option, you can map Microsoft 365 email aliases to their corresponding primary email addresses so that your repository’s content permissions are respected when a user logs in to a Coveo-powered search interface using an email alias. |
|
|
When using the Everyone content security option, see Safely apply content filtering for information on how to ensure that your source content is safely filtered and only accessible by intended users. |
"Access" tab
On the Access tab, specify whether each group (and API key, if applicable) in your Coveo organization can view or edit the current source.
For example, when creating a new source, you could decide that members of Group A can edit its configuration, while Group B can only view it.
For more information, see Custom access level.
Build the source
-
Finish adding or editing your source:
-
When you’re done editing the source and want to make your changes effective, click Add and build source/Save and rebuild source.
-
When you want to save your source configuration changes without starting a build/rebuild, such as when you know you want to make other changes soon, click Add source/Save. On the Sources (platform-ca | platform-eu | platform-au) page, click Launch build or Launch rebuild when you’re ready to make your changes effective and index your content.
-
-
On the Sources (platform-ca | platform-eu | platform-au) page, follow the progress of your source addition or modification.
-
Once the source is built or rebuilt, review its content in the Content Browser.
NoteIf you selected Specific URLs or User profiles in the Content section, some additional items will appear in the Content Browser. To retrieve user profiles, Coveo must crawl your SharePoint Online instance, including your host site collection and the documents it contains. Items encountered during this process are also retrieved and therefore appear in the Content Browser.
Index metadata
To use metadata values in search interface facets or result templates, the metadata must be mapped to fields. Coveo automatically maps only a subset of the metadata it extracts. You must map any additional metadata to fields manually.
|
|
Note
Not clear on the purpose of indexing metadata? Watch this video. |
-
On the Sources (platform-ca | platform-eu | platform-au) page, click your source, and then click More > View and map metadata in the Action bar.
-
Review the default metadata that your source is extracting from your content.
-
Map any currently not indexed metadata that you want to use in facets or result templates to fields.
For certain types of content, the source extracts a set of item keys and values, aggregates this information into the
coveo_AllMetadatametadata, and indexes this metadata in thesearchablemetafield. The keys and values that make up thecoveo_AllMetadatametadata are also available as separate metadata. No parsing on your part is required. Just locate the name of the metadata you need on the View and map metadata subpage and proceed, as explained below, to index the metadata in a field.-
Click the metadata and then, at the top right, click Add to index.
-
In the Apply a mapping on all item types of a source panel, select the field you want to map the metadata to, or add a new field if none of the existing fields are appropriate.
NoteFor advanced mapping configurations, like applying a mapping to a specific item type, see Manage mappings.
-
Click Apply mapping.
-
-
Return to the Sources (platform-ca | platform-eu | platform-au) page.
-
To reindex your source with your new mappings, click your source, and then click More > Rebuild in the Action bar.
-
Once the source is rebuilt, review your item field values. They should now include the values of the metadata you selected to index.
-
On the Sources (platform-ca | platform-eu | platform-au) page, click your source, and then click More > Open in Content Browser in the Action bar.
-
Select the card of the item for which you want to inspect properties, and then click Properties in the Action bar.
-
In the panel that appears, select the Fields tab.
-
-
If needed, extract and map additional metadata.
More on custom metadata extraction
The SharePoint Online source automatically extracts the metadata from your list and library columns. To extract additional metadata you want to index, add columns to your lists and libraries.
Then, rebuild and map each extracted custom metadata to a field, as you did for the default metadata.
Troubleshooting
After a rebuild, you may notice that your source isn’t indexing as expected. For example, there may be missing or extra items, or the values of some fields may not meet your requirements.
To help you troubleshoot, refer to the list of common issues and solutions when using the SharePoint Online source.
Safely apply content filtering
The best way to ensure that your indexed content is seen only by the intended users is to enforce content security by selecting the Same users and groups as in your content system option. Should this option be unavailable, select Specific users and groups instead.
However, if you need to configure your source so that the indexed source content is accessible to Everyone, you should adhere to the following leading practices. These practices ensure that your source content is safely filtered and only accessible by the appropriate users:
-
Configure query filters: Apply filter rules on a query pipeline to filter the source content that appears in search results when a query goes through that pipeline.
-
Use condition-based query pipeline routing: Apply a condition on a query pipeline to make sure that every query originating from a specific search hub is routed to the right query pipeline.
-
Configure the search token: Authenticate user queries via a search token that’s generated server side that enforces a specific search hub.
Following the above leading practices results in a workflow whereby the user query is authenticated server side via a search token that enforces the search hub from which the query originates. Therefore, the query can’t be modified by users or client-side code. The query then passes through a specific query pipeline based on a search hub condition, and the query results are filtered using the filter rules.
Configure query filters
Filter rules allow you to enter hidden query expressions to be added to all queries going through a given query pipeline.
They’re typically used to add a field-based expression to the constant query expression (cq).
You apply the @objectType=="Solution" query filter to the pipeline to which the traffic of your public support portal is directed.
As a result, the @objectType=="Solution" query expression is added to any query sent via this support portal.
Therefore, if a user types Speedbit watch wristband in the search box, the items returned are those that match these keywords and whose objectType has the Solution value.
Items matching these keywords but having a different objectType value aren’t returned in the user’s search results.
To learn how to configure query pipeline filter rules, see Manage filter rules.
|
|
Note
You can also enforce a filter expression directly in the search token. |
Use condition-based query pipeline routing
The most recommended and flexible query pipeline routing mechanism is condition-based routing.
When using this routing mechanism, you ensure that search requests are routed to a specific query pipeline according to the search interface from which they originate, and the authentication is done server side.
To accomplish this:
-
Apply a condition to a query pipeline based on a search hub value, such as Search Hub is Community Search or Search Hub is Agent Panel. This condition ensures that all queries that originate from a specific search hub go through that query pipeline.
-
Authenticate user queries via a search token that’s generated server side and that contains the search hub parameter that you specified in the query pipeline.
Configure the search token
When using query filters to secure content, the safest way to enforce content security is to authenticate user queries using a search token that’s generated server side. For instance, when using this approach, you can enforce a search hub value in the search token. This makes every authenticated request that originates from a component use the specified search hub, and therefore be routed to the proper query pipeline. Because this configuration is stored server side and encrypted in the search token, it can’t be modified by users or client-side code.
Implementing search token authentication requires you to add server side logic to your web site or application. Therefore, the actual implementation details will vary from one project to another.
The following procedure provides general guidelines:
|
|
Note
If you’re using the Coveo In-Product Experience (IPX) feature, see Implement advanced search token authentication. |
-
Authenticate the user.
-
Call a service exposed through Coveo to request a search token for the authenticated user.
-
Specify the
userIDsfor the search token, and enforce asearchHubparameter in the search token.
|
|
Note
You can specify other parameters in the search token, such as a query |
For more information and examples, see Search token authentication.
Reauthorize the source
With user delegated access, your source uses the OAuth 2.0 authorization protocol and the crawling account credentials specified in your source configuration to access your SharePoint Online content.
Authentication may start to fail for many reasons, such as:
-
The crawling account was disabled or deleted.
-
The crawling account’s permissions changed.
-
Coveo’s authorization to access the content was revoked.
-
Your source hasn’t indexed your content for a long time, and the refresh token it uses has expired.
An authentication error appears on the Sources (platform-ca | platform-eu | platform-au) page when your SharePoint Online source can no longer access your content.
To reauthorize the source
-
On the Sources (platform-ca | platform-eu | platform-au) page, click your source, and then click Edit in the Action bar.
-
On the source subpage, click the Authentication subtab.
-
Click Reauthorize, and then, in the window that opens, log in to your SharePoint Online tenant with the crawling account used to index your content.
By default, the Also update the authentication token of the related security identity provider box is checked to ensure that the authentication of the linked security identity provider to your source is also updated. However, this security identity provider may be used by multiple sources. Before updating, ensure that doing so won’t impact other sources.
-
Click Save or Save and rebuild source.
Required privileges
You can assign privileges to allow access to specific tools in the Coveo Administration Console. The following table indicates the privileges required to view or edit elements of the Sources (platform-ca | platform-eu | platform-au) page and associated panels. See Manage privileges and Privilege reference for more information.
|
|
Note
The Edit all privilege isn’t required to create sources. When granting privileges for the Sources domain, you can grant a group or API key the View all or Custom access level, instead of Edit all, and then select the Can create checkbox to allow users to create sources. See Can create ability dependence for more information. |
| Actions | Service | Domain | Required access level |
|---|---|---|---|
View sources, view source update schedules, and subscribe to source notifications |
Content |
Fields |
View |
Sources |
|||
Organization |
Organization |
||
Edit sources, edit source update schedules, and edit source mappings |
Organization |
Organization |
View |
Content |
Fields |
Edit |
|
Sources |
|||
View and map metadata |
Content |
Source metadata |
View |
Fields |
|||
Organization |
Organization |
||
Content |
Sources |
Edit |
What’s next?
searchablemeta field are also available as separate indexable metadata; no parsing on your part is required. Just proceed as explained in the Indexing metadata section to index the pieces you need.