Manage filter rules
Manage filter rules
- Prerequisites
- Access the "Filters" subtab
- Add or edit filter rules
- Duplicate filter rules
- Copy filter rules to another pipeline
- Delete filter rules
- Change the rule order
- Export and import filter rules
- Leading practices
- "Content that matches" section
- Operators
- QPL syntax
- Order of execution
- Required privileges
- What’s next
After creating a query pipeline, you can add filter rules to control which content appears in search results. A query pipeline filter is a hidden query expression that’s added to queries going through the pipeline. Filters help define the scope of search results displayed to users by including or excluding content based on specific criteria. With the required privileges, you can add them to your query pipeline.
A support agent authenticates to a customer service search interface.
A query pipeline filter rule adds the expression NOT @source=="Marketing" to ensure that marketing items don’t appear when the end user is identified as a support agent.
The cq is then always NOT @source=="Marketing" when support agents send queries.
Prerequisites
Before creating a rule, make sure that you have the following:
-
Access to a search page
You need access to a Coveo-powered search interface to be able to test the rule that you create.
-
An existing query pipeline
The queries from the search page must travel through a specific query pipeline.
-
Required privileges
You need specific privileges to be able to add and edit rules in a query pipeline.
Once you meet these requirements, you can create a rule on the Query Pipelines (platform-ca | platform-eu | platform-au) page. To test the rule, use the A/B test feature to compare the results of the rule with the results of the original pipeline.
Access the "Filters" subtab
To manage filter rules, first access the Filters subtab in a query pipeline.
-
On the Query Pipelines (platform-ca | platform-eu | platform-au) page, click the query pipeline in which you want to manage filter rules, and then click Edit components in the Action bar.
-
On the page that opens, select the Advanced tab.
-
On the Advanced tab, on the left side of the page, select Filters.
Add or edit filter rules
-
Access the Filters subtab in the query pipeline you want to manage, and then do one of the following:
-
To add a new filter rule, click Add filter rule.
 Note
Note-
If you’re adding a filter rule for the first time, you can click Add rule with code to define the rule using the appropriate QPL syntax.
-
If you’re adding a filter rule to a list of existing rules, you can click
 , and then click Add rule with code.
-
-
To edit an existing filter rule, click the rule you want to edit, and then click Edit in the Action bar.
NoteYou can also click More, and then select Edit code to edit the rule using the appropriate QPL syntax.
-
-
In the Add/Edit a filter rule panel, under the Query Parameter dropdown menu, select the query parameter in which the filter will be included in an
ANDexpression. -
In the Content that matches section, depending on the mode, use the dropdown menus or the input to provide the desired filter expressions.
-
In the Condition section, you can optionally select a query pipeline condition in the dropdown menu or create a new one.
-
Under Description, optionally enter information that will help you manage the rule in the future.
-
Click Add rule or Save.
Duplicate filter rules
When creating filter rules in a query pipeline, you might want to create a new rule that’s similarly configured to an existing one. An efficient way to do this is to duplicate the existing rule and then modify it as needed.
-
Access the Filters subtab in the query pipeline you want to manage.
-
In the Filters subtab, select the rules you want to duplicate within the same pipeline.
-
In the Action bar, click Duplicate.
The duplicated filter rules appear at the bottom of the filters list.
Copy filter rules to another pipeline
When you have multiple query pipelines that require similar rules, you can copy filter rules from one pipeline to another.
-
On the Query Pipelines (platform-ca | platform-eu | platform-au) page, click the query pipeline from which you want to copy query pipeline rules, and then click Edit components in the Action bar.
-
On the page that opens, select the Advanced tab.
-
On the Advanced tab, on the left side of the page, select Filters.
-
In the Filters subtab, select the rules you want to copy to another pipeline.
-
In the Action bar, click More, and then click Copy to….
-
In the dialog that appears, select the target pipeline to which you want to copy the rules, and then click Copy.
Your copied rules will take effect immediately in the target pipeline.
Delete filter rules
-
Access the Filters subtab in the query pipeline you want to manage.
-
In the Filters subtab, select the rules you want to delete.
-
In the Action bar, click More, and then Delete.
-
Click Delete to confirm.
Your deleted rules will stop being effective immediately in the current pipeline.
|
|
|
Change the rule order
Query pipeline rules are executed in the order in which they appear on the page. When multiple rules match the same query, they apply in sequence from top to bottom. Earlier rules can transform the query before later rules evaluate it.
-
On the Query Pipelines (platform-ca | platform-eu | platform-au) page, click the query pipeline for which you want to manage the rules' execution order, and then click Edit components in the Action bar.
-
On the page that opens, select the Advanced tab.
-
In the Advanced tab, on the left side of the page, select Filters.
-
In the Filters subtab, click the rule whose position you want to change.
-
In the Action bar, click Move up or Move down to change the position of the rule.
|
|
Note
When you move a filter rule, only the order of execution of filter rules is adjusted. Moving the rule doesn’t affect the order of execution of filter rules relative to other query pipeline components. |
Export and import filter rules
Once you’ve created filter rules, you can reuse them in different query pipelines.
-
On the Query Pipelines (platform-ca | platform-eu | platform-au) page, click the appropriate pipeline, click More in the Action bar, and then do one of the following:
-
To export rules, click Export.
-
In the Export panel, select the Filters option, and then click Export.
The data is exported to a CSV file.
-
-
To import rules, click Import.
-
In the Import panel, click Select a file, and select the appropriate CSV file.
-
Select the Filters option, and then click Import.

-
Importing filter rules from another query pipeline will overwrite any existing filter rules in the current query pipeline.
-
The rules and conditions listed in the CSV file must be formatted using the QPL syntax, while the feature name must be the Search API name of the rule type (in this case,
filter). See Creating CSV files for importation for more information.
-
-
-
Leading practices
Consider the following leading practices when creating filter rules:
Don’t use filter rules to exclude sensitive information
Filters, by themselves, don’t prevent the exposure of filtered content. We strongly advise against creating a source whose content is accessible to everyone and using a pipeline filter to exclude sensitive information.
In the following cases, sensitive content from a source whose content is accessible to everyone could be exposed:
-
A filter rule based on the
aqquery parameter is set on a query pipeline that contains an ART model for which the Match the advanced query option is disabled. -
Using other pipelines not having a similar filter from other search interfaces or directly from the API.
-
A colleague not understanding the reason for the filter could modify or remove the filter.
You can ensure security by enforcing the search hub at the search token level (see Search token authentication). Moreover, search hubs defined on the client-side that are used as conditions in pipelines don’t safeguard the security of the filtered content.
Use inclusion filters
When creating filters, specify what the pipeline should include rather than exclude (for example, @source==("Source 1", "Source 2") rather than NOT @source==("Source 3")) to prevent new source content or content types in your organization index from appearing in search results.
If you only use an exclusion filter you must modify the filter expression whenever new content is added to your organization index. To provide a controlled deployment of new sources into search results, use an inclusion filter, which allows content to be included in an additive manner. This means content only appears in search results after the filter is updated, not immediately after indexing.
You have three sources (Source 1, Source 2, Source 3) in your index and you want only Source 1 and Source 2 content to appear in the search results of a specific tab:
-
An exclusion filter (for example,
NOT @source==("Source 3")), requires you to modify the filter expression if you retrieve content from the newly created Source 4 (for example,NOT @source==("Source 3", "Source 4")). -
An inclusion filter (for example,
@source==("Source 1", "Source 2")), requires no further changes even if you index Source 4 content.
Check your source mappings
Filter rules exclude items that don’t match the hidden query expression on which the rule is based.
Since you’ll typically use filter rules to add a field-based expression to the cq, all items that fall within the scope of the filter rule must be mapped with the matching metadata values to appear in search results (see Manage source mappings).
In other words, items that don’t match the defined query expression won’t appear in the search results.
Therefore, you should be 100% certain that all items that must match the filter expression are consistently mapped with the proper metadata.
If you’re not 100% certain that the mappings are totally accurate, you should consider using query ranking expression rules instead.
Apply filter rules conditionally
Typically, filter rules should only apply when a certain condition is fulfilled.
In general, you should ensure that the rule or its pipeline is associated to a global condition.
Moreover, when basing a filter rule on the value of one or more $context keys, you should use a condition to assert that these keys contain values.
Otherwise, you risk injecting invalid expressions in the target part of the query expression (that is, aq, cq, etc.).
"Content that matches" section
When creating a rule, under the Content that matches section, you must define filter expressions to target specific content.
You can define filter expressions using either the "Basic mode" or "Advanced mode."
Basic mode
To define filter expressions using the Basic mode:
-
In the Select field dropdown menu, use the Filter box to find and select the field that must be targeted by the filter expression.
-
In the Select a comparator dropdown menu, select one of the available comparators.
-
If applicable, in the Select a field value dropdown menu, enter or select the values that must be filtered according to the field selected in step 1.
-
(Optional) Click Add to add another filter expression to the rule. Note that when adding multiple filter expressions to a rule, new filter expressions are appended to the initial expression using the
andlogic, meaning that only content matching all filter expressions will be affected by the rule.
Advanced mode
To define filter expressions using the Advanced mode, enter a query expression using the query syntax.
Operators
Contains
For the filter rules to modify the search results of an end user, the expression selected or entered in the Select a field value input must be part of the end user query.
Does not contain
For the filter rules to modify the search results of an end user, the expression selected or entered in the Select a field value input must not be part of the end user query.
Is
For the filter rules to modify the search results of an end user, the expression entered in the Enter keyword(s) input must be the same as the end user query.
Is defined
For the filter rules to modify the search results of an end user, the field selected in the Select field dropdown menu must be defined in the end user query.
Is not
For the filter rules to modify the search results of an end user, the expression selected or entered in the Select a field value input must not be the same as the end user query.
Is not defined
For the filter rules to modify the search results of an end user, the field selected in the Select field dropdown menu must not be defined in the end user query.
Since
For the filter rules to modify the search results of an end user, the date field selected in the Select field dropdown menu must be more recent than the date selected or entered in the Select a field value input.
QPL syntax
Use the following query pipeline language (QPL) syntax to define a statement expressing the filter feature:
filter <queryExpressionPart> <expressions><queryExpressionPart>
A string indicating the part of the query expression to which one or more query expressions should be appended. Must be one of:
-
aq: The advanced part -
cq: The constant part -
dq: the disjunction part -
lq: the large part -
q: the basic part
|
|
Notes
|
<expressions>
A comma-separated list of query expressions (for example, foo`, using an implicit @bar=="baz").
Each of these query expressions will be appended to the current value of the target `<queryExpressionPart>AND operator (that is, a whitespace character).
|
|
The result set of the constant part ( Consequently, you should avoid creating |
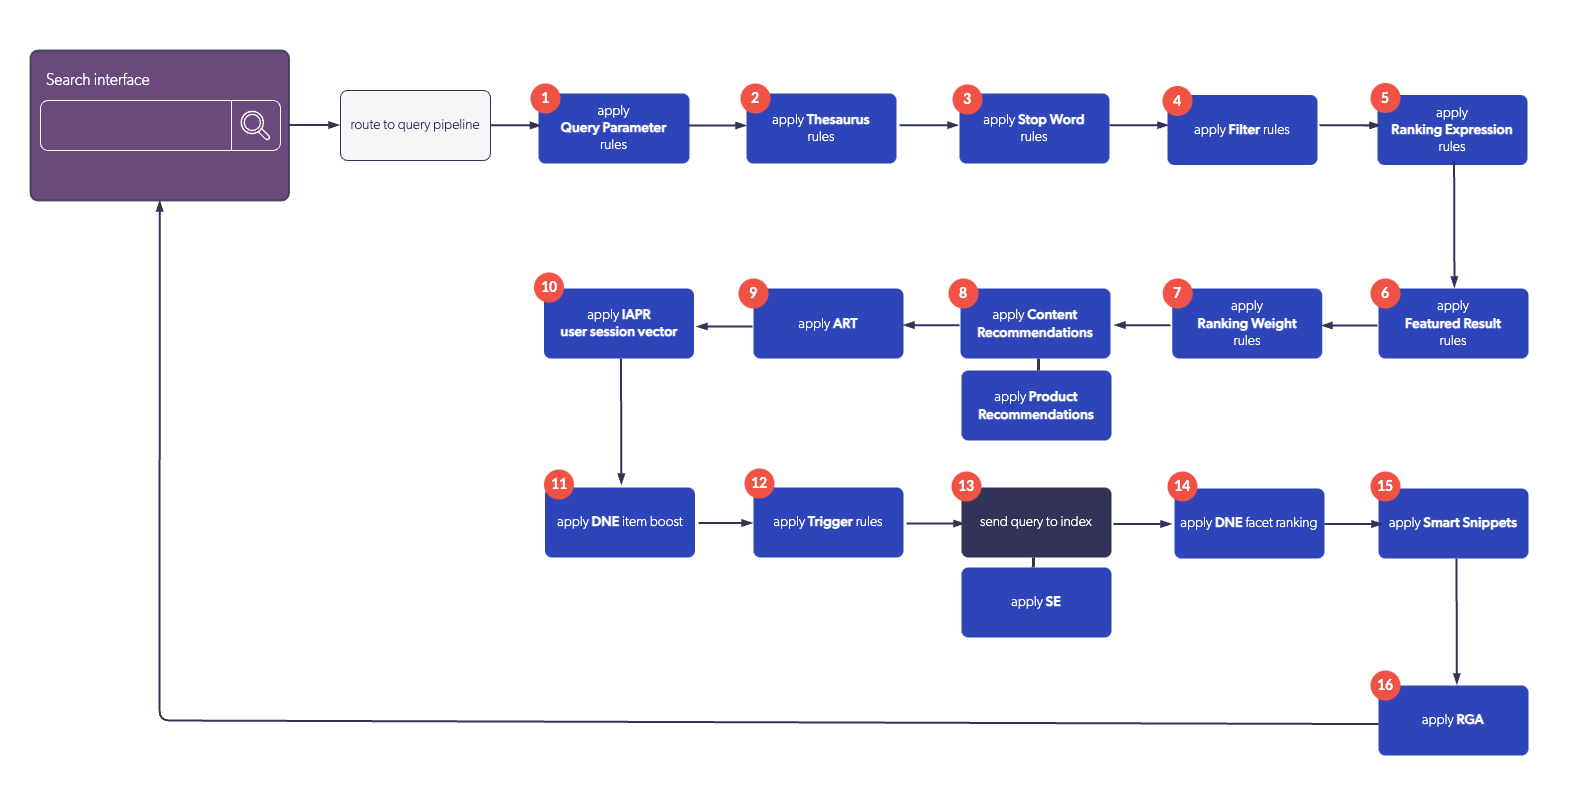
Order of execution
The following diagram illustrates the order of execution of query pipeline features:
Required privileges
The following table indicates the privileges required to view or edit filter rules. Learn more about the Privilege reference or how to manage privileges.
| Action | Service | Domain | Required access level |
|---|---|---|---|
View filter rules |
Organization |
Organization |
View |
Search |
Query pipelines |
View |
|
Edit filter rules using the Basic mode |
Organization |
Organization |
View |
Content |
Fields |
View |
|
Search |
Query pipelines |
Edit |
|
Edit filter rules using the Advanced mode |
Organization |
Organization |
View |
Search |
Query pipelines |
Edit |
What’s next
Use the Content Browser to test your filter rules and ensure they work as expected.