Manage trigger rules
Manage trigger rules
- When and why to use trigger rules
- Prerequisites
- Access the "Triggers" subtab
- Add or edit trigger rules
- Duplicate trigger rules
- Copy trigger rules to another pipeline
- Delete trigger rules
- Change the rule order
- Export and import trigger rules
- QPL syntax
- Order of execution
- Required privileges
- What’s next
trigger rules define an action to execute in a search interface when a query meets the associated conditions.
By default, a Coveo organization has no trigger rules, but with the required privileges, you can add trigger rules to your query pipelines.
When you add a trigger rule to a query pipeline, the query response generates an object representing the action to perform inside the triggers property of the query response.
The search interface from which the query originates is then responsible for translating this object into an action (for example, executing a corresponding JavaScript function call or redirecting the web browser to a specific URL).
When and why to use trigger rules
There are different methods you can use to define trigger rules, depending on the action you want to perform in the search interface:
Notify
Use the Notify trigger rule when you want to display notifications in the search interface based on specific queries. This method is useful when you want to inform users about important information and additional context related to their search. Common use cases include displaying alerts, tips, or disclaimers depending on the user’s query.
In your medical information website, when a user asks a specific question, you want to show a notification that suggests submitting a consultation request with a healthcare professional.
You create a Notify trigger rule that displays the message For more personalized advice, consider submitting a consultation request with one of our healthcare professionals. whenever a user performs a query containing the words symptoms and treatment.
|
|
Notes
|

Query
Use the Query trigger rule when you want to automatically modify or replace certain queries to improve search results. This method is useful when users commonly submit incomplete or inconsistent queries, and you want to improve result relevance without requiring manual refinement. Common use cases include correcting frequent search patterns, expanding queries to include related terms, or guiding users toward more precise queries.
You manage a support portal where you notice that users often search for password reset when they actually need to complete the 2FA process.
You create a Query trigger rule that performs the how do I log in query whenever a user searches for password reset, ensuring that support articles with relevant log-in steps are displayed.
|
|
Notes
|
Execute
Use the Execute trigger rule when you want to run custom logic in the search interface based on specific queries. This method is useful when the desired action can’t be achieved by displaying a notification, modifying the query, or redirecting the user. Common use cases include triggering custom warnings, displaying modal dialogs, or enforcing specific workflows based on what users search for.
You manage a support portal and you recently deprecated the ACME CTRLR product.
You realize that support agents, however, are still searching for this product name.
You create an Execute trigger rule that runs a deprecatedProduct() JavaScript function whenever a user searches for acme ctrlr (or any casing variation), ensuring that agents are alerted that the product has been deprecated.

|
|
Notes
|
Redirect
Use the Redirect trigger rule when you want to automatically send users to a specific URL based on certain queries. This method is useful when displaying search results on the current search interface doesn’t provide value to the user and a separate page better addresses their needs. Common use cases include directing users to store locators, contact pages, or even external resources that fully answer the user’s request.
You manage a retail website and notice that users frequently search for find stores when they want to find physical store addresses.
You create a Redirect trigger rule that automatically redirects users to your Store Finder page whenever they perform a query for find stores.
|
|
Notes
Handling redirect triggers varies depending on the framework you’re using:
|
Prerequisites
Before creating a rule, make sure that you have the following:
-
Access to a search page
You need access to a Coveo-powered search interface to be able to test the rule that you create.
-
An existing query pipeline
The queries from the search page must travel through a specific query pipeline.
-
Required privileges
You need specific privileges to be able to add and edit rules in a query pipeline.
Once you meet these requirements, you can create a rule on the Query Pipelines (platform-ca | platform-eu | platform-au) page. To test the rule, use the A/B test feature to compare the results of the rule with the results of the original pipeline.
Access the "Triggers" subtab
To manage trigger rules, access the Triggers subtab of the query pipeline you want to manage.
-
On the Query Pipelines (platform-ca | platform-eu | platform-au) page, click the query pipeline for which you want to manage rules, and then click Edit components in the Action bar.
-
On the page that opens, select the Advanced tab.
-
On the Advanced tab, on the left side of the page, select Triggers. The Triggers subtab appears.
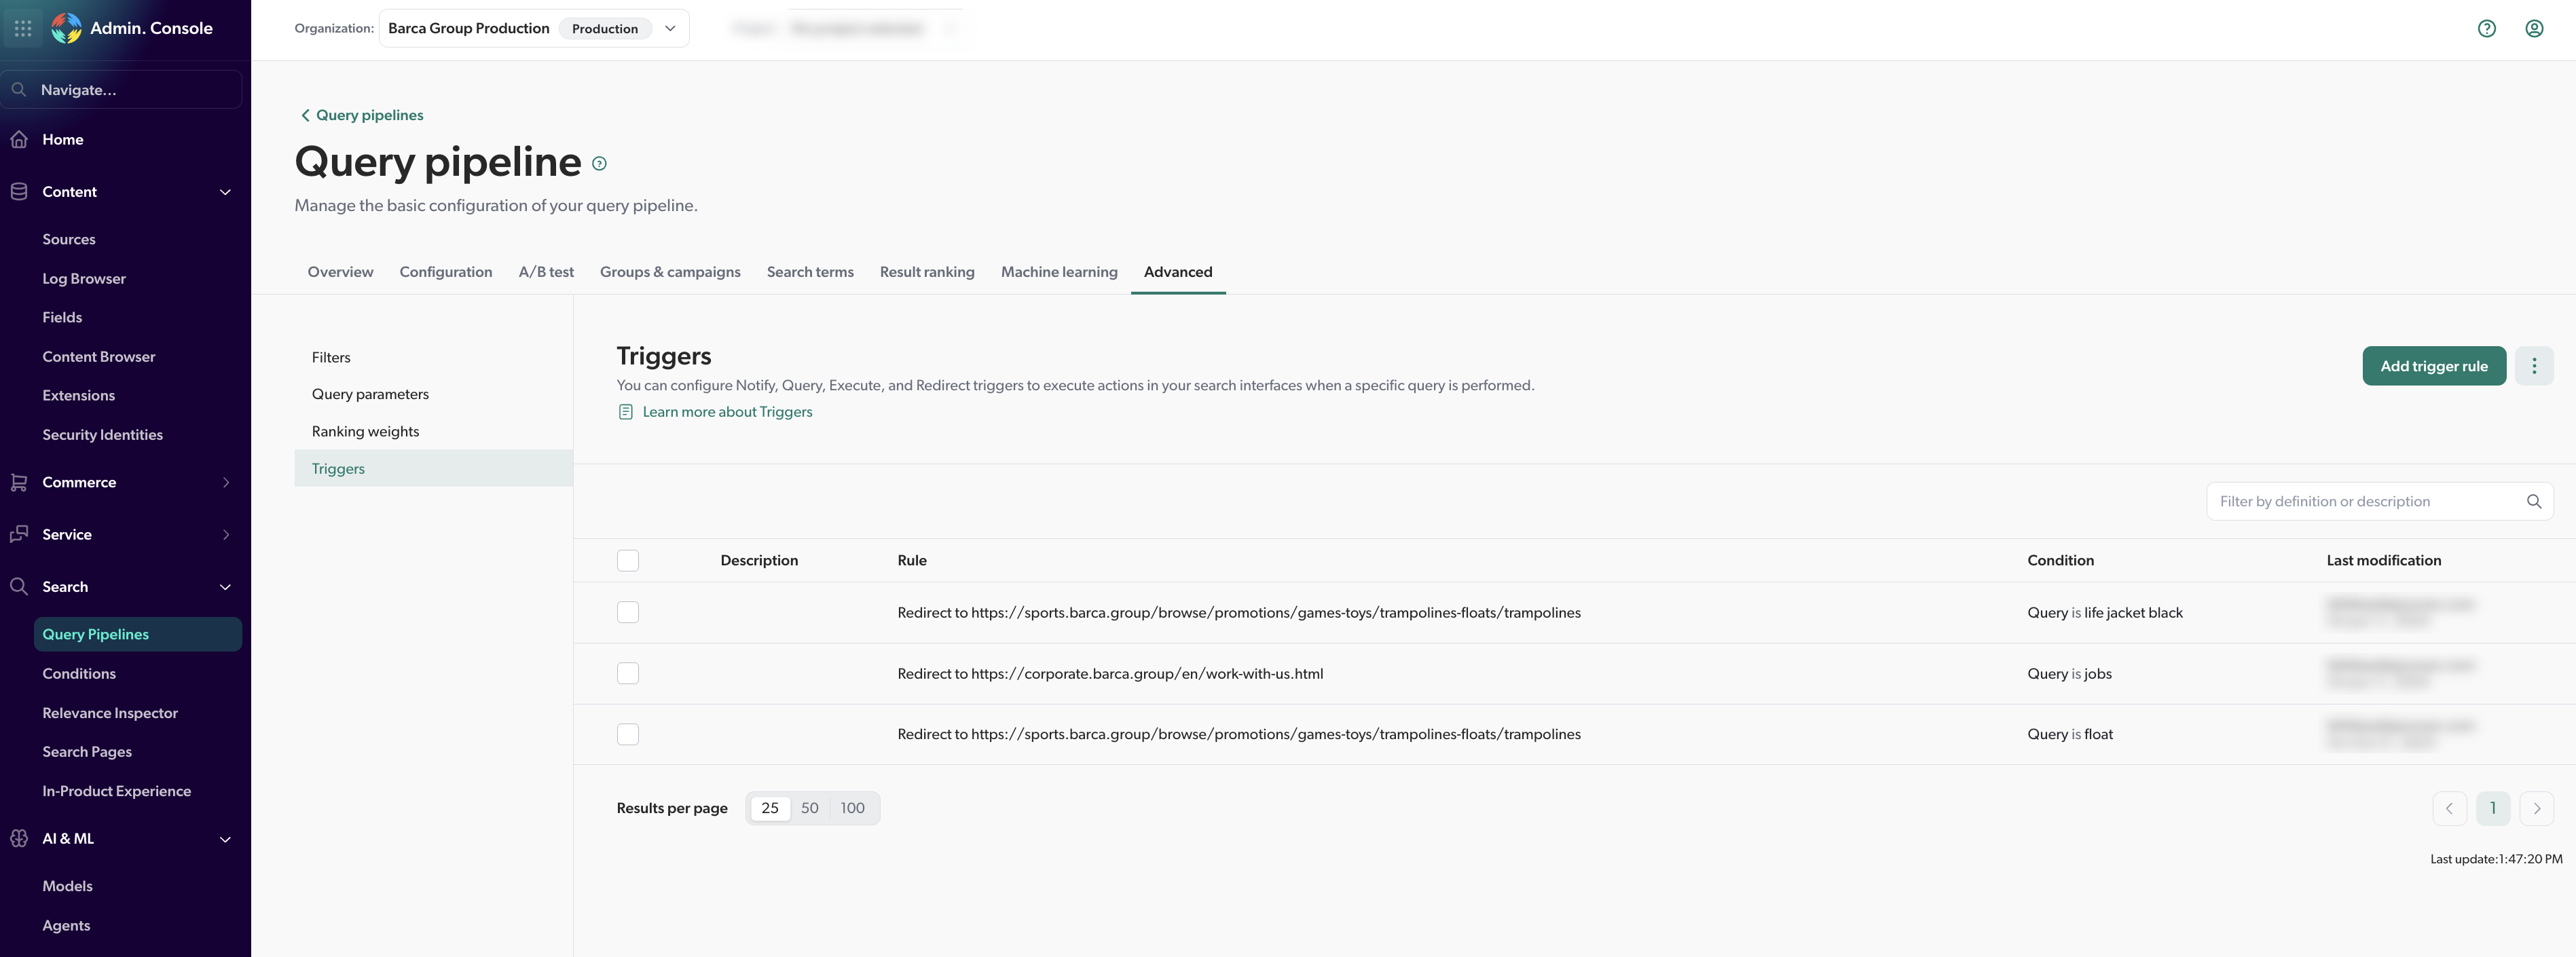
Add or edit trigger rules
-
Access the Triggers subtab in the query pipeline you want to manage, then do one of the following:
-
To add a new trigger rule, click Add trigger rule.
 Notes
Notes-
When adding a trigger rule for the first time, you can also click Add rule with code to define the rule using the appropriate QPL syntax.
-
When adding a trigger to a list of existing rules, you can also click
 , and then click Add rule with code.
-
-
To edit an existing trigger rule, click the rule you want to edit, and then click Edit in the Action bar.
NoteYou can also click More, and then select Edit code to edit the rule using the appropriate QPL syntax.
-
-
In the Add/Edit a trigger rule subpage, under Type, select one of the methods in the dropdown menu.
-
In the box that opens, depending on the selected method, enter the appropriate value. For example:
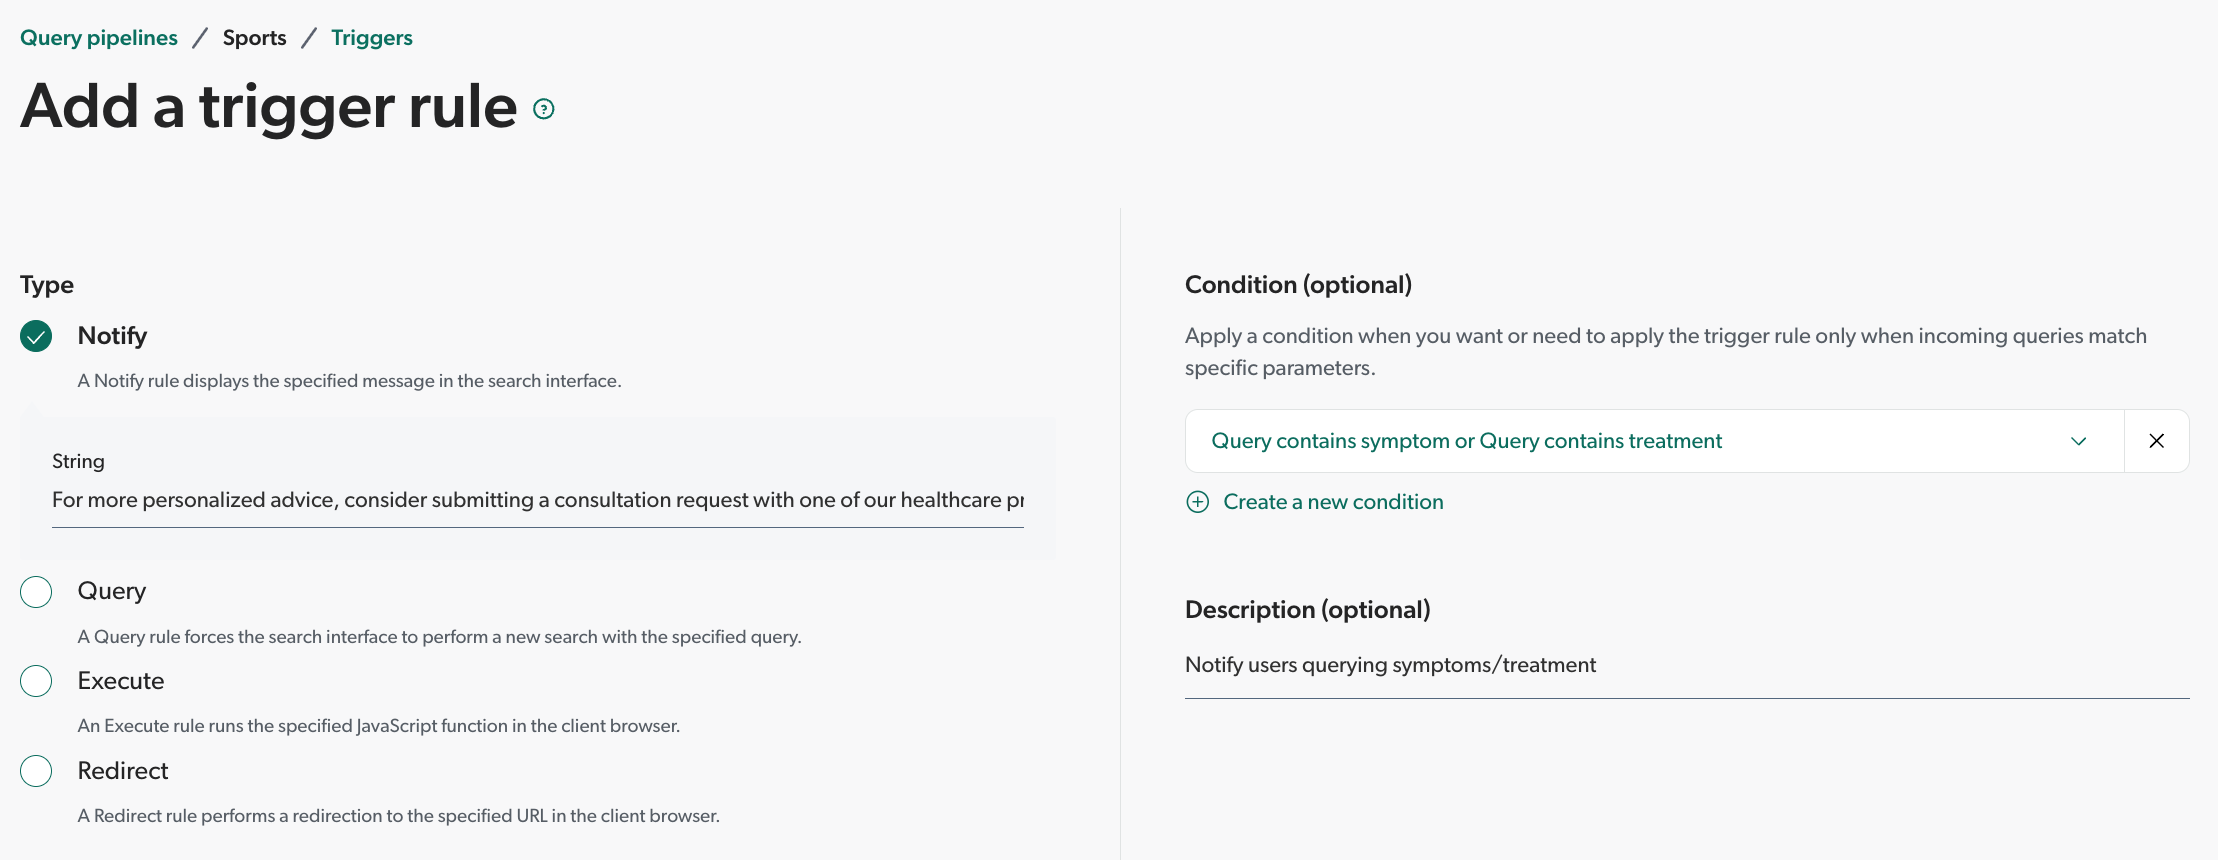
-
For Notify, in the String box, enter a message to display in the search interface.
-
For Query, in the Query box, enter a query to perform as a new search in the search interface.
-
For Execute, in the Function box, enter a JavaScript function to execute in the user’s browser.
-
For Redirect, in the URL box, enter a URL to redirect the user.
-
-
Under Condition, select a query pipeline condition in the dropdown menu or create a new one.

If a trigger rule isn’t associated with a query pipeline condition, the rule is ignored.
-
Under Description, optionally enter information that will help you manage the rule in the future.
-
Click Add rule or Save.
Duplicate trigger rules
You can duplicate trigger rules within the same pipeline.
-
Access the Triggers subtab of the query pipeline you want to manage.
-
In the Triggers subtab, select the rules you want to duplicate within the same pipeline.
-
In the Action bar, click Duplicate.
The duplicated trigger rules appear at the bottom of the list in the pipeline component tab.
Copy trigger rules to another pipeline
When you have more than one query pipeline that serve different purposes but require similar rules, you might want to copy trigger rules from one pipeline to another.
-
Access the Triggers subtab in the query pipeline you want to manage.
-
In the Triggers subtab, select the rules you want to copy to another pipeline.
-
In the Action bar, click More, and then click Copy to….
-
In the dialog that appears, select the target pipeline to which you want to copy the rules, and then click Copy.
Your copied rules will take effect immediately in the target pipeline.
Delete trigger rules
-
Access the Triggers subtab of the query pipeline you want to manage.
-
In the Triggers subtab, select the rules you want to delete.
-
In the Action bar, click More, and then Delete.
-
Click Delete to confirm.
Your deleted rules will stop being effective immediately in the current pipeline.
|
|
|
Change the rule order
Query pipeline rules are executed in the order in which they appear on the page. When multiple rules match the same query, they apply in sequence from top to bottom. Earlier rules can transform the query before later rules evaluate it.
-
On the Query Pipelines (platform-ca | platform-eu | platform-au) page, click the query pipeline for which you want to manage the rules' execution order, and then click Edit components in the Action bar.
-
On the page that opens, select the Advanced tab.
-
In the Advanced tab, on the left side of the page, select Triggers.
-
In the Triggers subtab, click the rule whose position you want to change.
-
In the Action bar, click Move up or Move down to change the position of the rule.
|
|
Note
When you move a trigger rule, only the order of execution of trigger rules is adjusted. Moving the rule doesn’t affect the order of execution of trigger rules relative to other query pipeline components. |
Export and import trigger rules
Once you’ve created trigger rules, you can reuse them in different query pipelines.
-
On the Query Pipelines (platform-ca | platform-eu | platform-au) page, click the appropriate pipeline, click More in the Action bar, and then do one of the following:
-
To export rules, click Export.
-
In the Export panel, select the Triggers option, and then click Export.
The data is exported to a CSV file.
-
-
To import rules, click Import.
-
In the Import panel, click Select a file, and select the appropriate CSV file.
-
Select the Triggers option, and then click Import.
-
Importing trigger rules from another query pipeline will overwrite any existing trigger rules in the current query pipeline.
-
The rules and conditions listed in the CSV file must be formatted using the QPL syntax, while the feature name must be the Search API name of the rule type (in this case,
trigger). See Creating CSV files for importation for more information.
-
-
-
QPL syntax
Use the following query pipeline language (QPL) syntax to define a trigger rule:
execute <function> | notify <message> | query <expression> | redirect <url><function>
A string that contains the JavaScript function call to execute (for example, myFunction()).
Boolean, integer, and quoted string function arguments are allowed.
|
|
Note
When specifying a function containing arguments (for example, Therefore, the corresponding function must be implemented accordingly on client-side.
For example, if the trigger expression is |
<message>
A quoted string that contains a message to display to the end user (for example, "Hello world!").
<expression>
A query expression to perform against the index (for example, coveo OR "machine learning").
<url>
A quoted string that contains a URL to which the browser is redirected (for example, "http://www.example.com").
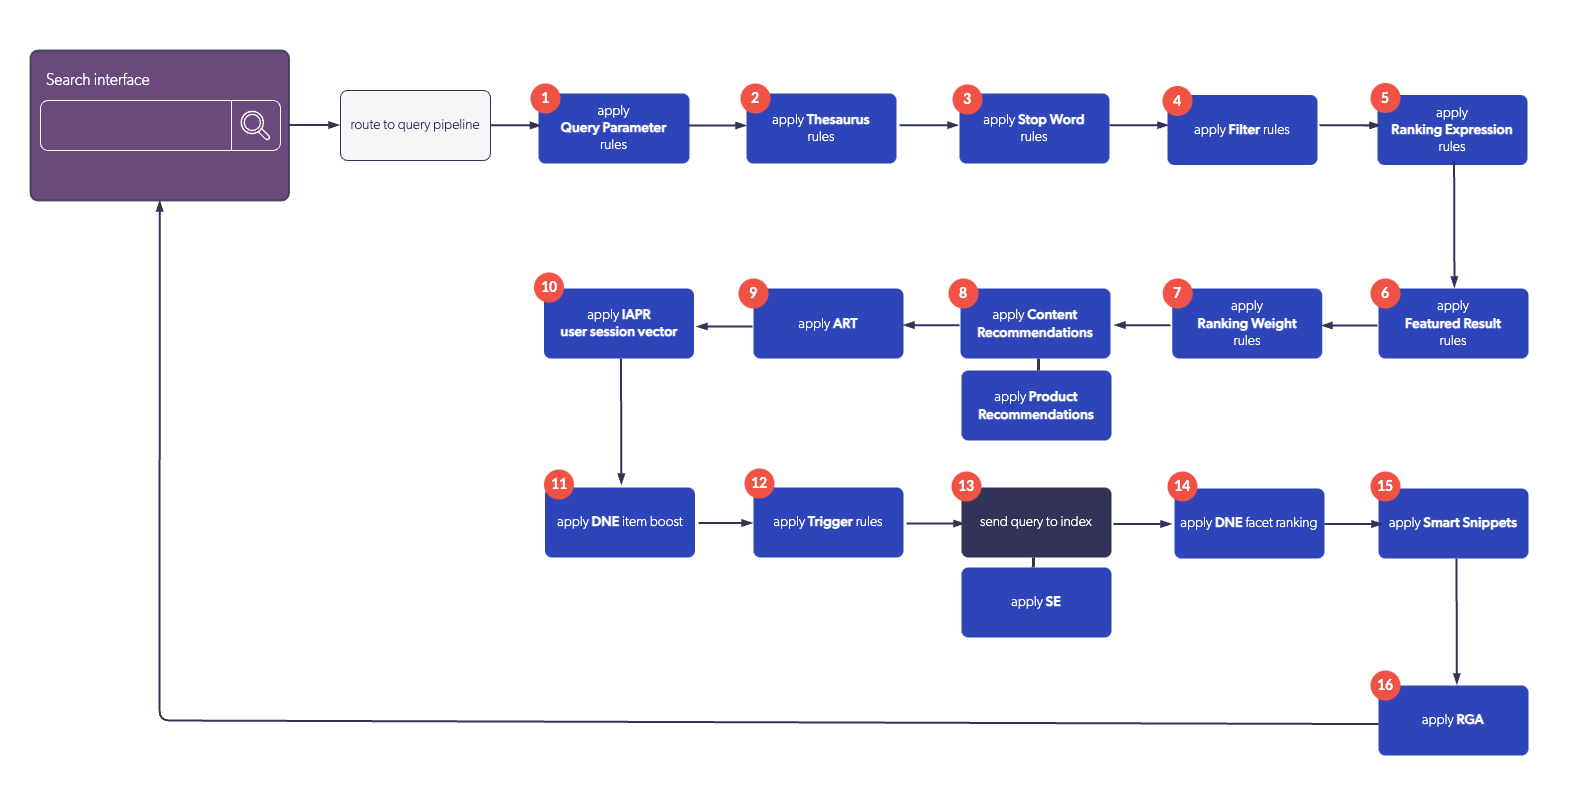
Order of execution
The following diagram illustrates the order of execution of query pipeline features:
Required privileges
The following table indicates the privileges required to view or edit trigger rules. Learn more about the Privilege reference or how to manage privileges.
| Action | Service | Domain | Required access level |
|---|---|---|---|
View trigger rules |
Organization |
Organization |
View |
Search |
Query pipelines |
View |
|
Edit trigger rules |
Organization |
Organization |
View |
Search |
Query pipelines |
Edit |
What’s next
Use the Content Browser to test your trigger rules and ensure they work as expected.