Manage trigger rules
Manage trigger rules
Members with the required privileges can use query pipeline triggers to define an action to execute in a search interface when a query meets the associated condition.
The list of query pipeline triggers for a Coveo organization is empty by default.
When a trigger rule is applied, an object representing the action to perform is generated inside the triggers property of the query response.
The search interface from which the query originates is then responsible for translating this object into an action (for example, executing a corresponding JavaScript function call, notifying the end user with a corresponding message, etc.).
Prerequisites
Before creating a rule, make sure that you have the following:
-
Access to a search page
You need access to a Coveo-powered search interface to be able to test the rule that you create.
-
An existing query pipeline
The queries from the search page must travel through a specific query pipeline.
-
Required privileges
You need specific privileges to be able to add and edit rules in a query pipeline.
Once you meet these requirements, you can create a rule on the Query Pipelines (platform-ca | platform-eu | platform-au) page. To test the rule, use the A/B test feature to compare the results of the rule with the results of the original pipeline.
Access the "Triggers" subtab
To manage trigger rules, access the Triggers subtab of the query pipeline you want to manage.
-
On the Query Pipelines (platform-ca | platform-eu | platform-au) page, click the query pipeline for which you want to manage rules, and then click Edit components in the Action bar.
-
On the page that opens, select the Advanced tab.
-
In the Advanced tab, on the left side of the page, select Triggers. The Triggers subtab appears.
Add or edit trigger rules
-
Access the Triggers subtab in the query pipeline you want to manage, then do one of the following:
-
To add a new trigger rule, click Add trigger rule.
 Note
Note-
If you’re adding a trigger rule for the first time, you can click Add rule with code to define the rule using the appropriate QPL syntax.
-
If you’re adding a trigger to a list of existing rules, you can click
 , and then click Add rule with code.
-
-
To edit an existing trigger rule, click the rule you want to edit, and then click Edit in the Action bar.
NoteYou can also click More, and then select Edit code to edit the rule using the appropriate QPL syntax.
-
-
In the Add/Edit a trigger rule subpage, under Type, select one of the available methods (Notify, Query, Execute, or Redirect).
-
In the box that opens, depending on the selected method, enter the desired value.
-
Under Condition, select a query pipeline condition in the dropdown menu or create a new one.

If a trigger rule isn’t associated with a query pipeline condition, the rule is ignored.
-
Under Description, optionally enter information that will help you manage the rule in the future.
-
Click Add rule or Save.
Duplicate trigger rules
You can duplicate trigger rules within the same pipeline.
-
Access the Triggers subtab of the query pipeline you want to manage.
-
In the Triggers subtab, select the rules you want to duplicate within the same pipeline.
-
In the Action bar, click Duplicate.
The duplicated trigger rules appear at the bottom of the list in the pipeline component tab.
Copy trigger rules to another pipeline
When you have more than one query pipeline that serve different purposes but require similar rules, you may want to copy trigger rules from one pipeline to another.
-
Access the Triggers subtab in the query pipeline you want to manage.
-
In the Triggers subtab, select the rules you want to copy to another pipeline.
-
In the Action bar, click More, and then click Copy to….
-
In the dialog that appears, select the target pipeline to which you want to copy the rules, and then click Copy.
Your copied rules will take effect immediately in the target pipeline.
Delete trigger rules
-
Access the Triggers subtab of the query pipeline you want to manage.
-
In the Triggers subtab, select the rules you want to delete.
-
In the Action bar, click More, and then Delete.
-
Click Delete to confirm.
Your deleted rules will stop being effective immediately in the target pipeline.
|
|
|
Change the rule order
Query pipeline rules are executed in the order in which they appear on the page until a condition is satisfied.
-
On the Query Pipelines (platform-ca | platform-eu | platform-au) page, click the query pipeline for which you want to manage the rules' execution order, and then click Edit components in the Action bar.
-
On the page that opens, select the Advanced tab.
-
In the Advanced tab, on the left side of the page, select Triggers.
-
In the Triggers subtab, click the rule whose position you want to change.
-
In the Action bar, click Move up or Move down to change the position of the rule.
Reference
Methods
When managing trigger rules, you can select one of the following trigger types:
Notify
When creating or editing a Notify trigger rule, in the String box, enter a message to display in the search interface.
On your internal search page for parts, each time a query is performed without a model number, you want to show Add a model number to your query to the user.
You use the Coveo Atomic library atomic-notifications component to handle notifications generated by the notify triggers.

|
|
Note
|
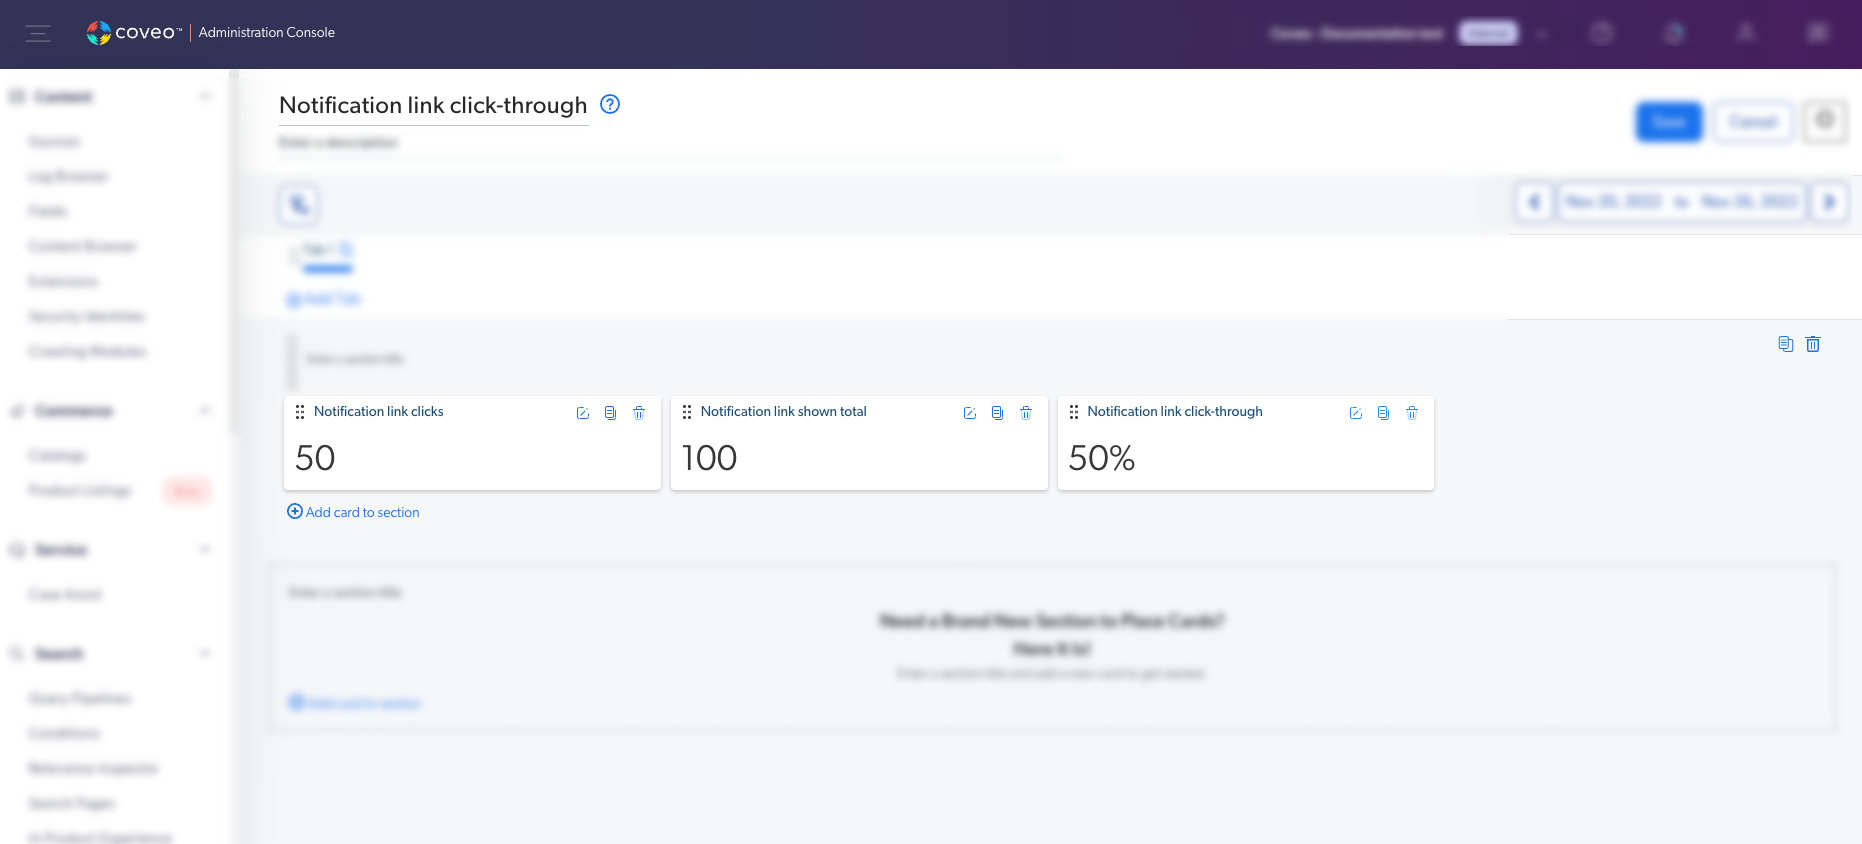
Reporting on notification clicks
You may want to capture information about clicks made by your end users on notification links.
For example, if you have a Notify trigger rule that displays a link when end users perform a certain query, you might want to capture information about its usage and leverage it in Coveo Analytics reports.
The approach to capture clicks notification links differs depending on whether the links redirects to items in your index or external resources (that is, resources that aren’t in your index):
-
When notification links redirect to items in the index, log these clicks as regular click events.
These clicks are taken into account in the Search Event Clickthrough metric and Coveo Machine Learning (Coveo ML) Automatic Relevance Tuning (ART) models can learn from them.
-
When notification links redirect to external resources, the best approach is to log these clicks as custom events.
Since the resources aren’t in your index, you don’t have all the information necessary to send the required request body properties to the Coveo UA Write API when logging click events.
When logging notification clicks as custom events, consider that:
-
These events can’t be used by Coveo ML ART models.
-
If you want to calculate the clickthrough rate related to these clicks, you must use report cards. The default Search Event Clickthrough metric can’t be used since clicks logged as custom events aren’t considered as regular click events from a Coveo UA perspective.
For example, you could have one metric card showing the number of times the notification link was shown (query count), one metric card showing the number of clicks the notification link (click count), and one calculated metric card dividing the click count by the query count multiplied by 100.
 Leading practice
Considering these facts, we recommend that you add these external resources to your Coveo index. This way, you could use these clicks to feed Coveo ML ART models and a default metric to report on the clickthrough rate.
-
Query
When creating or editing a Query trigger rule, in the Query box, enter a query to perform as a new search in the search interface.
For the Coveo Atomic library, the atomic-did-you-mean component is used to display changes made to the user’s query by a query trigger.
|
|
Note
|
Execute
When creating or editing an Execute trigger rule, in the Function box, enter a JavaScript function to execute in the user’s browser.
-
Suppose you recently deprecated the ACME CTRLR product, but realize that your support agents still search for it. To make sure that all your agents are aware of that recent change, you configured the
deprecatedProduct()function in your search interface to alert them when they’re about to send theACME ctrlrquery. -
Since you want this function to execute only when the
ACME ctrlrquery is sent, you configure an Execute trigger rule that targets thedeprecatedProduct()function and that executes only when a user sends theACME ctrlrquery.
-
The Coveo Headless library ExecuteTrigger controller lets you handle execute triggers, as shown in the following example:
const engine = searchInterface.engine!; const availableFunctions: Record<string, Function> = { deprecatedProduct() { const currentQuery = engine.state.search.queryExecuted;
alert("The '" + currentQuery + "' product has been deprecated.");
}
};
const executeController = buildExecuteTrigger(engine);
const currentQuery = engine.state.search.queryExecuted;
alert("The '" + currentQuery + "' product has been deprecated.");
}
};
const executeController = buildExecuteTrigger(engine);  executeController.subscribe(() => {
for (const execution of executeController.state.executions) {
executeController.subscribe(() => {
for (const execution of executeController.state.executions) {  const functionToExecute = availableFunctions[execution.functionName];
  if (!functionToExecute) {
console.error(`Index tried to execute function ${functionToExecute} with parameters ${JSON.stringify(execution.params)} but it was unavailable.`);
return;
}
functionToExecute(...execution.params);
}
});
if (!functionToExecute) {
console.error(`Index tried to execute function ${functionToExecute} with parameters ${JSON.stringify(execution.params)} but it was unavailable.`);
return;
}
functionToExecute(...execution.params);
}
});The deprecatedProduct()function is defined withinavailableFunctions. For this particular method, any user-defined functions intended to be used with execution triggers are to be defined withinavailableFunctions.buildExecuteTriggercreates a controller for the execute trigger.The executionsproperty is read and iterated over from the controller state. It stores the function names to be executed and their respective parameters.Each of the functions in the executionsarray is executed, or if a function isn’t defined, it will display an error.
|
|
Note
|
Redirect
When creating or editing a Redirect trigger rule, in the URL box, enter a URL to redirect the user.
For certain queries, you want a specific web page to open.
A user searching find stores is automatically redirected to your Store Finder page instead of being shown results containing the words find stores.
Redirection triggers are handled within the Coveo Headless library using the RedirectionTrigger controller.
const engine = searchInterface.engine!;
const redirectController = buildRedirectionTrigger(engine);
redirectController.subscribe(() => {
    const { redirectTo } = redirectController.state;
    if (redirectTo) {
        window.location.replace(redirectTo);
    }
});|
|
Note
Handling redirect triggers varies depending on the framework you’re using:
|
QPL syntax
Use the following query pipeline language (QPL) syntax to define a trigger rule:
execute <function> | notify <message> | query <expression> | redirect <url><function>
A string that contains the JavaScript function call to execute (for example, myFunction()).
Boolean, integer, and quoted string function arguments are allowed.
|
|
Note
When specifying a function containing arguments (for example, Therefore, the corresponding function must be implemented accordingly on client-side.
For example, if the trigger expression is |
<message>
A quoted string that contains a message to display to the end user (for example, "Hello world!").
<expression>
A query expression to perform against the index (for example, coveo OR "machine learning").
<url>
A quoted string that contains a URL to which the browser is redirected (for example, "http://www.example.com").
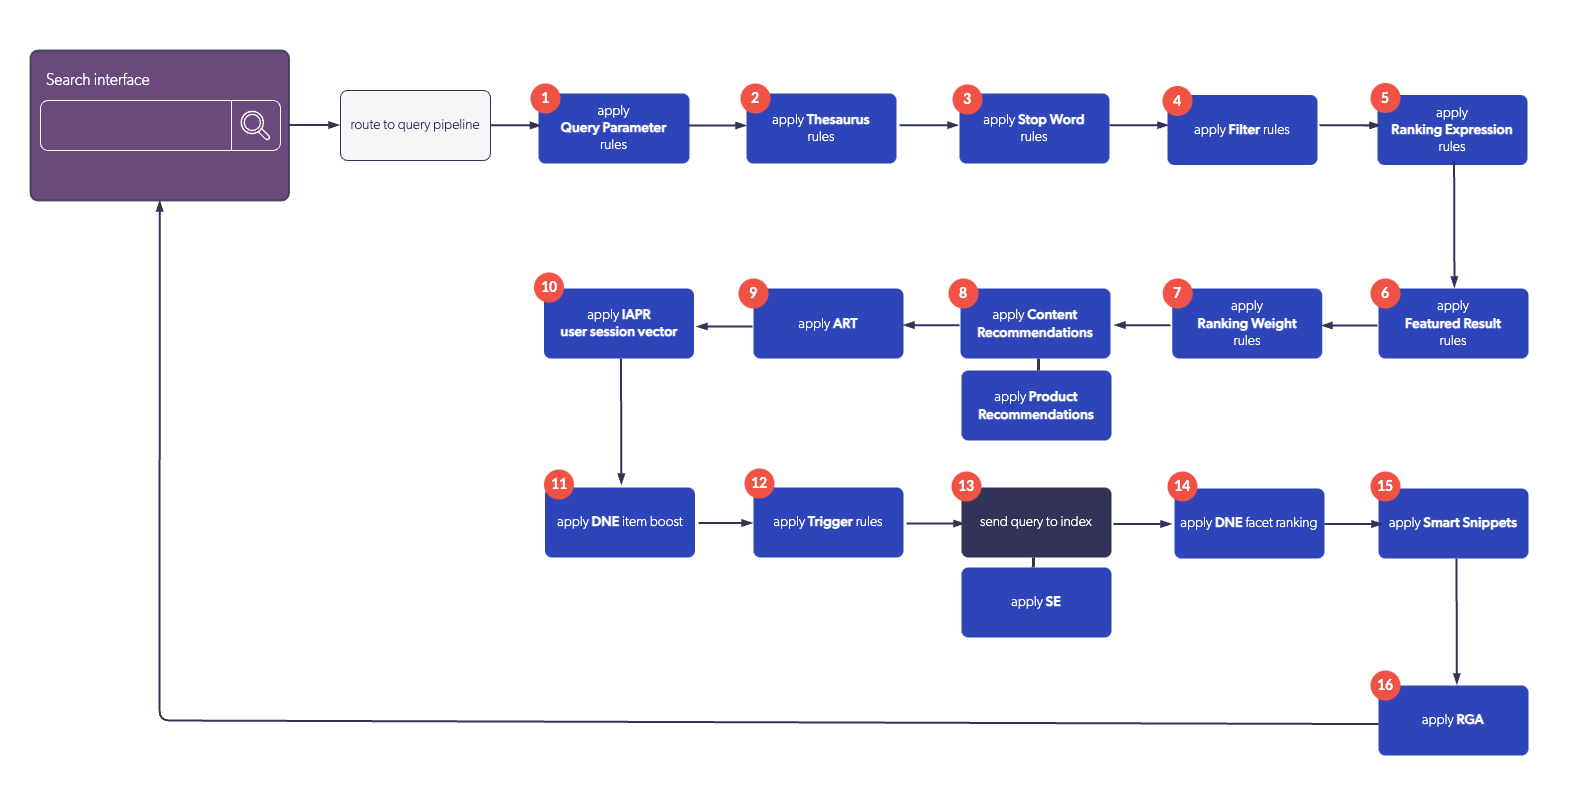
Order of execution
The following diagram illustrates the order of execution of query pipeline features:
Required privileges
The following table indicates the privileges required to view or edit trigger rules. Learn more about the Privilege reference or how to manage privileges.
| Action | Service - Domain | Required access level |
|---|---|---|
View trigger rules |
Organization - Organization |
View |
Edit trigger rules |
Organization - Organization |
View |
Search - Query pipelines |
Edit |