Create and manage a Dynamic Navigation Experience (DNE) model
Create and manage a Dynamic Navigation Experience (DNE) model
To effectively rank facets and facet values, a Coveo Machine Learning (ML) DNE model learns from Coveo Analytics events, such as search and click events in which end users interacted with facets and obtained the desired result items. Therefore, the more the model learns from facet-related actions performed by your end users, the more effectively it can rank facets and provide relevant search results.
|
|
A Coveo Machine Learning (Coveo ML) Dynamic Navigation Experience (DNE) model requires dynamic facets. If your search interface uses the Coveo JavaScript Search Framework, DNE doesn’t support regular facets. For more information, see Configure dynamic facets in your search interface. |
Create a DNE model
-
On the Models (platform-ca | platform-eu | platform-au) page of the Coveo Administration Console, click Add model, and then click the Dynamic Navigation Experience card.
-
Click Next.
-
(Optional) In the Learning interval section, you can change the default and recommended values for both Data period and Building frequency.
-
Click Next.
-
(Optional) In the Apply filters on dataset section, you can add filters to refine the data that the model uses to make its recommendations. By narrowing down the dataset that a model uses, you can better customize relevancy for specific user groups and use cases. You can apply filters on all events, or on every event that belongs to a specific category, such as search, click, view, or custom events.
ExampleDepending on the search interfaces in which the model is used, you want your DNE model to learn differently. Therefore, you add a filter on the Origin 1 (Page/Hub) dimension.
-
In the Select a dimension dropdown menu, select the dimension on which you want to base the learning of the model.
-
In the Select an operator dropdown menu, select the appropriate operator.
-
In the Select value(s) dropdown menu, add, type, or select the appropriate value.
-
You can optionally add other filters by clicking Add.
-
-
Click Next.
-
(Optional) To enable value autoselection in a facet, in the Facet Autoselect section, select the corresponding facet fields.

Once the model is saved, the Facet Autoselect feature can only be added or edited in the
extraconfigproperty of the JSON configuration. Note
NoteIf your Coveo organization includes multiple indexes, this feature supports only the fields of sources that are linked to the default index.
-
Click Next.
-
In the Name your model input, enter a meaningful display name for the model.
-
(Optional) Use the Project selector to associate your model with one or more projects.
-
Click Start building.
NoteOn the Models (platform-ca | platform-eu | platform-au) page, under the Status column, in the model row, the value is most probably Inactive.
The model value will change to Active when the model creation is complete (typically within 30 minutes, depending on the amount of usage analytics data to process). The model can only return recommendations when its status is Active.
For more information on Coveo ML model statuses, see the Status column reference.
-
(Optional) Configure advanced settings for your model.
-
Associate the model with a pipeline to use the model in a search interface and test your model to make sure it behaves as expected.
Make sure to follow the model association leading practices before associating your model with your production query pipeline.
Advanced configuration
You can configure advanced settings for your model to suit specific use cases.
Some advanced settings are available from the model options in the Administration Console, while others are only available through JSON configuration parameters.
|
|
Notes
|
To specify advanced settings
-
On the Models (platform-ca | platform-eu | platform-au) page, click the model for which you want to specify advanced settings.
-
Do one of the following:
-
To specify an advanced setting using an Administration Console model option:
-
Click Edit in the Action bar.
-
Click the Advanced tab, and then in the Advanced page left menu, select the setting to configure:
-
-
To specify an advanced setting using a JSON parameter:
-
In the Action bar, click More, and then click Edit JSON.
-
Enter the advanced parameter configuration in the JSON’s
extraConfigobject:
-
-
-
Click Save.
Manage a DNE model
You can edit using the model options or JSON, delete, or review information for your model.
Edit a DNE model
|
|
Once the model is saved, the Facet Autoselect feature can only be added or edited in the |
-
On the Models (platform-ca | platform-eu | platform-au) page, click the model you want to edit, and then click Edit in the Action bar.
-
On the subpage that opens, select the Configuration tab.
-
Under Name, you can optionally edit the model’s display name.
-
(Optional) Use the Project selector to associate your model with one or more projects.
-
(Optional) In the Learning interval section, you can change the default and recommended Data period and Building frequency.
-
(Optional) In the Apply filters on dataset section, you can add filters to refine the data that the model uses to make its recommendations. By narrowing down the dataset that a model uses, you can better customize relevancy for specific user groups and use cases. You can apply filters on all events, or on every event that belongs to a specific category, such as search, click, view, or custom events.
ExampleDepending on the search interfaces in which the model is used, you want your DNE model to learn differently. Therefore, you add a filter on the Origin 1 (Page/Hub) dimension.
-
In the Select a dimension dropdown menu, select the dimension on which you want to base the learning of the model.
-
In the Select an operator dropdown menu, select the appropriate operator.
-
In the Select value(s) dropdown menu, add, type, or select the appropriate value.
-
You can optionally add other filters by clicking Add.
-
-
Click Save.
-
On the Models (platform-ca | platform-eu | platform-au) page, under the Status column, in the model row, the value is most probably Updating.
NoteThe model value will change to Active when the model edition is complete (typically within 30 minutes, depending on the amount of usage analytics data to process). The model can only return recommendations when its status is Active.
For more information on Coveo ML model statuses, see the Status column reference.
-
Associate the model with a pipeline to use the model in a search interface and test your model to make sure it behaves as expected.
Make sure to follow the model association leading practices before associating your model with your production query pipeline.
Edit a DNE model JSON configuration
-
Access the Models (platform-ca | platform-eu | platform-au) page.
-
Click the desired model, and then click More > Edit JSON in the Action bar.
-
In the Edit a Model JSON Configuration panel that appears, modify the existing model configuration:
{
  "modelDisplayName": "<MODEL_DISPLAY_NAME>",
  "exportPeriod": "<EXPORT_PERIOD>",
  "intervalTime": "<INTERVAL_TIME>",
  "intervalUnit": "<INTERVAL_UNIT>",
  "commonFilter": "<COMMON_FILTER>",
  "customEventFilter": "<CUSTOM_EVENT_FILTER>",
  "exportOffset": "<EXPORT_OFF_SET>",
  "searchEventFilter": "<SEARCH_EVENT_FILTER>",
  "viewEventFilter": "<VIEW_EVENT_FILTER>",
  "extraConfig": "<ADVANCED_ML_PARAMETERS>"
}
Where:
-
modelDisplayName(string) is the name of the model appearing on the Models (platform-ca | platform-eu | platform-au) page. -
exportPeriod(ISO-8601 string, required) is the period defining the age of the Coveo Analytics data used to build the model. Must be in the ISO8601 period format (that is,PyYmMwWdDThHmMsS).
NoteUnless an
exportOffsetis specified, theexportPerioduses the moment when the model was generated as a base. -
intervalTime(integer, required) is the number ofintervalUnit(that is,DAY,WEEK, orMONTH) between each update of the model. Must be between1and30inclusively. -
intervalUnit(string enum, required) is the duration unit of the interval between each update of the model. SeeintervalTime. Accepted values are:DAY,WEEK, andMONTH. -
commonFilter(string) is the filter to apply to the common event dimensions (shared by all event types) in the export. Multiple filter parameters are joined with theANDoperator. -
customEventFilter(string) is the filter to apply to the custom event dimensions in the export. Multiple filter parameters are joined with theANDoperator. -
exportOffset(ISO-8601 string) is the offset of the usage analytics data used to build the model. Must be in the ISO8601 period format (that is,PyYmMwWdDThHmMsS). The default value isPT0S, meaning that all events are considered when building a model (theexportPeriodis based on the moment the model was generated).ExampleYou want to ignore events that occur on the current day, so you set the
exportOffsetvalue toP1D. -
searchEventFilter(string) is the filter to apply to the click and search event dimensions in the export. Multiple filter parameters are joined with theANDoperator. -
viewEventFilter(string) is the filter to apply to the view event dimensions (shared by all event types) in the export. Multiple filter parameters are joined with theANDoperator. -
extraConfig(array of string) are additional advanced parameters used to tailor the model to your use case.ExampleYou want to edit or add facets to the Facet Autoselect section.
{
  "extraConfig": {
        "automaticSelection": {
            "fields": [
                {
                    "field": "cfspacename",
                    "strategy": "taxonomy_coverage"
                },
                {
                    "field": "collectionname",
                    "strategy": "taxonomy_coverage"
                }
            ]
        }
    }
}
-
-
Click Save to apply your changes.
Delete a DNE model
|
|
Note
If the model is associated with a query pipeline, make sure to dissociate the model from the query pipeline after deleting it. |
-
On the Models (platform-ca | platform-eu | platform-au) page, click the ML model that you want to delete, and then click More > Delete in the Action bar.
-
In the panel that appears, click Delete.
Project association prompts
A machine learning model is a resource you can associate with a project. Resources associated with a project can require confirmation when you modify them. These confirmation prompts help prevent accidental changes that could affect a Coveo implementation.
Deleting a resource always requires confirmation, whether it’s associated with a project or not. When the resource is associated with projects, the confirmation prompt lists those projects.
Review model information
On the Models (platform-ca | platform-eu | platform-au) page, click the desired model, and then click View in the Action bar. For more information, see Reviewing model information.
Reference
DNE models reference
-
Default number of expanded facets: 4
-
Default number of displayed values in expanded facets: 8
While you can change both values, it’s not recommended and requires developer skills.
Advanced model options
Suggestion filters
Use the Suggestion filters advanced setting to set the Coveo Analytics dimensions to be used as filters for potential suggestions.
The model filters the suggestions so that only the interaction data from events that include the specified dimensions are considered.
By default, the Search hub and Tab dimensions are selected. This means that for a query that originates from a specific tab in a search hub, only interactions recorded in the same search hub tab will be used by the model.
Given the default values of Search hub and Tab, and the following implementation:
-
Two Search hub values:
partnerHubandtechSupportHub -
Four Tab values:
all,documentation,training, andcommunity
A total of eight possible filters will be created ( partnerHub/all, techSupportHub/all, partnerHub/documentation, etc.).
This means that if a query originates from partnerHub/all, only interactions recorded in partnerHub/all will be used by the model to make suggestions for that query.
You can set this option to use the recommended Search hub and Tab dimensions (default), to not use filters at all, or to use custom filters based on dimensions of your choice.
To configure the suggestion filters
-
On the Models (platform-ca | platform-eu | platform-au) page, click the model that you want to modify, and then click Edit in the Action bar.
-
On the subpage that opens, select the Advanced tab.
-
In the left menu of the Advanced tab, select Suggestion filters.
-
Choose one of the following options:
-
Search hub and Tab (default): The model uses the Search hub and Tab dimensions as filters for suggestions.
-
No dimension filters: The model doesn’t use any filters for suggestions. This provides the same relevance across all search hubs that use the model. It’s useful when your model serves different search hubs in which the same source items are available.
-
Custom filters: The model uses the dimensions that you select as filters for suggestions.
-
Optionally, select one or both of the Search hub and Tab filters.
-
Under Other dimensions, select the dimensions you want to use to filter the model suggestions (for example,
countryandlanguage).
If you set a dimension other than the two default ones (Search hub and Tab), you must also add the dimension at query time using the
filtersmlParameter.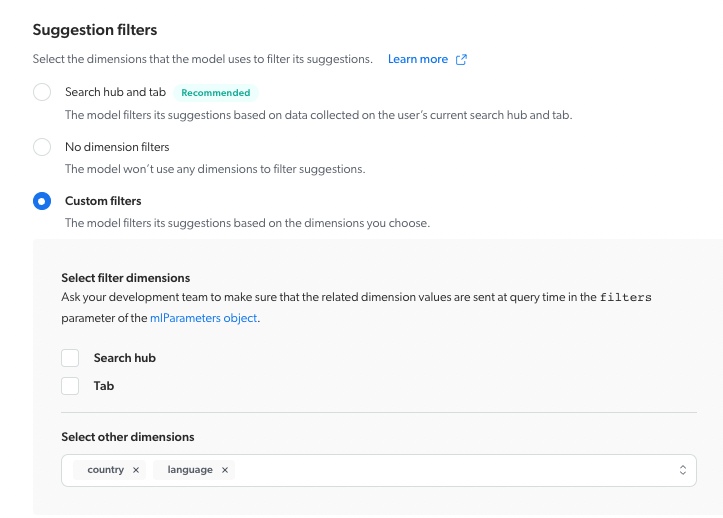
-
-
-
Click Save.
Test configuration mode
|
|
Note
The Test configuration mode advanced option is available only for sandbox organizations. |
Sandbox organizations typically lack the amount of usage analytics data that’s required to train a model. The Test configuration mode option lets you build a model in a sandbox organization with little or infrequent usage analytics data so you can test the model.
When activated, this option reduces the amount of analytics data that’s required to build the model. It also reduces other frequency thresholds that discard queries or clicks that weren’t performed frequently enough.
|
|
Note
The usage of certain frequency thresholds, or the selection of a specific value for these frequency thresholds depends on the configuration and implementation of the model. As the possible combinations of threshold configurations are adapted for each model, these frequency thresholds aren’t listed in this section. |
To activate the test configuration mode
-
On the Models (platform-ca | platform-eu | platform-au) page, click the model for which you want to activate the test configuration mode, and then click Edit in the Action bar.
-
On the subpage that opens, select the Advanced tab.
-
In the left menu of the Advanced tab, select Test configuration mode.
-
Select the Activate test configuration mode checkbox.
-
Click Save.
Advanced JSON model parameters
filterFields (list of strings)
Use this parameter to set the Coveo Analytics dimensions to be used as filters for potential suggestions.
The model filters the suggestions so that only the interaction data from events that include the specified dimensions are considered.
Default: ["originLevel1", "originLevel2"].
|
|
Note
Given the default value of
A total of eight possible filters will be created ( |
|
|
If you set a field other than the two default ones ( |
To set the parameter
Access the model’s JSON editor, and then add the parameter configuration to the extraConfig object.
You want your ML model to consider the possible value combination of the originContext and originLevel2 dimensions when filtering results because some of the results are not available in some other combinations.
Therefore, you enter the following configuration in the extraConfig object:
"extraConfig": {
    "filterFields": [
      "originContext",
      "originLevel2"
    ]
}
This would require sending the dimension values at query time in the filters mlParameter as follows:
"mlParameters": {
    "filters": {
          "originContext": "<MY-CONTEXT-VALUE>",
          "originLevel2": "<TAB-VALUE>"
    }
}
Moreover, you may want to build a model that doesn’t use filters at all since all items are accessible everywhere.
You can do so by setting the filterFields parameter to empty in a model configuration.
This allows you to provide the same relevance across all search hubs using the model.
For example:
"extraConfig": {
    "filterFields": []
}
"Status" column
On the Models (platform-ca | platform-eu | platform-au) page of the Administration Console, the Status column indicates the current state of your Coveo ML models.
The following table lists the possible model statuses and their definitions:
| Status | Definition | Status icon | ||
|---|---|---|---|---|
Active |
The model is active and available. |
|
||
Build in progress |
The model is currently building. |
|
||
Inactive |
The model isn’t ready to be queried, such as when a model was recently created or the organization is offline. |
|
||
Limited |
Build issues exist that may affect model performance. |
|
||
Soon to be archived |
The model will soon be archived because it hasn’t been queried for an extended period of time. |
|
||
Error |
An error prevented the model from being built successfully.
|
|
||
Archived |
The model was archived because it hasn’t been queried for an extended period of time. |
|
"Learning Interval" section
In this section, you can modify the following:
Set the Coveo ML model training Building frequency based on the Data Period value. Less frequent for a larger Data Period and more frequent for a smaller Data Period as recommended in the following table.
Data period |
Building frequency |
||
|---|---|---|---|
Daily |
Weekly |
Monthly |
|
1 month |
|
|
|
3 months (Recommended) |
|
||
6 months |
|
||
The more data the model has access to and learns from, the better the recommendations. As a general guide, a usage analytics dataset of 10,000 queries or more typically allows a Coveo ML model to provide very relevant recommendations. You can look at your Coveo Analytics data to evaluate the volume of queries on your search hub, and ensure that your Coveo ML models are configured with a training Data period that corresponds to at least 10,000 queries. When your search hub serves a very high volume of queries, you can consider reducing the data period so that the model learns only more recent user behavior and be more responsive to trends.
A Coveo ML model regularly retrains on a more recent Coveo UA dataset, as determined by the Building frequency and Data period settings, to ensure that the model remains up-to-date with the most recent user behavior.
|
|
Note
If you’re testing the model in a sandbox environment in which very little analytics data is available to train the model, you can activate the Test configuration mode advanced option to ensure the model provides recommendations. |
"Facet Autoselect" section
When enabled, the Facet Autoselect feature automatically selects facet values according to the user query. The feature learns from a user’s behavior to understand which categories are the most relevant according to the user’s current browsing task.
The Facet Autoselect section lets you choose the facet fields to which the automatic selection of facet values should apply.
To enable the automatic selection of facet values in the Coveo Platform UI:
-
In the Select facet fields dropdown menu, select the facet fields for which the automatic selection of values should apply.
-
In the Associated sources section, do one of the following:
-
Select All to take all sources into account for the selected fields.
-
Select Specific to take only certain sources into account for the selected fields. You can then deselect undesired sources.
NoteIf your Coveo organization includes multiple indexes, this feature supports only the fields of sources that are linked to the default index.
-
|
|
Note
The greater the number of items associated with the selections made in the Select facet fields dropdown menu and Associated sources section, the longer the model will take to build. |
Once the model is saved, the Facet Autoselect feature can only be added or edited in the extraconfig property of the JSON configuration.
You want to edit or add facets to the Facet Autoselect section.
{
  "extraConfig": {
        "automaticSelection": {
            "fields": [
                {
                    "field": "cfspacename",
                    "strategy": "taxonomy_coverage"
                },
                {
                    "field": "collectionname",
                    "strategy": "taxonomy_coverage"
                }
            ]
        }
    }
}
Required privileges
The following table indicates the privileges required to use elements of the Models page and associated panels (see Manage privileges and Privilege reference).
| Action | Service | Domain | Required access level |
|---|---|---|---|
View models |
Machine Learning |
Models |
View |
Organization |
Organization |
View |
|
Search |
Query pipelines |
View |
|
Edit models |
Machine Learning |
Models |
Edit |
Organization |
Organization |
View |
|
Search |
Query pipelines |
View |