Manage named filters
Manage named filters
named filters are custom filters that refine search usage analytics (UA) data shown in each UA card (see Filter Settings and Limitations). They can be added to any report, and can be renamed, edited, or deleted at any time. Named filters can also be added in usage analytics data exports and in the Visit Browser.
With the required privileges, you can use the Named Filters (platform-ca | platform-eu | platform-au) page to create sets of filters that you can use on many reports.
You notice many of your reports contain the same filters, therefore you decide to group them under one named filter to save space and time in the future when creating reports that require these filters.
Add or edit a named filter
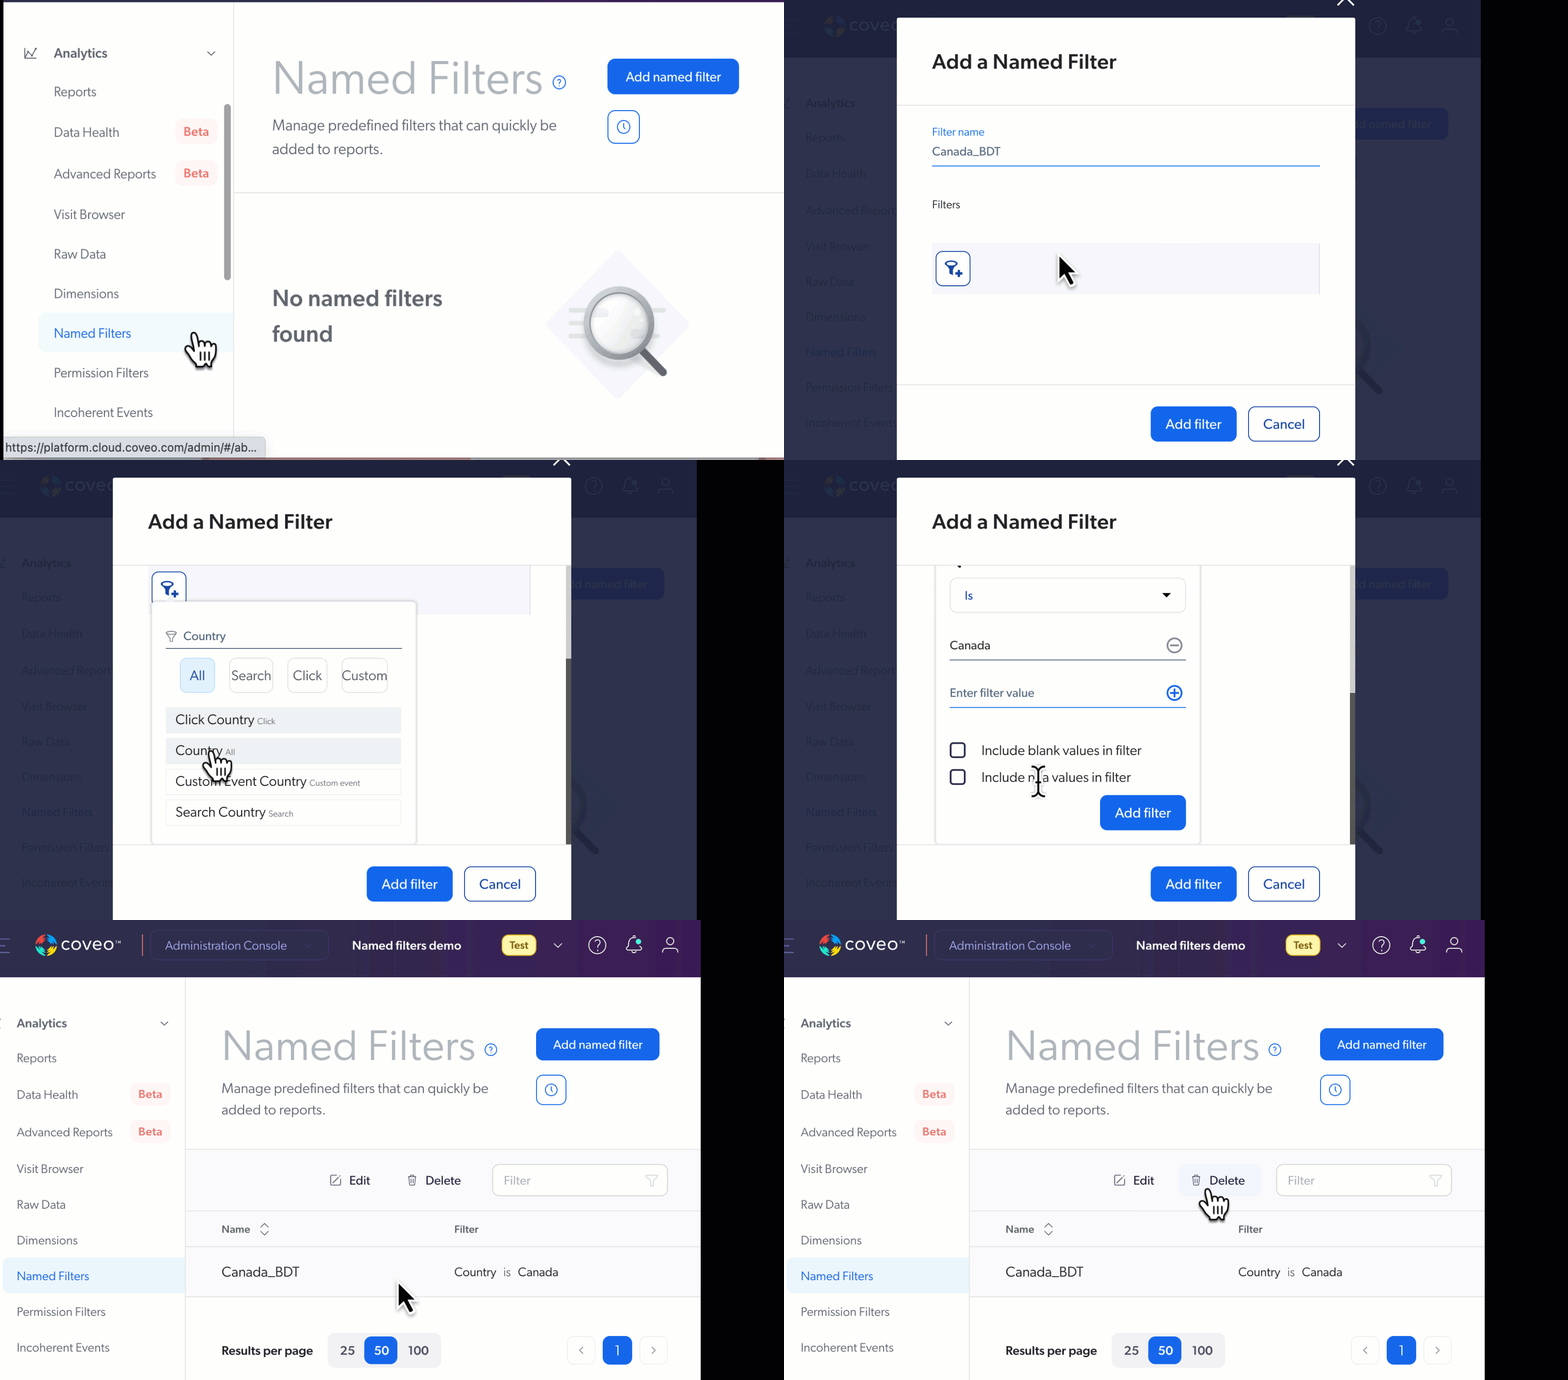
On the Named Filters (platform-ca | platform-eu | platform-au) page, click Add named Filter. To edit an existing filter, click the desired filter, and then click Edit in the Action bar.

Define filter
-
When creating a new filter, enter a descriptive name.
-
Click
, and in the list of available Dimensions, select the dimension on which you want to set the filter. You can:
-
Sort by event type by clicking Search, Click, or Custom.
-
Click All, and then use the Search box to find and select the dimension of your choice.
-
-
In the filter definition dialog box, click the dropdown menu, and then select an operator to apply between the selected dimension and the value. The list of available operators depends on the selected dimension.
-
Click the third field and enter the filter values. You can:
ExampleYou want to review the usage of your online help web site in Canada so you add the following two filters:
-
Country is Canada -
Origin 1 (Page/Hub) is Online Help
-
-
In the filter definition dialog box, click Add Filter.
-
In the Add/Edit a named Filter panel, click Add Filter or Save.
|
|
Maximum number of values per filter, depending on the dimension:
|
|
|
Notes
|
Add to reports
When you’re done adding or editing your filter, add the named filter to one or more reports.
Remove named filters
-
On the Named Filters (platform-ca | platform-eu | platform-au) page, click the named filter that you want to remove, and then click Delete in the Action bar.
-
In the confirmation prompt that appears, click Yes.
|
|
Note
Deleted named filters are automatically removed from the reports in which they’re used. |
Review named filter management activities
As part of your duties, you may need to review activities related to named filters for investigation or troubleshooting purposes.
To do so, in the upper-right corner of the Named Filters (platform-ca | platform-eu | platform-au) page, click .
See Review resource activity for details on activities and alternative ways to access this information.
The list contains the named filter management activities in reverse chronological order. Each row represents an activity, and indicates when it occurred, the display name of the affected filter, what was done (created, updated, deleted), and by who (user).
Required privileges
The following table indicates the required privileges for members to view and edit filters on the Named Filters (platform-ca | platform-eu | platform-au) page and associated panels (see Manage privileges).
| Action | Service - Domain | Required access level |
|---|---|---|
View named filters |
Analytics - Analytics data Analytics - Dimensions Analytics - Named filters Organization - Organization |
View |
Edit named filters |
Analytics - Analytics data Analytics - Dimensions Organization - Organization |
View |
Analytics - Named filters |
Edit |
|
Access the Activity Browser and view all organization activities |
Organization - Activities Organization - Organization |
View |
|
|
A member with the View access level on the Activities domain can access the Activity Browser. This member can therefore see all activities taking place in the organization, including those from Coveo Administration Console pages that they can’t access. |