Third-party cookie deprecation
Third-party cookie deprecation
third-party cookies have historically been used for cross-domain tracking of user activity. They collect analytics data that are then leveraged to provide a more personalized user experience. In recent years, however, major browsers have opted to phase out third-party cookies to improve their compliance with privacy regulations.
As of January 2021, Coveo implemented a way for clients to send the client ID through the Usage Analytics Write API. This removes the need for a third-party cookie to track user visits. The client ID is generated by the Coveo UA library and is stored client-side in local storage and a first-party cookie.
|
|
Note
If you aren’t using the Coveo UA library, you can still send the client ID by adding it to the payload on the call to the UA Write API. |
Clients deploying newer versions of Coveo search interfaces such as Headless or Atomic don’t rely on third-party cookies.
Instead, they rely on the client ID, which uses a first-party cookie and local storage to associate events from the same browser or device.
Older versions of the Coveo JavaScript Search Framework (before January 2021) and integrations relying on version 1.0.0 of the coveo.analytics.js library (which may include Sitecore integrations) still use third-party cookies to track user activities between visits.
To respect compliance goals and browser evolution, Coveo will deprecate third-party cookies by October 1st 2023.
Clients who still rely on a JSUI version dating from before January 2021 or have deployed version 1.0.0 of the coveo.analytics.js library will be required to upgrade to a newer version before the deprecation.
|
|
If you don’t upgrade your Coveo solution to a newer version, you’ll no longer be able to track user visits once the deprecation is completed. This will also affect Coveo Machine Learning (Coveo ML), the Visit Browser, and several other major features that rely on visit tracking. |
Will the deprecation affect my integration?
You may be affected by the third-party cookie deprecation if you only rely on third-party cookies to track end users. In order to verify whether this is the case, you can use the browser’s developer tools to inspect your integration:
-
Open a web browser and visit your Coveo integration.
-
Open your web browser’s developer tools.
 Note
NoteThis article uses the Google Chrome developer tools. For browser-specific information, see:
-
Select the Application tab which shows what’s locally stored in your browser.
-
Under Storage, inspect the data which is currently stored for your site’s domain.
-
If you’re using JSUI and see a
visitorIditem in the local storage, that means your JSUI version is up to date. -
If you’re using the
coveo.analytics.jsscript (packaged ascoveoua.js) and you see a cookie namedcoveo_visitorIdscoped to your site’s domain, that means yourcoveo.analytics.jsversion is up to date. Your integration, therefore, won’t be affected.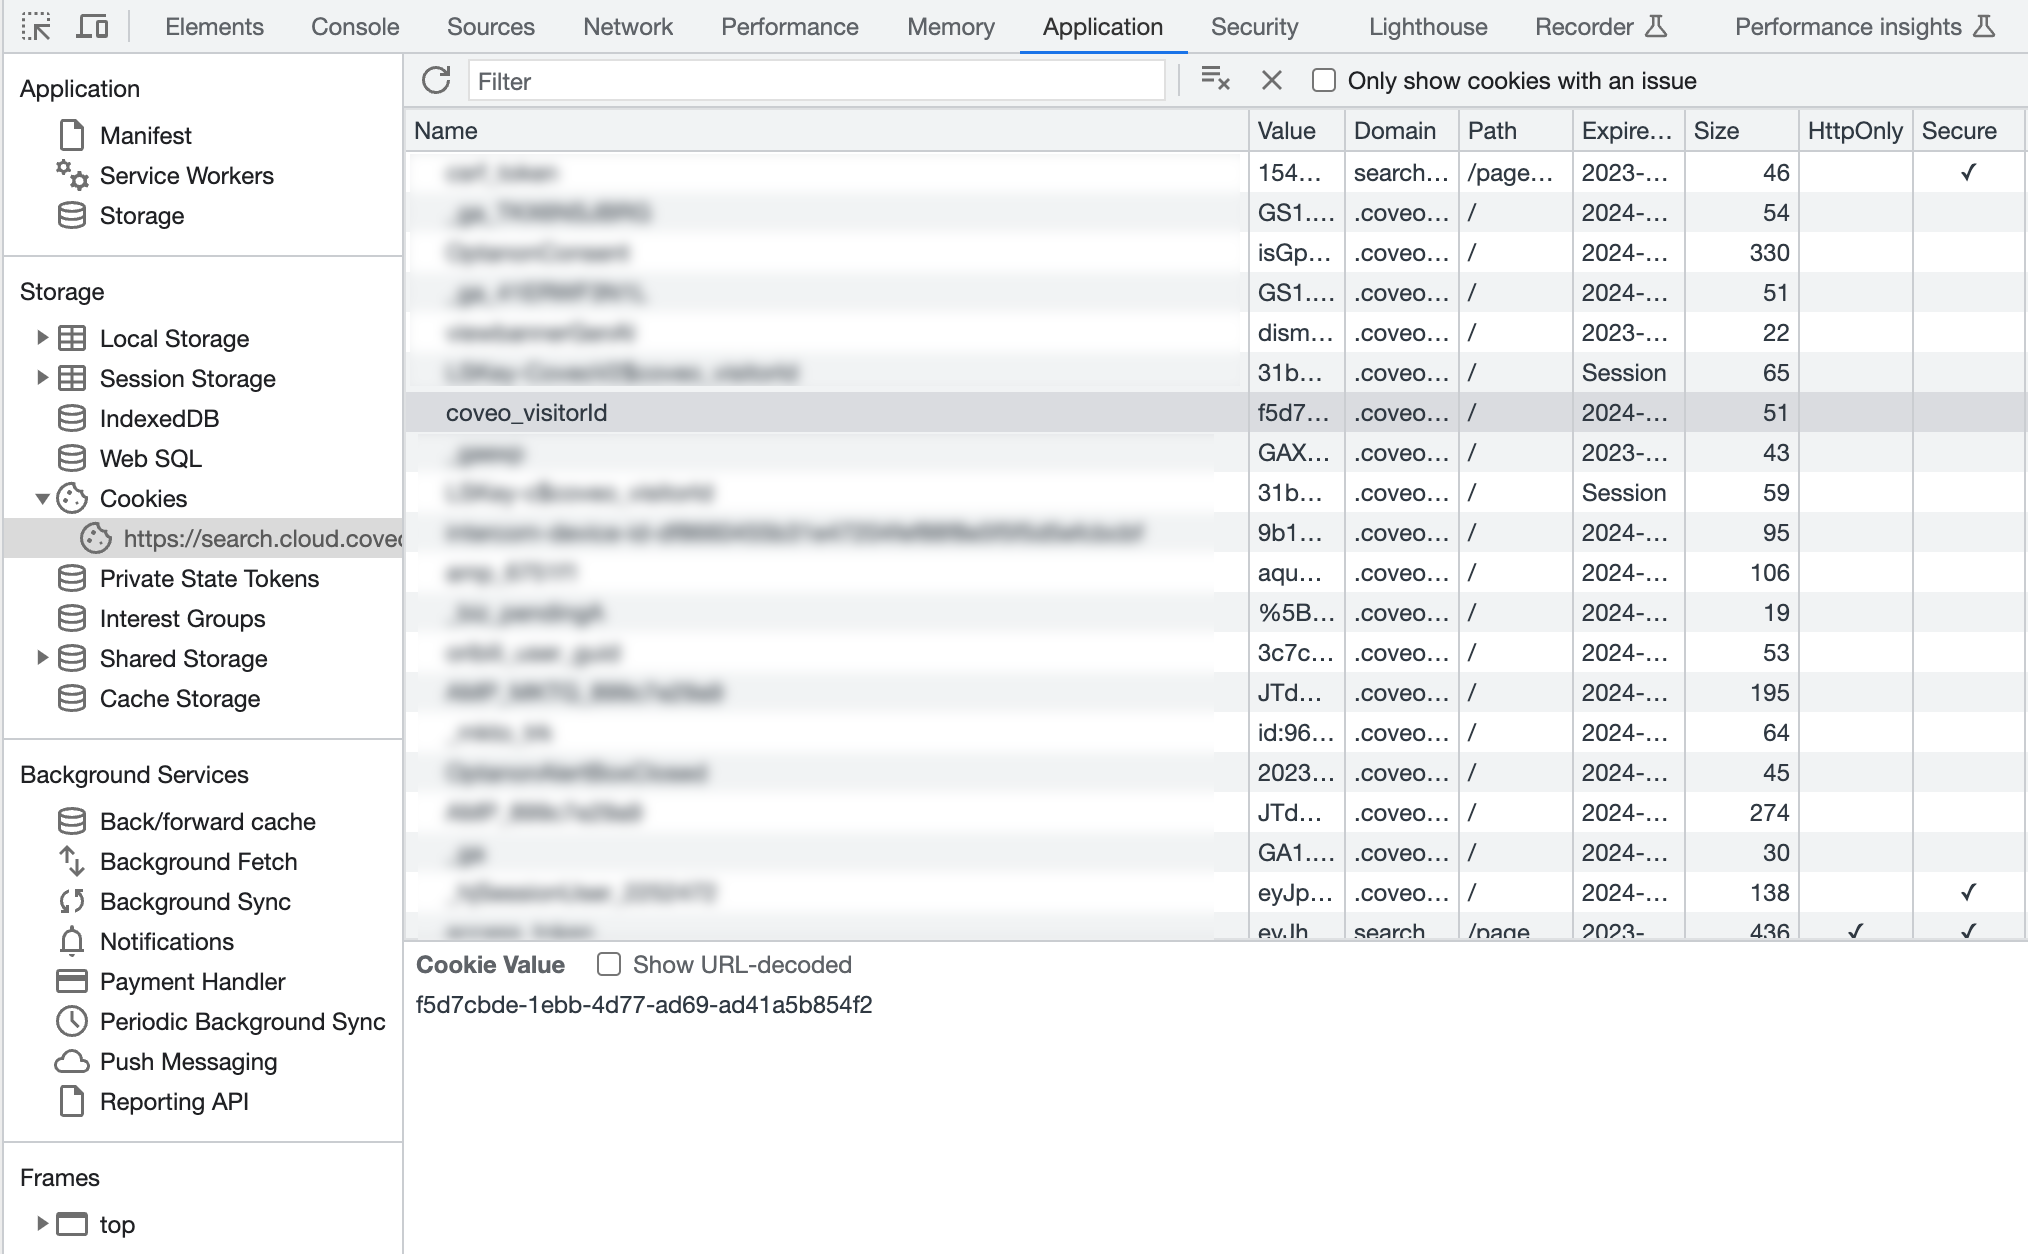
-
If neither of the previous options apply to you, you’ll need to upgrade the respective component as you’re likely still relying on a third-party cookie. In cases such as this one, your integration will be affected by the deprecation.
|
|
Note
It’s possible for both the |
Step 1: Verify software versions
-
Verify the version of the JavaScript Search Framework that your Coveo implementation is currently using.
-
If you’re using the January 2021 version (v2.10082 or newer), then you won’t be affected by the eventual deprecation since your deployment uses the client ID when an event is sent. For more information on how Coveo Analytics uses the client ID, see What’s the client ID?.
-
If you’re running on an older version, then you must perform Step 2: Upgrade your implementation before October 1st, 2023.
-
-
If you deployed (view) event tracking using the
coveo.analytics.jslibrary, verify whether you’re at least using version 2.0.0.-
If your site is loading this library from Coveo’s CDN at
https://static.cloud.coveo.com/coveo.analytics.js/2/coveoua.js, then you won’t be affected as this code already has the latest changes. -
If your site is loading this library from Coveo’s CDN at
https://static.cloud.coveo.com/coveo.analytics.js/coveoua.jsorhttps://static.cloud.coveo.com/coveo.analytics.js/latest/coveoua.jsthen you must perform step 2 before October 1st, 2023. This may require manual changes, depending on your integration. -
If your site is loading a locally hosted version of
coveo.analytics.js, you should compare its code against the older CDN version athttps://static.cloud.coveo.com/coveo.analytics.js/coveoua.js. If the files are identical, then you must perform step 2 before October 1st, 2023. This may require manual changes, depending on your integration.
-
-
If you’re using Coveo Headless v1 or v2, there’s no difference between the two versions regarding third-party cookies. Both versions are bundled with
coveo.analytics.jsv2, therefore neither version should be impacted by the third-party cookie deprecation issue.-
However, if you encounter instances where the client ID isn’t passed, upgrade to the latest iteration of the Headless version that you’re currently using.
-
Step 2: Upgrade your implementation
If you’re using a JSUI version that predates the January 2021 version (v2.10082), you must upgrade your implementation to the latest version available.
The following table lists the applicable version upgrades for different Coveo integrations:
| Integration | Upgrade |
|---|---|
Coveo for Salesforce |
Upgrade to 4.13 (or higher). |
Coveo for Sitecore |
If you track view events, you have two options:
|
If you don’t track view events, upgrade to 5.0.943.3 (or higher). |
|
Coveo for ServiceNow |
Upgrade to 21.2.51 (or higher). |
Coveo for Zendesk |
Upgrade all search pages to 2.10083 (or higher). |
Custom web (with |
Upgrade |
|
|
Notes
|
Step 3: Test your upgrade
Once you’ve completed the upgrade, test your implementation to ensure that the upgrade is successful and that the cookie header has been set. You can do this by creating a custom dimension and a dashboard report in the Coveo Administration Console. This step is necessary for verifying if there are elements in your implementation that:
-
are still using the third-party cookie.
-
aren’t using the client ID.
|
|
Note
If you have a custom integration with custom events, you may notice that the client ID doesn’t pass. This may be resolved by adding the set cookie header parameter in Coveo Analytics, which lets you drill down on the custom events and retrieve the information that the client ID would have gotten had it passed. |
Add a custom dimension
On the Dimensions (platform-ca | platform-eu | platform-au) page, create a custom dimension.
-
Ensure that you give the dimension a meaningful display name (for example,
Third-party cookie). -
For the API name, enter
c_third_party_cookie_set. -
Under Type, ensure that you select Boolean.
-
Under Related events, ensure that all three checkboxes are selected.
Add a custom dashboard
-
On the Reports (platform-ca | platform-eu | platform-au) page, add a blank dashboard.
-
In the upper-right corner of the window, click
 , and then select Paste JSON configuration.
 -
In the Import a report configuration panel that appears, paste the JSON configuration below, and then click Import and save.
Report configuration to import
{ "displayName": "Third-party cookie deprecation check", "type": "DASHBOARD", "configuration": { "description": "This report is to validate the third-party cookie deprecation and the transition to the client ID", "dateRange": { "range": "weeks", "length": 1, "offset": -1 }, "compareRange": { "range": "weeks", "length": 1, "offset": -2 }, "tabs": [ { "id": "9487", "title": "Tab 1", "sections": [ { "title": "", "position": { "col": "1", "row": "1", "sizex": "6", "sizey": "11", "minSizex": 2 }, "cards": [ { "id": "7006", "href": "", "title": "All events", "sortBy": "DocumentView", "filters": "", "metrics": [ "DocumentView", "CustomEvent", "PerformSearch" ], "cardType": "DetailedStatistics", "position": { "col": 1, "row": 2, "sizex": 4, "sizey": 4, "minSizex": 1, "minSizey": 2 }, "ascending": false, "showCount": false, "dimensions": [ "customEventType", "originLevel1" ], "headerHref": "", "showHeader": true, "metricsSort": [ "PerformSearch", "DocumentView", "CustomEvent" ], "metricFilters": "", "dimensionsSort": [ "originLevel1", "customEventType" ], "metricsHeaders": {}, "bindOnLastSearch": true, "dimensionsHeaders": {}, "editMode": false }, { "id": "34FF", "href": "", "title": "Events sending a Client ID", "sortBy": "DocumentView", "filters": "(clientid!~'null' AND clientid!~'' AND clientid!=null)", "metrics": [ "DocumentView", "CustomEvent", "PerformSearch" ], "cardType": "DetailedStatistics", "position": { "col": 1, "row": 7, "sizex": 2, "sizey": 4, "minSizex": 1, "minSizey": 2 }, "ascending": false, "showCount": false, "dimensions": [ "customEventType", "originLevel1" ], "headerHref": "", "showHeader": true, "metricsSort": [ "PerformSearch", "DocumentView", "CustomEvent" ], "metricFilters": "", "dimensionsSort": [ "originLevel1", "customEventType" ], "metricsHeaders": {}, "bindOnLastSearch": true, "dimensionsHeaders": {}, "editMode": false }, { "id": "BEA1", "href": "", "title": "Events leveraging a third-party cookie", "sortBy": "PerformSearch", "filters": "(c_third_party_cookie_set==true)", "metrics": [ "DocumentView", "CustomEvent", "PerformSearch" ], "cardType": "DetailedStatistics", "position": { "col": 3, "row": 7, "sizex": 2, "sizey": 4, "minSizex": 1, "minSizey": 2 }, "ascending": false, "showCount": false, "dimensions": [ "customEventType", "originLevel1" ], "headerHref": "", "showHeader": true, "metricsSort": [ "PerformSearch", "DocumentView", "CustomEvent" ], "metricFilters": "", "dimensionsSort": [ "originLevel1", "customEventType" ], "metricsHeaders": {}, "bindOnLastSearch": true, "dimensionsHeaders": {}, "editMode": false }, { "id": "2AB6", "href": "", "style": "info", "title": "Events sending Client ID", "value": "The table below needs to be identical to the \"All events\" table. If there are missing events, it means those events are not sending a Client ID, which is now required.\n", "cardType": "NoteCard", "position": { "col": 1, "row": 6, "sizex": 2, "sizey": 1, "minSizex": 1, "minSizey": 1 }, "eventType": "join", "headerHref": "", "isMarkdown": true, "editMode": false }, { "id": "DBCE", "href": "", "style": "info", "title": "Events leveraging third-party cookie", "value": "The table below needs to be empty. If it's not empty, it means that a search hub is still leveraging a third-party cookie to set the Visitor ID.\n", "cardType": "NoteCard", "position": { "col": 3, "row": 6, "sizex": 2, "sizey": 1, "minSizex": 1, "minSizey": 1 }, "eventType": "join", "headerHref": "", "isMarkdown": true, "editMode": false }, { "id": "A1D6", "href": "", "style": "info", "title": "All events", "value": "The event count in this table should always be the sum of the event counts from the two other tables in this dashboard.", "cardType": "NoteCard", "position": { "col": 1, "row": 1, "sizex": 4, "sizey": 1, "minSizex": 1, "minSizey": 1 }, "eventType": "join", "headerHref": "", "isMarkdown": true, "editMode": false } ], "editMode": false } ], "active": true, "editMode": false } ], "filters": "$", "version": 6 }, "allAnalyticsViewer": true, "filters": [] } -
Adjust the date range to specify the date your upgrade was completed. The dashboard should look similar to the following example:
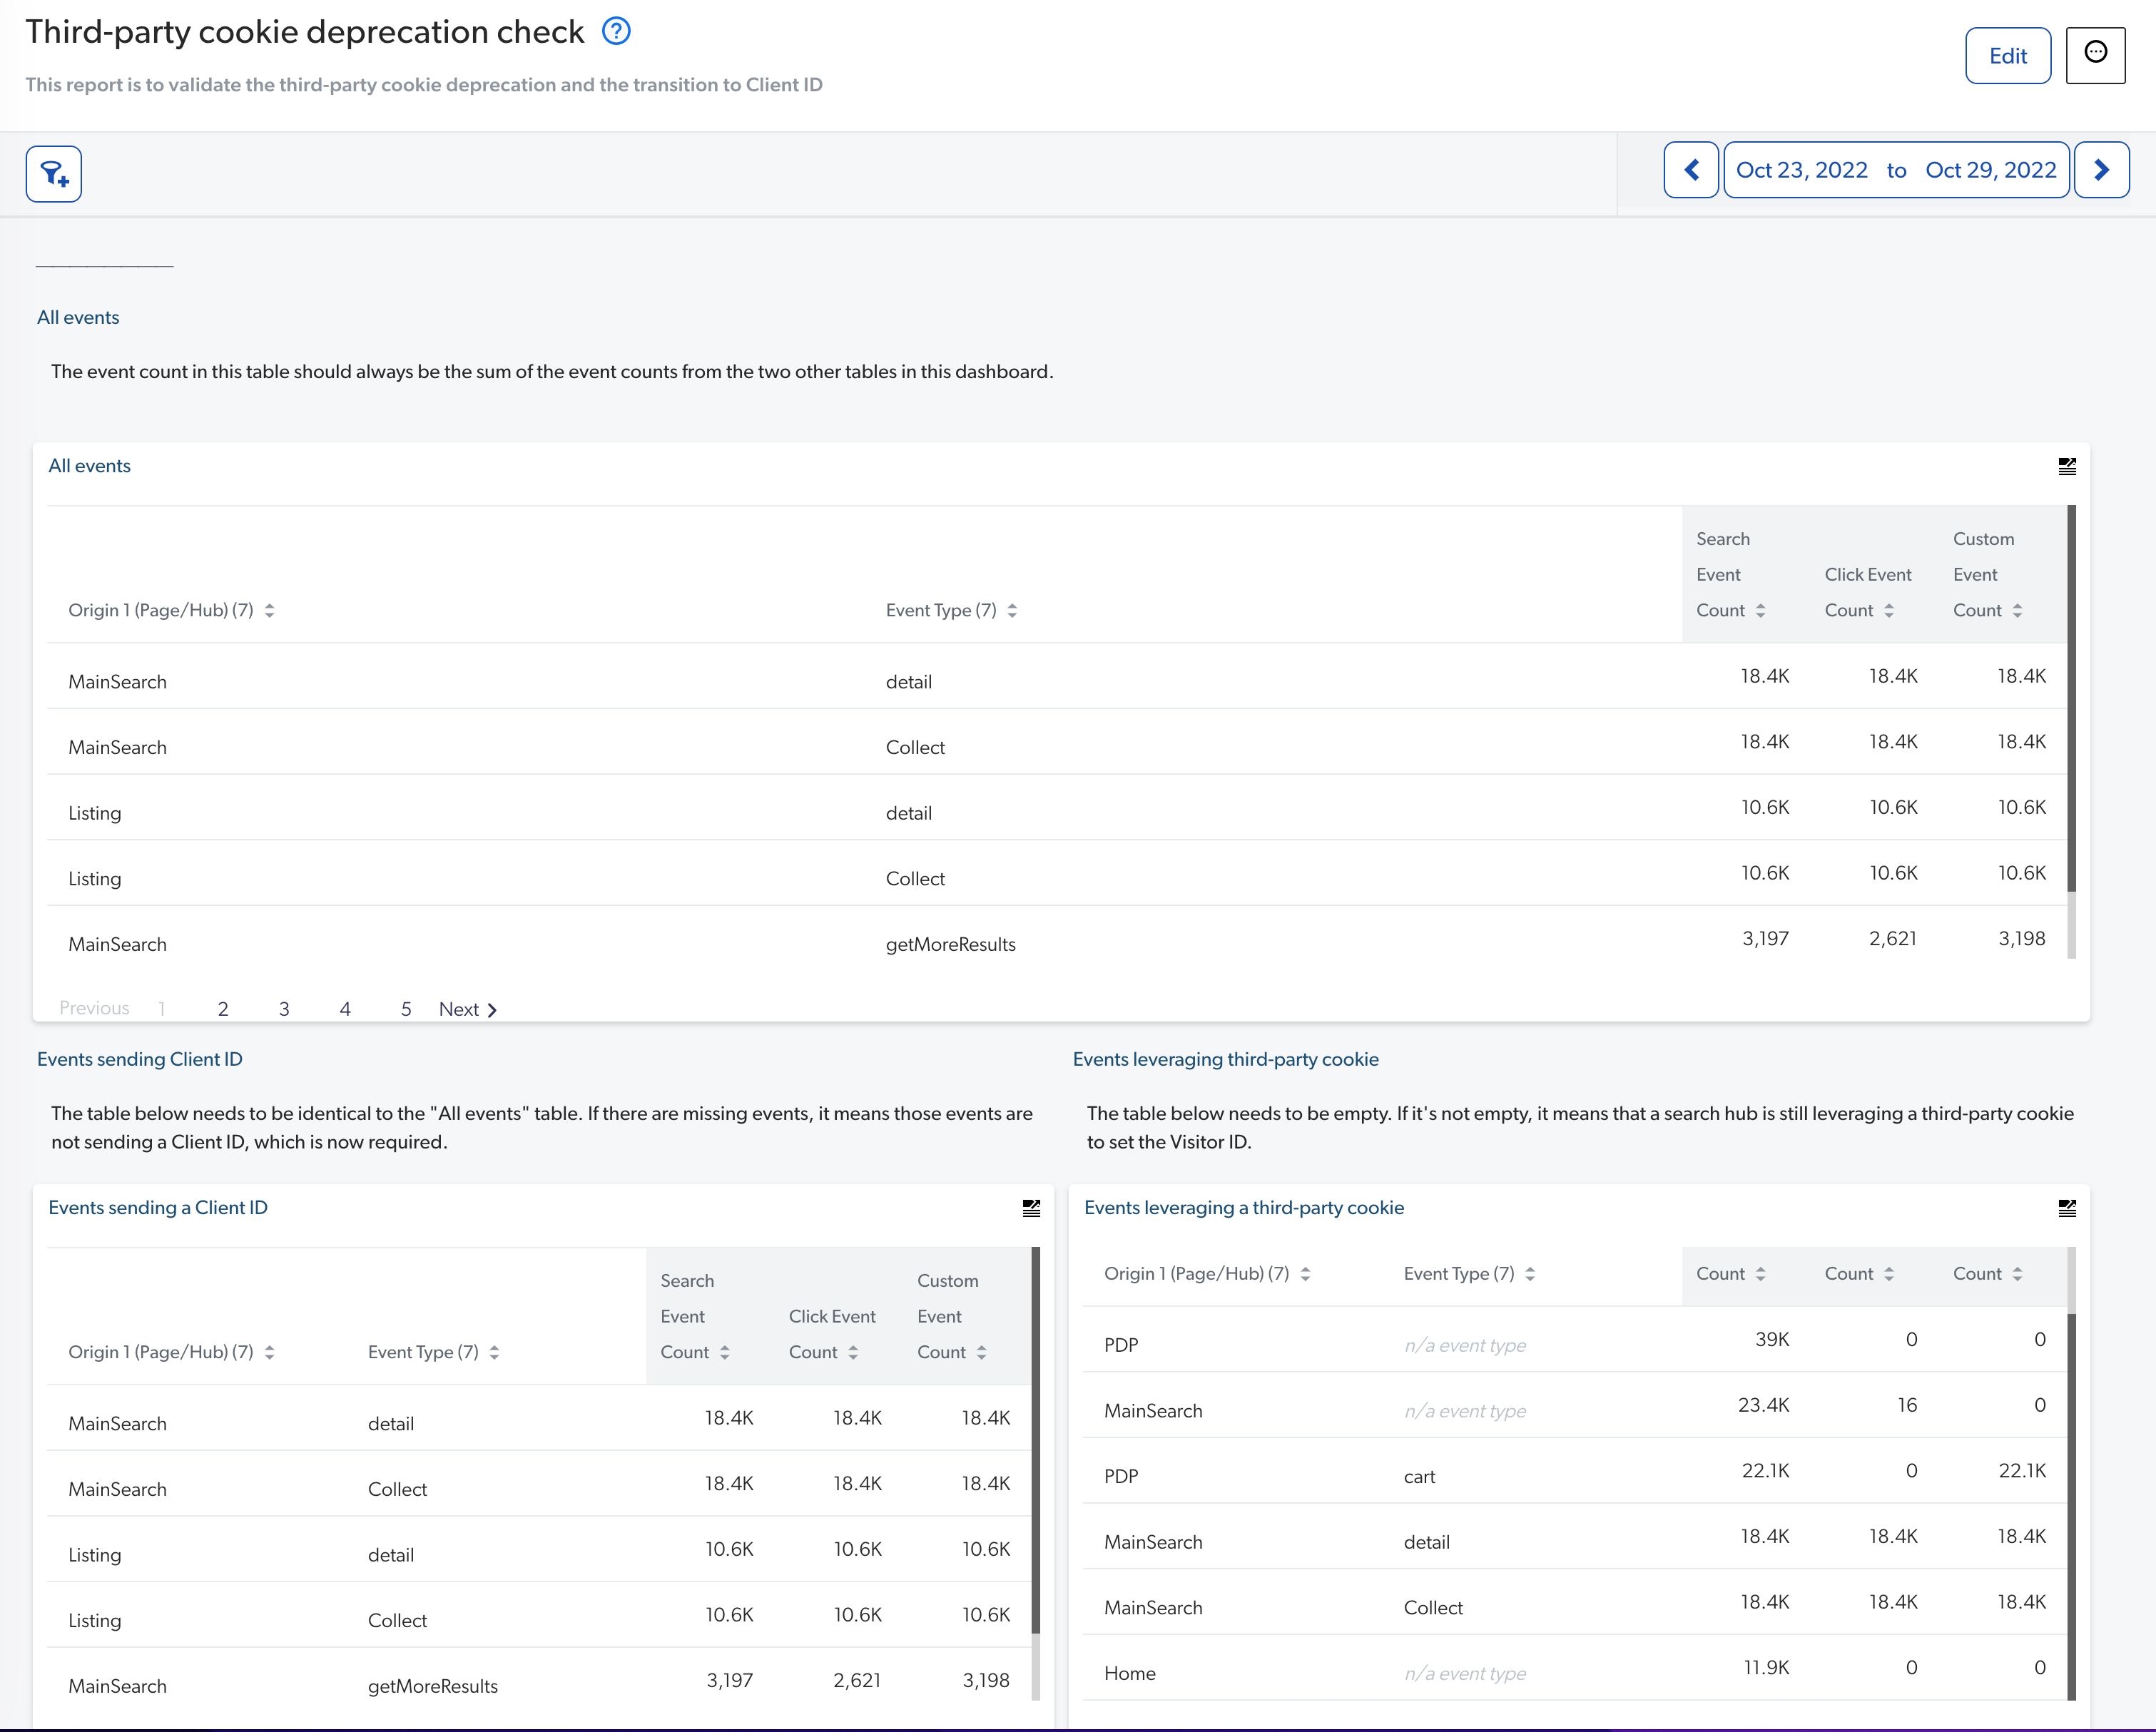
-
The dashboard is formed of three Table cards. Ideally, the All events and Events sending a Client ID cards should be identical, with the same events and event counts, while the Events leveraging a third-party cookie card should be empty.
-
If the Events leveraging a third-party cookie card isn’t empty (as shown in the previous example), it may indicate that the upgrade was incomplete and that there’s a search hub in your deployment which is still leveraging a third-party cookie.
-