Configure Okta for Coveo SSO
Configure Okta for Coveo SSO

This is for:
System Administrator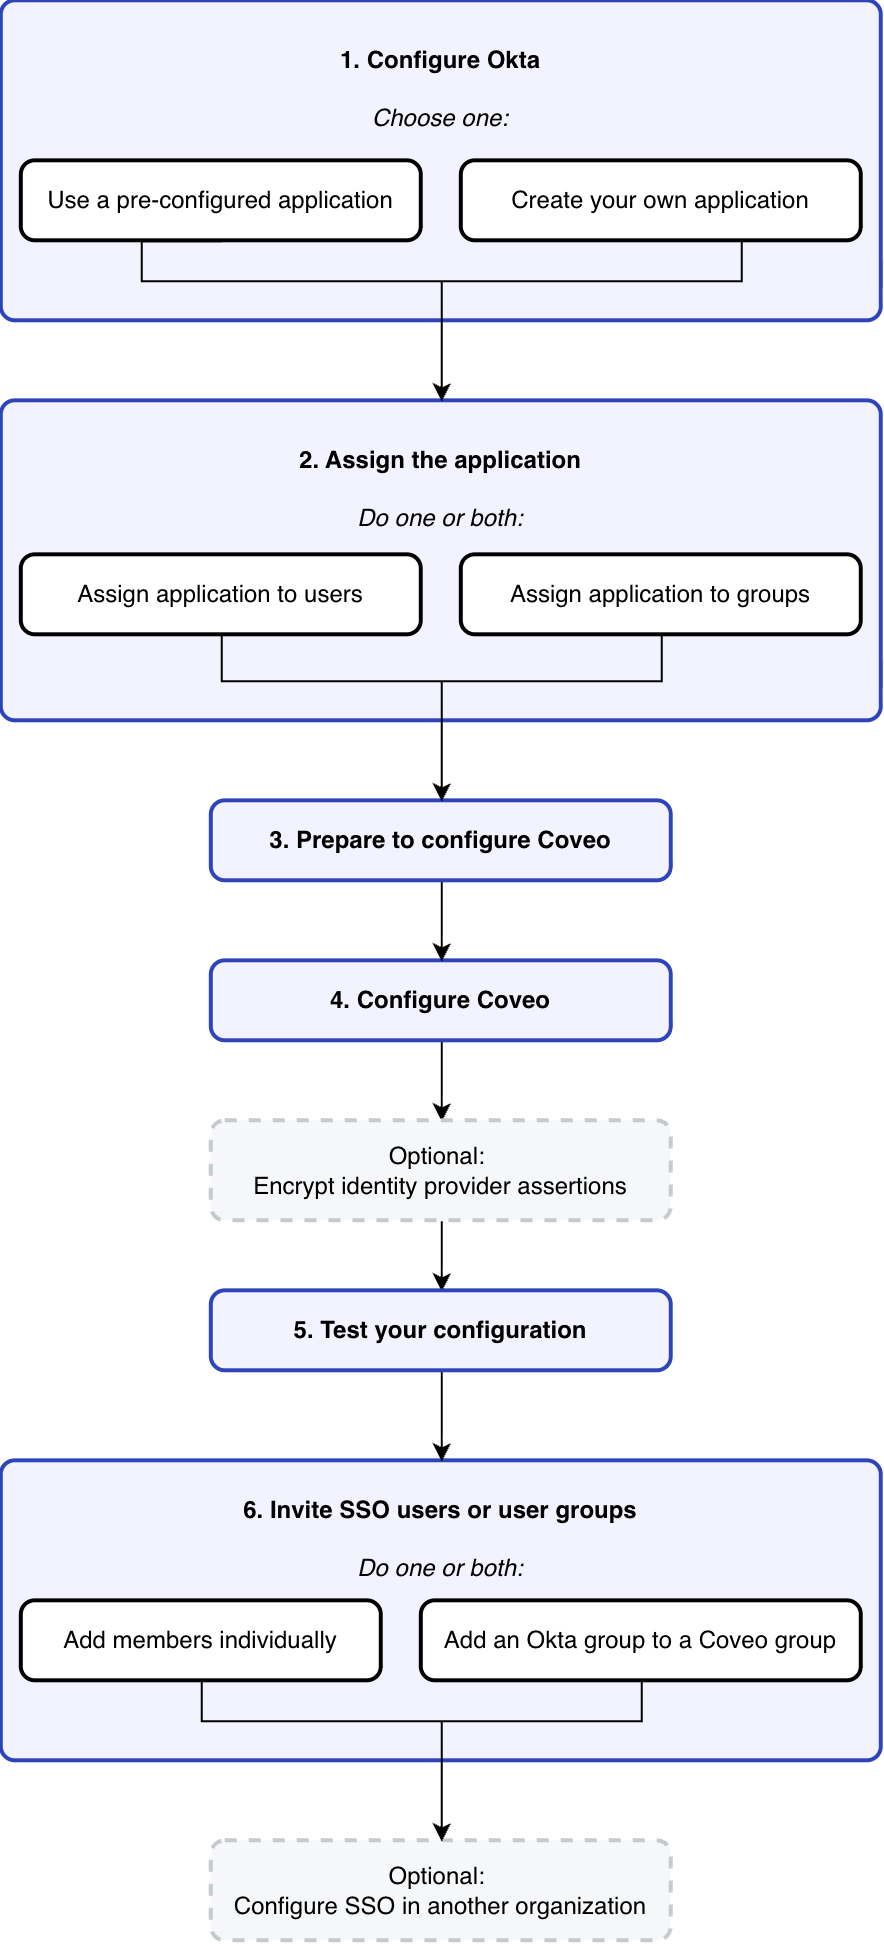
Okta is a service providing single sign-on (SSO) for web and mobile applications.
As a Coveo administrator, you can implement Security Assertion Markup Language (SAML) 2.0 SSO when your company uses Okta. Users can then log in to Coveo without having to provide their authentication credentials since their identity has previously been validated when logging in to their Okta session.
To allow users to log in via SAML SSO, Coveo must be able to trust and rely on Okta to authenticate users wanting to log in. To establish this trust relationship, you must configure Okta and Coveo so that both parties can exchange authentication information. This page explains how to proceed.
To configure SSO in more than one Coveo organization, for example in a production organization and a sandbox organization, configure one of these organizations, and then follow the instructions at the end of this page.

|
Note
If you’re not the Okta administrator at your company, contact them so that they configure Okta using the following steps. Provide them with the Coveo public certificate, which is needed to encrypt assertions. You can find this certificate on the Settings page of the Coveo Administration Console, under Organization > Single sign-on (platform-ca | platform-eu | platform-au). |
Configure Okta
Both Okta and Coveo must be configured to work together and provide a SAML SSO service to your Coveo users. First configure Okta so that it can provide Coveo with user authentication data.
-
Log in to your Okta Developer account.
-
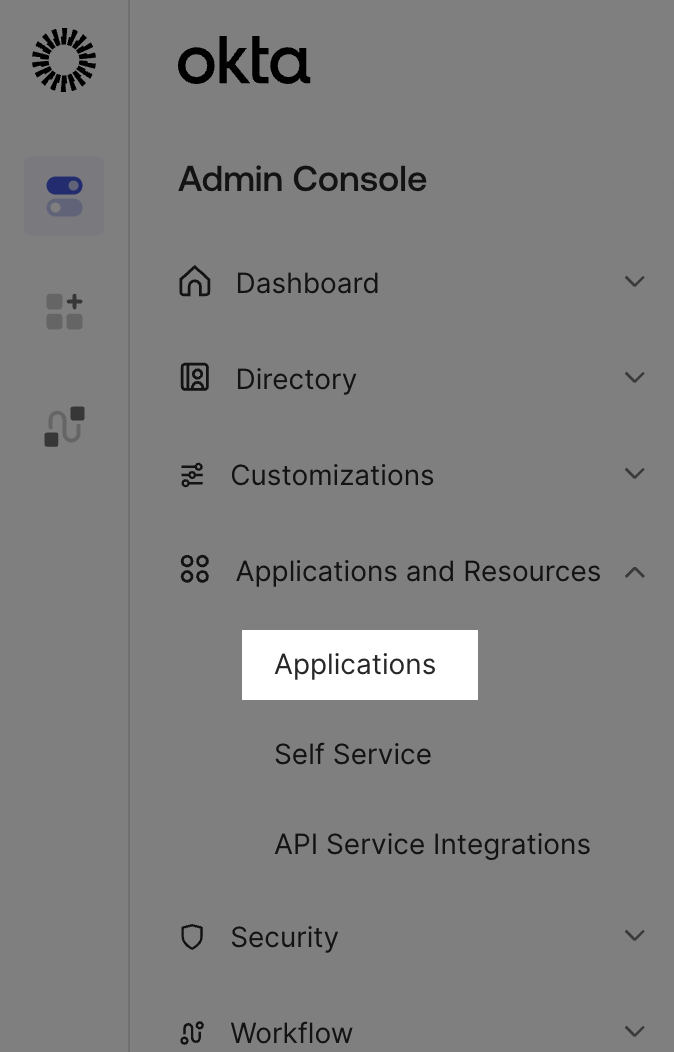
In the navigation menu of the Okta Admin Console, click Applications.
-
Depending on your needs, determine whether you’ll use the pre-configured application or create an application manually:
Application Supports assertion encryption Supports importing groups into Coveo 

About importing Okta groups into Coveo
Importing Okta groups into Coveo allows you to add Okta user groups to your Coveo groups.
For instance, in the screenshot below, Okta Administrators, Design Team, and Everyone are Okta groups.
They appear in the Coveo Administration Console because they’ve been imported into Coveo.
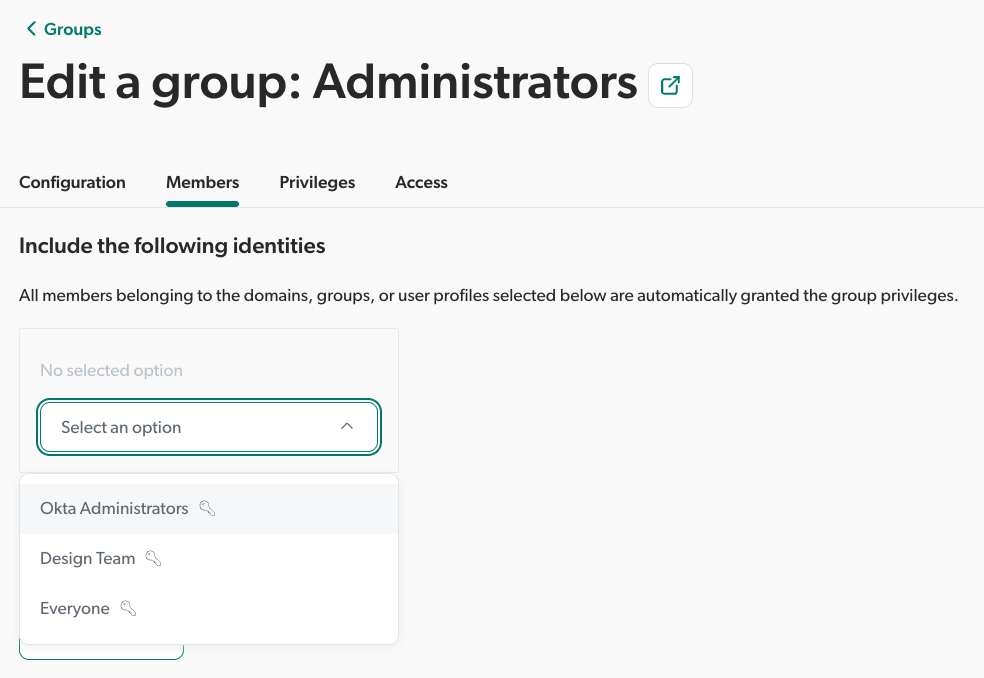
Importing Okta groups is possible with both a pre-configured application and a manually created one.
In either case, you must enter a user.groups attribute statement to specify the groups to import into Coveo.
The difference is that a pre-configured application supports only one attribute statement, whereas a custom application supports multiple statements for greater flexibility.
If you’re planning to import all Okta groups into Coveo, the pre-configured application is a suitable choice, as you can enter regex .* to import all groups.
However, if you’re planning to import only some groups, you may need more than one attribute statement to cover them all.
In this case, you should opt for a manually configured application.
See Assign application to groups for details on the process.
Coveo pre-configured application
-
In your Okta Developer account, on the Applications page, click Browse App Catalog.
-
Search for and click
Coveo Cloud. -
On the Coveo Cloud page, click Add integration.
-
On the Add Coveo Cloud page, consider editing the General Settings, and then click Done.
Manual application configuration
-
Log in to your Okta Developer account.
-
In the navigation menu of the Okta Admin Console, click Applications. Alternatively, on the Okta Admin Console dashboard, click SSO Apps.
-
On the Applications page, click Create App Integration.
-
In the Create a new app integration dialog, select SAML 2.0, and then click Next.
-
On the Create SAML Integration page, in the App name box, enter an application name to display on the Applications page. For example,
Coveo. -
Check the Do not display application icon to users box, and then click Next.
-
In the Single sign-on URL box, enter one of the following:
-
For a regular (non-HIPAA) organization:
https://platform.cloud.coveo.com/saml/SSO. -
For a HIPAA organization:
https://platformhipaa.cloud.coveo.com/saml/SSO. -
For an organization with data residency outside the US:
https://platform-<REGION_ABBREVIAITON>.cloud.coveo.com/saml/SSO.
-
-
In the Audience URI (SP Entity ID) box, enter one of the following:
-
For a regular (non-HIPAA) organization or an organization with data residency outside the US:
https://platform.cloud.coveo.com/saml/metadata. -
For a HIPAA organization:
https://platformhipaa.cloud.coveo.com/saml/metadata.
-
-
Leave the Default RelayState box empty and the Name ID Format dropdown menu on Unspecified.
-
In the Application username dropdown menu, select the kind of username you want to send through the assertion.
-
Click Show Advanced Settings, and then make sure that the Response is Signed.
-
Click Next.
-
Click Finish to complete the app creation wizard.
-
On your application page, on the Sign On tab, click Show legacy configuration under Attribute statements.
-
Next to Profile attribute statements, click Edit.
-
Add the following attribute statement:
Name Name format Value user.emailUnspecified
user.email -
Optionally, click Add Another to add more attribute statements. They all should be in
Unspecifiedformat. See Okta Expression Language for reference.ExampleYou could choose to add the following rules:
Name Name format Value user.firstNameUnspecified
user.firstNameuser.lastNameUnspecified
user.lastName -
Click Save.
Assign your application to users and groups
Once you’ve created an Okta application and configured it so that it passes user authentication to Coveo, you must assign it to your Okta users and/or groups.
Assigning your app to groups is especially useful, as it allows you to add Okta users in bulk to Coveo groups.
Assign application to users
Assign your application to the Okta users you want to allow to log in to Coveo using Okta SSO, including yourself:
-
On the Applications Okta page, click Assign Users to App.
-
On the Assign Applications page:
-
Under Applications, select your Coveo application.
-
Under People, select the users you want to allow to log in to Coveo using Okta SSO.
-
Click Next.
-
Review your application assignments, and then click Confirm Assignments.
-
-
Optionally, assign your application to Okta groups.
Alternatively, see Assign Applications to users.
Assign application to groups
Assigning your app to groups is especially useful, as it allows you to import your Okta groups into Coveo and add Okta users to Coveo groups in bulk rather than individually.
-
In Okta, add yourself to all groups you’re planning to import into Coveo. This is necessary because Coveo will only show you the Okta groups of which you’re a member. As an administrator, you may therefore want to be a member of all groups.
-
On the Applications Okta page, click your Coveo application.
-
On the Assignments tab, click the Assign dropdown menu, and then click Assign to Groups.
-
In the dialog that appears, click Assign for each group you want to import into Coveo, and then click Done.
-
Edit your Okta application to enter an attribute statement regarding the user groups to import:
If using a pre-configured app
-
On your Okta application page, select the Sign On tab.
-
Next to Settings, click Edit.
-
In the user.groups box, select an operator and enter a value.
NotePre-configured applications support entering only one expression. If you need to enter more than one expression, create an application manually instead.
For example:
-
Matches .*imports all Okta groups into Coveo. -
Contains Departmentimports theHuman Resources Department,Engineering Department, andSales Departmentgroups into Coveo, but not theEngineering InternsandOkta Administratorsgroups. -
Equals Support Agentsimports only theSupport Agentsgroup. Other groups aren’t imported.
-
If using a manually created app
-
On your Okta application page, select the Sign On tab.
-
Under Attribute statements, click Show legacy configuration.
-
Click Edit.
-
Under Group attribute statements, enter at least one attribute statement to specify which Okta groups can be imported Coveo. The name format must remain
Unspecified.Examples-
The following statement imports all Okta groups into Coveo:
Name Name format Filter user.groupsUnspecified
Matches regex
.* -
The following statement imports the
Human Resources Department,Engineering Department, andSales Departmentgroups into Coveo, but not theEngineering InternsandOkta Administratorsgroups:Name Name format Filter user.groupsUnspecified
Contains
Department -
The following statements imports the
Support Agents,Software Developers, andUser Interface Designersgroups into Coveo. Other groups aren’t imported.Name Name format Filter user.groupsUnspecified
Equals
Support Agentsuser.groupsUnspecified
Equals
Software Developersuser.groupsUnspecified
Starts with
User
-
-
-
Click Save.
-
Optionally, assign your application to individual Okta users.
Prepare to configure Coveo
Once you’ve configured your Okta application and assigned it to users and/or groups, you must retrieve Okta’s URIs and public certificate. This information will allow you to configure Coveo and enable federation with Okta.
-
On the Applications Okta page, click your Coveo application.
-
Select the Sign On tab.
-
Under Sign on methods, in the SAML 2.0 box, click More details to reveal the data required to configure Coveo.
Configure Coveo
Once you’ve configured your identity provider to provide Coveo with user authentication data, you must configure Coveo to trust your identity provider and accept to rely on it for user authentication.
-
With the data required to fill the Coveo configuration form in hand, access the Settings page:
-
Log in to Coveo (platform-ca | platform-eu | platform-au) as a member of a group with the required privileges to manage settings in the target Coveo organization.
-
On the Settings page, select the Organization tab, and then select the Single sign-on (platform-ca | platform-eu | platform-au) subtab.
-
-
In the Single sign-on subtab, in the Identity provider name box, enter the identity provider name as you want it to appear on your Coveo organization login page.
-
In the Single sign-on URL box, enter the URL where Coveo must send an authentication request. In Okta, you can find it under Sign on URL.
-
In the Identity provider issuer URI box, enter the identity provider issuer unique URI. In Okta, you can find it under Issuer.
-
Using one of the following methods, provide Coveo with the identity provider’s Base64 public certificate to validate the identity provider signature:
-
Paste the certificate in the X.509 public certificate box.
-
If you saved the certificate on your computer, click Upload to browse your files and upload the certificate.
-
-
Click Add.
-
Optionally, encrypt Okta assertions.
Encrypt Okta assertions
Assertion encryption is optional. To encrypt Okta assertions, retrieve the Coveo public certificate and import it into your Okta configuration:
-
On the Settings page, on the Single sign-on (platform-ca | platform-eu | platform-au) tab, download Coveo’s certificate.
-
Back on your Okta application page, select the General tab.
-
In the SAML Settings box, click Edit.
-
Click Next.
-
Under General, click Show Advanced Settings.
-
In the Assertion Encryption dropdown menu, select Encrypted.
-
Next to Encryption Certificate, click Browse files, and the select the Coveo certificate.
-
Click Next, and then complete the wizard.
Test your configuration
Once you’ve completed the SSO configuration, test the login process to ensure it works as expected. To do so, you’ll need to add your SSO identity as a member of your Coveo organization. You can’t use the account you’ve used to configure SSO, as it’s associated with a different identity provider. See Login options and Multiple accounts for details.
-
Add your email address as an organization member. In the Add a Member dialog, under Provider, ensure to select Single sign-on.
-
Log out of the Coveo Administration Console, and then log back in using the SSO option and your identity provider account. By doing so, you ensure Coveo and your identity provider work together properly.

We strongly recommend that you don’t delete the account with which you first logged in to the Administration Console and implemented SAML SSO. This original account is a "backdoor" that prevents you from being locked out if the SAML SSO doesn’t work as expected. At any time, you can log in with your original, non-SSO identity provider, and then edit the Coveo configuration. For details on how accounts belonging to the same individual are separated, see Multiple Accounts.
Alternatively, if you must delete your original account, you can also create another non-SSO administrator account with the required privileges beforehand. Logging in via email is also an alternative.
Invite SSO users or user groups
Once you’ve verified that your SSO configuration works, invite SSO users to join your Coveo organization.
|
|
Once your SSO is active, promptly add your users to the organization as SSO users so they can log in successfully. When an organization has an SSO configured, users accessing a hosted search page of this organization are directed by default to the SSO login page. If a user hasn’t been added to Coveo as an SSO user, they can authenticate with their identity provider, but they won’t be able to access the hosted search page because no corresponding Coveo SSO user exists. |
Add users to your Coveo organization by using either or both of these methods:
-
Adding them one by one through the Members (platform-ca | platform-eu | platform-au) page.
-
If you’ve decided to import SSO groups into Coveo, you can add a group of SSO users to a Coveo group.
Configure SSO in another organization
If you have multiple Coveo organizations, such as a production organization and a sandbox organization, you must use the same SSO settings for all organizations. Users will then use the same SSO credentials to log in, regardless of the organization they are accessing.
Follow these steps to configure SSO in additional organizations:
-
Ensure that the user identity you’ll use to configure SSO:
-
Is a member of all organizations where the SSO configuration will be used, including the original organization where SSO is already configured. If it’s not already a member, this user identity must be invited to the organizations and accept the invitations.
-
Has the privilege to edit SSO settings (Edit on the Single sign-on identity provider domain) in each of these organizations.
-
-
Using this identity, log in to the organization where you want to configure SSO.
-
In the Single sign-on (platform-ca | platform-eu | platform-au) tab of the Settings page, delete any existing SSO configuration. Save your change. This will also permanently delete the associated SSO members from your Coveo organization.
-
Copy the SSO settings from the first organization to the other. The SSO settings provided to Coveo must be identical across all organizations, including the identity provider name.

Open the organization where SSO was originally configured in a private browser window. This will let you copy and paste from one organization to the other without logging in and out to switch between them.
-
Follow the remainder of the deployment process above, starting at the assertion encryption step, for each organization where you copied the SSO settings.
Required privileges
The following table indicates the privileges required to configure SSO on the Single sign-on (platform-ca | platform-eu | platform-au) page (see Manage privileges and Privilege reference).
| Action | Service | Domain | Required access level |
|---|---|---|---|
View SSO configuration |
Organization |
Organization |
View |
Single sign-on identity provider |
View |
||
Edit SSO configuration |
Organization |
Organization |
View |
Single sign-on identity provider |
Edit |
|
|
Note
Granting the Edit access level on a domain also implicitly grants View on that domain. |