Coveo UA
Coveo UA
This is for:
DeveloperWhen used correctly, Headless controllers take care of logging standard search and click Coveo Analytics events for you. This article covers various topics that you may find helpful if you require further customization when using the Coveo UA protocol with Headless.
|
|
Notes
|
Modify the metadata to send with Coveo Analytics events
It can be useful to add or modify metadata to send along with the standard Coveo Analytics events logged by Headless controllers.
You can leverage the analyticsClientMiddleware property of an AnalyticsConfiguration to hook into an analytics event payload before Headless sends it to Coveo, as in the following example.
const analyticsClientMiddleware = (eventName, payload) => {  if (payload.visitorId == "") {
  payload.customData['loggedIn'] = false // new metadata field added
payload.customData['context_role'] = "Anonymous"
} else {
payload.customData['loggedIn'] = true
payload.customData['context_role'] = "Visitor"
}
return payload;
};
export const headlessEngine = buildSearchEngine({
configuration: {
organizationId: "<ORGANIZATION_ID>",
organizationEndpoints: getOrganizationEndpoints("<ORGANIZATION_ID>"),
accessToken: "<ACCESS_TOKEN>",
analytics: {
analyticsClientMiddleware
payload.customData['loggedIn'] = false // new metadata field added
payload.customData['context_role'] = "Anonymous"
} else {
payload.customData['loggedIn'] = true
payload.customData['context_role'] = "Visitor"
}
return payload;
};
export const headlessEngine = buildSearchEngine({
configuration: {
organizationId: "<ORGANIZATION_ID>",
organizationEndpoints: getOrganizationEndpoints("<ORGANIZATION_ID>"),
accessToken: "<ACCESS_TOKEN>",
analytics: {
analyticsClientMiddleware  },
}
})
},
}
})The analyticsClientMiddleware is a function that needs to be defined if we want to add or modify event data (see analytics.ts). |
|
The function takes as input an eventName and the event payload. |
|
Within this function, you can access the payload data and modify it.
In the example above, we check to see if visitorId is an empty string.
We add a new field (loggedIn) and a new custom context field (context_role) to customData.
If visitorId is empty, loggedIn is set to false and context_role to Anonymous.
On the other hand, if visitorId is not empty, loggedIn is set to true and context_role to Visitor. |
Send click events
Click events are intended to record item view and preview actions, such as:
-
Opening a result link
-
Opening a result Quick view
|
|
We strongly recommend using the |
Send your own click events
It’s also technically possible to send your own click events, without the InteractiveResult controller, by dispatching ClickAnalyticsActions or GenericAnalyticsActions.
However, we recommend against doing so because it’s very error prone.
For Coveo Analytics reports and ML models to function properly, click events need to contain all the metadata that the InteractiveResult controller extracts from results.
If you need to customize your click events, we rather recommend using the analyticsClientMiddleware property and listening to the target action, as in the following example.
export const headlessEngine = buildSearchEngine({
  configuration: {
    organizationId: "<ORGANIZATION_ID>",
    organizationEndpoints: getOrganizationEndpoints("<ORGANIZATION_ID>"),
    accessToken: "<ACCESS_TOKEN>",
    analytics: {
      analyticsClientMiddleware: (eventName: string, payload: any) => {
        if (payload.actionCause === 'documentOpen') {
          const matchingResult = headlessEngine.state.search.results[payload.documentPosition - 1];
          payload.customData['intent'] = matchingResult.raw['docsintent'];
        }
        return payload;
      };
    },
  }
})
If a Coveo Analytics event is dispatched with the logDocumentOpen cause, add the target metadata. |
|
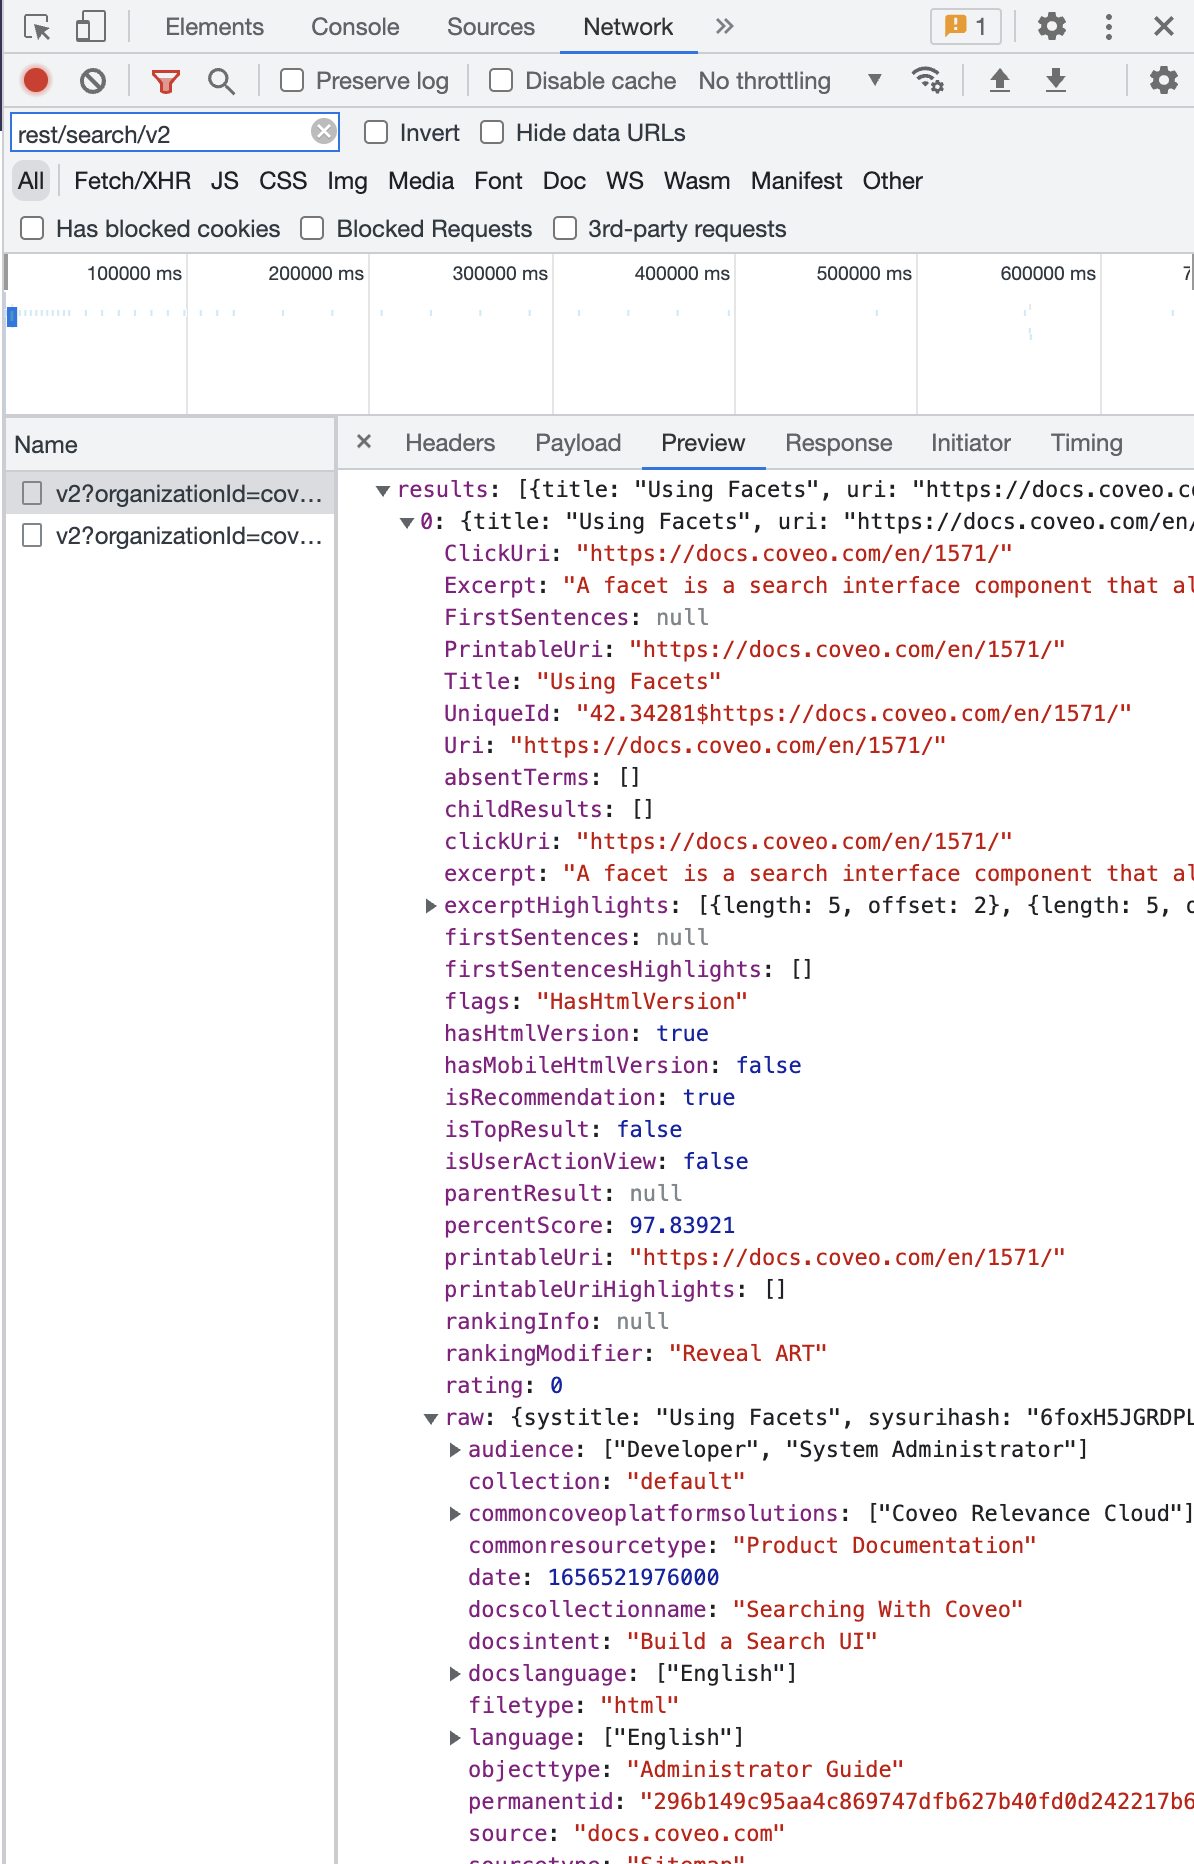
You can access result item fields when logging metadata.
Concretely, you can use the populated default item fields, plus the ones specified through the fieldsToInclude parameter.
You can inspect search request responses in your search interface to see the currently available fields: |
Send search events
Search events are intended to record end-user interactions that trigger queries, such as:
-
Submitting a search request from the search box
-
Selecting a facet value
You generally shouldn’t have to worry about logging search events, because standard search controllers such as SearchBox and facet controllers take care of automatically logging such interactions.
Send your own search events
If you need to send additional search events, you can do so by dispatching actions. We recommend using controllers over dispatching actions directly. However, the latter is still possible and can be helpful in specific use cases that controllers don’t cover, such as when you need to send your own analytics events.
Depending on your use case, there are two ways to send your own search events.
A search event can either be sent via SearchAnalyticsActions or GenericAnalyticsActions.
Both of these are action loaders.
SearchAnalyticsActions are for specific search events for which the cause is recognized by Coveo, such as logFacetClearAll or logInterfaceLoad.
These events are used by Coveo ML.
GenericAnalyticsActions lets you send any type of custom search event using the logSearchEvent action creator.
The cause of this event is unknown to Coveo, so it can’t be used by Coveo ML.
If you want to use SearchAnalyticsActions, we recommend implementing logic such as in the following example.
import {headlessEngine} from '../engine';
import {loadSearchActions} from '@coveo/headless';
import {loadSearchAnalyticsActions} from '@coveo/headless';

const searchAction = () => {
    const {executeSearch} = loadSearchActions(headlessEngine);
    const {logInterfaceLoad} = loadSearchAnalyticsActions(headlessEngine);
    headlessEngine.dispatch(executeSearch(logInterfaceLoad()));
};

export const CustomComponent = () => {
    return (
        <button onClick={searchAction}>Load Search Interface</button>
    )
};
};
export const CustomComponent = () => {
return (
<button onClick={searchAction}>Load Search Interface</button>
)
};Import a local initialized search engine from your engine.ts file. |
|
Import loadSearchActions from the Headless package.
This lets you create an action to execute a search query. |
|
Import loadSearchAnalyticsActions from the Headless package.
This will lets you return a dictionary of possible search analytics action creators. |
|
Get the executeSearch action creator to execute a search query. |
|
Get a specific action creator, logInterfaceLoad in this scenario.
This is the analytics event you will log. |
|
| Dispatch an action to execute a search query, with the search analytic action passed in as input to log it. |
|
|
Note
Take a look at Custom events to see a code example of how to log a search event using |
Send custom events
Custom events are intended to record end-user interactions that don’t trigger a query or open a query result, such as:
-
Updating end-user preferences
-
Changing the result list layout
GenericAnalyticsActions lets you send any type of custom event using the logCustomEvent action creator.
The cause of this event is unknown to Coveo, so it can’t be used by Coveo ML.
If you want to use GenericAnalyticsActions, we recommend implementing logic such as in the following example.
import {headlessEngine} from '../engine';
import {loadGenericAnalyticsActions} from '@coveo/headless';

const genericCustomAction = () => {
    const {logCustomEvent} = loadGenericAnalyticsActions(headlessEngine)
    const payload = {
        evt: '<EVT>',
        type: '<TYPE>'
    }
    headlessEngine.dispatch(logCustomEvent(payload))
}

export const CustomComponent = () => {
    return (
        <button onClick={genericCustomAction}>Click me</button>
    )
};
Import a local initialized search engine from your engine.ts file. |
|
Import loadGenericAnalyticsActions from the Headless package.
This lets you return a dictionary of possible generic analytics action creators. |
|
Get a specific action creator, logCustomEvent in this scenario. |
|
Create a payload object to be sent to Coveo when logging a custom event.
This payload will describe the details of which event led to the action being triggered. |
|
| Dispatch the action to log the custom event. |
User tracking and anonymizing Coveo Analytics data
By default, the Usage Analytics Write API will extract the name and userDisplayName, if present, from the search token.
If the users of your search interface are authenticated, you may want to hash their identities to ensure that they can’t be clearly identified in Coveo Analytics data.
You can do so when initializing an engine instance by setting the anonymous property of the AnalyticsConfiguration as in the example below.
export const headlessEngine = buildSearchEngine({
  configuration: {
    organizationId: "<ORGANIZATION_ID>",
    organizationEndpoints: getOrganizationEndpoints("<ORGANIZATION_ID>"),
    accessToken: "<ACCESS_TOKEN>",
    analytics: {
      anonymous: true
    },
  }
})
While we recommend the use of a search token for request authentication, it’s still possible to send user information if users are logged in, and you’re utilizing an API key for authentication.
When using an API key, user information can be sent to Coveo by modifying the event, as shown in the following code snippet:
|
|
Use the Anonymous search template when creating your API key. It will provide the right privileges for this use case. |
export const headlessEngine = buildSearchEngine({
  configuration: {
    organizationId: "<ORGANIZATION_ID>",
    organizationEndpoints: getOrganizationEndpoints("<ORGANIZATION_ID>"),
    accessToken: "<ACCESS_TOKEN>",
    analytics: {
      analyticsClientMiddleware: (eventName: string, payload: any) => {
        if isLoggedIn {
          payload.username = <USERNAME>;
          payload.userDisplayName = <USER>;
        }
        return payload;
      };
    },
  }
});
Use a custom isLoggedIn variable to determine whether the user is logged in.
Extract the username and userDisplayName from your user object and add them to the payload. |
Send events externally
If you want to log Coveo Analytics events to an external service, such as Google Analytics, we recommend leveraging the analyticsClientMiddleware property in your AnalyticsConfiguration to hook into an analytics event payload, as in the following example.
const pushToGoogleDataLayer = (payload: Record<string, unknown>) => {
  // For implementation details, see the Google documentation
  // (https://developers.google.com/tag-platform/tag-manager/web/datalayer#datalayer)
};
// ...
(async () => {
        await customElements.whenDefined('atomic-search-interface');
        const searchInterface = document.querySelector('atomic-search-interface');
        await searchInterface.initialize({
            accessToken: '<ACCESS_TOKEN>',
            organizationId: '<ORGANIZATION_ID>',
            analytics: {
                analyticsClientMiddleware: (eventType, payload) => {
                    pushToGoogleDataLayer(payload);
                    return payload;
                },
            }
        }),
})();
Disable and enable analytics
Coveo front-end libraries use the coveo_visitorId cookie to track individual users and sessions.
|
|
Note
Coveo now uses the client ID value to track individual users and sessions.
For compatibility with legacy implementations, however, the associated cookie and local storage value are still labeled |
When implementing a cookie policy, you may need to disable Coveo Analytics tracking for end-users under specific circumstances (for example, when a user opts out of cookies).
To do so, call the disableAnalytics method on an engine instance.
To re-enable Coveo Analytics tracking, call the enableAnalytics method.
// initialize an engine instance
const headlessEngine = buildSearchEngine({
  configuration: getSampleSearchEngineConfiguration(),
});

headlessEngine.disableAnalytics()
// Or, headlessEngine.enableAnalytics();
doNotTrack property
doNotTrack is a browser property which reflects the value of the DNT HTTP header.
It’s used to indicate whether the user is requesting sites and advertisers not to track them.
|
|
Note
This property is deprecated, but it’s still supported in many browsers. |
Headless v2 complies with the value of this property.
It automatically disables analytics tracking whenever DNT is enabled.
|
|
Headless v3 will no longer support this property. |
|
|
Note
To understand how Coveo Analytics tracks users and sessions, see What’s a user visit?. |