Create and manage Passage Retrieval (CPR) models
Create and manage Passage Retrieval (CPR) models
|
|
Passage Retrieval (CPR) is a paid product extension. Contact Coveo Sales or your Account Manager to add CPR to your organization license. |
A Passage Retrieval (CPR) model retrieves the most relevant segments of text (passages) from your dataset to help your LLM-powered application generate an output for a specific user query.
A Coveo Machine Learning (Coveo ML) Passage Retrieval (CPR) model retrieves the most relevant passages from your dataset for a user query. The passages are then used by a generative large language model (LLM) within a retrieval-augmented generation (RAG) system to generate answers.
What does a CPR model do?
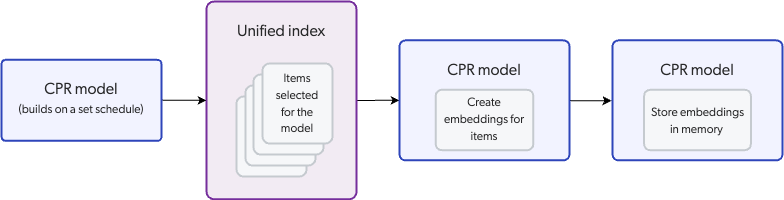
When a CPR model builds, it creates embeddings for the indexed items specified in the model settings and stores the embeddings in model memory.
|
|
Note
The model is preconfigured to rebuild and update the embeddings weekly based on when the model is created. Contact your Coveo Account Manager if a different build interval is required. |
|
|
By default, content retrieval is supported only for English content. However, Coveo offers beta support for content retrieval in languages other than English. Learn more about multilingual content retrieval and answer generation. |
A CPR model uses a pre-trained sentence transformer language model to create the embeddings. The language model does this by capturing relationships between words, phrases, and sentences in the dataset.
A CPR model creates embeddings only for the content in an item's body, which is the content mapped to the body field in the Coveo index.
For more information, learn how CPR uses your content.
|
|
Note
The CPR model uses only the content in an item’s |
As shown in the following diagram, the model uses chunks to create the embeddings. Instead of creating a vector for each individual word, a vector is created for a segment of text (chunk) to increase relevance.
|
|
Note
You can choose the chunking strategy that the CPR model uses to create the chunks. |
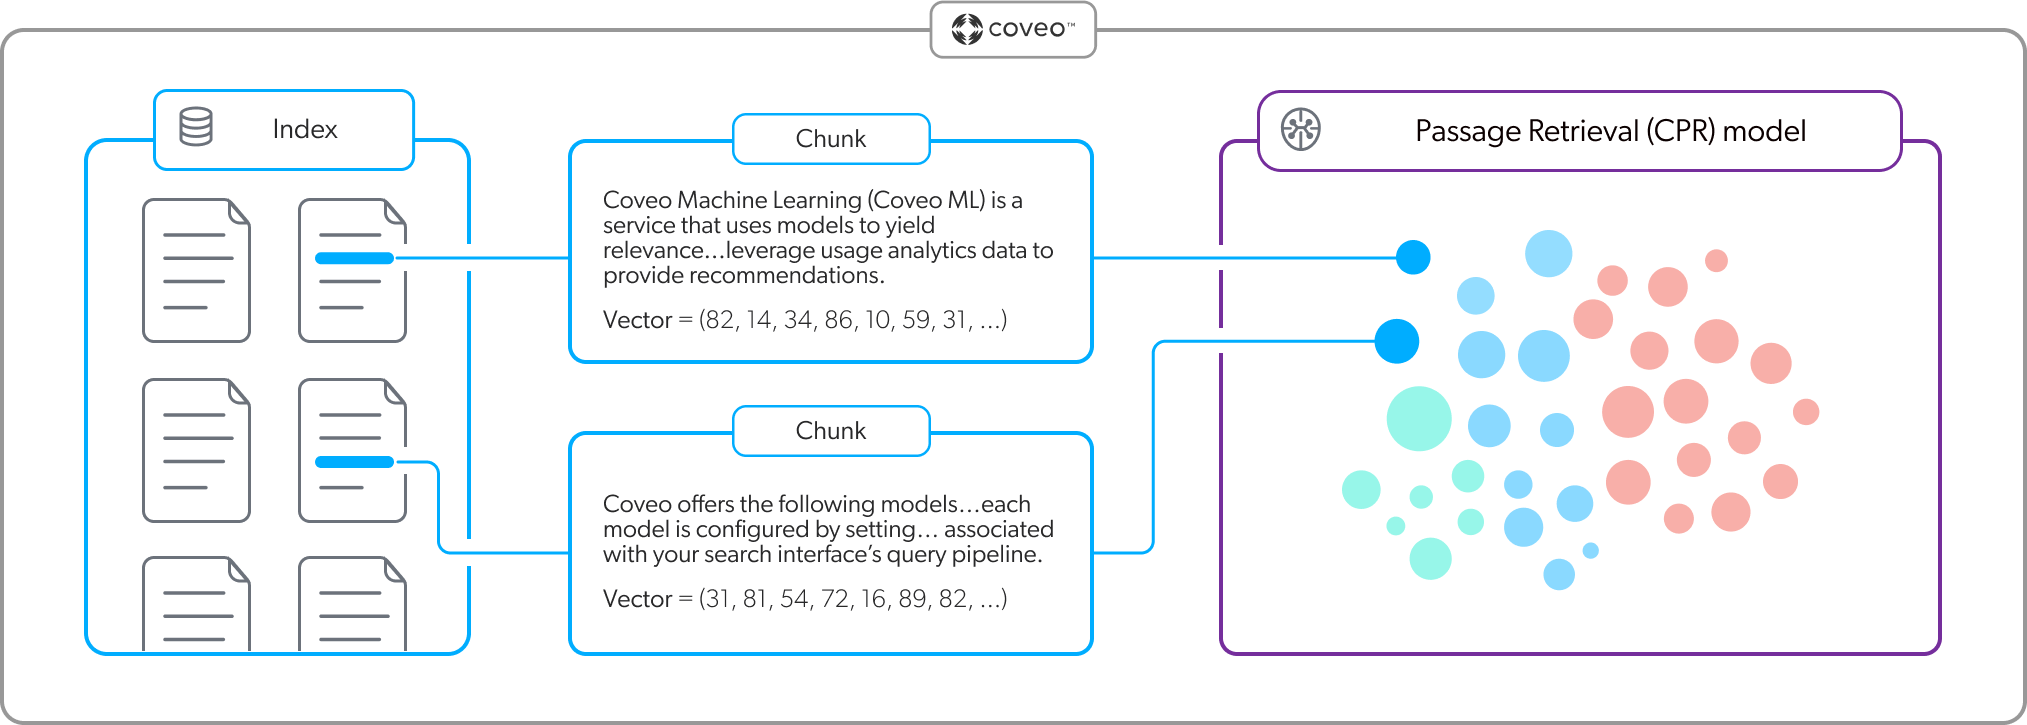
As shown in the following diagram, for a given query, the CPR model embeds the query in the embedding vector space in its memory to find the most relevant passages (chunks). In the context of the CPR passage retrieval flow, this is referred to as second-stage content retrieval. Only the passages corresponding to the most relevant items identified during first-stage content retrieval (items retrieved by the Coveo search engine) are considered.

|
|
The embeddings that are created by the CPR model aren’t impacted by Coveo Analytics events. However, a CPR model leverages the most relevant items retrieved by your Coveo-powered search for a given user query. Therefore, by enabling an Automatic Relevance Tuning (ART) model, which learns from events, then the most relevant items, and by extension the generated output by your LLM, will be influenced by events. |
|
|
Note
You can set a custom value for the maximum number of items that the CPR model considers when retrieving the most relevant passages. Though the default value usually provides good results, you can set a custom value if needed. When using the CPR model with the Coveo Search Agent, you can set a custom value in the Search Agent configuration. When using the CPR model with the Passage Retrieval API, you can set a custom value for the model association configuration in the query pipeline. |
Prerequisites
-
You have the required privileges to create a CPR model.
-
The content you want to use for the model meets the item requirements and is optimized for CPR.
 Note
NoteA Passage Retrieval (CPR) implementation must include both a CPR model and a Semantic Encoder (SE) model. Both the CPR and SE models must be configured to use the same content.

Keep the model embedding constraints in mind when choosing the content for your model.
Create a CPR model
-
On the Models (platform-ca | platform-eu | platform-au) page of the Coveo Administration Console, click Add model, and then click the Passage Retrieval card.
-
Click Next.
-
In the Learn from section, select the content that the model will use. You can select the sources and apply additional filters using the Standard configuration, or use Advanced mode to define a custom filter expression.
You’ll lose the current mode settings when you switch between Standard and Advanced mode.
NoteA Passage Retrieval (CPR) implementation must include both a CPR model and a Semantic Encoder (SE) model. Both the CPR and SE models must be configured to use the same content.

The Data volume preview section shows the impact of your settings on the data that’s available to the model.
-
In the Standard tab:
-
In the Sources dropdown menu, select the sources that contain the items from which you want the model to learn.
NoteIf your Coveo organization includes multiple indexes, the model can learn only from sources that are linked to the default index.
-
(Optional) In the Apply filters on dataset section, you can specify a condition to segment the content on which the model should base its training:
ExampleYou want the model to base its training only on items for which the collection field have the
FAQvalue.Therefore, you add a
collection is equal to FAQcondition.-
Click Add filter(s).
-
In the Field name input, enter the name of the field that you want to use to segment the dataset.
-
In the Select an operator dropdown menu, select the desired operator.
-
In the Value input, enter the value of the field on which you want to segment the dataset.
-
Click Apply.
-
-
-
In the Advanced tab:
-
Enter a custom filter expression using Coveo query syntax.
-
Click Apply.
-
-
-
Click Next.
-
In the Name your model input, enter a meaningful display name for the model.
-
(Optional) Use the Project selector to associate your model with one or more projects.
-
Click Start building.
-
Associate the model with a pipeline to use the model in a search interface.
-
If required, change the chunking strategy that’s used by the model.
Set the chunking strategy
To create the embeddings, a CPR model uses a process called chunking to break large pieces of text into smaller segments called chunks. The method that’s used to create the chunks is referred to as the chunking strategy.
|
|
Note
CPR models created after the release of structure-aware chunking (October 2025) use the structure-aware chunking strategy by default. CPR models created before October 2025 use the fixed-size chunking strategy by default. To view a CPR model's active chunking strategy, on the Models (platform-ca | platform-eu | platform-au) page, click the CPR model, and then click More > View JSON in the Action bar.
The chunking strategy appears in the |
|
|
Structure-aware chunking is specifically optimized for large language models (LLMs) and RAG systems, and is the recommended chunking strategy. You should use structure-aware chunking unless you have a specific use case that requires the use of fixed-size chunking. |
|
|
Note
You can configure each CPR model to use a different chunking strategy depending on your specific needs. |
To set the model chunking strategy
|
|
Note
Review the main considerations when choosing between chunking strategies. |
-
Access the Machine Learning section of the Swagger UI that’s associated with your Coveo organization region (US | CA | EU | AU).
-
Click Authorize and authenticate using your Coveo organization account credentials.
-
In the Swagger UI, expand the Machine Learning Models section.
-
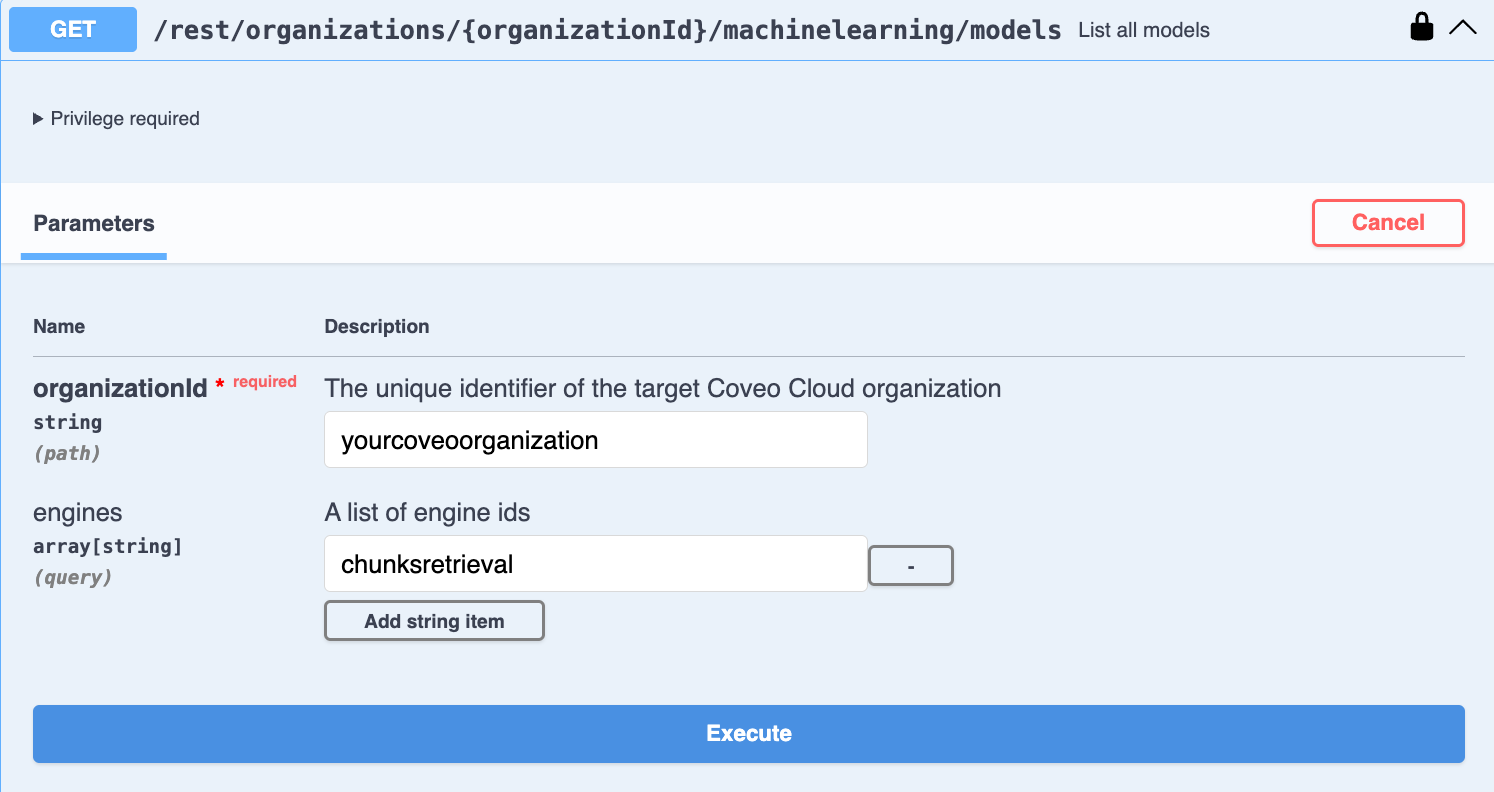
Use the List all models GET request to access your model’s JSON code:
-
Enter your Coveo organization ID.
-
Enter the
chunksretrievalengine ID to filter the list to show only CPR models. -
Click Execute. The JSON code for all CPR models in your organization appears in the Response body.
-
In the Response body, copy the JSON code of the model that you want to configure. You’ll need it in the next step.
-
-
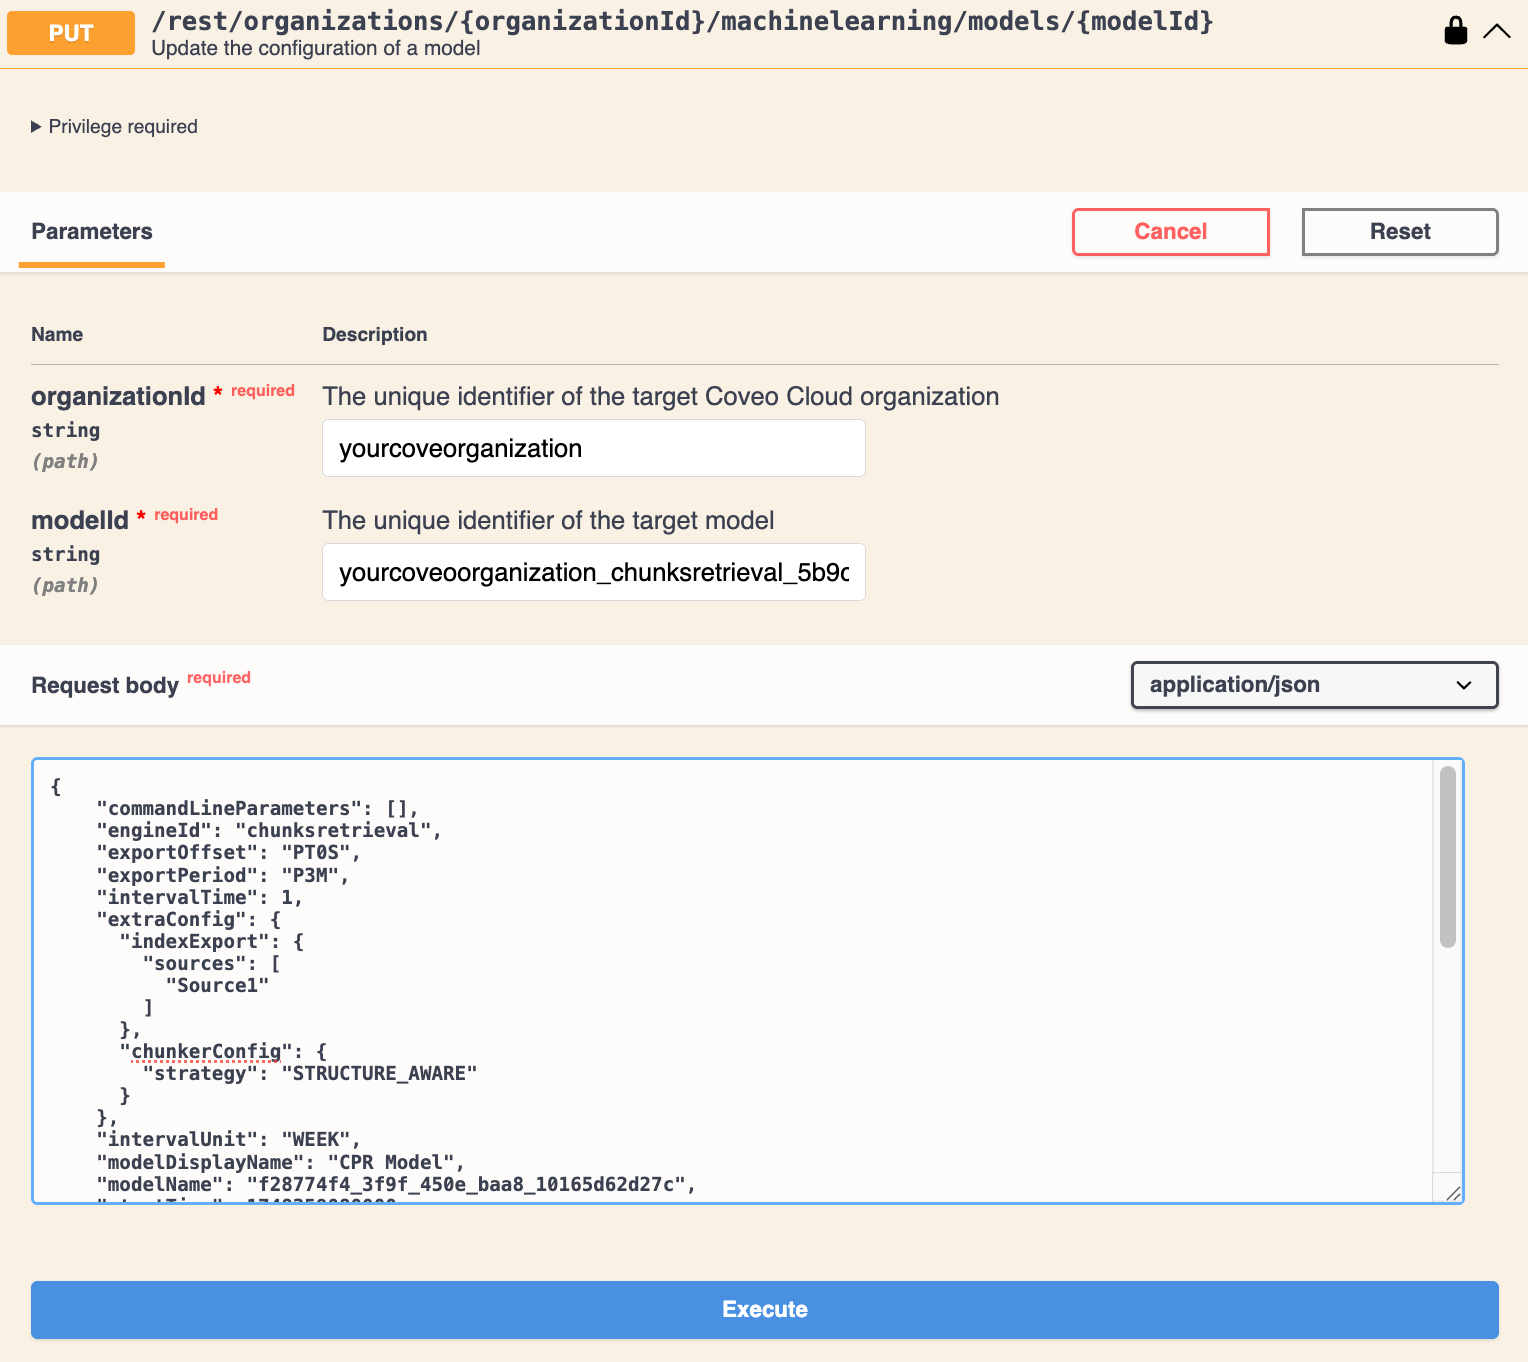
Use the Update the configuration of a model PUT request to modify the model's JSON code:
-
Paste the copied JSON code in the Request body.
-
Enter your Coveo organization ID.
-
Enter the ID of the model you want to modify.
If you don’t know the model ID, it appears in the model's JSON code in the
idfield. -
In the
extraConfigelement, add thechunkerConfigobject, and then add thestrategyparameter, and set it to eitherFIXED_SIZEorSTRUCTURE_AWARE.ExampleTo set the structure-aware chunking strategy, the JSON is as follows:
{
...
"extraConfig": {
    "chunkerConfig": {
        "strategy": "STRUCTURE_AWARE"
    }
    }
...
}
-
-
In the Swagger UI, click Execute to apply the changes to the model.
Set the maximum chunks per item
By default, a CPR model is configured to create a maximum of 1000 chunks per item during the embedding process. The default setting is suitable for the majority of use cases. However, if you have a large dataset, you can lower the maximum number of chunks per item to avoid the model exceeding the overall model embedding constraints for chunks.
|
|
The model will embed the item’s text until the maximum chunks per item limit is reached. The remaining text in the item won’t be embedded and therefore won’t be used by the model. To make sure that each item’s text is fully embedded, follow best practices by keeping items concise and focused. |
To set the maximum number of chunks per item
-
Access the Machine Learning section of the Swagger UI that’s associated with your Coveo organization region (US | CA | EU | AU).
-
Click Authorize and authenticate using your Coveo organization account credentials.
-
In the Swagger UI, expand the Machine Learning Models section.
-
Use the List all models GET request to access your model’s JSON code:
-
Enter your Coveo organization ID.
-
Enter the
chunksretrievalengine ID to filter the list to show only CPR models. -
Click Execute. The JSON code for all CPR models in your organization appears in the Response body.
-
In the Response body, copy the JSON code of the model that you want to configure. You’ll need it in the next step.
-
-
Use the Update the configuration of a model PUT request to modify the model's JSON code:
-
Paste the copied JSON code in the Request body.
-
Enter your Coveo organization ID.
-
Enter the ID of the model you want to modify.
-
In the
extraConfigelement, under thechunkerConfigobject, add themaxPassagesPerDocumentparameter, and set it to a value between1and1000(default).ExampleTo set the maximum number of chunks per item to 500, the JSON is as follows:
{
...
"extraConfig": {
    "chunkerConfig": {
        "strategy": "STRUCTURE_AWARE",
        "maxPassagesPerDocument": 500
    }
    }
...
}
NoteOnce you modify the model's default value, you can view the set value by going to the Models (platform-ca | platform-eu | platform-au) page, clicking the CPR model, and then clicking More > View JSON in the Action bar. The value appears in the
maxPassagesPerDocumentparameter of thechunkerConfigobject underextraConfig.
-
-
In the Swagger UI, click Execute to apply the changes to the model.
Manage a CPR model
You can edit, delete, or review information for your model.
Edit a CPR model
-
On the Models (platform-ca | platform-eu | platform-au) page, click the model you want to edit, and then click Edit in the Action bar.
-
On the subpage that opens, select the Configuration tab.
-
Under Name, edit the model’s display name.
-
(Optional) Use the Project selector to associate your model with one or more projects.
-
In the Learn from section, select the content that the model will use. You can select the sources and apply additional filters using the Standard configuration or use Advanced mode to define a custom filter expression.
You’ll lose the current mode settings when you switch between Standard and Advanced mode.
NoteA Passage Retrieval (CPR) implementation must include both a CPR model and a Semantic Encoder (SE) model. Both the CPR and SE models must be configured to use the same content.
The Data volume preview section shows the impact of your settings on the data that’s available to the model.
-
In the Standard tab:
-
In the Sources dropdown menu, select the sources that contain the items from which you want the model to learn.
NoteIf your Coveo organization includes multiple indexes, the model can learn only from sources that are linked to the default index.
-
(Optional) In the Apply filters on dataset section, you can specify a condition to segment the content on which the model should base its training:
ExampleYou want the model to base its training only on items for which the collection field have the
FAQvalue.Therefore, you add a
collection is equal to FAQcondition.-
Click Add filter(s).
-
In the Field name input, enter the name of the field that you want to use to segment the dataset.
-
In the Select an operator dropdown menu, select the desired operator.
-
In the Value input, enter the value of the field on which you want to segment the dataset.
-
Click Apply.
-
-
-
In the Advanced tab:
-
Enter a custom filter expression using Coveo query syntax.
-
Click Apply.
-
-
-
Click Save.
NoteSome configuration changes initiate an automatic model rebuild when you save the model. The Models (platform-ca | platform-eu | platform-au) page shows your model’s current Status. Model settings take effect only when its status is Active.
For more information on Coveo ML model statuses, see the Status column reference.
Delete a CPR model
|
|
Note
If the model is associated with a query pipeline, make sure to dissociate the model from the query pipeline after deleting it. |
-
On the Models (platform-ca | platform-eu | platform-au) page, click the ML model that you want to delete, and then click More > Delete in the Action bar.
-
In the panel that appears, click Delete.
Project association prompts
A machine learning model is a resource you can associate with a project. Resources associated with a project can require confirmation when you modify them. These confirmation prompts help prevent accidental changes that could affect a Coveo implementation.
Deleting a resource always requires confirmation, whether it’s associated with a project or not. When the resource is associated with projects, the confirmation prompt lists those projects.
Review model information
On the Models (platform-ca | platform-eu | platform-au) page, click the desired model, and then click View in the Action bar. For more information, see Reviewing model information.
Model embedding constraints
The CPR model converts your content’s body text into numerical representations (vectors) in a process called embedding. It does this by breaking the text up into smaller segments called chunks, and each chunk is mapped as a distinct vector. For more information, see Embeddings.
Due to the amount of processing required for embeddings, the model is subject to the following embedding constraints, depending on the chunking strategy.
|
|
Note
For a given model, the same chunking strategy is used for all sources and item types. |
| Constraint | Structure-aware chunking | Fixed-size chunking | ||||
|---|---|---|---|---|---|---|
Chunk size |
Average of 400 tokens per chunk |
250 whitespace-delimited words per chunk |
||||
Maximum number of items or chunks |
Up to 15 million items or 50 million chunks
|
|||||
Maximum number of chunks per item |
1000 (default)
|
|||||
"Status" column
On the Models (platform-ca | platform-eu | platform-au) page of the Administration Console, the Status column indicates the current state of your Coveo ML models.
The following table lists the possible model statuses and their definitions:
| Status | Definition | Status icon | ||
|---|---|---|---|---|
Active |
The model is active and available. |
|
||
Build in progress |
The model is currently building. |
|
||
Inactive |
The model isn’t ready to be queried, such as when a model was recently created or the organization is offline. |
|
||
Limited |
Build issues exist that may affect model performance. |
|
||
Soon to be archived |
The model will soon be archived because it hasn’t been queried for an extended period of time. |
|
||
Error |
An error prevented the model from being built successfully.
|
|
||
Archived |
The model was archived because it hasn’t been queried for an extended period of time. |
|
Required privileges
The following table indicates the privileges required for members to manage Coveo Generic models (see Manage privileges and Privilege reference).
| Action | Service | Domain | Required access level |
|---|---|---|---|
View models |
Machine Learning |
Models |
View |
Organization |
Organization |
View |
|
Search |
Query pipelines |
View |
|
Manage models |
Content |
Fields |
View |
Sources |
View All |
||
Machine Learning |
Allow content preview |
Allowed |
|
Models |
Edit |
||
Organization |
Organization |
View |
|
Search |
Query pipelines |
View |