Creating a Search Driven Page Using the Coveo for Sitecore Legacy Search UI Framework
Creating a Search Driven Page Using the Coveo for Sitecore Legacy Search UI Framework
Coveo for Sitecore 4.1 (November 2018)
A search driven page is a search page that dynamically shows content without requiring your users to enter a query. It’s usually displayed in such a way that it doesn’t look or feel like a search page, while still benefiting from the flexibility and dynamism of a search page.
This type of page is useful if you want to change the content of your page based on facets or user profiles, or if you want to manually boost certain items.
Using the Launch Sitecore demo, this tutorial will show you how to create a search driven page listing all your team members, and how to dynamically change the content ordering of the page.
While this tutorial uses examples from the Launch Sitecore demo, it’s easily adaptable to other sites.
Create a Coveo-Powered Search Page
The first step is to create a Coveo-Powered Search Page, which is the framework for your search driven page.
To learn how to create a Coveo-Powered Search Page, see Inserting and Customizing a Search Interface Component or Inserting Coveo Search Components to an Existing Item.
Filter Your Results
Now that you’ve created your search page, you need to filter the results so that it only shows your desired items. For this example, you want to filter items so that you only get Team members.
-
If you’re an Enterprise edition client and want to learn how to filter results, see Adding Boosting or Filtering Expressions. You want your rule to look like this:

-
If you’re not an Enterprise edition client and want to learn how to filter results, see Using Boosting or Filtering Rules on the Search Component Programmatically.
Set the Search Component Properties
You must now set the search component properties to disable certain features.
Keep in mind that these are suggestions, and that you may want to enable or disable certain properties based on your needs. For a complete list of the search component properties and their function, see Search Component Properties.
Paging
Set the Pager location to None.
Change the Number of results per page according to your number of items. If you have a limited amount of items that isn’t subject to change often, set it at that number. If your number of items changes often, set it to the maximum number, which is 1000.
The higher you set this number, the longer a query takes to load.
On a search driven page, you usually don’t want to have many pages listing your content, which is why you should disable the Pager location. However, you want to display all of your content, which is why you should increase your Number of results per page.
Alternatively, you could go to the Infinite scrolling section and check Enable infinite scrolling.
Layout
Disable the following options:
-
Display the logo: You usually don’t want to display the logo of the search page.
-
Display the main search box: You don’t want your users to alter your search results.
-
Display sorting components: Activate this when you want your users to be able to change the way your content is sorted.
-
Display a loading animation before the first query is executed: You usually don’t want to display a loading animation.
-
Display query duration: You don’t want to show the query duration.
-
Display query summary: You don’t want to show the query summary.
-
Display Did You Mean: Since the user can’t enter a query, you don’t want to activate this option.
-
Display the error report: Since the user can’t enter a query, you don’t want to activate this option.
-
Display the tabs section: If you didn’t add other tabs, you want to deactivate this option.
Advanced
You want to make sure Auto Trigger Query is activated, as deactivating it prevents your page from showing content.
Customize Your Search Driven Page
You can now customize your search page to your liking. For example, you can:
-
Add tab components (see Inserting and Customizing a Tab Component)
-
Add sort components (see Inserting and Customizing a Sort Component)
-
Add facet components (see Inserting and Customizing a Facet Component)
Optimize Your Page for WebCrawlers
Because the content of your search driven page is displayed dynamically in your visitors browser, a web crawler would be unable to index your pages. This affects your ranking in popular search engines, and is an undesirable behavior.
For this reason, it’s important that you optimize your page for web crawlers. For instructions on how to do that, see Creating a Search Interface Optimized for WebCrawlers.
Boost Content on Your Page
One of the main advantages of a search driven page is that it allows you to change the ordering of your content. Here are some ways to do it:
Automatically Boost Content
As your page is search driven, you can allow Coveo Machine Learning (Coveo ML) to dynamically change the way your content is ordered.
For more information on how to enable Coveo ML on your search page, see Get Started With Coveo Machine Learning.
As your page is a search driven page, it’s automatically affected by the items in your Top Results.
For more information on how to manage your Top Results, see Manage Top Results.
Automatically Boost Content Based on User Profiles
This option is only available to Enterprise edition clients.
You can choose to dynamically boost your content based on the current profile of your user. Here are the steps to follow to make use of this feature.
Enable Automatic Boosting
-
If not already done, assign profile cards to your Sitecore items. In the Launch Sitecore demo, no team member has a profile card, so you need to add the appropriate card.
For this example, you can add Network Architect to Brandon Royal, Kevin Di Troia, and Patrick Wallace.
-
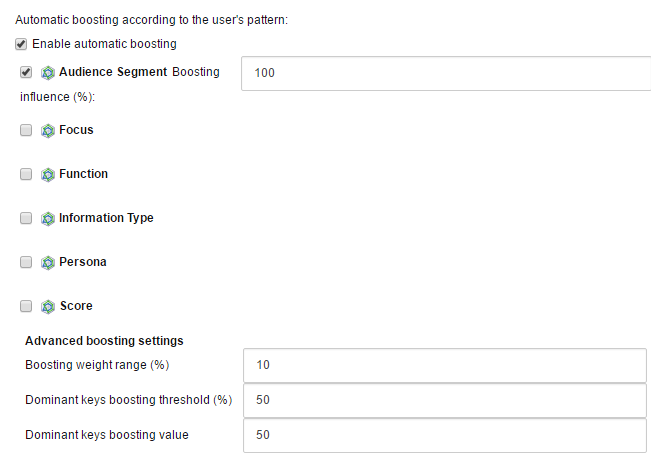
Enable automatic boosting on your search page (for more information, see Using Automatic Boosting).
-
In the Experience Editor, click the Coveo Search component to open the floating toolbar.
-
Click Edit Properties. It should be the first option.
-
Under Results Scope, check Enable automatic boosting.
-
Because you’re looking to boost according to the audience segment, select Audience Segment.
-
If you want, you can fine-tune your boosting settings. For more information on how automatic boosting works, see Coveo for Sitecore October 2016- - Using Automatic Boosting.
For this example, you can leave it at its default value.

-
Save your search page.
-
Test Your Search Page
You now need to test whether the search page works as expected.
-
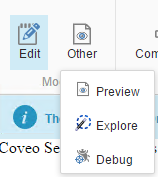
In the Experience Editor of your search page, in Mode, select Other, and then Explore.

-
In the Settings panel on the left, under Onsite Behavior > Profiles > Audience Segment, enter the values associated to your pattern card for each of the profile keys.
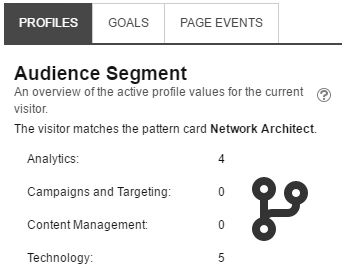
In Launch Sitecore, the Network Architect pattern card has an Analytics value of
4, a Campaigns and Targeting and Content Management value of0, and a Technology value of5. -
Click Apply. After the page reloads, you should see, in the Viewer panel on the right, under Onsite Behavior > Profiles, that you have the Network Architect pattern card.

-
You should now see that the team members associated with the Network Architect pattern card are boosted at the top of the page.

Manually Boost Content
You can also manually boost content on your page by adding or subtracting boosting values.
-
If you’re an Enterprise edition client and want to learn how to use boosting rules, see Adding Boosting or Filtering Expressions.
-
If you’re not an Enterprise edition client and want to learn how to use boosting rules, see Using Boosting or Filtering Rules on the Search Component Programmatically.