Applying Filtering and Ranking Rules
Applying Filtering and Ranking Rules
Coveo for Sitecore and the Coveo Administration Console provide several mechanisms you can use to filter or boost results.
-
Using the Rule Set Editor
Enterprise only
The Rule Set Editor is a wizard which alleviates the complexity that comes with dealing with filtering and boosting expression syntax, and using Coveo JavaScript Search Framework classes and methods. You can access the Rule Set Editor through Coveo for Sitecore rendering data sources, directly in the Sitecore Experience Editor (see Filtering and Boosting Using the Rule Set Editor).
-
Using Coveo Cloud Query Pipelines
Query Pipelines are rules that can be specified to alter queries in the cloud before they’re sent to the index and the results returned by the index. Among others, filtering and boosting rules can be defined in Query Pipeline. Query pipelines are defined in the Coveo Cloud Console (see Manage query pipelines).
You can map a Coveo for Sitecore search interface to a specific Query Pipeline or associate conditions to your Query Pipelines to apply filtering and boosting expressions dynamically (see Filtering and Boosting Using Query Pipelines).
-
Using JavaScript in Custom Coveo for Sitecore Renderings
You can create Coveo for Sitecore renderings with your own JavaScript code to apply your custom filtering and boosting expressions (see Filtering and Boosting Using JavaScript in Custom Coveo for Sitecore Renderings).
-
Using Automatic Boosting
Coveo provides powerful, AI-powered automatic boosting. Enabling and configuring automatic boosting is covered in a dedicated documentation section on leveraging visitor profile information and associated patterns through Sitecore Analytics (see Using Automatic Boosting).
Filtering and Boosting Using the Rule Set Editor
Enterprise only
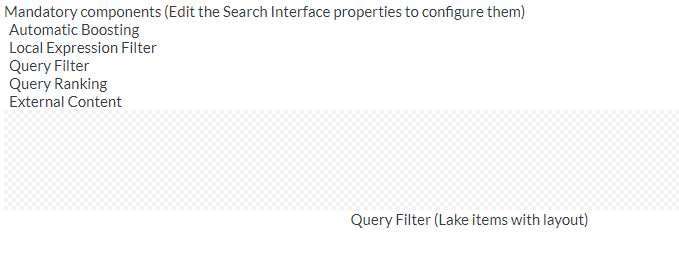
You can access the Rule Set Editor through the data source of the following Coveo for Sitecore components:
-
the Query Filter component
-
the Query Ranking component
-
the Coveo Search Interface component
 Leading practice
Although the Coveo Search Interface component view file automatically instantiates both a Query Filter and a Query Ranking component, you should insert standalone instances of these components in your search interfaces. This eases the configuration and reusability of these components.
Using the Query Filter Component
You can apply filtering expressions to all your search interface queries by inserting the Query Filter component and editing its data source.
-
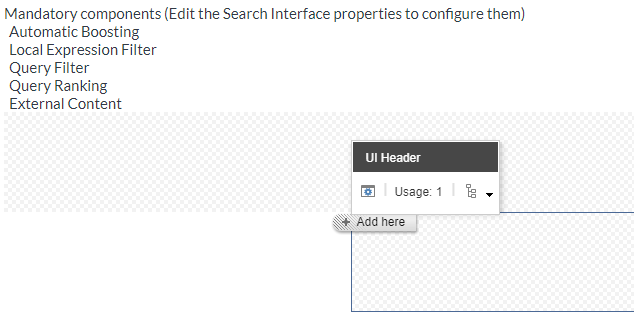
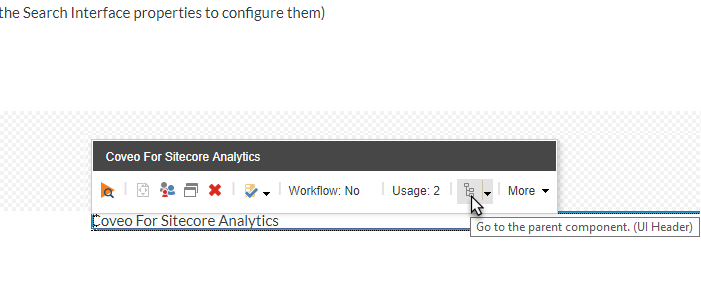
In the Experience Editor, locate and select the UI Header placeholder. When the UI Header placeholder is empty, the placeholder shaded area is visible (image below left). Otherwise, you can select a component that has been inserted in the UI Header placeholder and use the Go to the parent component option (image below right).
-
Click Add here.
-
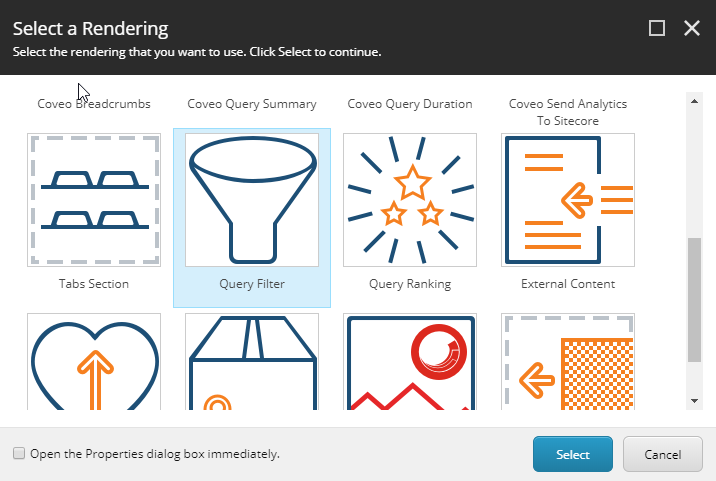
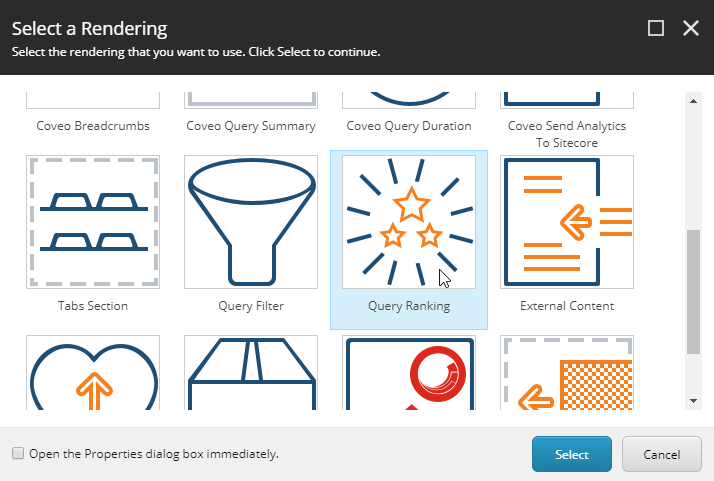
Select the Query Filter rendering.
-
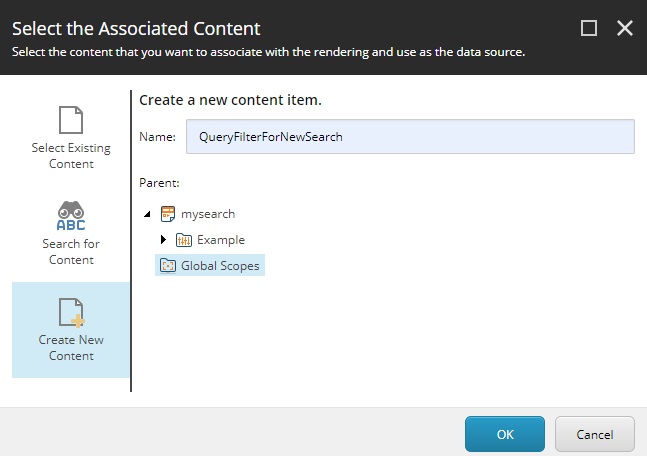
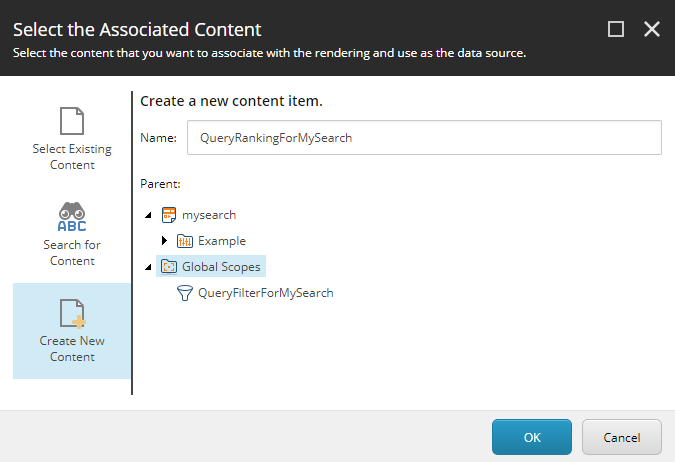
Create a data source for your component.
-
In the Query Filter component floating toolbar, select the Edit the rendering’s data source option. It should be the leftmost option on the floating toolbar.
-
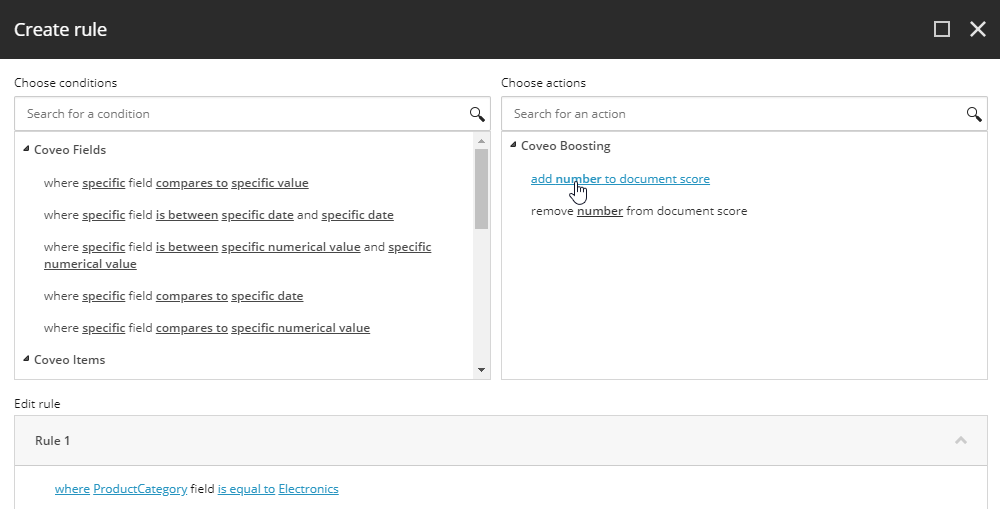
In the Query Filter section, just underneath Filter expression rules, click Edit rule.
-
Click Add a new rule.
-
In the Choose conditions section of the dialog, select the condition template you want to use (see Rule Set Editor boosting and filtering rules reference).

-
In the Edit rule section, for each link in the condition template, click the link to either toggle between possible options or to set a value (for example, clicking the
wherelink will allow you to toggle between thewhereandexcept whereoptions.)
-
If you want to add other conditions to your rule, repeat steps 7 to 9. You can change the
andlogical operator between the conditions, if need be.
-
Give your rule a meaningful name.

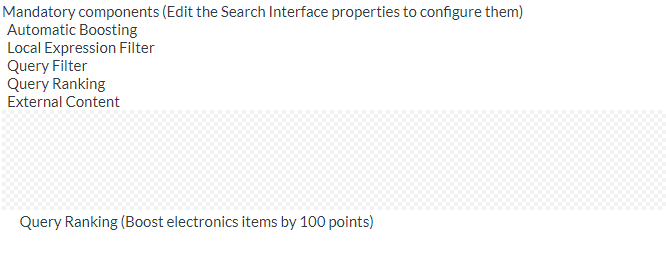
Once completed, the Query Filter component and its rule name should be displayed in the Experience Editor.
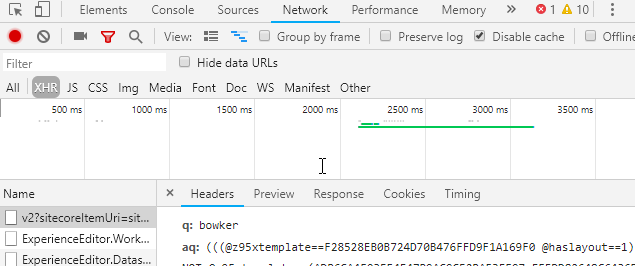
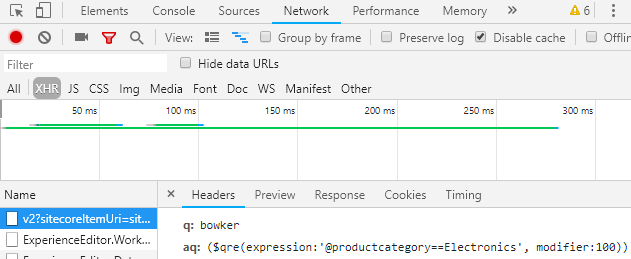
When executing queries in search interface, you can review your call headers in the browser developer tools to ensure that the advanced query (aq) value properly reflects your query filter rule.
Using the Query Ranking Component
You can boost the score of targeted results on all your search interface queries by inserting the Query Ranking component and editing its data source.
-
In the Experience Editor, locate and select the UI Header placeholder. When the UI Header placeholder is empty, the placeholder shaded area is visible (image below left). Otherwise, you can select a component that has been inserted in the UI Header placeholder and use the Go to the parent component option (image below right).
-
Click Add here.
-
Select the Query Ranking rendering.
-
Create a data source for your component.
-
In the Query Ranking component floating toolbar, select the Edit the rendering’s data source option. It should be the leftmost option on the floating toolbar.
-
In the Query Ranking section, just underneath Boost expression rules, click Edit rule.
-
In the Choose conditions section, select the condition template you want to use.
-
In the Edit rule section, for each link in the condition template, click the link to either toggle between possible options or to set a value (for example, clicking the
wherelink will allow you to toggle between thewhereandexcept whereoptions.)
-
If you want to add other conditions to your rule, click Add a new rule and repeat steps 7 and 8. You can change the
andlogical operator between the conditions, if need be. -
In the Choose actions section, select whether you want to boost (add number to document score) the targeted items or reduce the score (remove number from document score) of the targeted items.
-
In the Edit rule section, click the
numberlink to specify the number of points to add to, or subtract from, the scores of the targeted items. -
Give your rule a meaningful name.

Once completed, the Query Ranking component and its rule name should be displayed in the Experience Editor.
When executing queries in search interface, you can review your call headers in the browser developer tools to ensure that the advanced query (aq) value properly reflects your query ranking rule.
Filtering and Boosting Using Query Pipelines
This section provides instructions on how to create filtering and boosting rules in Query Pipelines.
You might well decide to create several Query Pipelines, based on your specific requirements. You can then decide upon the best Query Pipeline mapping strategy. For example, you might want to associate a search interface to a specific Query Pipeline (as in the Query Pipeline Filtering example below) or use a more dynamic, condition-based, pipeline routing approach instead (see Routing Search Queries to Query Pipelines).
Query Pipeline Filtering
-
Create a query pipeline in the Coveo Administration Console (see Create a query pipeline). For now, don’t create a condition. Stop after step 4.
-
In your query pipeline, add a filter (see Manage filter rules).
ExampleTo ensure only Sitecore items associated with a layout appear in the results list, the query expression would look like the following.
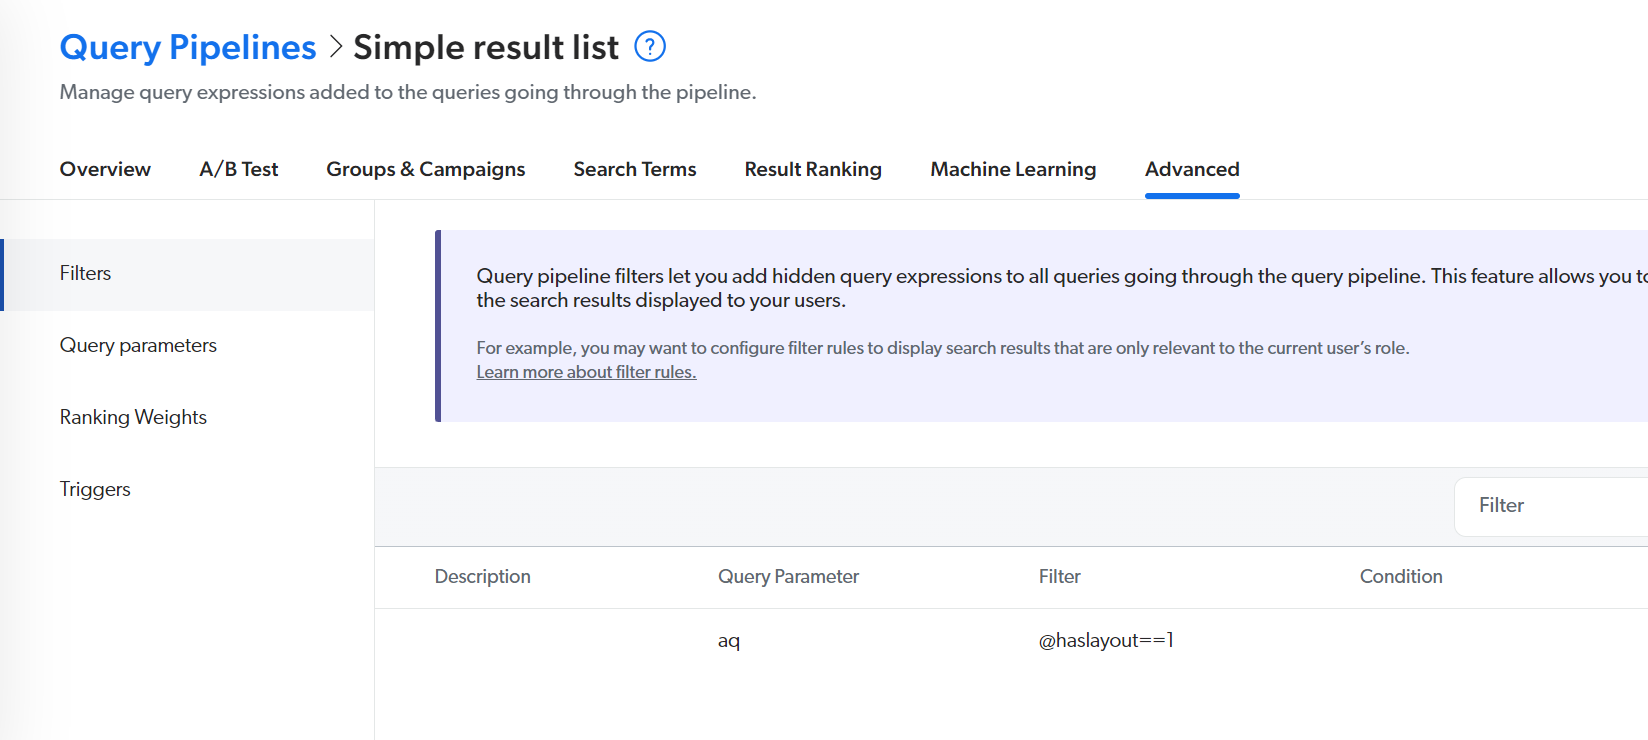

Use the Coveo field name (also called the Translated Name), not the Sitecore field name, when creating query expressions (see Understanding the Indexing Manager).
-
In the Experience Editor, on the Coveo Search Interface component floating toolbar, select the Edit the rendering’s data source option.
-
In the Query Settings section, enter the name of your pipeline in the
Query pipelinefield.
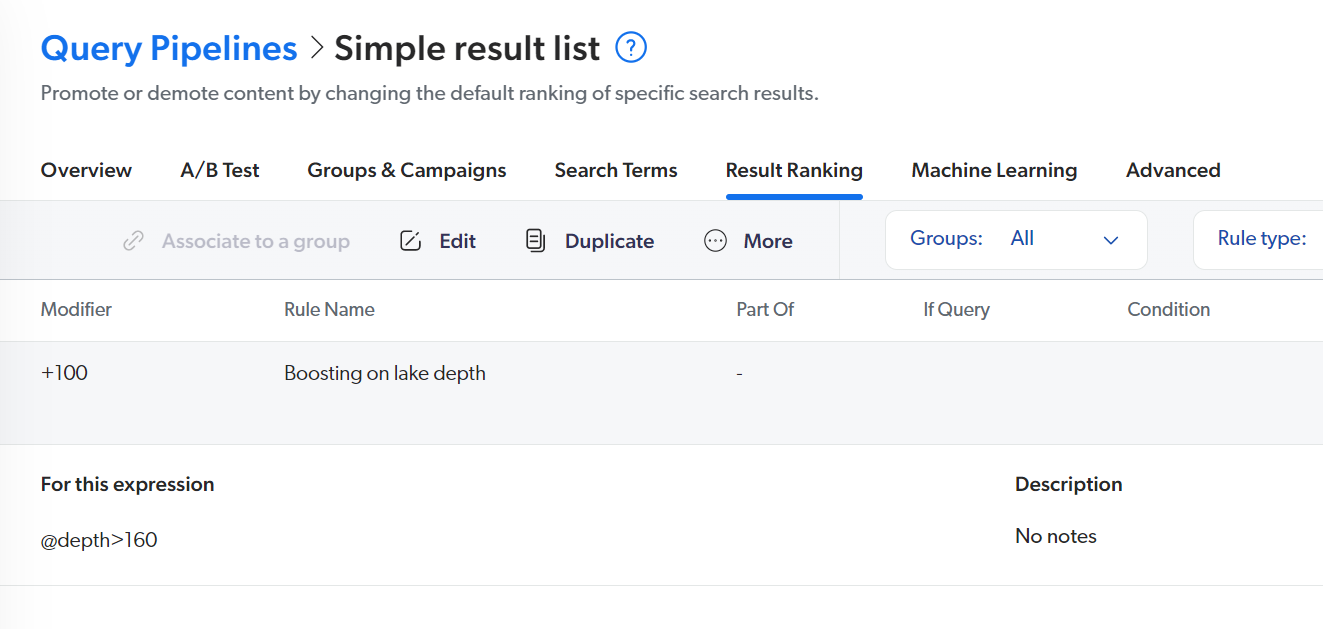
Query Pipeline Boosting
There are several result boosting methods available in query pipelines. Boosting results based on a ranking expression is one of them (see Manage ranking expression rules).
You have a Sitecore website about world lakes.
Your lake items contain a Depth field.
When your visitors land on a page that describes a deep lake, you might like to promote other lake items with comparable depths.
|
|
Use the Coveo field name (also called the Translated Name), not the Sitecore field name, when creating query expressions (see Understanding the Indexing Manager). |
Filtering and Boosting Using JavaScript in Custom Coveo for Sitecore Renderings
You can create custom filtering and boosting renderings and leverage the Coveo JavaScript Search Framework in your rendering view file code. You can subsequently add these renderings to your search interface.
Creating a Custom Filtering Rendering
The following instructions will allow you to create a CoveoForSitecoreFilterExpression component with a custom expression and add this rendering to the Search Interface.
-
Create a
.cshtmlfile.-
Create a folder for custom view files (example:
/Views/Project/CoveoForSitecoreHive). -
In the folder, create a new
.cshtmlfile (example:JS Query Filter.cshtml).
-
-
Add the dependencies.
-
The first two dependencies are required by custom components.
-
The partial view will render the component’s name on the Search Page in the Experience Editor.
@using Coveo.UI.Components
@using Coveo.UI.Components.Extensions
@Html.Partial(Partials.EDIT_TITLE, Html.Coveo().GetViewName())
-
-
Add the
CoveoForSitecoreFilterExpressioncomponent.<div id="JSFilterExpression" class="CoveoForSitecoreFilterExpression"></div> -
Insert the JavaScript code required to create the filtering rule in the file. The following code will exclude two items (the Search Page and the Home Page) from the search results.
<script> document.addEventListener('DOMContentLoaded', function() { var expressionBuilder = new Coveo.ExpressionBuilder(); var fieldName = CoveoForSitecore.Context.fields.toCoveo('@@_id'); var homePageID = 'A5551D45FCE245718E4066F82E67D646'; var searchPageID = 'A03A727F95E04CF7BB31D196F9756BEE'; var contentPathValues = [homePageID, searchPageID]; expressionBuilder.addFieldNotEqualExpression(fieldName, contentPathValues); document.getElementById('JSFilterExpression').dataset.scAdvancedFilter = expressionBuilder.build(); }); </script> -
Create a custom rendering in Sitecore.
-
Copy the
Query Filterrendering, located under/Renderings/Coveo Hive/Scopesto a custom rendering folder (example:/Renderings/Project/CoveoForSitecoreHive). -
Change the path to match it with the new
.cshtmlfile.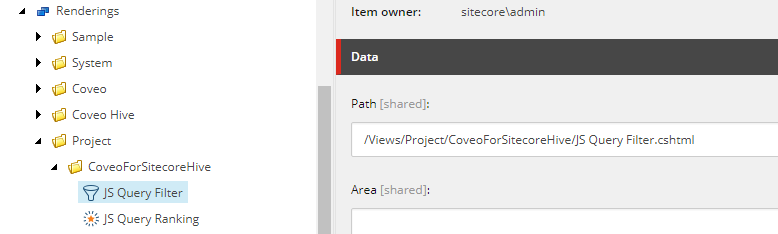
-
-
Make the component available in the Search Interface.
-
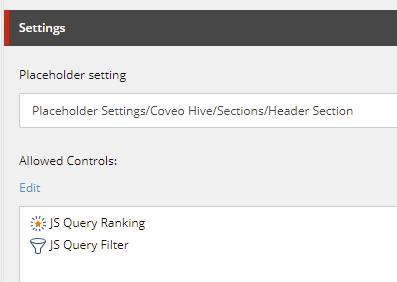
Add the component in the required placeholder of the search interface. In this example, the Placeholder Extender component is used to add the rendering in the Header section of the Modular Frame.
-
-
Add the component to the Search Interface.
-
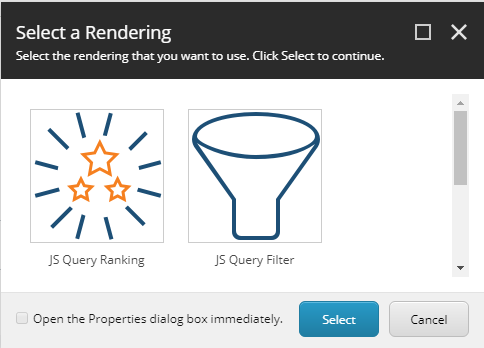
Open your search page with the Experience Editor and add the component. In this example, the component is available in the Header Section.
-
Creating a Custom Ranking Rendering
The following instructions will allow you to create a CoveoForSitecoreRankingExpression component with a custom expression and add this rendering to the Search Interface.
-
Create a
.cshtmlfile.-
Create a folder for custom view files (example:
/Views/Project/CoveoForSitecoreHive). -
In the folder, create a new
.cshtmlfile (example:JS Query Ranking.cshtml).
-
-
Add the dependencies in the file.
-
The first two dependencies are required by custom components.
-
The partial view will render the component’s name on the Search Page in the Experience Editor.
@using Coveo.UI.Components
@using Coveo.UI.Components.Extensions
@Html.Partial(Partials.EDIT_TITLE, Html.Coveo().GetViewName())
-
-
Add the
CoveoForSitecoreRankingExpressioncomponent in the file.<div id="JSRankingExpression" class="CoveoForSitecoreRankingExpression"></div> -
Insert the JavaScript code required to create the ranking rule in the file. The following code will boost the items having the value
Value To Boostin the fieldFieldToBoostby 500 points.<script> document.addEventListener('DOMContentLoaded', function() { var expressionBuilder = new Coveo.ExpressionBuilder(); var fieldName = CoveoForSitecore.Context.fields.toCoveo('@@FieldToBoost'); var fieldValue = 'Value To Boost'; expressionBuilder.addFieldExpression(fieldName, '==', [fieldValue]); document.getElementById('JSRankingExpression').dataset.scRankingExpression = "$qre(expression: '" + expressionBuilder.build() + "', modifier: '500')"; }); </script> -
Create a custom rendering in Sitecore.
-
Copy the
Query Rankingrendering, located under/Renderings/Coveo Hive/Scopesto a custom rendering folder (example:/Renderings/Project/CoveoForSitecoreHive) -
Rename it
JS Query Ranking. -
Change the path to match it with the new
.cshtmlfile.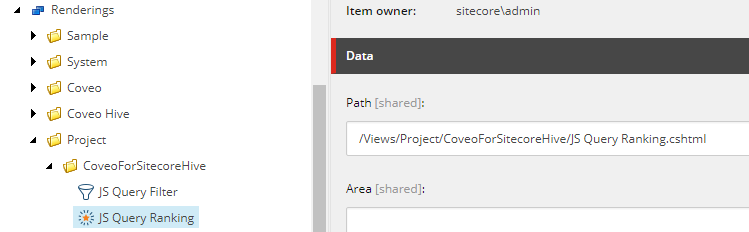
-
-
Make the component available in the Search Interface.
-
Add the component in the required placeholder of the Search Interface. In this example, the Placeholder Extender component is used to add the rendering in the Header section of the Modular Frame.
-
-
Add the component to the Search Interface.
-
Open the Search Page with the Experience Editor and add the component. In this example, the component is available in the Header Section.
-