Add or edit a SharePoint Online legacy source (Deprecated)
Add or edit a SharePoint Online legacy source (Deprecated)
|
|
SharePoint Online legacy sources are unavailable in organizations created after February 28th, 2018. Customers with such an organization must create regular SharePoint Online sources instead. |
When you have the required privileges, you can index SharePoint Online content and make it searchable.
|
|
Note
The SharePoint Online legacy source requires an identity provider URL (when using a federated authentication) and a SharePoint trust identifier to make secured content searchable (see Authentication Section). To authenticate with OAuth 2.0, create a regular SharePoint Online source instead. |
|
|
Leading practice
The number of items that a source processes per hour (crawling speed) depends on various factors, such as network bandwidth and source configuration. See About crawling speed for information on what can impact crawling speed, as well as possible solutions. |
Source key characteristics
The following table presents the main characteristics of a SharePoint Online legacy source.
| Features | Supported | Additional information | |
|---|---|---|---|
SharePoint Online version |
Latest cloud version |
||
Indexable content |
Sites, sub-sites, user profiles, personal websites, lists, list items, list item attachments, document libraries, document sets, documents, web parts, and microblog posts and replies. |
||
|
Takes place every hour by default. A rescan or rebuild is required to take account of deleted user profiles. |
||
|
|||
|
|||
Content security options |
|
||
|
|||
|
|||
Requirements
DNS records configuration for Office 365
-
Log in to Office 365 admin center with an administrator account.
-
In the navigation bar on the left, select Domains.
-
On the Manage domains page:
-
Under Domain Name, select your corporate domain (not
company.onmicrosoft.com) checkbox. -
Next to the Action column, under the domain name, click Domain settings.
-
-
On the domain page, in the DNS records section, take note of the DNS records.
-
On the domain page, in the DNS records section, click the Troubleshoot domain link to ensure that the DNS records were correctly configured.
SharePoint Online account with appropriate permissions
When you want to include SharePoint Online content, you must create a specific SharePoint Online account (that is, the crawling account) that will only be used by the source. Otherwise, you’ll need to also change the source Password value each time the account password changes to prevent authentication errors.
-
Access your SharePoint Online tenant with an administrator account.
-
On your SharePoint Online tenant:
-
Select or create the crawling account user that the source will use to retrieve your SharePoint Online content. See the following table to identify the required type of user for your web application enabled authentication.
SharePoint web application enabled authentication Type of user User format Native Native Office 365 account username@domain.onmicrosoft.comSSO with ADFS Single Sign-On Office 365 account username@domain.comSSO with Okta -
Grant appropriate SharePoint permissions to the crawling account to ensure it has access to all the content that you want to include. The following table presents the minimal required permissions that the crawling account must have to perform the specified action.
Action to perform Minimal required permission Indexing content and security, incremental refresh, and site collection discovery (Only when you include the content of a SharePoint web application) SharePoint Administrator permissions in Office 365 (see Assigning admin roles in Office 365).
Administrator permissions for all SharePoint Online site collections, including the root site collection (see procedure below the table).
Indexing personal sites, user profiles, and social tags
When including personal sites or user profiles, the crawling account must not have a personal site on the SharePoint instance being included to prevent connector failure cases when attempting to retrieve the list of personal sites.
Owner of all personal sites collections (see procedure below the table). Click for the procedure on granting Site Collection Administrator permissions
-
Access the SharePoint Online administration center (that is,
https://<YOUR_DOMAIN>-admin.sharepoint.com). -
Click Manage site collections.
-
In the left navigation panel, click Site Collections.
-
In the right panel, under Site Collections, select one or more site collections you want to crawl.
-
In the toolbar, click Owners > Manage Administrators.
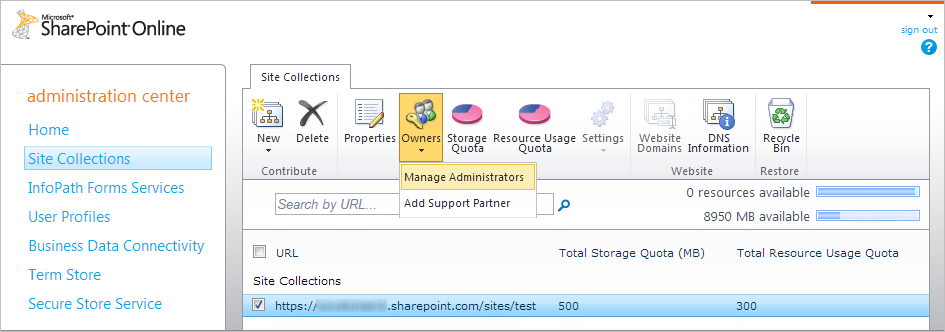
-
Add the crawling account to the list of Site Collection Administrators.
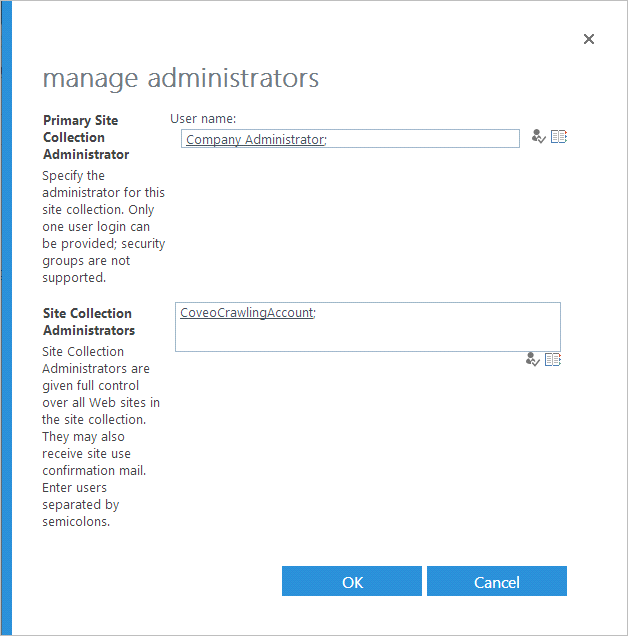
-
Click OK.
Click for the procedure on granting Owner permissions on a personal site collection
SharePoint Online admin center allows granting owner permissions for only one personal site collection at a time, which means the following procedure has to be done for every personal site collection.
-
Access the SharePoint Online administration center (that is,
https://<YOUR_DOMAIN>-admin.sharepoint.com). -
In the left navigation panel, click user profiles.
-
Click Manage User Profiles.
-
Use the search box to find the user profile you want to crawl.
-
Right-click an Account name, and then select Manage site collection owners.

-
Add the crawling account to the list of Site Collection Administrators.
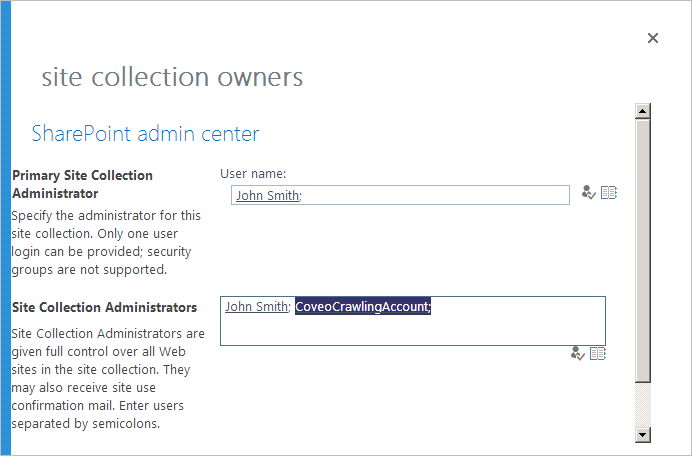
-
Click OK.
-
Add or edit a SharePoint Online legacy source
Before you start, ensure that your SharePoint Online Legacy instance meets the source requirements.
|
|
Leading practice
It’s best to create or edit your source in your sandbox organization first. Once you’ve confirmed that it indexes the desired content, you can copy your source configuration to your production organization, either with a snapshot or manually. Source re-authentication with a separate crawling account may be required in the production organization. See About non-production organizations for more information and best practices regarding sandbox organizations. |
"Configuration" tab
On the Add/Edit a SharePoint Online Legacy Source subpage, the Configuration tab is selected by default. It contains your source general and content information, as well as other parameters.
General information
Source name
Enter a name for your source.
|
|
Leading practice
A source name can’t be modified once it’s saved, therefore be sure to use a short and descriptive name, using letters, numbers, hyphens ( |
URL
Enter the URLs of the SharePoint Online site sections that you want to make searchable.
Ensure to include the protocol (http:// or https://).
-
For the whole SharePoint Online site:
https://domain.sharepoint.com -
For a Web Application:
https://site:8080/ -
For a site collection:
https://site:8080/sites/support -
For a website:
https://site:8080/sites/support/subsite -
For a document library:
https://site:8080/documentLibrary -
For a list:
https://site:8080/sites/support/lists/contacts/allItems.aspx
|
|
Note
Indexing a specific folder in a list isn’t supported. |
Scope
Select the content type that you want to index in relation with the specified source URLs.
By default, Web application is selected, which is the highest element type in the SharePoint Online site hierarchy. It allows you to index everything.
| Value | Content to crawl |
|---|---|
Web application |
All site collections of the specified web application |
Site collection |
All web sites of the specified site collection |
Web and sub webs |
Only the specified web site and its sub webs (also known as subsites) |
List |
Only the specified list or document library |
Optical Character Recognition (OCR)
If you want Coveo to extract text from image files or PDF files containing images, enable the appropriate option. The extracted text is processed as item data, meaning that it’s fully searchable and will appear in the item Quick view.
|
|
Note
When OCR is enabled, ensure the source’s relevant file type configurations index the item content. Indexing the item’s metadata only or ignoring the item will prevent OCR from being applied. |
See Enable optical character recognition for details on this feature.
"Authentication" section
In the Authentication section, you must provide authentication information so that Coveo can access the content you want to make searchable. In the dropdown menu, select the identity provider you use to manage identities in your SharePoint site. Options are:
-
Native
-
Federated
Depending on the option you choose in the dropdown menu, you must fill some or all of the following boxes.
Username and Password
The credentials of the dedicated SharePoint Online administrator account (that is, the crawling account) that has access to all the content you want to index (see instructions in SharePoint Online account with appropriate permissions). See Source credentials leading practices.
|
|
Note
Starting March 25, 2019, when you create two SharePoint Online Legacy sources retrieving content from the same tenant, they share their security providers, which increases the speed of the security identities refresh operation. You must however use the same administrator credentials for both sources. |
Identity Provider URL
Depending on the provider your users use to log in to SharePoint:
-
When using SSO Office 365 authentication, enter the URL of the identity provider server used in SharePoint Online to authenticate users.
-
When authenticating via ADFS, you can edit the identity provider URL in the ADFS settings.
ExampleWhen authenticating via Okta, the URL should be of the following format:
https://acme.okta.com/app/office365/<APPLICATION_ID>/sso/wsfed/active -
When using native authentication, leave this field blank.
SharePoint Trust Identifier
Depending on the provider your users use to log in to SharePoint:
-
When using SSO Office 365 authentication, enter the Relying Party Trust identifier for the SharePoint Online identity provider server. Unless you use a different or modified SharePoint Online identity provider, use the default
urn:federation:MicrosoftOnlinevalue. -
When using native authentication, you may leave the default value, as it will be ignored.
"Content to Include" section
User profiles
Check this box to index SharePoint Online user profiles.
|
|
Note
Indexing user profiles can take a significant time depending on their number. Moreover, including user profiles more than once creates as many duplicates in your Coveo organization index. Therefore, we recommend to index your user profiles only once for all your SharePoint Online sources:
|
Personal sites
When the selected scope is Web application, check this box to include SharePoint Online personal sites.
"Content security" tab
Select who will be able to access the source items through a Coveo-powered search interface. For details on the content security options, see Content security.
"Access" tab
On the Access tab, specify whether each group (and API key, if applicable) in your Coveo organization can view or edit the current source.
For example, when creating a new source, you could decide that members of Group A can edit its configuration, while Group B can only view it.
For more information, see Custom access level.
Completion
-
Finish adding or editing your source:
-
When you want to save your source configuration changes without starting a build/rebuild, such as when you know you want to make other changes soon, click Add source/Save.
-
When you’re done editing the source and want to make changes effective, click Add and build source/Save and rebuild source.
 Note
NoteOn the Sources (platform-ca | platform-eu | platform-au) page, you must click Launch build or Start required rebuild in the source Status column to add the source content or to make your changes effective, respectively.
Back on the Sources (platform-ca | platform-eu | platform-au) page, you can follow the progress of your source addition or modification.
Once the source is built or rebuilt, you can review its content in the Content Browser.
-
-
Once your source is done building or rebuilding, review the metadata Coveo is retrieving from your content.
NoteNot clear on the purpose of metadata? Watch this video.
-
On the Sources (platform-ca | platform-eu | platform-au) page, click your source, and then click More > View and map metadata in the Action bar.
-
If you want to use a currently not indexed metadata in a facet or result template, map it to a field.
-
Click the metadata and then, at the top right, click Add to Index.
-
In the Apply a mapping on all item types of a source panel, select the field you want to map the metadata to, or add a new field if none of the existing fields are appropriate. For advanced mapping configurations, like applying a mapping to a specific item type, see Manage mappings.
-
Click Apply mapping.
-
-
Depending on the source type you use, you may be able to extract additional metadata from your content. You can then map that metadata to a field, just like you did for the default metadata.
More on custom metadata extraction and indexing
Some source types let you define rules to extract metadata beyond the default metadata Coveo discovers during the initial source build.
For example:
Source type Custom metadata extraction methods Define metadata key-value pairs in the
addOrUpdatesection of the PUT request payload used to upload push operations to an Amazon S3 file container.REST API
and
GraphQL APIIn the JSON configuration (REST API | GraphQL API) of the source, define metadata names (REST API | GraphQL API) and specify where to locate the metadata values in the JSON API response Coveo receives.
Add
<CustomField>elements in the XML configuration. Each element defines a metadata name and the database field to use to populate the metadata with.-
Configure web scraping configurations that contain metadata extraction rules using CSS or XPath selectors.
-
Extract metadata from JSON-LD
<script>tags.
-
Configure web scraping configurations that contain metadata extraction rules using CSS or XPath selectors.
-
Extract JSON-LD
<script>tag metadata. -
Extract
<meta>tag content using theIndexHtmlMetadataJSON parameter.
Some source types automatically map metadata to default or user-created fields, making the mapping process unnecessary. Some source types automatically create mappings and fields for you when you configure metadata extraction.
See your source type documentation for more details.
-
-
When you’re done reviewing and mapping metadata, return to the Sources (platform-ca | platform-eu | platform-au) page.
-
To reindex your source with your new mappings, click Launch rebuild in the source Status column.
-
Once the source is rebuilt, you can review its content in the Content Browser.
-