Securing the Admin Service
Securing the Admin Service
On-Premises only
The Admin Service is a service installed along with Coveo Enterprise Search (CES). It provides an API to the CES Administration Tool, which allows the Coveo Search Provider to automate various tasks through programming (creating sources, editing a security provider, etc.). If you install the Admin Service and CES on a dedicated server - that is, on a server different from Sitecore - we highly recommend that you enable secure communications. Here are the necessary steps.
Step 1: Enable Admin Service Security
-
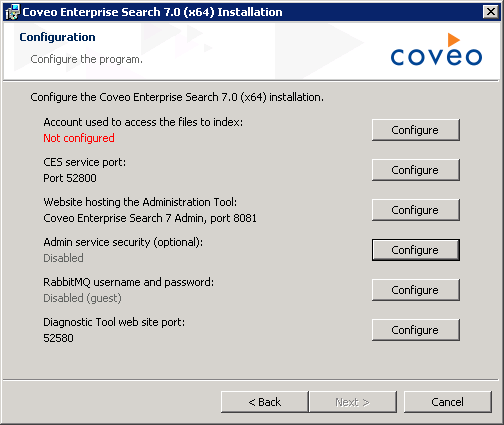
When installing CES, in the Configuration screen, choose Configure next to Admin service security.
 Note
NoteYou can secure the Admin Service or change its settings directly from the Control Panel in Sitecore ().
If you have already installed CES without the Admin Service feature (or without a secure Admin Service), re-run the installation package and choose Modify. You will have access to the same screen as above. For CES releases prior to August 2015, it may be necessary to remove the Admin Service in a first step, and then add it again to enable it and be able to change its settings.
-
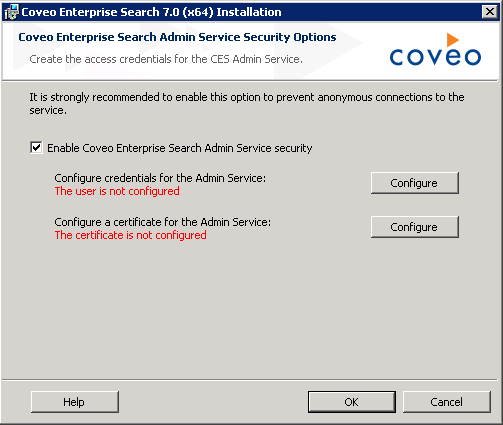
In the Coveo Enterprise Search Admin Service Security Options screen, select Enable Coveo Enterprise Search AdminService security.
-
In the same screen, click Configure next to Configure credentials for the Admin Service.
-
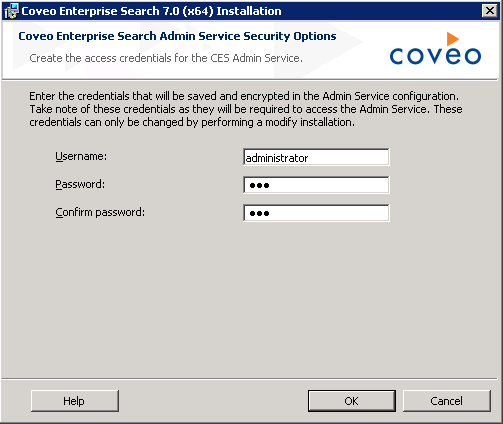
In the Create the access credentials for the CES Admin Service screen, enter the credentials that will be used to secure the Admin Service.
-
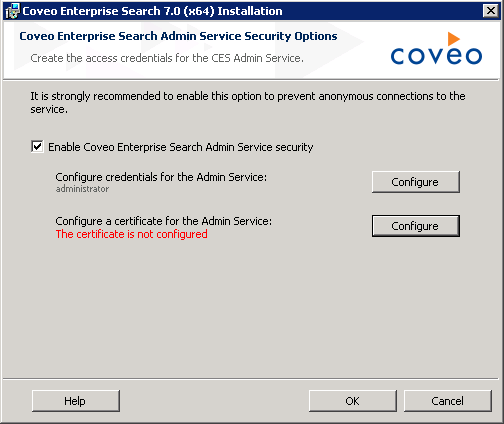
Back in the previous screen, click Configure next to Configure a certificate for the Admin Service.
-
In the Create a certificate to secure the Admin Service screen, enter the settings that will be used to generate a certificate:
-
CES Server domain name: enter the FQDN of the CES server or an alias that you will be able to refer to using your
hostsfile later on (for example,ces-server.acme.comorSVR-CES).
This value will be in the
Subjectfield of the generated certificate, therefore representing the CES server host name. This implies that you’ll need to use this host name throughout the steps of the Configuration Wizard. -
Private key password / Confirm password: enter the password that will be used to protect the certificate private key.
-
Port number: enter the port number used by the Admin Service. By default, it’s 443.
-
Export path: enter the path where the certificate’s
.pfxfile will be exported.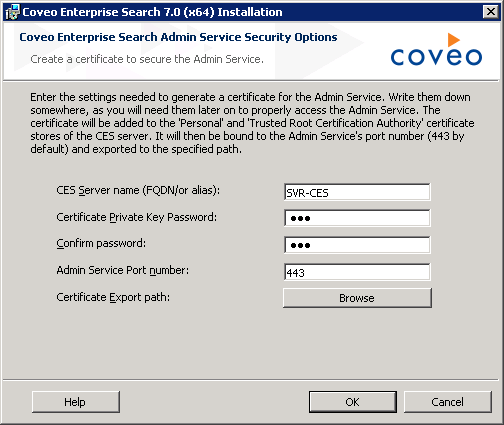
-
-
Proceed with the rest of the installation steps.
-
Retrieve the generated certificate file (
.pfx) and keep it for the upcoming configuration steps in the Coveo for Sitecore Configuration Wizard. -
Validate that the Admin Service URI is accessible in a web browser (typically
https://localhost/AdminService).
Step 2 - Validate That the Admin Service Is Now Secure
When loading the Coveo Diagnostic Page of your Sitecore instance, all components should be in the Up & running state, especially the Admin Service.
Troubleshooting
-
Problem: port 443 is already used by another application or service.
-
Solution: you can easily change it via the file
Coveo.CES.AdminService.exe.configthat’s located in thebinfolder of CES. There’s a section calledappSettings. You can change the port there. Remember to restart the service after this change.<appSettings> <add key="port" value="443" /> </appSettings> -
Problem: the Admin Service isn’t accessible via its URL.
-
Solutions:
-
Make sure that the Admin Service is started.
-
Make sure that a certificate is bound to the port of the Admin Service.
-
Make sure that no error appears on the Coveo Diagnostic Page. A common error is: "Could not establish trust relationship for the SSL/TLS secure channel with authority." It means that the Sitecore server doesn’t trust the certificate of the Admin Service/CES server. To diagnose this issue, you can enable the System.Net traces in the
web.configof your Sitecore instance. You should be looking for errors related to certificates and trust in the generated.logfile.
-
-
Problem: you see the invalid token.
-
Solution: it means that the token that your Search Provider has is invalid. You will have to restart Sitecore to get a new one immediately.