Deploy Coveo for Sitecore JSS
Deploy Coveo for Sitecore JSS
|
|
Coveo will be sunsetting Coveo for Sitecore JSS in March 2023. Coveo for Sitecore JSS documentation will no longer be available after this date. We recommend Coveo for Sitecore JSS users migrate their search interfaces. The Coveo Atomic and Headless libraries let you use your preferred web application framework (for example, React, Angular, Vue.js) to build search interfaces. |
You’ve installed Coveo for Sitecore JSS. You’re now ready to add Coveo for Sitecore components to your Sitecore JSS app and to deploy your app.
Adding Coveo Components to Your JSS App Route YML Files
A typical search solution implementation consists of a full-fledged Coveo-powered search page and content pages with a Coveo global search box in their header section, with searches performed in the global search box being redirected to the main search page.
Adding the Main Search Page
-
In your JSS app, under the
data/routesfolder, create a folder calledsearch. -
In your
data/routes/searchfolder, create anen.ymlfile. -
Follow the instructions associated with your search page implementation strategy (see Leading Practices). Select Using the Coveo Hosted Search Page component (recommended) or Adding a search page as a collection of single-purpose components.
-
Using the Coveo Hosted Search Page component (recommended)
-
If you haven’t already done so, create a very basic classic hosted search page in your Coveo organization. Note its name as you’ll need it later.
NoteDon’t spend time creating an elaborate classic hosted search page at this stage. Team collaboration to improve your search page iteratively is the subject of the Create hosted search pages article, later in the workflow.
-
Copy and paste the contents of the following code block in your
data/routes/search/en.ymlfile.Initialdata/routes/search/en.ymlfile contentfields: pageTitle: Hosted Search Page placeholders: jss-main: - componentName: CoveoSearchbox fields: cssClass: id: hiveDataSource: '' - componentName: CoveoHostedSearchPage fields: cssClass: id: hiveDataSource: '' - componentName: CoveoSearchResources fields: cssClass: id: hiveDataSource: '' -
Save your changes.
-
Proceed to Adding a Header Global Search Box to a JSS App Route.
-
-
Adding a search page as a collection of single-purpose components.
You’ll need to add your single-purpose components to your
data/routes/search/en.ymlfile and link each component in the.ymlfile to a data source using thehiveDataSourcefield. For further instructions, see Adding and Configuring Coveo for Sitecore JSS Components.
-
Adding a Header Global Search Box to a JSS App Route
The following instructions use the Home route of your JSS app as an example.
-
In a text editor, open the
data/routes/en.ymlfile of your app. -
Copy and paste the contents of the code block below in your
data/routes/en.ymlfile.Initialdata/routes/en.ymlfile contentfields: pageTitle: Coveo for Sitecore | Sitecore JSS placeholders: jss-main: - componentName: CoveoSearchbox fields: cssClass: id: hiveDataSource: '' - componentName: CoveoSearchResources fields: cssClass: id: hiveDataSource: '' -
Save your changes.
Feeding Data to Your Components
|
|
Note
Instructions in this section apply when the Coveo Hosted Search Page component is used. If you’re building your main search by assembling single-purpose components, see Adding and Configuring Coveo for Sitecore JSS Components for general instructions. |
Coveo components receive data from Coveo Hive data sources, which are referenced by the hiveDataSource field located in the .yml file. You will first need to create the necessary Coveo for Sitecore data source branch.
To create the data source branch
-
In the Sitecore Content Editor, right-click the
Homeitem and select Insert > Insert from template. -
Under Templates > Branches > Coveo Hive, select Coveo Global Parameters Folder.
-
For the sake of simplicity, name the item
DataSourcesForJSS.
Feeding Data to Your Main Search Page Components
-
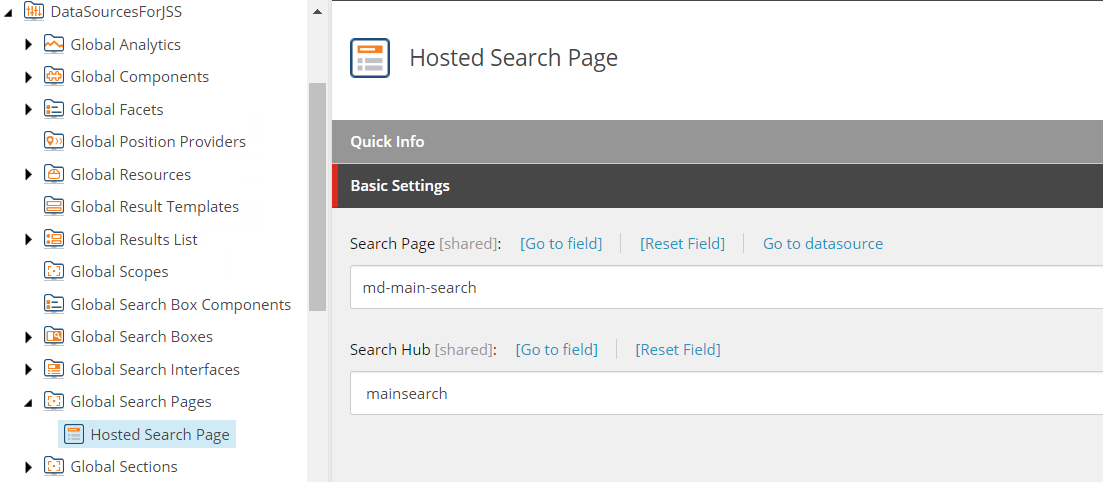
Under the DataSourcesForJSS item in the content tree, right-click the Global Search Pages item and select Insert > Hosted Search Page.
-
Name the new item
Hosted Search Page. This is the data source for the CoveoHostedSearchPage component your JSS apphome/searchroute will use. -
In the data source you just created, use the
Search Pagefield dropdown menu to select the Coveo organization hosted search page you created in the Adding the Main Search Page section. -
In the data source you just created, provide a value for the
Search Hubfield.
-
Save your changes to the item.
-
In the
data/routes/search/en.ymlfile, set the value of theCoveoHostedSearchPagecomponenthiveDataSourcefield value to theItem IDof the Hosted Search Page data source item.Example ofdata/routes/search/en.ymlfile at this pointfields: pageTitle: Hosted Search Page placeholders: jss-main: - componentName: CoveoSearchbox fields: cssClass: id: hiveDataSource: '' - componentName: CoveoHostedSearchPage fields: cssClass: id: hiveDataSource: '1CED416F-330F-4546-8067-3152BB16A453' - componentName: CoveoSearchResources fields: cssClass: id: hiveDataSource: '' -
Under the DataSourcesForJSS item in the content tree, right-click the Global Search Boxes item and select Insert > Coveo Global Searchbox.
-
Name the new item
Coveo Global Searchboxand click OK. This is the data source for the CoveoSearchbox component your JSS apphome/searchandhomeroutes will both use. -
In the data source you just created, use the
Search Page URIfield droptree to select your JSS app main search page route (that is,home/search).
-
Save your changes to the item.
When you delete your JSS app item in the Sitecore Content Editor, the Search page URI field in the Coveo Global Searchbox data source is automatically emptied. If you need to redeploy your JSS app at any time, don’t forget to go back into the Coveo Global Searchbox data source and set the Search page URI field.
-
In the
data/routes/search/en.ymlfile, set the value of theCoveoSearchboxcomponenthiveDataSourcefield value to theItem IDof the Coveo Global Searchbox data source item. -
Repeat the steps you performed for the CoveoHostedSearchPage and CoveoSearchbox components but, this time, to create and link a data source for the CoveoSearchResources component your
home/searchandhomeroutes will use. The Coveo Search Resources data source template is located in the Global Resources folder of the data source branch. You don’t need to set any field values in the Coveo Search Resources data source.Example ofdata/routes/search/en.ymlfile once populatedfields: pageTitle: Hosted Search Page placeholders: jss-main: - componentName: CoveoSearchbox fields: cssClass: id: hiveDataSource: '669466ED-4272-4C2F-823C-A486F25D0036' - componentName: CoveoHostedSearchPage fields: cssClass: id: hiveDataSource: '1CED416F-330F-4546-8067-3152BB16A453' - componentName: CoveoSearchResources fields: cssClass: id: hiveDataSource: 'ED76DA0B-72D7-49F4-9154-85680CD7D37C'
Feeding Data to Your Header Global Search Box Components
The home app route item contains a Coveo Global Searchbox and a Coveo Search Resources component. You can reuse the data sources you created in the main search page for these two components.
To do so, copy the hiveDataSource values you entered for the CoveoSearchbox and CoveoSearchResources components in the data/routes/search/en.yml file and paste them in the corresponding hiveDataSource fields in the data/routes/en.yml file.
data/routes/en.yml file once populatedfields:
pageTitle: Coveo for Sitecore | Sitecore JSS
placeholders:
jss-main:
- componentName: CoveoSearchbox
fields:
cssClass:
id:
hiveDataSource: '669466ED-4272-4C2F-823C-A486F25D0036'
- componentName: CoveoSearchResources
fields:
cssClass:
id:
hiveDataSource: 'ED76DA0B-72D7-49F4-9154-85680CD7D37C'Deploying Your JSS App to Your Sitecore Instance
When Coveo for Sitecore JSS components have been added and configured in your Sitecore JSS app, you’re ready to deploy your app.
-
In a terminal, with your app folder being the active folder, run:
jss deploy config, and thenjss deploy app -c -dto deploy your app to your Sitecore instance. -
Browse the
homeapp route item created under your Sitecore instance parent app item. Thishomeitem will contain a global search box. -
Type a search keyword in the global search box and then select Enter. This redirects the query to your search page.
NoteIf the
homeitem query redirects to a URL on another host name, you need to update the<site>elementhostNameattribute value in the<APP_NAME>\sitecore\config\<APP_NAME>.configfile.If you notice CSS-related styling issues in your
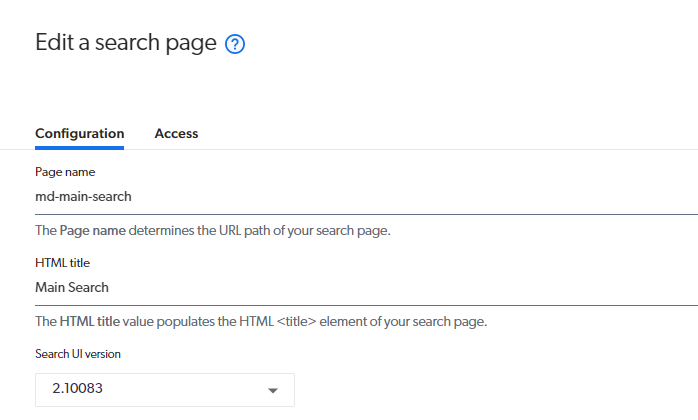
searchitem, this could be because your Coveo organization hosted search page is not using the same version of the Coveo JavaScript Search Framework as your Coveo Search Resources component. If need be, update your Coveo organization hosted search pageSearch UI version.
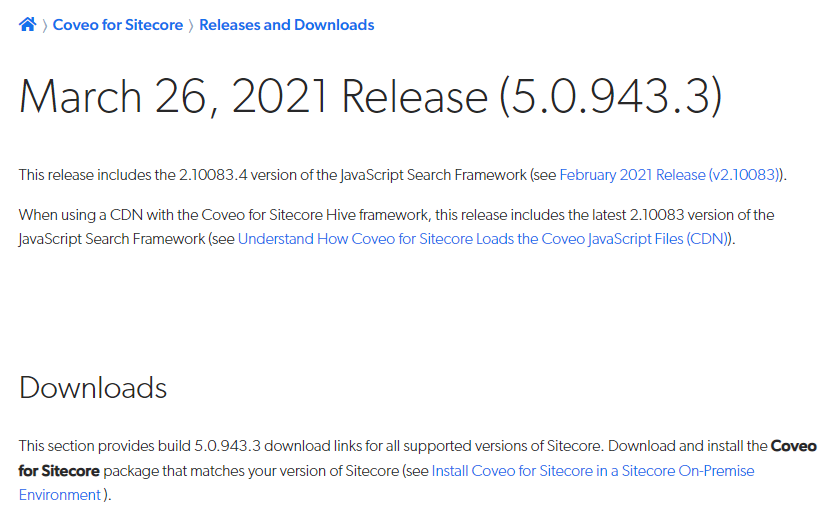
Coveo for Sitecore release notes pages, accessible through the Releases and Downloads page, indicate the version of the Coveo JavaScript Search Framework that is included with your version of Coveo for Sitecore (that is, 2.10083 in the following example).

ClickableUri Values in Headless Server-Side Rendering Mode
When setting up a proxy to the Sitecore server, you need to configure Sitecore to ensure your search page result ClickableUri values reflect the proxy host name rather than your Sitecore server host name.
To achieve this, patch the relevant Sitecore <site> configuration element(s) to target your proxy.
You have items to index on your Sitecore server whose URL is http://sc920.sc.
You need your Coveo-powered search page results to have ClickableUri values that target your proxy whose URL is http://mysite.com.
-
Create a patch file called
ProxyUri.configin the<SITECORE_INSTANCE_ROOT>\App_Config\Include\Coveofolder. -
Open
ProxyUri.configin a text editor. -
Copy and paste the following content in the
ProxyUri.configfile.<configuration xmlns:patch="http://www.sitecore.net/xmlconfig/"> <sitecore> <sites> <!--We assume below that all items are associated with the default Sitecore "website" site. If required, adjust the <site> element "name" attribute value. Apply a patch like the one below for all appropriate <site> elements.--> <site name="website" > <patch:attribute name="hostName">sc920.sc.*</patch:attribute> <patch:attribute name="targetHostName">mysite.com</patch:attribute> </site> </sites> </sitecore> </configuration> -
Save your changes.
-
Publish your site.
-
Rebuild your indexes.
What’s next?
You may now want to improve your main search page.