Test your segments
Test your segments
In this article, we’ll show you how to test your segments using the Qubit Explorer.
Before getting started
As a quick recap, in Testing your simple segment and Validating your advanced segment, we explored some of the in-app tools and methods at your disposal for making sure your segments work according to design.
In this article, we’ll explore this further by looking at how you can use the Qubit Explorer to test your segment logic and force your "virtual visitor" in and out of segments to see how the visitor journey is affected.
What is the Qubit Explorer and what can I use it for?
The Qubit Explorer is a feature-rich tool that consolidates three key views, providing a comprehensive overview of your site’s activities:
-
Segments: Identify the segments your "virtual" user belongs to as they navigate through your site and interact with experiences.
-
Experiences: Monitor the state of each experience, access specific experiences, or preview multiple experiences at once. See Using Qubit Explorer to preview your experience.
-
Events: Observe the events being triggered as you interact with your site and any live or draft experiences. See Using Qubit Explorer to validate your setup.
|
|
Note
Qubit Explorer is supported by the latest versions of Internet Explorer, Edge, Firefox, and Chrome browsers. See Browser compatibility for more information about the browsers we support. |
|
|
Note
To use the explorer in Safari on mobile devices you’ll need to disable Prevent Cross-site tracking. Once done, close and relaunch Safari. |
Starting the Explorer
Whilst we work on improving the workflow around starting the Explorer, specifically when working on segments, the simplest way of starting it, is to append ?qubit_explorer or #qubit_explorer to your site’s URL (for example, www.mywebsite.com?qubit_explorer).
Once your site loads, you’ll find an on-page prompt:

Select this to open the explorer and then select Segments
Viewing segments
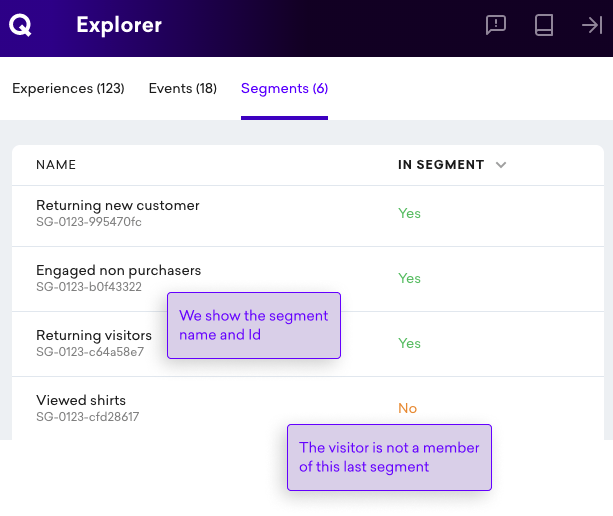
In the Segments view, we can see which segments, both simple and advanced, the current visitor is a member of–as a tester, you play the role of a "virtual visitor."
In the following example, we see the visitor is a member of six segments, including Returning new customer and Engaged non purchasers:

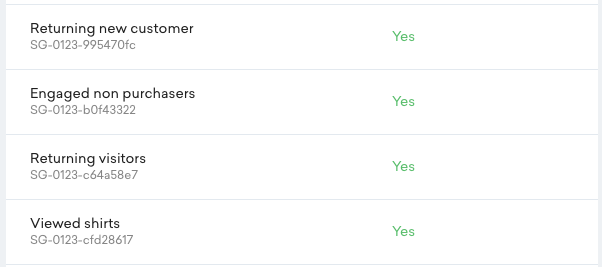
As you move through your site, generating data and triggering events, we will continuously evaluate the segment logic in real time and report changes in segment membership.
As an example, look what happens when we now visit a PDP in the product category Shirts:

To exercise control of what happens on your site as you navigate through it, and especially over which experiences are fired as segment membership changes, you can force users in and out of segments. This is a useful technique if you’re testing how segment membership affects the "visitor experience" through your site.
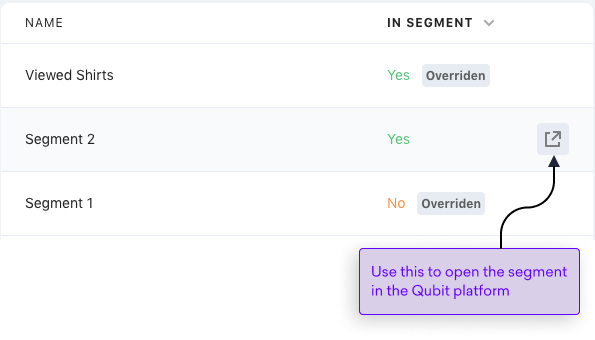
To manually control user segment membership, click Configure overrides at the bottom of the Explorer sidebar and click one of the following options from the IN SEGMENT column:
-
Auto: Consider segment logic and the data and activities associated with the visitor when determining segment membership (default state).
-
Yes: Ignore segment logic, data, and activities and force the user into the segment.
-
No: Ignore segment logic, data, and activities, and force the user out of the segment.
To implement your changes, click Apply overrides.
In the following example, the user has chosen to force the user into Viewed Shirts and out of Segment 1:

and can then see the impact on the journey through their site.