Set up Google Tag Manager to send data to Google Analytics 4
Set up Google Tag Manager to send data to Google Analytics 4
If you have implemented the Google Analytics 4 (GA4) tag on your site via Google Tag Manager, you need to set up the trigger, variables, and GA4 tags so that the Coveo Experimentation Hub can send the GTM event and custom events to GA4.
|
|
The Coveo Experimentation Hub doesn’t send events to Google Universal Analytics (Google UA) and Google Analytics 4 (GA4) if any or both of the following are true:
|
|
|
Note
When a visitor is served an experience, the Experimentation Hub sends a single custom event to GA4 and a single GTM event (for tags implemented via GTM). The Experimentation Hub send these only once per session, when the visitor is served the experience. |
|
|
These events are only sent for published experiences. |
Set up the trigger
You need to create a trigger to detect when the Experimentation Hub sends the GTM event.
-
Log in to your GTM account.
-
From the left menu, select Triggers.
-
Click the New button.
The trigger card appears.
-
At the top of the card, enter a trigger name.
-
In the Trigger Configuration panel, click anywhere to open the Choose trigger type pane.
-
Select Custom Event.
The Trigger Configuration panel now shows trigger fields and settings.
-
Specify the following:
-
In the Event name field, enter
ceh_experience. -
Select the Some Custom Events option.
-
Define the following trigger conditions: Event > equals > ceh_experience.
-
-
Click the Save button.
Set up variables
Next, you need to create and set up variables for the experience ID and variation ID. GTM will send these variables to your GA4 tag.
-
From the left menu, select Variables.
-
In the User-Defined Variables section, click the New button.
The variable card appears.
-
Enter
CEH experience IDas the variable name. -
In the Variable Configuration panel, click anywhere to open the Choose variable type pane.
-
Select Data Layer Variable.
The Variable Configuration panel now shows variable fields and settings.
-
Specify the following:
-
In the Data Layer Variable Name, enter
experience_id. -
In the Data Layer Version menu, select Version 2.
-
-
Click the Save button.
You created a CEH Experience ID to store the experience ID.
Repeat these steps to create a variable for the variation ID, but use the following values for a new variable:
-
CEH variation main IDas the variable name. -
variation_master_idas the Data Layer Variable Name.
Set up the GA4 tag
-
Google Analytics: GA4 Configuration: allows GTM to send data to GA4.
-
Google Analytics: GA4 Event: allows GTM to send custom events to GA4.
-
Create a Google Analytics: GA4 Configuration tag. Don’t specify Triggering for this tag.
-
While being in the Tags section, click the New button.
The tag card appears.
-
At the top of the card, enter a trigger name.
-
In the Tag Configuration panel, click anywhere to open the Choose tag type pane.
-
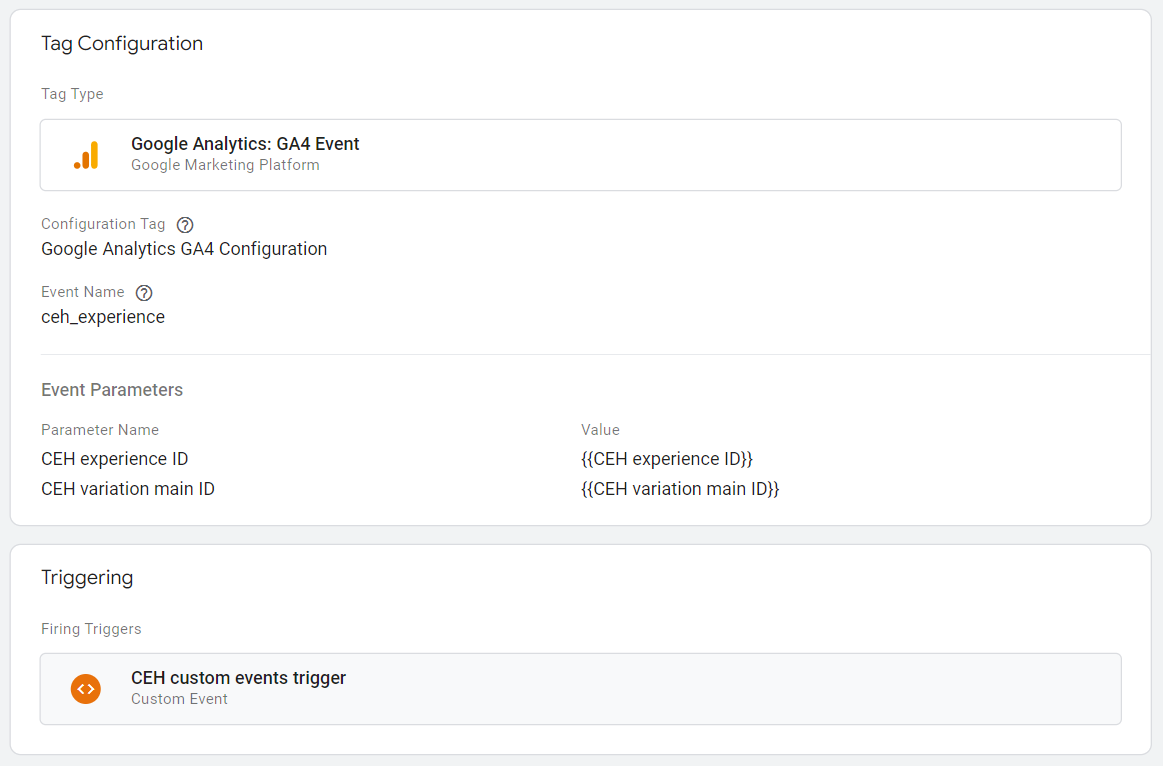
Select Google Analytics: GA4 Event.
The Tag Configuration panel now shows tag fields and settings.
-
Specify the following:
-
In the Configuration Tag menu, select the configuration tag created in step 1.
-
In the Event name field, enter
ceh_experience. -
In the Event parameters subsection, you need to add two rows.
Click the Add row button.
-
In the Parameter Name, enter
CEH experience ID. -
In the Value field, click the button to the right and select the CEH experience ID variable.
-
-
Click the Add row button.
-
In the Parameter Name, enter
CEH variation main ID. -
In the Value field, click the button to the right and select the CEH variation main ID variable.
-
-
-
In the Triggering panel, click anywhere to open the Choose a trigger pane.
-
Select the trigger you created earlier.
The tag properties should look like this:

-
Click the Save button.
-