Build your product recommendations interface (legacy)
Build your product recommendations interface (legacy)
|
|
This article explains how to implement Coveo-powered interfaces that use legacy Atomic components interacting with the Coveo Search API. For new Coveo for Commerce implementations, consider using Coveo Headless for commerce. Coveo Headless leverages the Commerce API, offering a more efficient and flexible approach to interacting with the Coveo Platform. |
This article explains how to employ Coveo Machine Learning product recommendations in an SAP Commerce Cloud project using the example of adding a recommendations carousel to a product detail page (PDP).
|
|
This article explains how to replace an existing component in an SAP Commerce CMS. To create a new component, refer to the SAP documentation. |
Back-end configuration
The SAP Commerce Cloud uses a Web Content Management System (WCMS) to store pages used in a storefront. Pages consist of content slots, which comprise components.
Step 1: Create a new component
WCMS provides different component types, from which you can use the CMS Flex Component.
This component type is meant for Angular components that don’t need any data from CMS (for example, a login name), which makes it suitable for recommendations.
This component type contains the special flexType attribute that SAP Composable Storefront uses to map components with the WCMS.
-
In the Backoffice Administration Cockpit, go to the WCMS → Component page.
-
Next to the plus sign, click the dropdown menu and select CMS Flex Component.
-
Fill in the following fields:
-
Catalog Version. Select a catalog that starts with
SPA[1] and ends with Staged. You’ll sync this catalog version with theonlineversion later. -
ID. Enter a unique ID for the component. For example,
CoveoRecs.
-
-
Once the component is created, you can see it in the list of components.
-
Open the created component and switch to the Administration tab.
-
In the Flex type field, enter
CoveoRecs. -
Click Save.
|
|
The steps above show how to create a component via the Backoffice Administration Cockpit. You can also create a component via SmartEdit. To do so, go to the Storefront tab and click the plus sign on the Component button. Then, select CMS Flex Component and fill in the Name and Flex Type fields. 

|
Step 2: Find the component slot for a new component
To find the slot where you want to place your CoveoRecs component, perform the following steps.
-
Run the storefront in the development mode and open the PDP in the browser.
-
Open the Elements tab of your browser’s developer tools to inspect the page. You should see a number of slots that SAP Commerce Storefront provides out of the box, so you can pick one that suits your needs. In case of recommendations, it can be the
UpSellingslot.<cx-page-slot ng-reflect-position="UpSelling" ng-reflect-is-page-fold="true" position="UpSelling" class="UpSelling page-fold has-components">
Step 3: Add the component to a content slot
-
In the Backoffice Administration Cockpit, go to the WCMS → Content Slot page.
-
Open the advanced search and fill in the following fields:
Catalog Version
Equals
Select the catalog that you specified while creating the component.
ID
Contains
UpSelling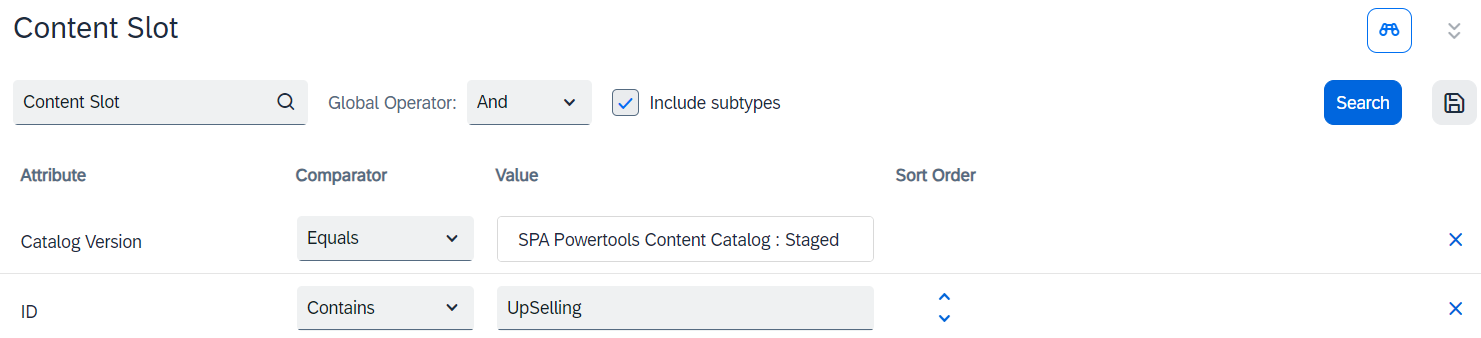
-
Click Search.
-
Click the found slot.
-
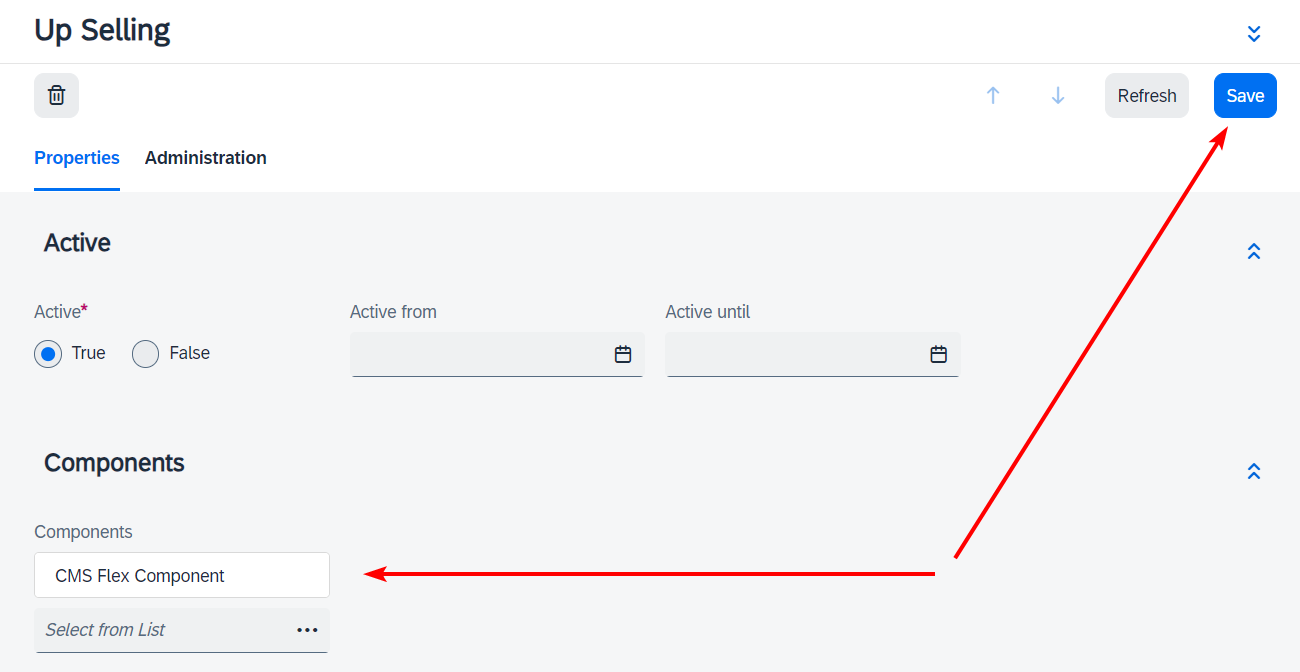
On the Properties tab, click the three dots in the Components field. An advanced component search opens.
-
Search for ID—Equals—
CoveoRecs. -
Select the checkbox to the left of the found component.
-
In the advanced search window, click Select. The advanced component search closes.
-
Click Save.
-
Go to the Catalog → Catalog versions page.
-
Select the checkbox to the left of the catalog version that you specified while creating the component.
-
At the top of the page, click Synchronize.
-
In the modal window that appears:
-
Switch to the Push to target tab.
-
Select the catalog with the same name but ending with Online.
-
Click Sync.
-
Step 4: Check the availability of the new component via API
Before moving on to the front-end configuration, verify whether the new component is available for the storefront.
You can do so via the Commerce Webservices API which is exposed locally at https://localhost:9002/occ/v2/swagger-ui/index.html#/Pages/getPage.
-
In the
cms/pagesendpoint, click Try it out. -
Specify the parameters as follows:
baseSiteId
The ID of the site whose catalog you’re using.
code
The unique code of any PDP page. You can find it in the URL of the PDP page.
pageType
ProductPage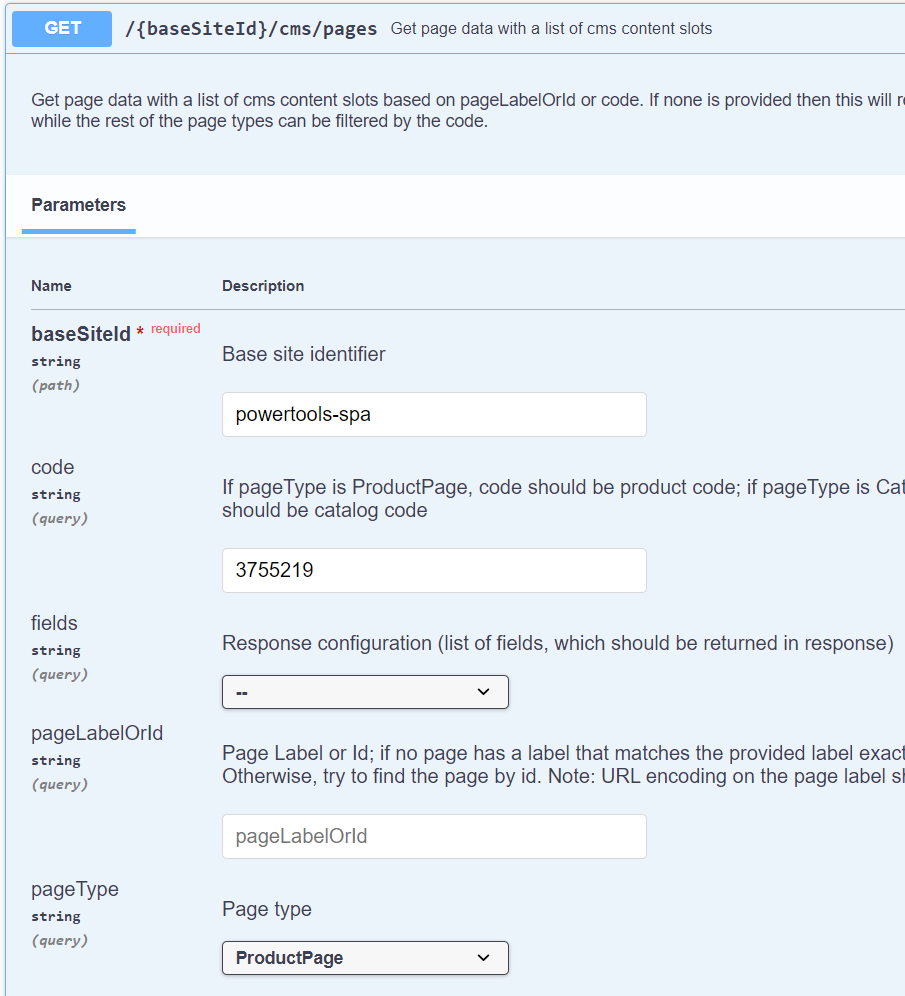
-
Click Execute.
-
You should see the response with the
CoveoRecscomponent within theUpSellingSlot.
Front-end configuration
Step 1: Create a module and a component
In your storefront project directory, perform the following steps:
-
Create a new module with the following command:
ng g m custom-pdp -
Create a new component within your new module:
ng g c custom-pdp/coveo-recs
Step 2: Add Coveo recommendations
-
Open the
./src/app/custom-pdp/custom-pdp.module.tsfile and import theConfigModuleandCmsConfigmodules. Also, specifyCUSTOM_ELEMENTS_SCHEMAto be able to use Atomic web components.import { NgModule, CUSTOM_ELEMENTS_SCHEMA } from '@angular/core'; import { CommonModule } from '@angular/common'; import { CoveoRecsComponent } from './coveo-recs/coveo-recs.component'; import { ConfigModule, CmsConfig } from '@spartacus/core'; @NgModule({ schemas: [CUSTOM_ELEMENTS_SCHEMA], declarations: [ CoveoRecsComponent ], imports: [ CommonModule, ConfigModule.withConfig({ cmsComponents: { CoveoRecs: { component: CoveoRecsComponent
  }
}
} as CmsConfig)
]
})
export class CustomPdpModule { }
}
}
} as CmsConfig)
]
})
export class CustomPdpModule { }This is the value of the flexTypeattribute that you specified while creating a component in the SAP Commerce Cloud Backoffice Administration Cockpit.The default name of the class that you created previously and then imported in this file. -
Open the
./src/app/custom-pdp/coveo-recs/coveo-recs.component.tsfile and initialize the recommendations engine.import { Component, AfterViewInit } from '@angular/core'; import { loadFieldActions } from '@coveo/atomic-angular'; @Component({ selector: 'app-coveo-recs', templateUrl: './coveo-recs.component.html', styleUrls: ['./coveo-recs.component.scss'] }) export class CoveoRecsComponent implements AfterViewInit { ngAfterViewInit(): void { const recommendInterface = document.querySelector('atomic-recs-interface'); recommendInterface ?.initialize({ organizationId: '<YOUR_ORG_ID>',
accessToken: '<YOUR_ACCESS_TOKEN>',
pipeline: '<YOUR_PIPELINE>'
})
.then(() => {
const engine = recommendInterface.engine;
const fieldActions = loadFieldActions(engine!);
engine!.dispatch(fieldActions.registerFieldsToInclude([
'ec_images'
// ...
]));
recommendInterface.getRecommendations();
}
);
}
}Replace: -
<YOUR_ORG_ID>with the ID of your Coveo organization. -
<YOUR_ACCESS_TOKEN>with credentials for the target Coveo organization. See Authenticate via search token and Use API key authentication with the Search API. -
<YOUR_PIPELINE>with a query pipeline.
Fields that you would like to use in the recommendations template. For example, 'ec_name', 'ec_category', 'ec_images', 'ec_price' -
-
Open the
./src/app/custom-pdp/coveo-recs/coveo-recs.component.htmland add the basic layout for the recommendations tiles.<atomic-recs-interface> <atomic-recs-list label="Similar products" number-of-recommendations="5"> <atomic-recs-result-template> <template>
<atomic-result-section-title>
<atomic-result-link></atomic-result-link>
</atomic-result-section-title>
<atomic-result-section-visual>
<atomic-result-image field="ec_images">
</atomic-result-image>
</atomic-result-section-visual>
</template>
</atomic-recs-result-template>
</atomic-recs-list>
</atomic-recs-interface>This is the template for the recommendations. You can use any of the Atomic web components to build your template. See Result sections. An example of using a field dispatched via the registerFieldsToIncludemethod.
Step 3: Update imports and run the storefront
-
Import the
CustomPdpModuleandAtomicAngularModulemodules in the./src/app/app.module.tsfile.// other imports import { AtomicAngularModule } from '@coveo/atomic-angular'; import { CustomPdpModule } from "./custom-pdp/custom-pdp.module"; @NgModule({ declarations: [ AppComponent ], imports: [ // other imports AtomicAngularModule, CustomPdpModule ], providers: [], bootstrap: [AppComponent] }) export class AppModule { } -
Run the storefront in the development mode and open any PDP in the browser. You should see the recommendations carousel powered by Coveo.
yarn start