Authenticate via search token
Authenticate via search token
This article explains how to employ Coveo search token authentication in an SAP Commerce Cloud project. Using this authentication method provides better security, as it doesn’t require exposing the API key in the front-end code.
Prerequisites
Make sure your configuration meets the following criteria:
-
The Apache Ant utility is installed on your machine.
-
You added an Omni Commerce Connect (OCC) extension to your project.
-
You have a Coveo-powered search UI embedded in your SAP Commerce Cloud storefront. See Use Coveo Search in SAP Commerce Cloud Composable Storefront.
Back-end configuration
Step 1: Add an OCC extension
To use search token authentication, you must add a new API to the OCC extension of your project. Whereas you can do so by building a new extension from scratch, you should use the prebuilt extension published on Coveo GitHub: https://github.com/coveo/coveo-sap-commerce-connector
-
Go to your SAP project directory.
-
Navigate to the
hybris/bin/customdirectory. -
Clone or download the extension repository. This would create a new directory named
coveocc. -
In the project directory, open the
hybris/config/localextensions.xmlfile and add thecoveoccextension:<extension name='coveocc' /> -
Save the file.
Step 2: Build and run the server
-
From the root of your project directory, run the following command:
ant clean all -
After the command execution, navigate to the
hybris/bin/platformdirectory. -
Run the
hybrisserver.shscript:./hybrisserver.sh
Step 3: Specify credentials
The Coveo credentials should be set through the graphical interface of the Backoffice Administration Cockpit.
-
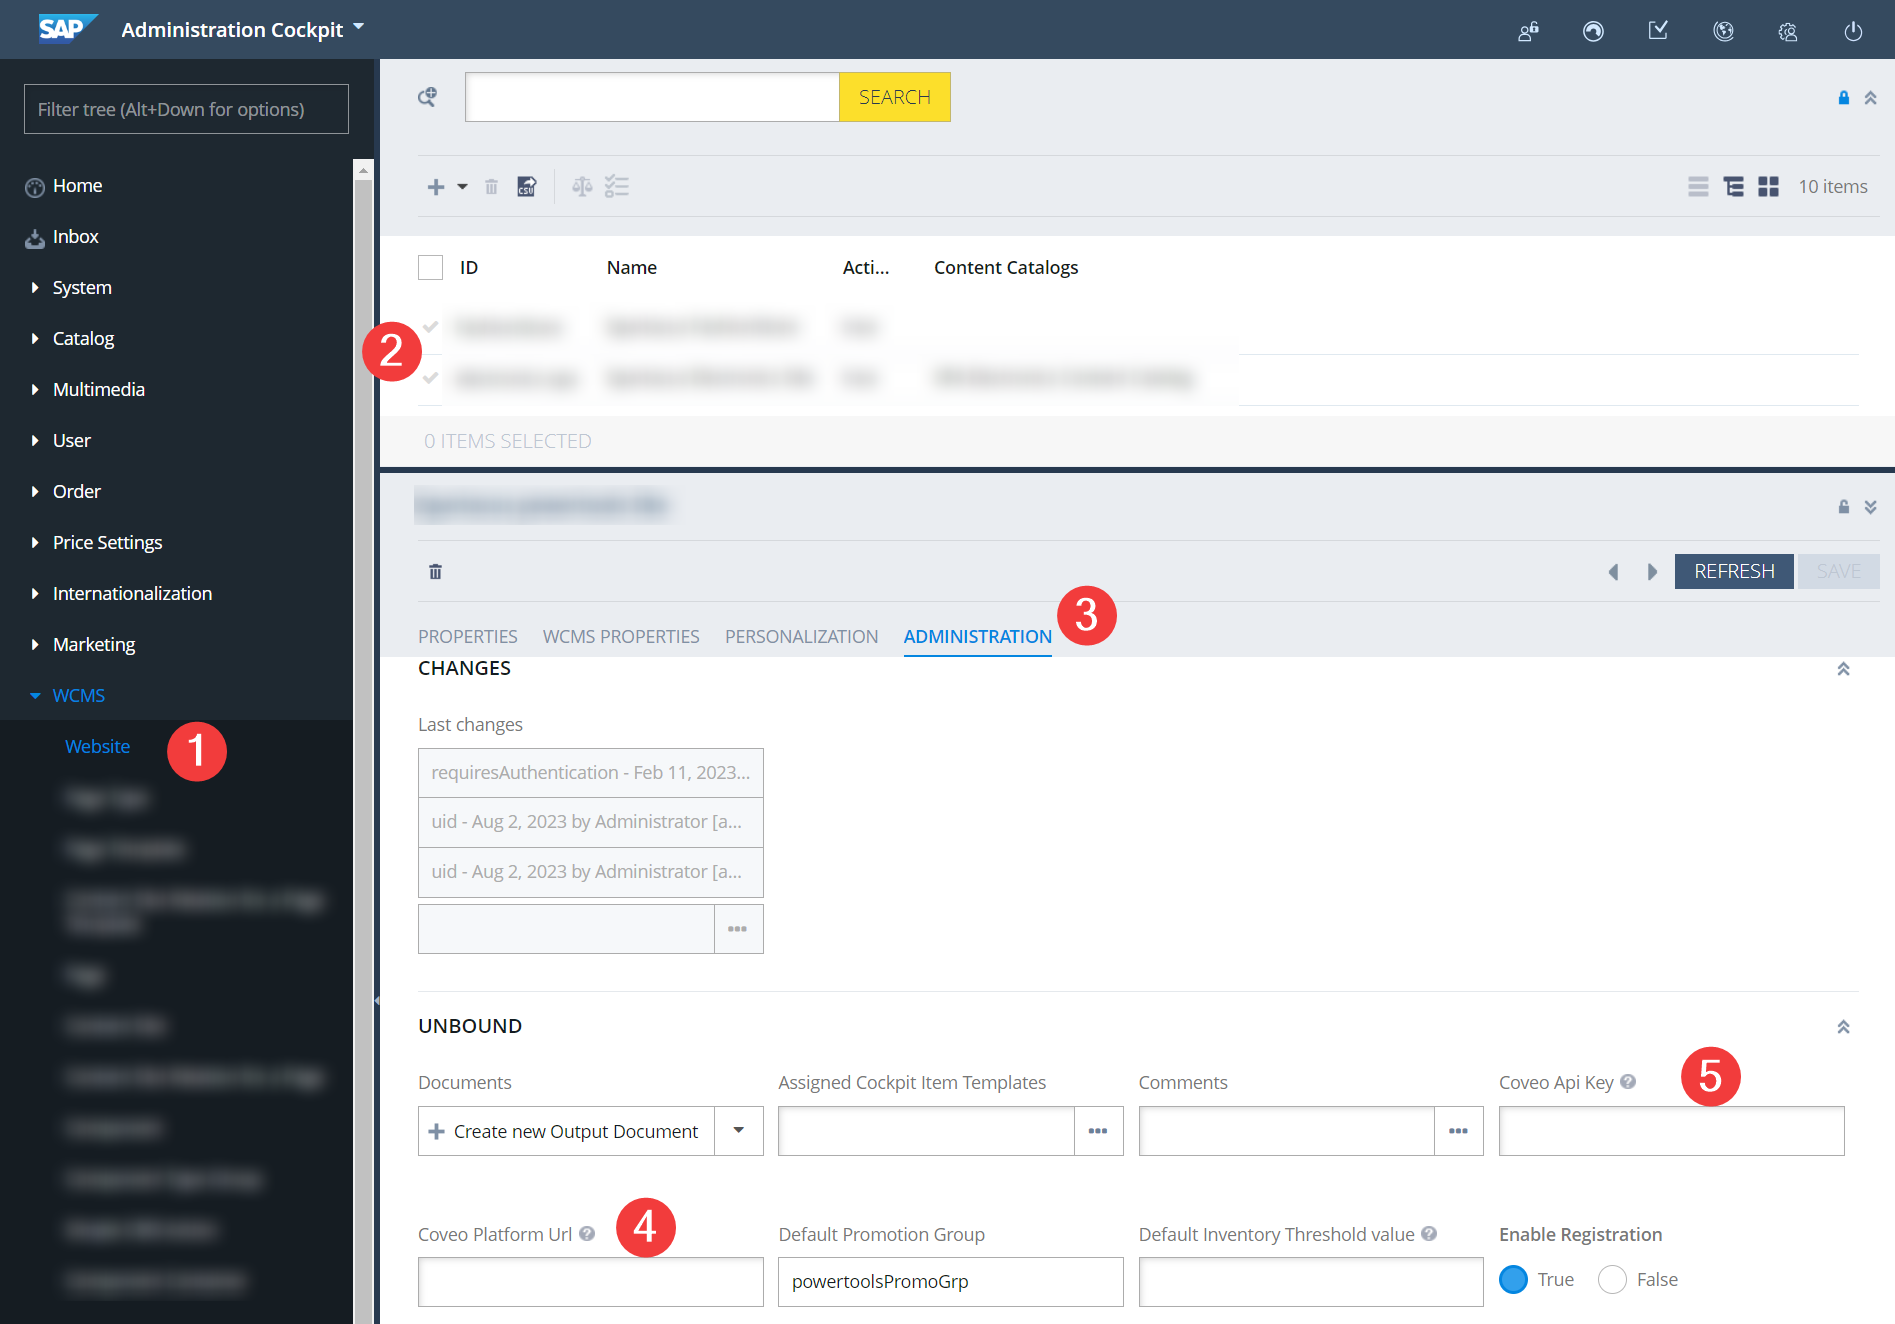
In the Administration Cockpit, go to the WCMS → Website page.
-
In the list of sites, double-click the required website.
-
Switch to the Administration tab.
-
Fill in the following fields:
-
Coveo Platform URL. For production, it must be
https://platform.cloud.coveo.com/. -
Coveo API Key. Create an authenticated search API key, and then paste the key in the field.
-
Local testing
To test retrieving a search token, you can use a Swagger UI that’s available when you’re running the hybrisserver.sh script.
By default, your local server would use ports 9001 (http) and 9002 (https).
The Swagger UI is available at https://localhost:9002/occ/v2/swagger-ui.html, where you can find and test the /coveo/token/ endpoint.
This endpoint returns a JSON object with the token property that contains the search token.
Depending on the user type, the endpoint returns a JWT token for a logged-in user or an anonymous user.
|
|
Note
Your implementation may use price groups to manage user-specific pricing. Price groups can be attached to a user group or directly to the user. Either way, JWT tokens will contain all the price group IDs that are associated with a logged-in user. See more about user groups in the SAP documentation. |
Front-end configuration
Step 1: Add a new file
-
Navigate to the root of your angular application (for example,
src/appdirectory). -
Create a new service for token management,
coveo/services/search-token-service/search-token.service.ts:import { CommerceEngine } from '@coveo/headless/commerce'; import { loadConfigurationActions } from '@coveo/headless'; import { Injectable, EventEmitter } from '@angular/core'; import { EventService, LoginEvent, LogoutEvent, AuthStorageService } from '@spartacus/core'; import { environment } from '../../../../environments/environment'; @Injectable() export class SearchTokenService { public newTokenGenerated: EventEmitter<string> = new EventEmitter<string>(); private TOKEN_PREFIX: string = `coveo-jwt`; constructor( private events: EventService, private authStorageService: AuthStorageService) { this.events .get(LogoutEvent) .subscribe( () => { removeAccessToken(this.TOKEN_PREFIX); this.emitEvent(); }); this.events .get(LoginEvent) .subscribe(() => { this.emitEvent(); }); } getToken() { return getAccessToken({ prefix: this.TOKEN_PREFIX, hybrisToken: this.authStorageService.getItem('access_token'), }); } refreshToken() { return getAccessToken({ prefix: this.TOKEN_PREFIX, refresh: true, hybrisToken: this.authStorageService.getItem('access_token'), }); } reloadSearchEngineWithToken(engine: CommerceEngine, token: string) { if (engine) {
const {updateBasicConfiguration} = loadConfigurationActions(engine);
const action = updateBasicConfiguration({accessToken: token})
engine.dispatch(action);
}
}
private async emitEvent() {
this.newTokenGenerated.emit(await getAccessToken({
if (engine) {
const {updateBasicConfiguration} = loadConfigurationActions(engine);
const action = updateBasicConfiguration({accessToken: token})
engine.dispatch(action);
}
}
private async emitEvent() {
this.newTokenGenerated.emit(await getAccessToken({  prefix: this.TOKEN_PREFIX,
hybrisToken: this.authStorageService.getItem('access_token')
}));
}
function removeAccessToken(prefix: string) {
for (let i = 0; i < localStorage.length; i++) {
const key = localStorage.key(i);
if (key && key.startsWith(`${prefix}`) && !key.startsWith(`${prefix}-guest`)) {
localStorage.removeItem(key)
}
}
}
interface GetAccessTokenOptions {
prefix: string;
refresh?: boolean;
hybrisToken: string;
}
async function getAccessToken(options: GetAccessTokenOptions) {
const { prefix, refresh = false, hybrisToken } = options;
const usertype = hybrisToken ? 'user' : 'guest';
prefix: this.TOKEN_PREFIX,
hybrisToken: this.authStorageService.getItem('access_token')
}));
}
function removeAccessToken(prefix: string) {
for (let i = 0; i < localStorage.length; i++) {
const key = localStorage.key(i);
if (key && key.startsWith(`${prefix}`) && !key.startsWith(`${prefix}-guest`)) {
localStorage.removeItem(key)
}
}
}
interface GetAccessTokenOptions {
prefix: string;
refresh?: boolean;
hybrisToken: string;
}
async function getAccessToken(options: GetAccessTokenOptions) {
const { prefix, refresh = false, hybrisToken } = options;
const usertype = hybrisToken ? 'user' : 'guest';  const cache = createTokenCache(prefix, usertype);
const cachedToken = cache.get();
if (cachedToken && !refresh) return cachedToken;
const token = await generateAccessToken(hybrisToken);
if (token) cache.set(token);
return token;
}
function createTokenCache(prefix: string, usertype: string) {
const cache = createTokenCache(prefix, usertype);
const cachedToken = cache.get();
if (cachedToken && !refresh) return cachedToken;
const token = await generateAccessToken(hybrisToken);
if (token) cache.set(token);
return token;
}
function createTokenCache(prefix: string, usertype: string) {  const key = `${prefix}-${usertype}`;
const get = () => localStorage.getItem(key);
const set = (token: string) => localStorage.setItem(key, token);
return { get, set };
}
async function generateAccessToken(hybrisToken?: string | null) {
const key = `${prefix}-${usertype}`;
const get = () => localStorage.getItem(key);
const set = (token: string) => localStorage.setItem(key, token);
return { get, set };
}
async function generateAccessToken(hybrisToken?: string | null) {  const url = getCoveoAccessTokenUrl();
const headers: Record<string, string> = {};
if (hybrisToken) {
headers['Authorization'] = `Bearer ${hybrisToken}`;
}
const requestOptions: RequestInit = {
method: 'GET',
headers: headers,
};
try {
const response = await fetch(url, requestOptions);
const data = await response.json();
return data.token || '';
} catch (error) {
console.error('Request failed:', error);
return '';
}
}
function getCoveoAccessTokenUrl() {
const base = environment.occBaseUrl;
const baseSiteId = '<YOUR_SITE_ID>';
const url = getCoveoAccessTokenUrl();
const headers: Record<string, string> = {};
if (hybrisToken) {
headers['Authorization'] = `Bearer ${hybrisToken}`;
}
const requestOptions: RequestInit = {
method: 'GET',
headers: headers,
};
try {
const response = await fetch(url, requestOptions);
const data = await response.json();
return data.token || '';
} catch (error) {
console.error('Request failed:', error);
return '';
}
}
function getCoveoAccessTokenUrl() {
const base = environment.occBaseUrl;
const baseSiteId = '<YOUR_SITE_ID>';  return `${base}occ/v2/${baseSiteId}/coveo/token`;
}
return `${base}occ/v2/${baseSiteId}/coveo/token`;
}
reloadSearchEngineWithToken updates the engine configuration with the new JWT token when a user changes its authentication status.
Once a user logs in or logs out, the |
|
The service uses the emitEvent method to inform the app about the generation of a new token and retrieve it. |
|
getAccessToken checks if there’s a token in the localStorage.
If not, it checks whether it’s a logged-in user or an anonymous user and creates a cache token based on the user type.
Finally, it calls generateAccessToken to create and retrieve a new token. |
|
createTokenCache creates a cache object that exposes get and set methods to retrieve and store the token in the localStorage. |
|
generateAccessToken calls the getCoveoAccessTokenUrl function which returns the URL of OCC extension that retrieves the token. |
|
Saves the ID of your site into a baseSiteId variable.
The site ID is the one that you configured in the Backoffice Administration Cockpit. |
Step 2: Update app.component.ts
Update the src/app/app.component.ts file to use the getAccessToken method:
import { AfterViewInit, Component, ViewChild } from '@angular/core';
import { SearchTokenService } from './coveo/services/search-token-service/search-token.service';
import {
  CommerceEngine,
  StandaloneSearchBox,
  buildCommerceEngine,
  buildSearch,
  buildStandaloneSearchBox
} from '@coveo/headless/commerce';

@Component({
  selector: 'app-root',
  templateUrl: './app.component.html',
  styleUrls: ['./app.component.scss'],
  providers: [
    SearchTokenService
  ]
})
export class AppComponent implements AfterViewInit {
  @ViewChild('searchinterface')
  title = 'powertoolsstore';
  commerceEngine!: CommerceEngine;
  state: any;
  constructor(
    private searchTokenService: SearchTokenService
  ) {
    this.searchTokenService.newTokenGenerated.subscribe((value) => {
      const engine = this.commerceEngine;
      if (engine) {
        this.searchTokenService.reloadSearchEngineWithToken(engine, value);
      } else {
        this.initializeCommerceEngine(value);
      }
    });
  }

  async ngAfterViewInit() {
    const accessToken = await this.searchTokenService.getToken();
    this.missingAccessToken = !accessToken;

    if (this.missingAccessToken) {
      return;
    }

    this.initializeCommerceEngine(<YOUR_ACCESS_TOKEN>);

    // ...
  }

  private initializeCommerceEngine(accessToken: string) {
    this.commerceEngine = buildCommerceEngine({
      configuration: {
        organizationId: '<YOUR_ORG_ID>',
        accessToken,
        renewAccessToken: () => this.searchTokenService.refreshToken(),
      },
    });
  }

  private initializeCommerceEngine(accessToken: string) {
    this.commerceEngine = buildCommerceEngine({
      configuration: {
        organizationId: '<YOUR_ORG_ID>',
        accessToken: accessToken,
        renewAccessToken: () => this.searchTokenService.refreshToken(),
        analytics: {
          trackingId: 'sports'
        },
        context: {
          currency: 'USD',
          country: 'US',
          language: 'en',
          view: {
            url: 'example.com'
          },
        }
      },
    });

    if (this.commerceEngine) {
      // ...
      const search = buildSearch(this.commerceEngine);
      search.executeFirstSearch();
    }
  }
}
Subscribe to the newTokenGenerated event to reload the engine with the new JWT token. |
|
| Once the Commerce engine is initialized, you can use it to create subcontrollers.
Example
Declare a Then, in the To reflect the changes in the UI and handle user input, you can add the following event handler: |
|
Pass the following parameters:
|
|
| You can further specify the engine configuration before executing the first search. See ConfigurationActions (Commerce Engine). |
From now on, your storefront will use the search token to authenticate the search requests.