Use the Coveo Cartridge for B2C Commerce in Eclipse IDE
Use the Coveo Cartridge for B2C Commerce in Eclipse IDE
This article explains how to use the Coveo Cartridge for B2C Commerce (Coveo Cartridge) in the Eclipse IDE to push data from a Salesforce Commerce Cloud instance to a Coveo organization.
The indexed data can be used in a Coveo-powered search interface implemented in your storefront.
|
|
This article focuses on installing the Coveo Cartridge in the B2C Commerce Storefront Reference Architecture (SFRA) environment. However, it’s possible to use it in the SiteGenesis architecture. Most of the steps are the same for SiteGenesis; those that are different are formatted as SiteGenesis only notes. |
Prerequisites
Make sure that your configuration meets the following criteria:
-
The required software is installed on your machine:
-
The Salesforce UX Studio plugin for the Eclipse IDE.
-
SFRA 6.2.0 with the Compatibility Mode of version 22.7.
 SiteGenesis only
SiteGenesis 104.0.1 with the Compatibility Mode of version 22.7.
-
You have:
-
Access to the Business Manager (your Salesforce sandbox UI). To get access, you have to contact an account administrator within your organization.
-
Downloaded the Coveo Cartridge archive.
-
Step 1: Install the Coveo Cartridge in UX Studio
-
Open the UX Studio plugin in the Eclipse IDE.
-
Navigate to File → Import → General → Existing Projects Into Workspace.
-
To the right of Select root directory, click the Browse button. A modal window opens.
-
Navigate to the folder where you downloaded the Coveo Cartridge, then to the cartridges folder.
-
Select the cartridges folder.
-
Click the Ok button. The modal window closes.
-
In the Projects section, select the following projects:
-
bm_coveo -
int_coveo -
int_coveo_sfra -
int_coveo_sfra_changes
SiteGenesis onlyDetails
-
bm_coveo -
int_coveo -
int_coveo_sg -
int_coveo_sg_changes
-
-
-
Click the Finish button to finish the import.

-
The Eclipse IDE will prompt you to connect the cartridges to your sandbox. Click the Yes button.
Step 2: Map the fields
To enforce proper indexing, you must map the product attributes in your Salesforce catalog to the fields in your Coveo organization. To do the mapping, create a mapping file and upload it to your Salesforce instance.
By default, the Coveo Cartridge uses mapping located at the end of the file int_coveo/cartridge/scripts/utils/coveoConstant.js:
// ...
exports.COVEO_FIELD_MAPPER = {
    primaryCategory: {
        custom: {
            sizeChartID: {
                fieldName: 'gender',
                fieldType: 'string'
            }
        }
    },
    name: {
        fieldName: 'ec_brand',
        fieldType: 'string'
    },
    custom: {
        color: {
            fieldName: 'ec_color',
            fieldType: 'string'
        }
    }
};
fieldType: 'string'
},
custom: {
color: {
fieldName: 'ec_color',
fieldType: 'string'
}
}
};The SFCC attribute name. |
|
The Coveo field ec_brand that’s mapped to the SFCC attribute name. |
Update this mapping as required.
Step 3: Assign the cartridges to a site
-
In the Business Manager, navigate to Administration → Sites → Manage Sites.
-
Click the Manage the Business Manager site button.
-
Switch to the Settings tab.
-
In the Cartridges field, add the following values at the beginning:
bm_coveo:int_coveo: -
Click the Apply button.
-
Navigate to Administration → Sites → Manage Sites.
-
Click the name of the required site.
-
Switch to the Settings tab.
-
In the Cartridges field, add the following values at the beginning:
int_coveo_sfra_changes:int_coveo_sfra:int_coveo
SiteGenesis onlyint_coveo_sg_changes:int_coveo_sg:int_coveo -
Click the Apply button.
-
Navigate to Administration → Site Development → Code Deployment.
-
Select the checkbox to the left of the code version that you want to activate.
-
Click the Activate button to activate the code version.
Step 4: Configure indexing
-
In the Business Manager, click the Select a Site drop-down menu.
-
Click the name of the target site.
-
Navigate to Merchant Tools → Site Preferences → Custom Preferences.
-
In the ID column, click the Coveo Configs link.
-
Fill in the fields as follows:
Name Value Coveo Enabled
YesCoveo Search Enabled
YesCoveo Chunk Mode Enabled
-
Yesif your catalog data JSON file is larger than 256 MB. See Uploading large catalog data files. -
Noif your catalog data JSON file doesn’t exceed 256 MB.
Coveo API Key
The API key to index the Salesforce catalog and send its data to a source in your Coveo organization. This API key should have the following privileges:
Service Privilege Access level Content
Sources
Edit all[1]Organization
Organization
ViewSee Manage API keys and Manage privileges.
Coveo Anonymous search API Key
The API key to use on a Salesforce search page.
This API key should have the following privileges:
Service Privilege Access level Analytics
Analytics data
PushSearch
Execute queries
AllowedCoveo Organization Id
Coveo Source ID
The ID of a Catalog source in your Coveo organization.
Coveo Atomic CSS URL
Don’t fill in this value to use the default URL,
https://static.cloud.coveo.com/atomic/v2/themes/coveo.css.Coveo Atomic JS URL
Don’t fill in this value to use the default URL,
https://static.cloud.coveo.com/atomic/v2/atomic.esm.jsCoveo Catalog Last Sync
The last date and time when the catalog data was indexed. Only the products added on or after this date will be indexed.
Coveo Search Response Fields
Add created search fields that you added in your project. For example,
ec_rating,ec_color.Coveo Search Hub
The name of the search hub that’s used for the search page.
-
Step 5: Import the Coveo service, profile, and credentials
The Coveo Cartridge contains an archive with the metadata of the Coveo services, profiles, and credentials that you must use. To import the metadata archive, perform the following steps:
-
In the Business Manager, navigate to Administration → Site Development → Site Import & Export.
-
Make sure that the Local option is selected.
-
Click the Choose File button.
-
Navigate to the folder where you downloaded the Coveo Cartridge, then to the
metadatafolder and select themetadata.zipfile. -
You’ll see a new entry in the table,
instance/metadata.zip. Select this entry, and then click Import. -
Once the archive is imported, your sandbox will have new entries added in Services, Profiles, and Credentials sections.
-
Navigate to Administration → Operations → Services and switch to the Services tab. Check that the
int.coveo.http.apiservice is present in the list of services. You don’t need to change the service’s parameters, but make sure they’re as follows: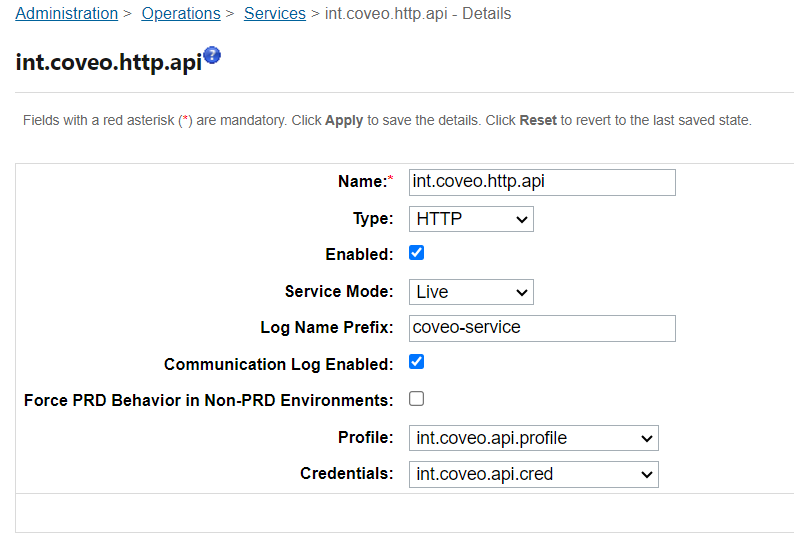
-
Switch to the Profiles tab. Check that the
int.coveo.api.profileentry is present in the list of profiles. You don’t need to change the profile’s parameters, but make sure they’re as follows: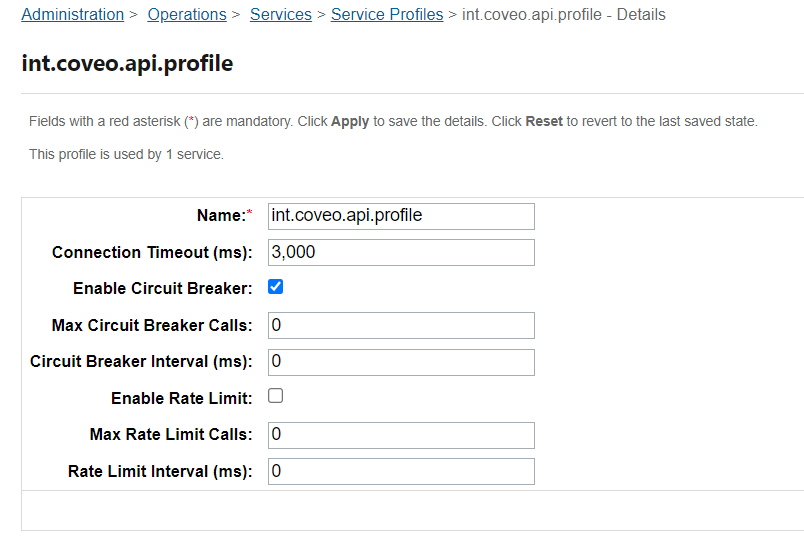
-
Switch to the Credentials tab. Check that the
int.coveo.api.credentry is present in the list of credentials. Click the int.coveo.api.cred link to open the credential’s details. You don’t need to change the parameters, but make sure they’re as follows: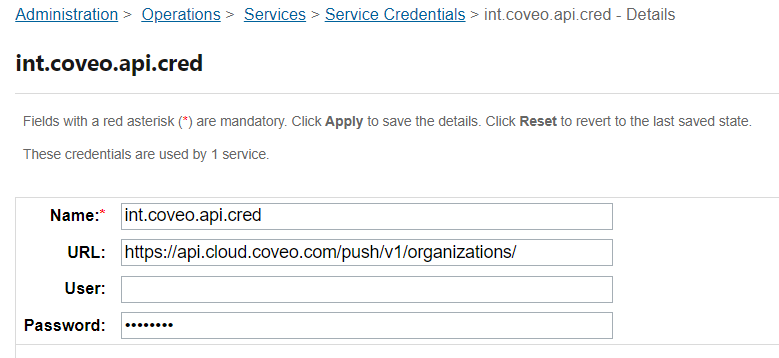
The User and Password fields are default sandbox fields and not used by the Coveo Cartridge, so their values don’t matter.
-
Step 6: Push the catalog to Coveo
Once the metadata.zip archive is imported, there are two jobs available in your Salesforce sandbox:
-
ProductsFeedExportFull: the job to push the entire catalog to Coveo. It suits the first time when you need to index your catalog. -
ProductsFeedExportDelta: the job to push only the products that were updated or added after the date set in theCoveo Catalog Last Syncfield. See Configure indexing.
To make the jobs operational, do the following:
-
Navigate to Administration → Operations → Jobs.
-
Click the required job to open its settings.
-
Switch to the Job Steps tab.
-
Next to the Scope label, click X Sites Assigned.
-
In the modal window that appears, select the checkbox to the left of the required site.
Optional: you may select or clear the checkboxes for other available sites, if required.
-
Click the Assign button.
-
While at the job’s settings, you can:
-
Run the job manually by clicking Run Now.
-
Schedule the job to run automatically on the Schedule and History tab.
-