Capture a click event
Capture a click event
This article explains how to capture a click event and send the information to Coveo along with the product information.
When to capture a click event
A click event should be captured when a visitor clicks a product from a search results page, Product listing page (PLP), or a recommendations carousel. Tracking click events is a requirement for Coveo Machine Learning (Coveo ML) and usage analytics reporting.
Headless controllers and Atomic components
Headless and Atomic components facilitate the logging of click events. Atomic components automatically log click events, while with Headless, specific controllers need to be used when constructing UI components.
The following section provides guidance on the necessary configuration to ensure that click events are properly logged.
|
|
|
Send the appropriate actionCause
Depending on the user context, the click event will have a corresponding actionCause value.
The actionCause is the identifier of the user action that triggered the event.
For example, when the user clicks a result from a search query, the actionCause would be documentOpen, whereas when the user clicks a recommendation, the actionCause would be recommendationOpen.
For Headless
Let’s take a look at some popular actionCause values that you may need to send when logging click events:
-
documentOpen: We recommend usingInteractiveResultwhen implementing your result components, as it automatically extracts relevant data from results items. -
recommendationOpen: To send this event, we suggest that you use thelogRecommendationOpenaction, found in the Recommendation and ProductRecommendation engines. Refer to the Headless project repository for an example of how to dispatch this action.
For Atomic
With Atomic components, you don’t need to specify the actionCause, as these components handle all of the necessary actions and event logging automatically, therefore simplifying your development process.
Set the search hub
Depending on the type of interface the event originates from, there are naming conventions for the search hub value you need to follow. We recommend setting the search hub on Headless and Atomic to control how the queries are processed in the Coveo Administration Console (see Query routing).
When configured, the frameworks will automatically send the value in search events in the originLevel1 field.
You can either configure the search hub in the authentication method, or set it at interface level.
For Headless
Specify the value of the search hub in the SearchConfigurationOptions object when initializing your Headless engine:
import { buildSearchEngine, getOrganizationEndpoints } from '@coveo/headless';

export const headlessEngine = buildSearchEngine({
  configuration: {
    organizationId: '<ORGANIZATION_ID>',
    accessToken: '<ACCESS_TOKEN>'
    organizationEndpoints: getOrganizationEndpoints('<ORGANIZATION_ID>'),
    search: {
      searchHub: "<SEARCH_HUB>",
    },
  },
});
For Atomic
Specify the search hub value as a property on the atomic-search-interface component:
<body>
  <atomic-search-interface id="search" search-hub="<SEARCH_HUB>">
    <atomic-search-box></atomic-search-box>
    <!-- ... -->
  </atomic-search-interface>
</body>
Query pipeline
When the interface sends a query to your Coveo organization, it goes through a specific Coveo query pipeline before reaching the index. This can be done by specifying a Search Hub and then using condition based routing in the Administration Console to target a specific pipeline.
A query pipeline uses its rules to transform that query and apply specific features following a specific order of execution. While it’s not necessary to specify the query pipeline, we recommend that you do, as it allows you to filter and segregate events when looking at usage analytics reports.
Origin levels
The originLevel feature provides valuable information about the origin of usage analytic events, similar to the Search Hub.
Several fields are associated with the originLevel feature:
-
originLevel1(required): This field should match the value of the Search Hub. If you initialize Headless or Atomic with the SearchHub configuration, this field is automatically set. -
originLevel2(recommended): This field lets you differentiate between different tabs within the search interface if multiple tabs are present. When using the Tab controller, Headless can automatically populate theoriginLevel2field with the ID specified during the initialization of your controller.-
For the "Search" interface without any tabs, you can send the value "default".
-
For the "Listing" page, send the path name of the listing (for example, "my-products/shoes").
-
For "Recs", you can send the value "default".
-
-
originLevel3(recommended): This field represents the URL of the page that redirects the browser to the search interface. It helps you analyze the effectiveness of various entry points leading to the search experience. It’s typically extracted fromdocument.referrer.
During engine initialization, you can set the values for the originLevel fields.
However, if you need to dynamically modify these values, you have the flexibility to modify the usage analytics data sent to Coveo.
You can do so by leveraging the analyticsClientMiddleware property of an AnalyticsConfiguration to hook into an analytics event payload before it’s sent to Coveo.
This can be done for both Headless and Atomic.
Custom data
Along with the regular fields added by Headless and Atomic, UA events must contain a customData JSON with additional fields.
While the library adds some fields to this customData JSON, there are other fields that have to be manually added using the Headless library:
|
|
Note
If you’re using the Atomic library, you’ll need to access Headless through Atomic. |
customData.variant and customData.group (recommended)
The group represents the group ID of the clicked product and variant represents the variant ID of the clicked variant.
To add this metadata to your analytics request, you can use the analyticsClientMiddleware property on your engine as follows:
const createSearchEngine = buildSearchEngine({
 configuration: {
   organizationId: "barcagroupproductionkwvdy6lp",
   accessToken: "XXXXXXXXXX-XXXX-XXXX-XXXX-XXXXXXXXXXXX",
   organizationEndpoints: getOrganizationEndpoints(
     "barcagroupproductionkwvdy6lp"
   ),
   search: {
     pipeline: "Sports",
     searchHub: "MainSearch",
   },
   analytics: {
     analyticsClientMiddleware: (eventType, payload) => {
       if (eventType === 'click') {
         const matchingResult = createSearchEngine.state.search.results[payload.documentPosition - 1];
         payload = {
           ...payload,
           customData: {
             ...payload.customData,
             group: matchingResult.ec_item_group_id,
             variant: matchingResult.variant_id,
           }
         };
       }
       return payload;
     },
   },
 },
});
...payload.customData,
group: matchingResult.ec_item_group_id,
variant: matchingResult.variant_id,
}
};
}
return payload;
},
},
},
});Where:
| Hook into the analytics payload and check to see if the event is a click. | |
| Use the state of the engine to fetch the matching result for which the click event is sent. | |
Retrieve the group and variant ID from the matching result and concatenate it to the customData payload of the event. |
Language
In Coveo Machine Learning (ML) models, multilingual search and recommendations are supported, allowing you to deliver personalized and relevant content to users in different languages.
To ensure accurate and effective language-based results, it’s important to consider the language of the search query and align it with the language specified in the various usage analytics events.
Headless and Atomic automatically set the language of usage analytics events to the language of the search query.
The language is set to en by default; however, if your use case serves content in multiple languages, we recommend specifying the language by setting the value of the locale field when initializing your components.
The locale field is formed by combining the language and region values with a hyphen, like en-US, where en represents the language and US represents the region.
Headless
Specify the language by setting the value of the locale field in the SearchConfigurationOptions object when initializing your Headless engine:
import { buildSearchEngine, getOrganizationEndpoints } from '@coveo/headless';

export const headlessEngine = buildSearchEngine({
  configuration: {
    organizationId: '<ORGANIZATION_ID>',
    accessToken: '<ACCESS_TOKEN>'
    organizationEndpoints: getOrganizationEndpoints('<ORGANIZATION_ID>'),
    search: {
      locale: "<LANGUAGE>",
    },
  },
});
Atomic
Specify the language as a property on the atomic-search-interface component:
<body>
  <atomic-search-interface id="search" language="<LANGUAGE>">
    <atomic-search-box></atomic-search-box>
    <!-- ... -->
  </atomic-search-interface>
</body>
Capture a click event using Coveo UA library commands
We recommend using either the Headless or Atomic libraries. These libraries are designed to facilitate the logging of click events and inclusion of appropriate metadata, simplifying the event collection process. However, if you choose not to use these libraries or want to track clicks using a component that’s not powered by Coveo, you can still log click events manually using the Coveo Usage Analytics (Coveo UA) library.
The following is an example of the JavaScript code that uses the Coveo UA library to send a click event:
coveoua('send', 'click', {
   'actionCause': 'documentOpen',
   'anonymous': true,
   'documentPosition': 1,
   'documentTitle': 'BruBrown Bottle',
   'documentUrl': 'https://sports.barca.group/pdp/SP03929_00009',
   'originLevel1': 'MainSearch',
   'originLevel2': 'default',
   'originLevel3': 'http://localhost:3000/search',
   'searchHub': 'MainSearch',
   'searchQueryUid': '514970dd-7c76-429f-8e80-6ea2f957f303',
   'sourceName': 'demo-barca-sport',
   'language': 'en'
   'trackingId': 'Sports',
   'customData:' {
    	'contentIDKey': 'permanentid',
    	'contentIDValue': 'SP03929_00012',
  },
});
'customData:' {
'contentIDKey': 'permanentid',
'contentIDValue': 'SP03929_00012',
},
});| Send the click event, specifying the various required fields. | |
When a click event happens directly from a Coveo-powered search result page or listing page, you must specify the searchUid of the query that was responsible for showing this set of results.
Otherwise, the Coveo Platform won’t be able to attribute the potential transaction to the right service (that is, search or listing).
You must pass this value in the searchQueryUid parameter of the click payload.
For more information, refer to Extract the searchUid. |
|
While this code snippet includes trackingId in the payload of the click event, it’s recommended to set it as a global custom field instead.
This ensures that the field is available on all events emitted using the Coveo UA library, without duplicating it in each event payload. |
Click data payload requirements
The following table lists the fields sent along with the event and the solutions that leverage them. Search, Listings, and Recs columns refer to whether the ML that powers those solutions needs those data points. The Reporting column is for general reporting purposes that encompasses all solutions.
| Field | Priority | Search | Listings | Recs | Reporting |
|---|---|---|---|---|---|
Required |
|||||
Required |
|||||
Required |
|||||
Required |
|||||
Required |
|||||
Required |
|||||
Required |
|||||
Required |
|||||
Recommended |
|||||
Recommended |
|||||
Required |
|||||
Required |
|||||
Required |
|||||
Required |
|||||
Recommended |
|||||
Recommended |
|||||
Recommended |
-
The
documentUrlfield is used by ML for content recommendations, but not product recommendations. -
Defaults to english.
-
Refer to Extract the searchUid.
-
This field is necessary when configuring ML models to provide recommendations at the group level. If this field is sent with one event, it must be included in all subsequent events.
-
If this field is sent with one event, it’s also recommended that it’s included in all subsequent events.
-
While this field isn’t required for ML models to function, it’s recommended to include it for better reporting. For example, it’s used in the standard usage analytics reports that assess the performance of ML models.
Refer to Log click events for more information and optional fields.
Click event validation
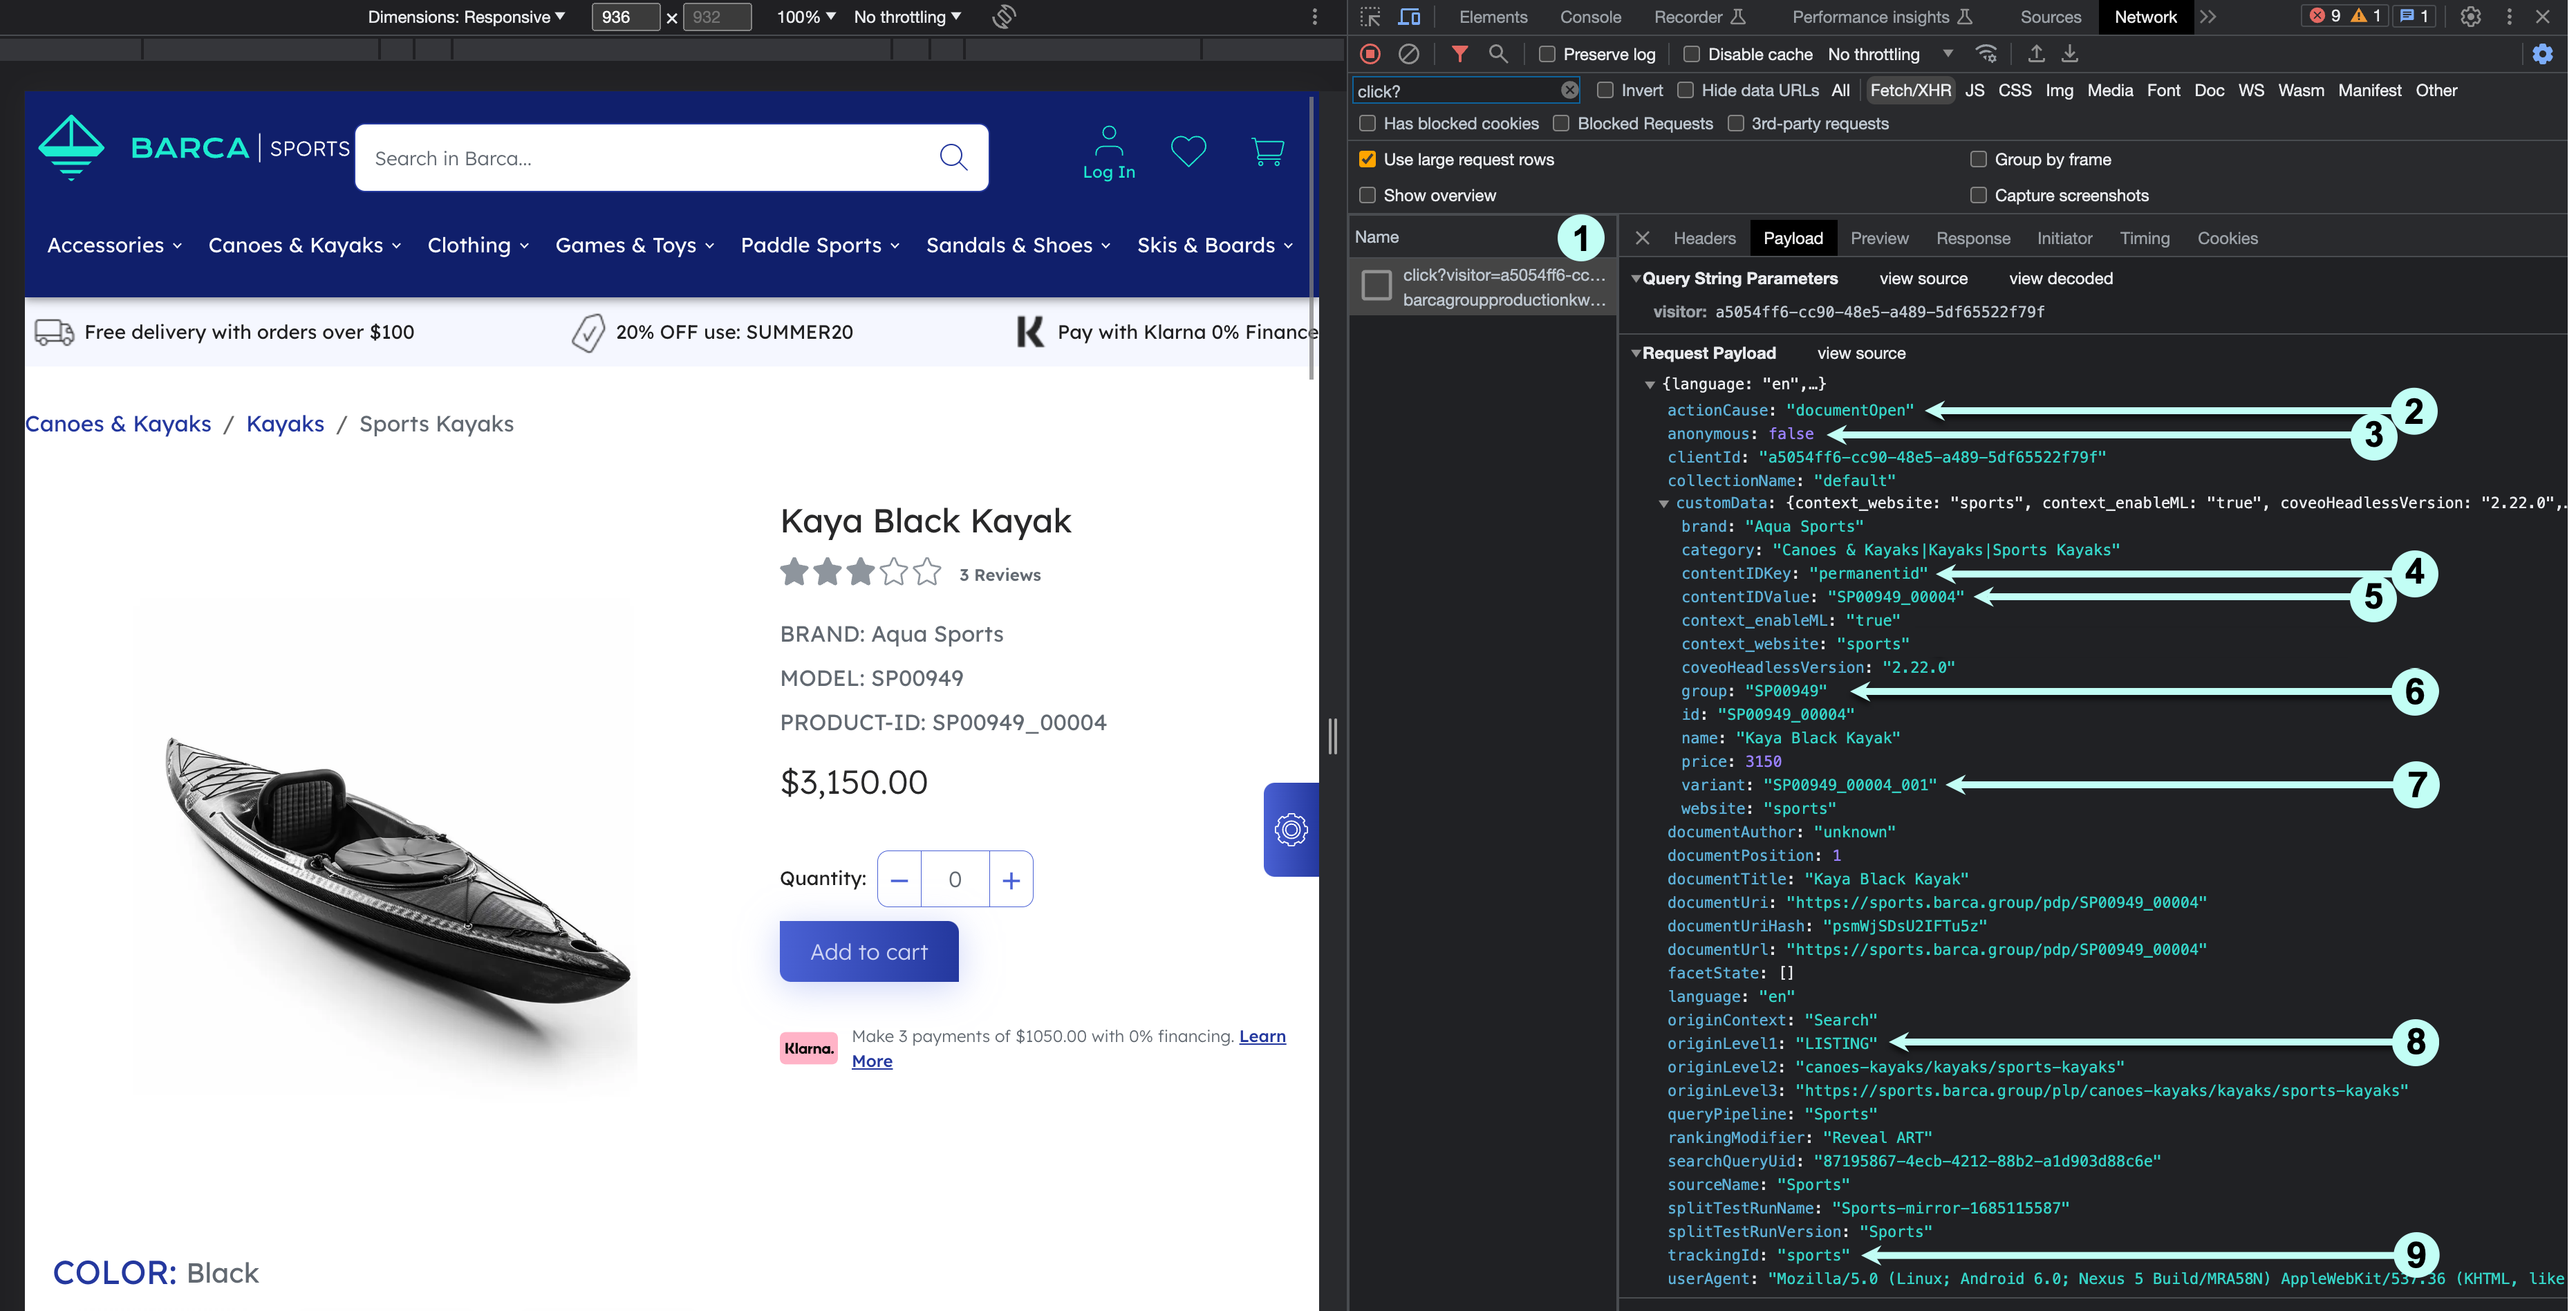
To validate that a click event was sent, use the developer tools for client-side request verification to inspect your visit to ensure that everything done using the UI is captured as a set of consistent and coherent events. This must occur after the implementation is applied.
Inspect the click event through the network browser and ensure that it satisfies the following:

1 Ensure that the click event is sent without error and that it’s not sent twice.
2 Validate the actionCause parameter of the event.
The most common values are:
| Value | Description |
|---|---|
|
When a user clicks any item from a search results or product listings page, either right-click or left-clicks (user opens in a new tab). |
|
When a user clicks any item in a recommendation interface. |
|
When a user previews a query result (Quickview). |
The full list of standard actionCause values is available in the Coveo JavaScript Search Framework source code.
3 The anonymous field is set to the correct value based on the implementation.
The default value is false.
4 The contentIDKey is set to permanentid.
5 the contentIDValue matches the correct product ID.
6 The correct group ID is sent in group field within the customData object (if applicable).
7 The correct SKU is sent in the variant field within the customData object (if applicable).
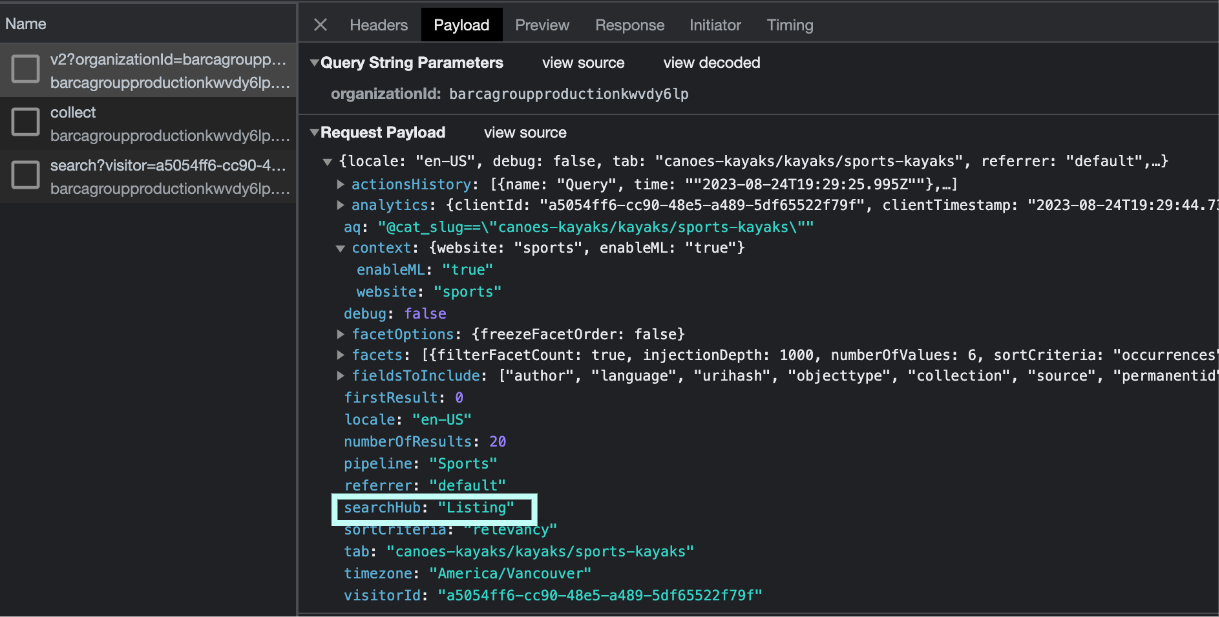
8 The value of the originLevel1 field in the UA request matches the value of the searchHub from the corresponding Search API request event, as seen below:

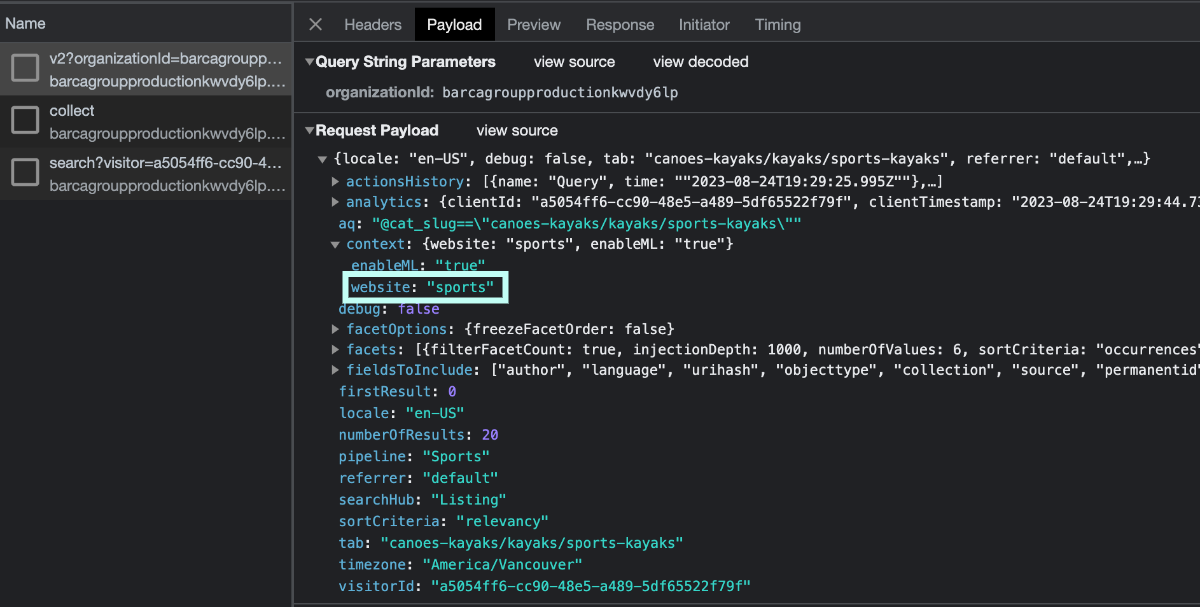
9 The value of the trackingId field for the Coveo UA request is sending the right value assigned to that website and matches the value of the website field within the context object of the Search API request event that took place before the click event, as seen below:

For a complete list of parameters that can be sent in the event, see Log click events.