Push data to Coveo (SAP Commerce Cloud 2011 or later)
Push data to Coveo (SAP Commerce Cloud 2011 or later)
This article explains how to push data from SAP Commerce Cloud (version 2011 or later) to a Coveo organization.
|
|
Ingestion modes
Coveo supports two mutually exclusive ingestion modes: multi-source/multi-market (one source per market) and single-source/multi-market (multiple markets from a single source, using dictionary fields). Both modes are fully supported, so choose the one that fits your implementation. The setup in this article applies to both modes. If you’re implementing single-source/multi-market, also follow Single-source multi-market for SAP Commerce Cloud, which covers the differences specific to that mode. |
Install the Coveo SAP Commerce extensions
The Coveo SAP Commerce extensions allows your SAP project to exchange data with the Coveo Platform. To install the extensions, perform the following steps:
-
Copy the
searchprovidercoveosearchservicesandcoveopushclientextensions to thehybris/bin/customdirectory of your project.Depending on your SAP Commerce version, download the extensions from the appropriate branch:
Branch SAP Commerce Cloud support Status Links v4[1]2211-jdk21
Active development
v3[1]2211
Active development
v2[1]2105, 2205
v12011
Deprecated.
This is because the SAP Commerce Cloud version 2011 is out of maintenance.
1. In the
v4,v3andv2branches, you can find that the extensions have different minor and patch versions. For detailed changes between versions, see the v4 Change log, the v3 Change log, or the v2 Change log. -
Open the
hybris/config/localextensions.xmlfile and add the extensions:<extension name='searchprovidercoveosearchservices' /> <extension name='coveopushclient' /> Retries
The
coveopushclientextension enables more retries for the indexing process. See details in the Retry indexing section. -
Set up the Ant environment by running the script:
. ./setantenv.sh -
From the root of your project directory, run the following command:
ant clean all -
After the command execution, navigate to the
hybris/bin/platformdirectory. -
Start your SAP Commerce installation by running the script:
./hybrisserver.shBy default, your local server would use ports 9001 (http) and 9002 (https).
-
Open the SAP Commerce Administration Console (or HAC, Hybris Administration console) at https://localhost:9002/platform/update. You can also navigate to the Update page by clicking Platform → Update in the top menu.
-
Find and select the checkboxes for:
-
searchprovidercoveosearchservices(required to create the new search provider) -
Update running system -
Localize types
-
-
At the top of the page, click Update.
|
|
Note
The extension creates new data types in the database, but it doesn’t import any data. |
|
|
Semi-automatic configuration
In the You can also manually configure every source and your indexes via the Backoffice. Perform the following steps to do so. |
Customize the extension
It’s not recommended to modify the extension code directly as it complicates upgrades to newer versions. If you need custom functionality, you can follow this approach:
-
Create your own custom SAP Commerce extension.
-
Update the
/hybris/bin/custom/<YOUR_EXTENSION_NAME>/extensioninfo.xmlso that your extension depends on thesearchprovidercoveosearchservicesextension.<requires-extension name="searchprovidercoveosearchservices"/> -
In your extension, either implement interfaces from the
searchprovidercoveosearchservicesextension or extend the existing classes with your custom logic. -
In the
/hybris/bin/custom/<YOUR_EXTENSION_NAME>/resources/<YOUR_EXTENSION_NAME>-spring.xmlfile, add and configure your beans.
This way, the Coveo extension’s upgrades and your custom code won’t interfere with each other.
|
|
Custom value providers
If you need to manipulate your data in a specific way, it’s recommended to build your own value providers within your custom extension. The Coveo extension contains several example value providers that can be used as templates to help you get started. |
Coveo setup
Step 1: Create a source in your Coveo organization
For storing the SAP catalog data, you need a Catalog source.
-
Log in to the Coveo Administration Console.
-
Add the Catalog sources that you’ll be pushing your data to.
The guidelines for creating sources are:
-
Each combination of language, currency, and country existing in your data should have a separate Coveo Catalog source to push to.
-
Any availability data you have should also have it’s own dedicated Catalog source.
-
-
Take note of the Stream API URL value for your source.
Step 2: Create an API key
Create one API key that you’ll use for all your sources. See Manage API keys.
The key should have the edit privileges detailed here: Catalog source privileges. See the Edit sources, edit source update schedules, and view the View and map metadata page row in the privileges table.
SAP Commerce setup
Step 1: Create Coveo sources
For each source you created in the Coveo Administration Console you should perform the following steps in the SAP Backoffice.
-
In the SAP Backoffice Administration Cockpit, go to System → API → Destinations → Coveo Source.
-
Click the plus sign (+) above the search results.
-
In the modal window that appears, enter a unique ID that represents your Catalog source. It’s recommended to use a human-readable value to assist with identifying a specific source.
-
Click Finish.
-
Select the newly created item from the search listing.
-
On the General tab:
-
Fill in the Name field.
-
In the Object type menu, specify the type that matches your Coveo source:
AVAILABILITY
This type is for the availability source. See Source configuration approaches for availability channel and Catalog availability data.
PRODUCTANDVARIANT
This type is for the products and variations. See Catalog product data and Catalog variant data and product groupings.
When selecting an object type of
PRODUCTANDVARIANT,Language,Currency, andCountryare mandatory for the system to determine the correct source for your product data.
-
-
Click Save.
Step 2: Create a consumed destination
-
Go to System → API → Destinations → Consumed Destinations.
-
Click the plus sign (+) above the search results.
-
In the modal window that appears:
ID
Enter a unique ID that represents your Catalog source.
URL
Paste the Stream API URL that you copied from the Coveo Catalog source.
Details
-
In your Coveo organization, open the Catalog source you created in step 1.
-
On the Configuration tab, there’s a section called Stream API URL. Click Copy to clipboard to copy the URL.
Active
Verify that the Active checkbox is selected.
Destination Target
Click the field and select Default_Template.
NoteThe destination target you select doesn’t matter as it’s not used in the push implementation and only needed to create the destination.
-
-
Click Finish.
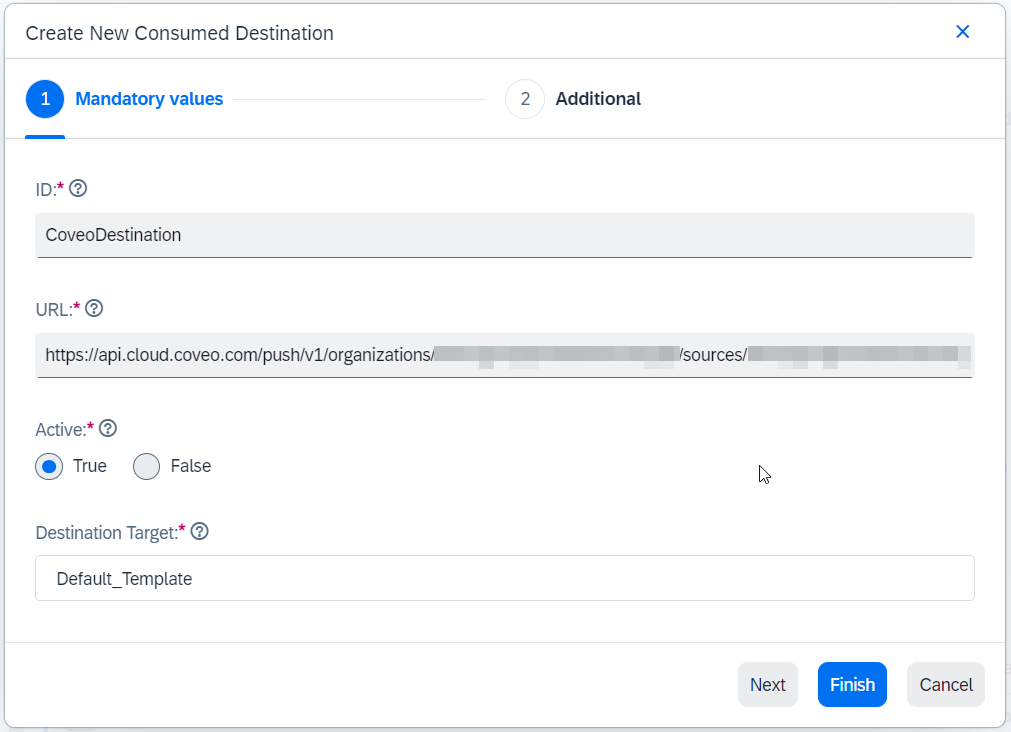
Now you see the destination you created in the list of consumed destinations.
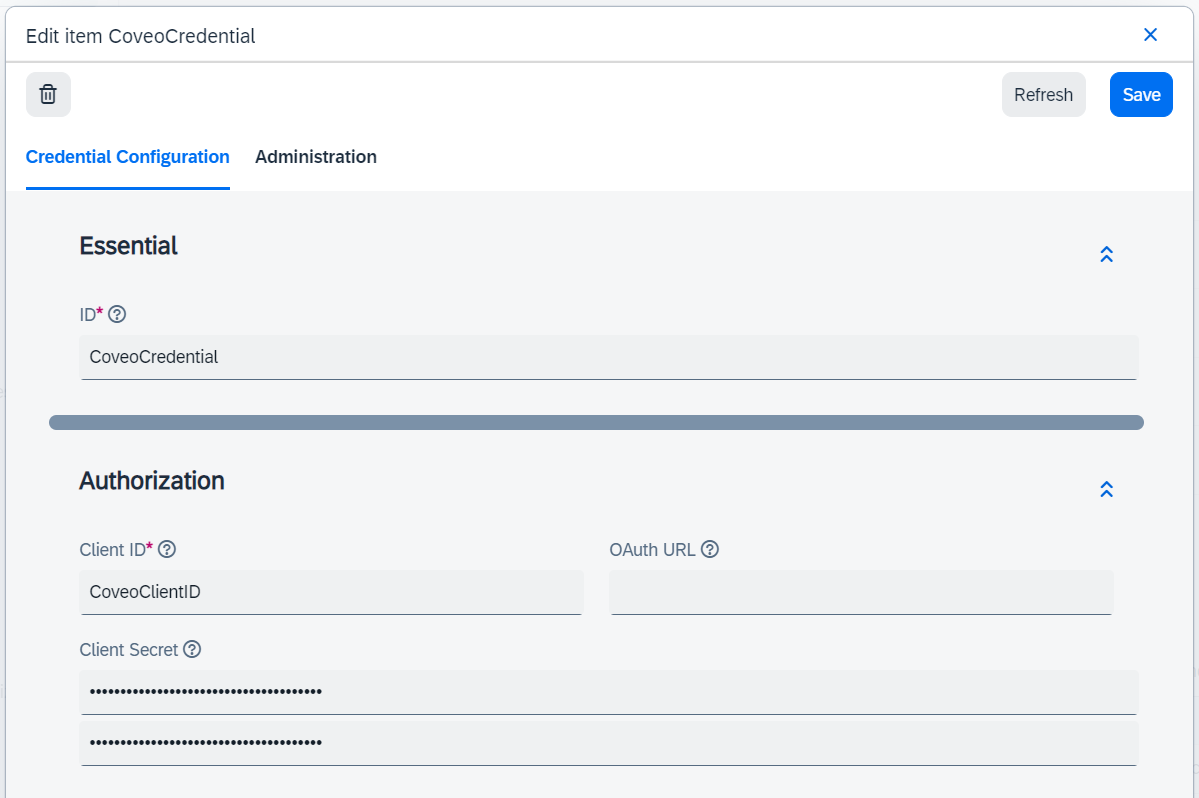
Step 3: Create a credential for the consumed destination
|
|
If you have a number of sources, you only need to create one OAuth Credential and attach it to many Consumed Destinations. |
-
Click the destination you created and switch to the Destination Configuration tab.
-
Double-click in the Credential field to open a dropdown menu and select Create Credential → Consumed OAuth Credential.
-
Fill in the following fields:
ID
Enter a unique ID for a new credential. For example,
CoveoCredential.Client ID
Enter a client ID for a new credential. For example,
CoveoClientID. -
Click Finish. You see the Destination Configuration tab again.
-
Double-click in the Credential field to open the credential settings.
-
In the Client Secret section, there are Password and Verify password fields. In both fields, paste the Coveo API key that you created earlier.
-
Click Save to save and close the credential settings.
-
Click Save to save the destination settings.
Step 4: Assign the consumed destination to the Coveo source
-
Return to System → API → Destinations → Coveo Source.
-
Click your Coveo source.
-
On the General tab, find the Consumed Destination field.
-
Specify the consumed destination that you created earlier.
-
Click Save.
Step 5: Create a search provider
Now that you’ve mapped the Coveo sources to the SAP Commerce API destinations, you must configure the search index to push the data to Coveo.
-
Go to the System → Search and Navigation → Search Provider Configurations page.
-
Next to the plus sign, click the dropdown menu and select Coveo Search Provider Configuration.
-
Fill in the following fields:
Identifier
Enter a unique identifier for a new search provider, for example,
CoveoSearchProviderID.Name
Enter a name for a new search provider, for example,
Coveo Search Provider Configuration.Coveo Source
Select all the Coveo sources that you created.
-
Click Finish. Now you see the provider you created in the list of search providers.
Step 6: Create the index configuration
-
Go to System → Search and Navigation → Index Configurations.
-
Next to the plus sign (+), click the dropdown menu and select CoveoSnIndexConfiguration.
-
Fill in the following fields:
Identifier
Enter a unique identifier for a new configuration, for example,
CoveoIndexID.Name
Enter a name for a new search provider, for example,
Coveo Index Configuration.Search Provider Configuration
Select the Coveo Search Provider Configuration created in the previous step.
-
Click Next to proceed to the next step, Index Types.
Skip this step for now and click Next again.
-
In the Session step, select all the Languages, Currencies, and Countries that are relevant for your data.

You must fill in the User field if you have data with access restrictions. If that’s the case, specify the user name with the necessary permissions to access the data.
Otherwise, you can leave the User field empty or set the user as
Anonymousas it’s done in the example impex file in the extension code base.
-
Click Finish.
Step 7: Create the ServiceLayerJobs
|
|
Skip this step if you’re using the connector version 3.1.3 or later. The connector versions starting from 3.1.3 have the ServiceLayerJobs created automatically. |
Create the ServiceLayerJobs for the future cron jobs, one for incremental indexing and one for full indexing.
|
|
Note
Based on your SAP Commerce Cloud updates, the incremental indexing job:
The full indexing job does all that the incremental indexing job does, and also deletes items from your Coveo sources that have been removed from SAP Commerce Cloud. |
-
Go to System → Types.
-
In the search bar, type in
ServicelayerJoband search. -
In the search results, click the ServicelayerJob.
The properties of the ServicelayerJob are displayed on the page.
-
In the upper part of the properties, click the search icon that’s titled Search by type.
-
Click the plus sign (+) above the search listing.
-
In the modal window that appears:
Spring ID
Paste
fullCoveoSnIndexerJob.Code
Paste
fullCoveoSnIndexerJob. -
Click Finish.
-
Perform the same steps to create another ServicelayerJob for which specify
incrementalCoveoSnIndexerJobfor the Code and the Spring ID attributes.
|
|
Note
The Coveo SAP Commerce extension doesn’t currently support Coveo partial catalog updates.
Although SAP Commerce Cloud provides a SAP’s One reason you might consider partial updates is to merge data from multiple SAP Commerce instances into Coveo (for example, product details from one instance and inventory from another). Since partial updates aren’t supported by this extension, you should instead aggregate all the data you need into a single SAP Commerce instance before indexing. The Coveo SAP Commerce extension is designed to run from a single instance where all searchable data is available. |
Step 8: Create the Index types
Create one Index type for full indexing and one for incremental indexing.
-
Go to System → Search and Navigation → Index Types.
-
Click the plus sign (+) above the search results.
-
In the modal window that appears, in the Essential step, fill in the following fields:
Identifier
Enter a unique identifier for a new type, for example,
CoveoFullIndexTypeID.Name
Enter a name for a new type, for example,
Coveo Full Index Type Configuration.Composed Type
Specify the type that matches a Coveo Object type for the source you’ll use this to push data to.
ExampleIf this index type will be used to push
availabilityobjects, then you may want to select theWarehouseComposed type. This will be dependent on how your data is structured.Index Configuration
Select the Coveo Index Configuration created in the previous steps.
-
The next steps can be configured later, so you may skip them for now. Click Next to proceed to the Cron Jobs step.
-
In the Cron Jobs step, click the plus sign (+) at the end of the dropdown menu.
-
Select Full Indexer Cronjob.
-
Fill in the following fields:
-
Code. Enter a unique code for the cron job, for example,
coveoFullIndexType. -
Job Definition. Select the
fullCoveoSnIndexerJobsystem type. The chosen type should correspond to the type of cron job you’re creating. -
Indexer Item Source. Click this field to create a Flexible Search Indexer Item Source.
In the modal window that appears, fill in the Query field. It must be the FlexibleSearch query that will be used to retrieve the Composed Type. For example, if you selected Warehouse for your
availabilityobject, the following query would retrieve all warehouses for the electronics site:SELECT {w:PK} FROM {Warehouse as w JOIN BaseStore2WarehouseRel as rel ON {w:PK} = {rel:target} JOIN BaseStore AS bs ON {rel:source} = {bs:PK} } WHERE {bs:uid}='electronics'For product indexing, the following query would retrieve all approved products in the catalog.
SELECT {p:pk}
FROM {Product AS p
  LEFT JOIN ArticleApprovalStatus AS a ON {p:approvalStatus} = {a:pk}
}
WHERE {a:code} = 'approved'
-
-
Click Finish for every modal window that has been opened.
-
Select the newly created Index type.
-
On the General tab, configure the Identity Provider as
snIdentityProviderand link the catalog you want to index in the Catalogs field. -
Perform the same steps to create an Index type for incremental indexing, but adjust them as follows:
-
in the Essential step, update the Identifier and Name fields to reflect the incremental indexing type.
-
in the Create Cron Jobs step, select Incremental Indexer Cronjob. Use
coveoIncrementalIndexTypefor the Code attribute andincrementalCoveoSnIndexerJobfor the Job Definition attribute. Update the FlexibleSearch query to match the incremental indexing requirements.
-
Step 9: Create the objectType field
In both created Index types, create a field that will be used to specify the Coveo object type.
-
Click the required Index type, either
coveoFullIndexTypeorcoveoIncrementalIndexType. -
Switch to the Fields tab.
-
For Coveo Push solution, the Code, Name, and DocumentId fields are mandatory.
-
Click in the Fields menu, to create a field specific for Coveo.
NoteYou can create as many additional fields as you need to push to the Coveo Platform. In this example, you’ll create one field,
objectType. -
In the modal window that appears, fill in the following fields:
Identifier
Enter
objectType.Name
Enter
Object Type.Field Type
Select
TEXT. -
Click Next.
-
In the Indexer step, paste
coveoObjectTypeSnIndexerValueProviderin the Value Provider field. -
Click Finish.
-
In your SAP Commerce Cloud project, open the
hybris/bin/custom/searchprovidercoveosearchservices/project.propertiesfile. -
There will be three properties, each maps one Coveo Source object with one or more Composed Index types.
For example, if you created a
WarehouseComposed index type for theavailabilityobject, add it to thecoveo.availability.typecodesproperty.coveo.availability.typecodes=Warehouse coveo.product.typecodes=Product coveo.variant.typecodes=VariantProduct
Step 10: Use the value providers
Your Coveo organization has a set of expected fields to be indexed, see Standard commerce fields. The values for these fields should follow the Coveo index format.
However, your SAP Commerce Cloud project might generate values whose formats are different from what the Coveo index expects, so this will lead to errors during indexing. To handle this, you can employ value providers to retrieve and change field names from the SAP Commerce Cloud database.
The searchprovidercoveosearchservices extension includes two sets of value providers:
-
Standard value providers that retrieve values directly from the database. For the list of provider names, see the example impex file in the extension code base.
-
Coveo Platform value providers that transform the values before they’re pushed to the Coveo Platform. Examine the table below to learn more about the Coveo Platform-specific value providers.
| Provider name | Provider ID | Description | ||
|---|---|---|---|---|
|
|
This value provider uses the following properties:
Each property can be set in the |
||
|
|
This value provider builds a document ID that follows the URI format required by the Coveo Platform, For example, if the provider has the |
||
|
|
This value provider extends the default To do that, set the Not required, but recommended. |
||
|
|
This value provider is an example of how to send an array of attributes to your Coveo index. The provider gets all the products within a warehouse (even if there are none left in stock) and returns them as an array. For the |
||
|
N/A (not in the example impex file) |
This value provider is similar to By default, a product is considered in stock if more than |
||
|
|
This value provider is an example of how to generate a dictionary object of localized values to the index. The example has a user pricing group to price dictionary, where the currency will determine what data to send to each source. For the The value of the map is the dictionary to push to the index. In this example, it’s a map of user price group to price value. |
||
|
|
This value provider is an example of how to generate a standard dictionary object. The example gets the stock levels of a product for the warehouses it can be available in. For the |
||
|
|
This value provider returns a value with the category hierarchy in the specific format required by the Coveo index.
It leverages the OOTB By default, the root category name is excluded from the paths you push as this will be common to all products in the index. |
Dictionary value providers
The Coveo index supports dictionary fields, which are key-value pairs used to store additional information about an indexed item within a single field. However, you must ensure that the following requirements are met for the dictionary value providers to work correctly:
-
In your impex file, the
multiValuedparameter must be explicitly set tofalsefor each dictionary or it must be the default in the value provider’s parameters.// ... INSERT_UPDATE SnField; indexType(id)[unique = true]; id[unique = true]; name ; fieldType(code); localized[default = false]; valueProvider ; valueProviderParameters[map-delimiter = |]; qualifierTypeId; searchable[default = false]; retrievable[default = false]; multiValued[default = false]; useForSuggesting[default = false]; useForSpellchecking[default = false] ; $coveoProductIndexType ; price ; Price ; TEXT ; ; valueProviderName ; ; ; ; true ; ; ; // ...With
multiValuedset tofalse, the value provider returns a single dictionary object that can be indexed correctly. This is aMap<String, Double>orMap<String, String>object that contains the key-value pairs. Correct
{value1: 300, value2: 500, value3: 1000}However, if
multiValuedis set totrue, SAP Commerce Cloud will treat the dictionary as an array with one value. Incorrect
[{value1: 300, value2: 500, value3: 1000}] -
If you’re using a custom value provider for dictionaries, it must return a
Map<String, Double>orMap<String, String>object.
Step 11: Map the catalog fields
For both created Index types, map catalog fields with the Coveo fields. Do the mapping only for the fields that you want to push to Coveo.
-
Navigate to the System → Search and Navigation → Index Types page.
-
In the list of index types, click the required index type.
-
Switch to the Fields tab.
-
Examine the fields.
Make sure there are only fields that you want to push to Coveo. The rest should be removed as they will add to the indexing time.
Although leaving them in won’t cause the indexing to fail, it’s recommended to remove them for optimization.
-
Examine the Identifier column. The values in it should match the field name that was set within the source in the Coveo Administration Console.
ExampleFor the SAP field
name, you must create the mapping%[name]in the Coveo Administration Console.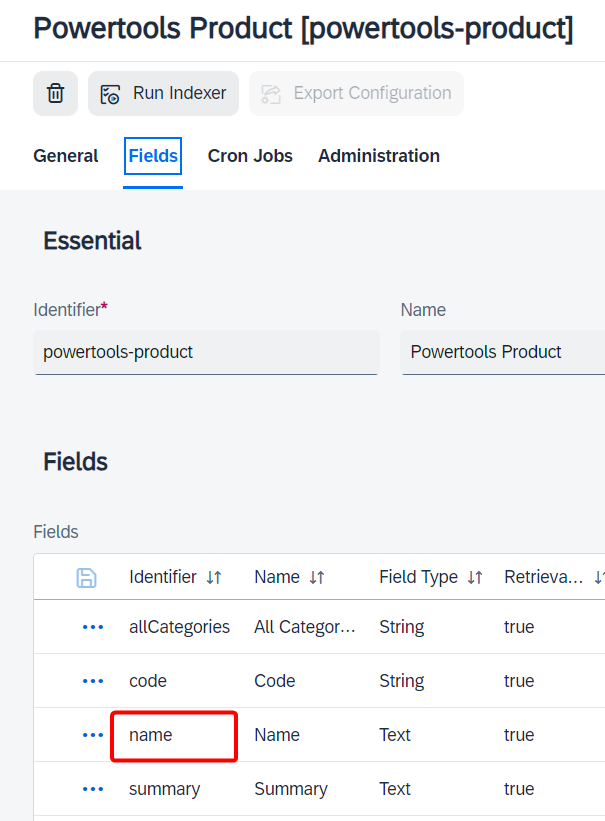 ←→
←→
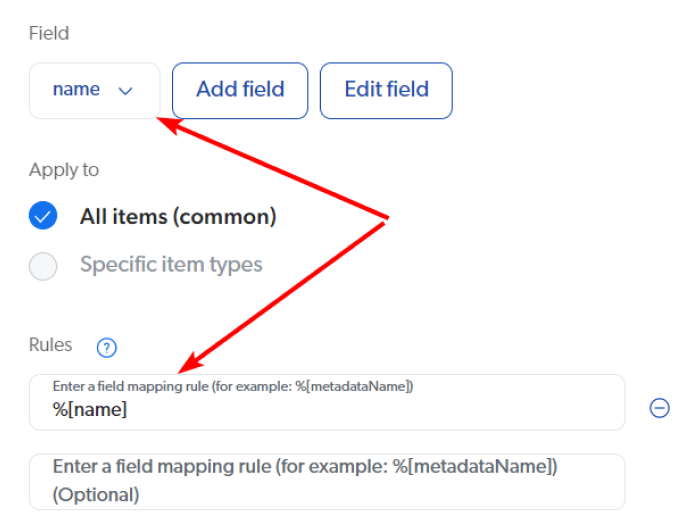
-
To create a new field, do so the same way you created the
objectTypefield in the previous step.
Step 12: Run the indexers
Once you’ve configured your system correctly, you can run your indexers.
-
Navigate to the System → Search and Navigation → Index Types page.
-
In the list of index types, click the required index type.
-
Switch to the Cron Jobs tab.
-
Click the required cronjob.
-
Make sure that the cronjob is enabled, see the True checkbox in the Enabled section.
-
On the Time Schedule tab, you can set the time when the cronjob should run.
For the full indexer, it’s recommended to run it relatively often to ensure the consistency of the data between your SAP Commerce Cloud project and the Coveo index. For example, you can schedule the full indexer to run every two or three days, but the exact timeframe will depend on your judgment based on the number of products in your catalog.
The exact time depends on the amount of data you have and how often it changes.
-
-
Click Save to save and close the cronjob settings.
-
While having the index type open, switch to the Administration tab.
-
Check that the Stores field is set to the store you want to index.
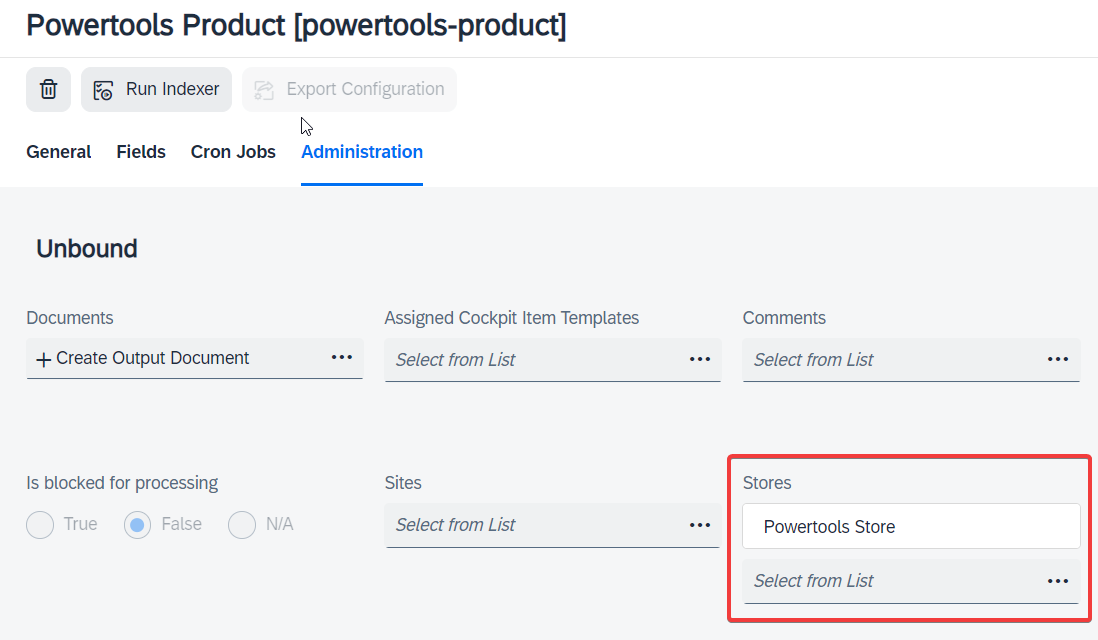
-
Above the index tabs, click Run indexer.
-
In the modal window that appears, click the dropdown menu and select the cronjob that you’ve just enabled.
-
Click Run.
You can track the indexing progress by clicking Processes at the top of the Administration Cockpit.
Retry indexing
If the full indexing fails, the default behavior of SAP Commerce Cloud is to retry the indexing up to 3 times. However, this hardcoded amount of retries might not be enough in your case. Both the Coveo extension and SAP Commerce Cloud let you retry programmatically until indexing is complete.
Coveo extension retries
The coveopushclient extension lets you configure retries.
These retries are especially efficient if you’re reaching Coveo Stream API quotas.
To enable the retries, make sure you:
-
Downloaded the version
3.4.1or later from thev4branch or the version2.1.7from thev2branch. -
Added the
coveopushclientextension in thehybris/config/localextensions.xmlfile, as shown in an installation step earlier.
By default, the coveopushclient extension will retry the indexing process 10 times, with a 5-second delay before the first retry.
To change these values, you can do so in the hybris/bin/custom/coveopushclient/project.properties file:
coveopushclient.retryafter.milliseconds=5000
coveopushclient.maxretries=10
After the first retry, each subsequent retry will occur at exponentially increasing intervals with a multiplier of 2. Note that you can change the initial delay but not the multiplier.
-
retry 1 happens in 5 s
-
retry 2 happens in 5 x 2 = 10 s
-
retry 3 happens in 10 x 2 = 20 s
-
retry 4 happens in 20 x 2 = 40 s
SAP Commerce Cloud retries
Since release 2211.32, SAP Commerce Cloud exposes the SnRetryConfiguration type that lets you configure the number of retries and the delay between them.
These retries happen on the SAP Commerce Cloud and are especially efficient if you’re facing SAP Hybris issues, such as multithreading, databases, and data retrieval problems.
Configure these retries programmatically in the target impex file.
Create a SnRetryConfiguration retry configuration and use it in your SnIndexerConfiguration, where you configure your Coveo indexer.
The following example sets a retry configuration with:
-
at most
5attempts -
a
30-second timeout -
an initial delay of
500ms before the first retry -
an interval of
1second before the second retry -
a maximum interval of
10min -
a multiplier of
2between retries
// ...
INSERT_UPDATE SnRetryConfiguration; id[unique = true]         ; maxAttempts; timeout; initialDelay; interval; maxInterval; multiplier
                                  ; coveo-retry-configuration ; 5          ; 30000  ; 500         ; 1000    ; 600000     ; 2

INSERT_UPDATE SnIndexerConfiguration; &indexerConfig            ; id[unique = true]         ; name                                    ; concurrency; batchSize ; retryConfiguration(id)
                                    ; coveoIndexerConfiguration ; coveoIndexerConfiguration ; Coveo Electronics Indexer Configuration ; 5          ; 10        ; coveo-retry-configuration
// ...