Manual and programmatic import
Manual and programmatic import
In this article, we’ll show you how to import your data manually in our app and programmatically through Google Cloud Storage.
Creating a new import
To import your data into the Qubit platform, you must first set up the import by defining a unique name, a schema, and the access method.
If you’ve already done this and you’re looking to ingest data into an existing import, you can jump to Ingesting into an existing import.
Step 1
Select Data tools and then Import from the side menu
Select New import and enter a name for the new import. This must be unique and without special characters
|
|
Note
If you’re also using Derived Datasets, when you select New import you’ll need to select Ingested data. |
Step 2
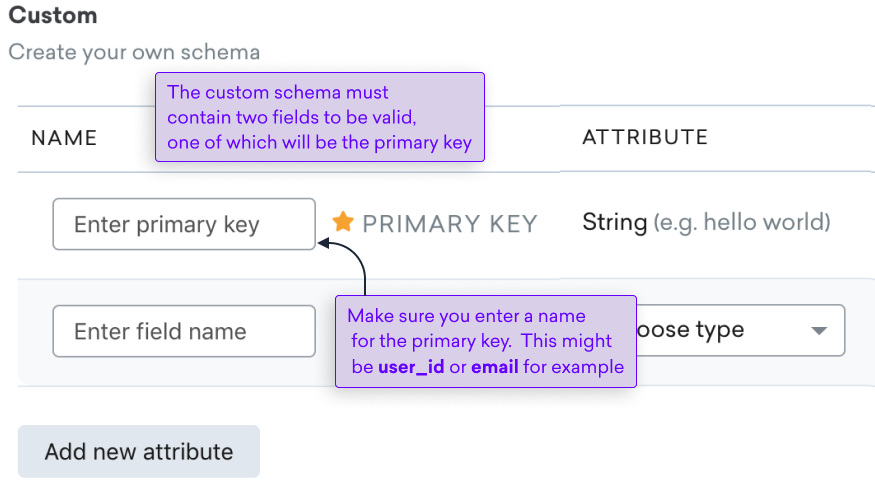
Select one of the pre-built schema templates, which represent the most popular schemas, or create a custom one
In the following example, the user has selected to create a custom schema:
|
|
It’s not possible to remove fields from pre-built schemas, only append new ones. |
Step 3
To align the schema with the import, you can add additional fields.
To do this, select Add new attribute, enter a name for the attribute, and select a type: String, Integer, Float, Timestamp, Boolean
|
|
Note
If you define a field as a timestamp, we will try to resolve the value against one of the following formats: |
Step 4
If you want the field to be available for lookup, select the toggle, and then select Enable lookup to confirm
|
|
Pay particular attention to the disclaimer, which outlines the consequences of making a field available for lookup. |
See A focus on lookup availability for more information.
Step 5
Select Save to finish. At this point, you are ready to ingest data into the import
|
|
Once you have saved the import, you cannot make any changes to the import name or schema. If you have selected the wrong schema by mistake, we recommend you delete the import and start again. |
A focus on lookup availability
You can specify which fields you want to make available for lookup. Only fields available for lookup can be used when building experiences.
Fields will only be available for lookup if the primary key is also available.
|
|
Note
Segment resolutions are done server-side so you can use any fields when building segments, irrespective of whether they are made available for lookup or not. |
|
|
If a field is marked as available for lookup, the data it contains can be retrieved over the public Internet without any authentication. Fields which contain personal data should therefore not be marked as available for lookup. |
|
|
You should not mark a field as available for lookup if you are unclear what this means, or if you are not authorized to do so. Contact Coveo Support for more information. |
Ingesting into an existing import
Once you’ve created an import, the next step is to ingest data into it.
Manual CSV upload
This option can be used for a one-time manual upload of data through a .CSV file and is recommended for clients that wish to import data that will not change over time.
When choosing this option, please be aware of the following conditions:
-
The ingested file must be a .CSV file
-
The file headers should correspond to the schema defined in the import
-
The file size must be less than 10GB
Step 1
Select Data tools and then Import from the side menu
|
|
|

Select the import you want to ingest data into from your list of imports and then select Import data.
The Import new data window displays
|
|
Note
If you’re also using Derived Datasets, your previous imports are shown in the Ingested data tab. |
Step 2
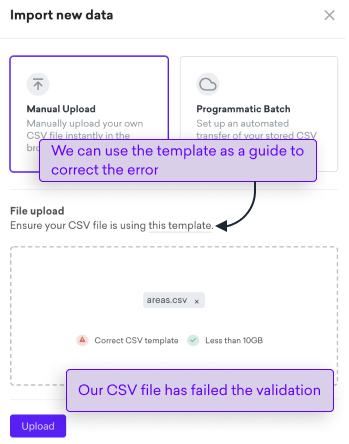
Select Manual upload and either drag and drop your CSV file into the space provided or select inside the same space and select the .CSV file from a local or server directory
Observe any validation errors and correct if necessary. One of the most common errors occurs when your CSV file doesn’t match the import schema. To help with this, you can download a template as a guide:
Step 3
Select Upload
|
|
Any data you upload into an import will overwrite any previously uploaded data. Data in an upload is not joined to a previous upload. |
Programmatic batch upload
This method allows you to set up automated file uploads through Google Cloud Storage (GCS) and is recommended for clients that wish to import data that is likely to change over time.
Before uploading to GCS, you’ll need an authentication key. You can either use an existing key or generate a new one. See Authentication Keys if you are not sure how to do this.
|
|
Note
The file to be transferred must be a .CSV file. |
|
|
Note
Before getting started, you’ll need to download and install gsutil. See here for details. |
Step 1
If your import is not already open, select it from your list and then select Import data.
The Import new data window displays
Select Programmatic Batch
Step 2
Open your key file, locate the key client_email, and copy the key value, for example:
client-36902-22422219017643717@qubit-client-36902.iam.gserviceaccount.comStep 3
Open a terminal window and enter:
gcloud auth activate-service-account [email] --key-file [file]- Where
-
-
[email]is the key value from step 2 -
[file]is the path to the directory containing the key file
-
Step 4
You can now upload the file to the GCS bucket location shown in the Import new data window using the following command:
gsutil cp [your data] [path] [file]Where:
-
[your data]is the name of the CSV file you want to upload, for example, 20180323.csv -
[path]is the GCS bucket location shown in theImport new datawindow, as shown in the following example:
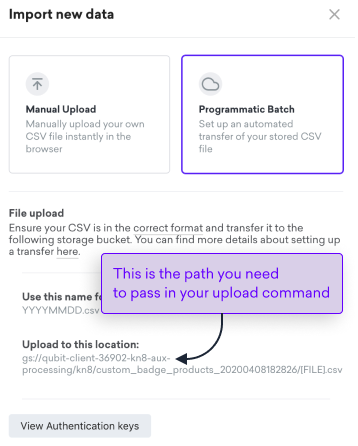
|
|
Do not use the location shown in the above example. You’ll find the correct location in the Import new data window. |
[FILE] is the file you want to create on GCS
In our example, the command would be:
gsutil cp 20180323.csv gs://qubit-client-36902-kn8-aux-processing/kn8/tone_test/my_first_upload.csvThe upload will now begin.
If you see an error returned that begins with AccessDeniedException: 403, you must enable the programmatic file transfer for the authentication key.
See Configuring An Existing Key For Programmatic File Transfer.
|
|
Note
To ensure that the file can be automatically retrieved by Qubit, you must adhere to the location hierarchy given in the transfer details. The CSV needs to be in the correct format before you can transfer it. |
|
|
Any data you upload into an import will overwrite any previously uploaded data. Data in an upload is not joined to a previous upload. |
Error reporting
As mentioned earlier, in your list of imports,  will display when an error was encountered the last time data was imported into the dataset.
You can get more details by opening the import and looking in the Details tab.
in Import activity, you will find details of each of the data imports. In the following example, we see that the last two imports failed:
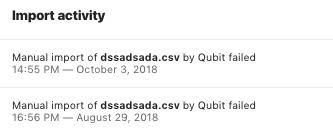
When you select one of the items in the activity log, you can find additional details relating to the failure:
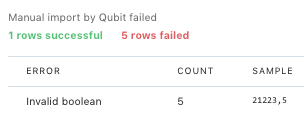
Typically, failure is caused either by the issues with imported CSV file, for example, the file headers do not correspond to the defined schema, or problems in one of Qubit’s internal services. If you see two consecutive failures, we recommend to contact Coveo Support.
Next steps
Using your data
How you use your imported data in the Qubit platform depends on your personalization goals.
One option is to create new or enhance existing segments, using your offline data to deliver one-to-many personalizations. This rules-based approach targets specific groups of visitors based on loosely-aligned preferences and behaviors. See Using Imported Data to Create Segments for more information.
A more powerful and flexible option is the Import API, which can deliver one-to-few and one-to-one personalizations that target smaller sub-sets of visitors, and even individual visitors based on individual behavioral patterns and interactions. This approach offers a greater connection between online and offline campaign messaging than can be achieved with segments.
One of the most powerful features of the API is that it provides an endpoint that can be directly called in an experience to target visitors. It supports complex data types and per field filtering.
Analyzing your data
All imported data is available instantly in Live Tap so you can get started right away with your analysis, dashboards, or ad-hoc queries.
The data is stored alongside all the collected behavioral event data, so can be joined in a query to further understand your customers, for example, including CRM data when analyzing transactions.
Frequently asked questions
What is a valid dataset?
To be valid, a dataset must meet each of the following conditions:
-
The fields in the dataset conform to the schema defined in your chosen templates. For example, if you’re using the Loyalty template, userid_ must be a string, whereas balance must be an integer
-
The number of columns in the uploaded dataset conforms to the number of columns defined for the dataset. Each defined field translates into a column
-
The names and types of the fields for custom schemas conform to the names defined in the header files. To avoid this, you can download a template file with the headers defined. See Getting Your Data Into Qubit’s Data Store Using Datasets
-
There are no empty values in the dataset. NULL is allowed
Let’s take a look at a dataset based on the loyalty schema as an example.
The following table shows a valid dataset:
| User ID | Tier | Balance | Expiry |
|---|---|---|---|
202 |
Gold |
10000 |
2017-03-25 00:00:00 UTC |
203 |
Silver |
2000 |
2017-04-31 00:00:00 UTC |
204 |
Platinum |
20000 |
2017-05-31 00:00:00 UTC |
The following table shows an invalid dataset:
| User ID | Tier | Balance | Expiry |
|---|---|---|---|
202 |
Gold |
10000A@ |
2017-03-25 00:00:00 UTC |
203 |
Silver |
2000 |
2017-04-31 00:00:00 UTC |
204 |
Platinum |
20000 |
There are 2 issues in the invalid dataset example.
Firstly, 10000A@ is not an integer.
Secondly, the third record has an empty expiry field.
The following table also shows an invalid dataset, as it does not conform to the column requirements outlined above:
| User ID | Tier | Balance | Expiry | ABC |
|---|---|---|---|---|
202 |
Gold |
10000 |
2017-03-25 00:00:00 UTC |
Value1 |
203 |
Silver |
2000 |
2017-04-31 00:00:00 UTC |
Value2 |
204 |
Platinum |
20000 |
2017-05-31 00:00:00 UTC |
Value3 |
What happens if I mistakenly import a file that has invalid records?
The file will not be imported.
Is the Datasets API writable from the client?
The API is readonly for public fields when calling the API without authentication. If you wish to write small blobs of data against a user ID, we still recommend using the Stash API.
How can I upload data into Datasets API?
Data can be ingested to this API in Qubit’s Datasets.
Why don’t all the fields I’ve uploaded appear in the Datasets API.
Only fields marked as Available for lookup in a dataset schema are made available via the Datasets API through an unauthenticated request. You can read more about this in A focus on Lookup availability.
What are the implications of marking a field as Available for lookup?
If a field is marked as available for lookup, the data it contains can be retrieved over the public Internet without any authentication. Fields which contain personal data should therefore not be marked as available for lookup.
However, it’s worth noting that only fields made available for lookup can be used to build experiences. This does not apply to using fields to build segments since resolutions are done server-side.
What happens if I upload data into an existing import?
Any data you upload into an import will overwrite any previously uploaded data. Data in an upload is not joined to a previous upload.
Where can I find the correct GCS bucket location for my property?
The easiest way to find this out is to open an existing import, then select Import data, and then Programmatic Batch.
The Import new data window reports the upload location, for example, gs://qubit-client-36902-kn8-aux-processing/kn8/dssadsada/[FILE].csv
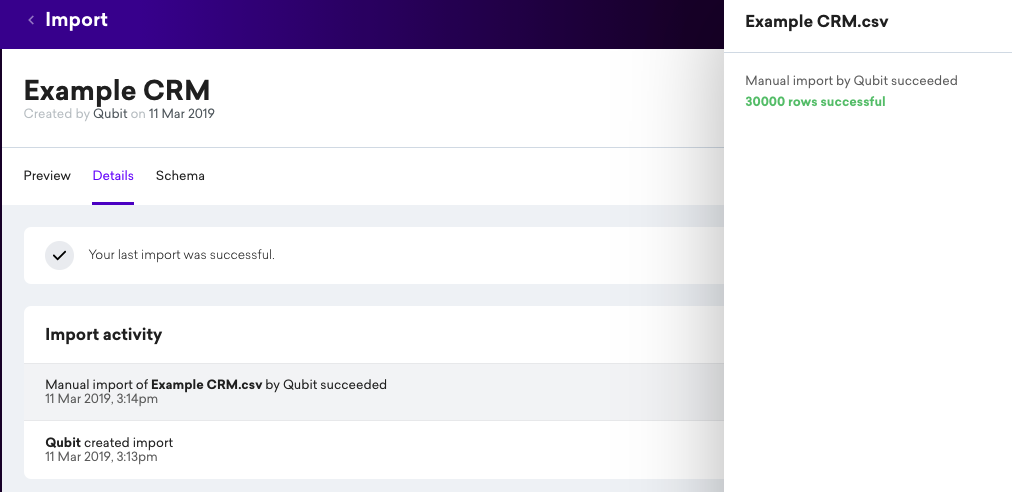
How can I see the number of rows imported into my dataset?
Once you’ve successfully ingested data, you can find the number of rows imported into your dataset.
To do this, open your dataset from the Imports page, head to the Details tab and then select the desired import from the Import activity card.
In this example, we see 30000 rows were imported: