Configure recommendations
Configure recommendations
In this article, we’ll show you how to configure a Recommendations experience.
Using the Settings tab
Once you’ve created your experience, you can use the Settings tab to configure your experience.
Goals
Goals enable you to define the criteria that you will use to evaluate whether an experience’s variations have been successful compared to your control. Which goals you choose will depend on the reason for running the experience.
For example, you might want to check that a visitor is creating a basket. You could do this by adding the relevant QP event as a goal:

You could take this 1 step further and check whether a visitor adds a product from the category shoes to their basket:

All experience goals consist of a primary goal and secondary goals.
The default primary goal is Conversion Rate, which you can change, if necessary.
An experience is considered complete when the primary goal has reached statistical significance. This simply means that we have collected enough data to be certain that the observed change in, for example, Conversion Rate, is due to the experience being shown to visitors and not some unknown factor.
|
|
Note
Secondary goals are measured but do not define whether the experience is successful or not. |
See Goals and success for more information and Testing and Evaluating Experiences for a more in-depth look at A/B testing and Qubit’s stats engine.
Adding goals
Step 1
Select Edit in Goals.
Then select a goal from the Add new goal combo box
Step 2
Select Save to finish
|
|
Note
Depending on the goal you select, you will be required to enter additional information. For example, if you select the goal Page URL, you will have to select either contains or matches regex and then enter the page URL you wish to track for the goal. |
Changing the primary goal
Select  against the goal you wish to make the primary goal.
 will display against the primary goal.
|
|
You cannot change the primary once you have published an experience, even if you subsequently pause it. If you want to change the primary goal for an experience that is or has been live, we recommend duplicating it and then setting the desired primary goal. |
Emitting custom goals using the QP API
You can use the emitCustomGoal function to add custom goals to an experience.
A custom goal might be linked to the firing of a particular QP event or an interaction with a button or similar UI element.
This function is typically added to triggers.js, where your want the goal to apply to both the control and any variations in an experience, but could equally be added to variation.js if you want the goal to be emitted when the visitor interacts with something you built specifically for the experience variation, for example, a button or similar UI element. See Emitting Custom Goals for more details.
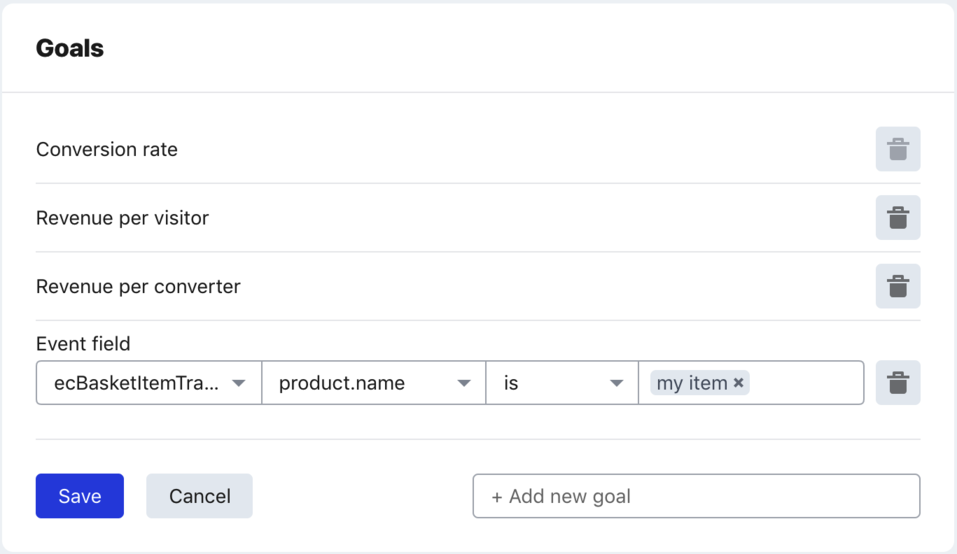
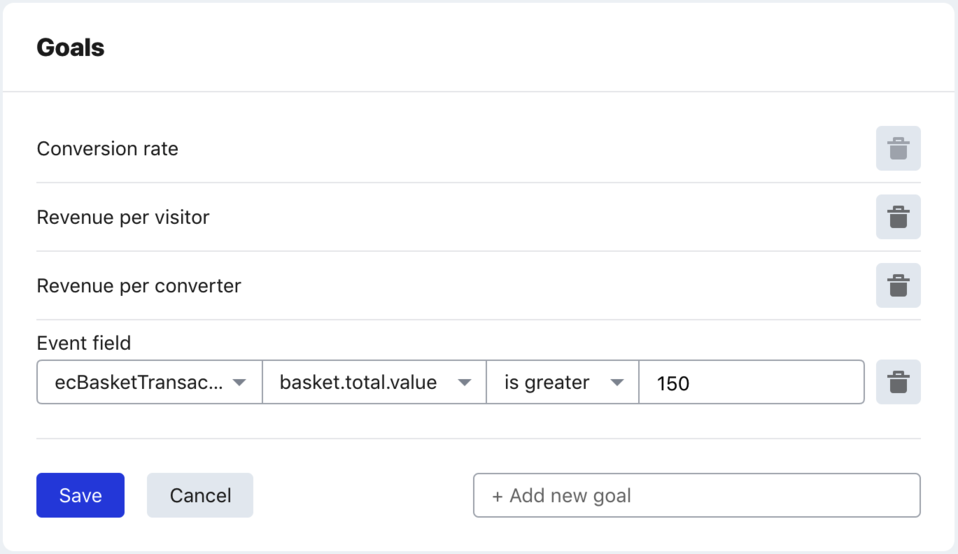
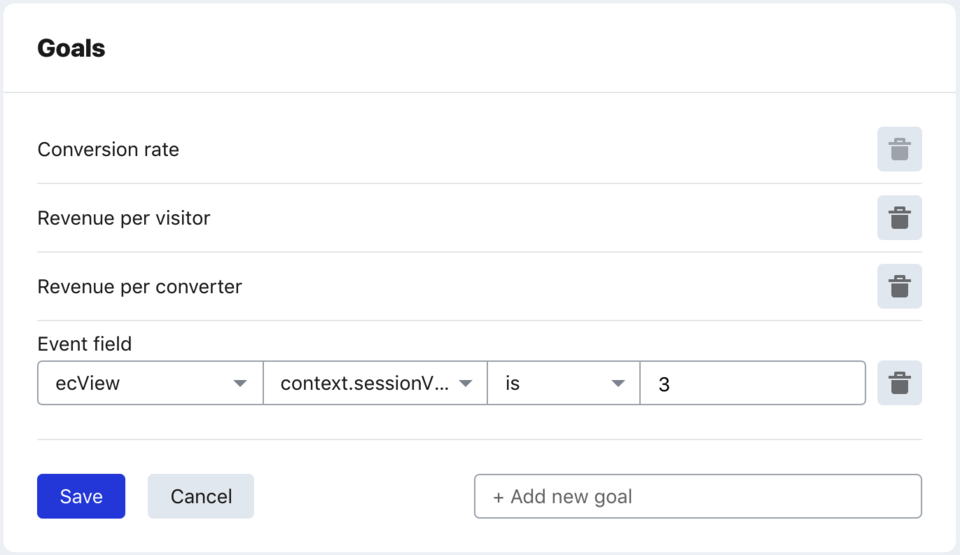
Example QP goals
What can you achieve with QP goals? Well, let’s look at some examples:
-
You can send a goal based on a user purchasing a certain product after seeing an experience:
-
You can set a goal based on a user having a certain amount in their basket after seeing an experience:
-
Or, you could set a goal for a certain defined depth of user journey, such as a second pageview in the session:
Integrations
Integrations are developed using Node.js functions inside the Qubit platform and then deployed into Qubit managed infrastructure. Once deployed, they can be invoked from experiences and experience templates.
Select Edit in Integrations and then select an integration from the Add new integration combo box
See Qubit Integrations for more information and Building Integrations if you want to jump straight in and starting building an integration.
Segments
By selecting segments you can determine which groups of visitors will be exposed to the experience.
When targeting segments with an experience, you can combine segments using AND, OR, and OR/AND conditions to target more specific and business relevant groups of visitors.
|
|
The percentage of visitors in an included segment that actually see the experience will depend on the traffic allocation split. |
A focus on location-based segmentation
It is important to recognize that the accuracy of location-based segmentation is dependent on IP geolocation, a method that employs an approach called whois to obtain an Internet Protocol address (IP)–a unique identifier–to resolve a device’s or network location against a maintained database of physical locations.
At its most precise, this method can map an IP address to a house. At its least precise, the same method may only map an address to a country and at both ends of the spectrum, accuracy is entirely dependent on efforts to ensure the databases storing location details are up-to-date.
The issue of accuracy is clouded somewhat when targeting mobile visitors, on devices that rely on mobile connections for internet connectivity. This is because the device’s IP will typically be resolved to the location of the carrier’s mobile switching center rather than the location of the device itself.
Including and excluding a segment
Step 1
Select Edit in Segments and either the Include OR Exclude tab
Step 2
Select one or more segments from the Select one or more multiple segments… combo box and select Save to finish
Combining segments with AND
-
Target visitors in a segment AND in another segment
-
Target visitors not in a segment AND not in another segment
Step 1
Select a segment from the Include people who are part of at least one of the following segments combo box and then select Add another group of segments
Step 2
Select a segment from the as well as at least one of these combo box and then Save to finish
In the following example, the user has chosen to serve an experience to visitors in the VIP segment AND in the Not purchased in the last 2 weeks segment:

In this scenario, only the visitors that belong to both segments would be served any linked experiences.
Combining segments with OR
-
Target visitors in a segment OR in another segment
-
Target visitors not in a segment OR not in another segment
Step 1
Select 1 or more segments from the Include people who are part of at least one of the following segments combo box
In the following example, the user has chosen to serve an experience to visitors in the English Speakers OR French Speakers segments:

In this scenario, visitors that belong to either segment would be served any linked experiences.
Combining segments with OR and AND
-
Target visitors in a segment OR in another segment AND in another segment
-
Target visitors not in a segment OR not in another segment AND not in another segment
Step 1
Select 1 or more segments from the Include people who are part of at least one of the following segments combo box and then select Add another group of segments
Step 2
Select a segment from the as well as at least one of these combo box and then Save to finish
In the following example, the user has chosen to serve an experience to visitors in the English Speakers OR in the French Speakers segments AND in the VIP segment:

In this scenario, only visitors that belong to either the French Speakers OR the English speakers segment AND the VIP segment would be served any linked experiences.
Traffic allocation
These settings allow you to define the percentage of visitors that will see the experience control vs the experience variation(s).
Those visitors that do not see any of the experience variations will see the same page or pages but without the experience. This is referred to as the control.
|
|
We prevent changes to traffic splits that flip users from a variation into the control once the experience has been published. See Traffic Allocation Modes for more information. |
Setting the traffic allocation mode
We offer 4 standard traffic allocation modes: Pilot, Split, Supervised, All traffic, and the possibility to set your own custom traffic allocations.
Step 1
Select Edit in Traffic Allocation and then either select one of the standard modes or select the Custom split toggle and assign your own allocations to the control and variation(s)
|
|
Note
The percentage of visitors that will see a variation will change according to the number of experience variations you create. For example, if you select the option Pilot, with a single variation and control, the percentage will be 20% variation and 80% control. With 2 variations, the split will be 10% variation 1, 10% variation 2, and 80% control. |
|
|
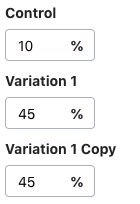
In a custom allocation, the percentage total must be equal to 100. Each variation must be allocated a percentage value between 1 and 99. |
In the following example, the user has chosen to use a custom traffic allocation:
Step 2
Select Save to finish
Frequently Asked Questions
I’ve paused an experience and I would like to change the traffic allocation to bucket more users into the control. When I try to do this, I cannot change the allocation in the control. Why is that?
As previously mentioned, changes to splits that result in users flipping from the variation into the control aren’t allowed, primarily to maintain statistical robustness. Instead, we recommend duplicating the experience and re-running it with the desired split.
Further reading
For readers looking for more information about standard modes and the answers to more FAQs, head over to our Traffic Allocation Modes article.
Triggers
These settings allow you to define where and when the experience will fire. Triggers only become relevant if the visitor has met the rules for any segments included or excluded in the experience.
Triggers are checked every pageview. If no triggers are set, the experience will fire on every pageview.
When selecting triggers, you can filter the list by entering a search term in the Add new condition combo box.
Adding a trigger
Step 1
Select Edit in Triggers and then select a trigger from the Add new condition combo box
Adding advanced triggers
For those with JavaScript experience, triggers can also be written in JavaScript using an in-browser editor. See triggers.js for more information.
Step 1
Select Edit in Triggers and then  next to Custom JavaScript
Step 2
In triggers.js, add your triggers as necessary and select Save to finish
There are two ways of implementing this function, the callback based method or the promise based method.
Both methods allow you to provide a boolean value to determine whether the experience should fire.
However, the promise method has the additional advantage that any asynchronous errors that cause the promise chain to be rejected will be captured and reported in the UI.
Callback based syntax:
module.exports = function triggers (options, cb) {
  cb(true)
}
Promise based syntax:
const Promise = require('sync-p/extra')

// The following are equivalent:

module.exports = function triggers (options) {
  return Promise.resolve()
}

module.exports = function triggers (options) {
  return Promise.resolve(true)
}

module.exports = function triggers (options) {
  return Promise.resolve({ execute: true })
}
Snippets
In this section we will look at a few examples that you can use to get started.
Poll for elements snippet
This can be used to poll for certain elements to ensure they are on the page before the variation JS is ran. It can poll for an array of elements or an outcome of functions within the array:
module.exports = function triggers (options) {
  return require('@qubit/poller')([/* array of elements and / or functions */], cb)
}
Example:
module.exports = function triggers (options, cb) {
  return require('@qubit/poller')([
    '.product_image',
    '.product_title',
    function () {
      var active = a === 0
      return active
    }
  ])
}
Get pageview count snippet
Within experiences, we expose the options object. Within this there are the getVisitorState and getBrowserState functions. The following can be used to return the pageview number in the user’s current session.
Example:
options.getVisitorState().then(function (data) {
  console.log(data.viewNumber)
})
Get session count snippet
This can be used to return the total session count for a visitor.
Example:
options.getVisitorState().then(function (data) {
  console.log(data.sessionNumber)
})
Setting custom statistical thresholds
|
|
We strongly advise against changing the winning threshold percentage or effect size percentage whilst an experience is running. |
|
|
By default, Qubit will declare an experience a winner if there’s a 95% probability (credible interval) of a 5% uplift (effect size), 80% of the time (power). |
|
|
You can’t edit custom statistical thresholds once you’ve published an experience, even if you subsequently pause it. If you want to change the thresholds for an experience that is or has been live, we recommend duplicating it and then setting the desired custom thresholds. |
|
|
Note
With the release of Statistical Power, setting an effect size is no longer necessary. It’s no longer used to determine if we’ve reached the required sample size based on the observed number of visitors. |
Step 1
Make changes to the winning threshold and outlier removal as required, referring to the following explanations:
-
Winning threshold: The default winning threshold for all Qubit Experiences is 95%. This is the standard in web analytics.
Lowering the threshold will reduce the required sample size and, therefore, the time it takes for the experience to complete and get a result. Therefore, this is often seen as an acceptable method of getting results more quickly.
As an example, with the default threshold, approximately 6000 converters are required to get a statistically significant result. The required number of converters reduces linearly with each percentage reduction:
-
90% - approx 5000 converters
-
85% - approx 4000 converters
-
80% - approx 3000 converters
However, we don’t recommend changing the default winning threshold percentage, mainly because it increases the probability of getting a false positive result. Stated simply, the less converters you test against, the less robust your test results.
-
-
Outlier removal: You can ignore the data generated by outliers by selecting the Outlier removal toggle
This will remove the top 0.1% of spenders from the sample size to prevent the data from outliers interfering with the statistical analysis of an experience.
Step 2
Select Save to confirm your changes
In an effort to increase test velocity we’re considering changing the winning threshold to 90%. Is this a good idea?
Changing the threshold to 90% is a good option, if you’re interested in reaching sample size faster. The trade-off is that by moving faster, you increase the potential for false-positive test results.
Making this change would mean that potentially 1 out of 10 winners could be a statistical fluctuation, compared to 1 out of 20 with the 95% threshold. This means that you would be 90% sure, instead of 95%, when the dashboard reports a winner.
Enabling Google Analytics integration
By enabling our Google Analytics integration, you can send experience interaction data directly to your GA dashboard for tracking and analysis.
To turn on GA integration, select the Google Analytics integration toggle
|
|
Note
You can enable the GA integration before or after publishing an experience. There’s no need to republish or create a new experience iteration if you do it afterward. However, you should be aware that events emitted before enabling the integration won’t be sent to GA. |
|
|
Note
When a visitor is served an experience, Qubit will send a single custom event to GA and, for tags implemented via Google Tag Manager, a single GTM event. These events are only sent once per session when the visitor is served the experience. |
|
|
These events are only sent for published experiences. |
Before you can use the data in Google Analytics, you must set it up to receive the data sent by Qubit and process it into a standard format. How you do this depends on how you’ve implemented the GA tag on your site.
Setting up GA
Hard-coded Google Analytics tag
If the tag has been hard coded, you only need to set up a segment in GA and pass the experience Event action Id and Event Label Id as advanced conditions.
See Creating Segments in Google Analytics for more information.
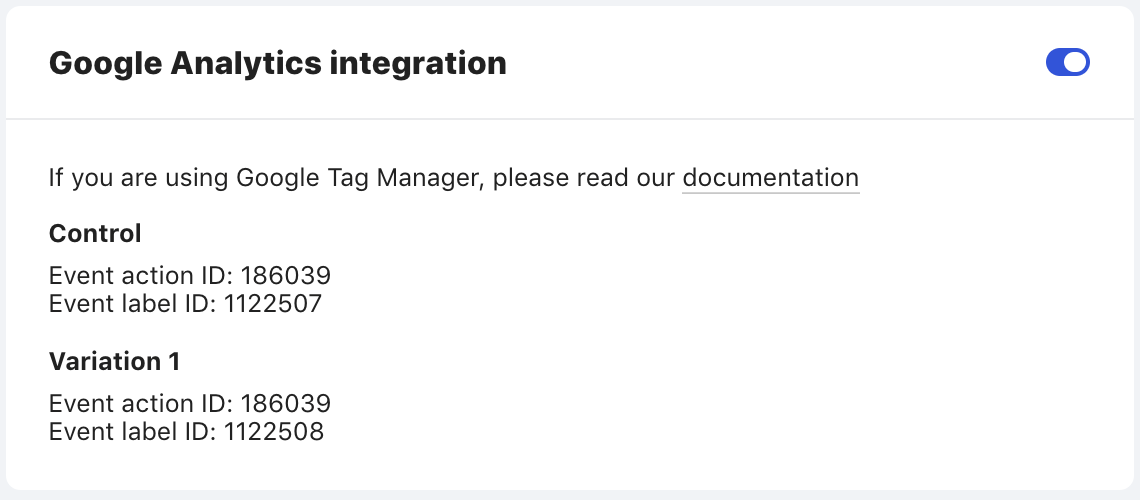
So that you can correctly identify the experience when creating the segment in GA, the card includes the Event action Id and Event label Id for the experience control and any experience variations:
|
|
Note
To help you easily identify the experience control and variation in third-party integrations such as GA, we provide a method, via your prescript, to send a custom label rather than an Id. See our example for details. |
Tag implemented via Google Tag Manager (GTM)
If the tag has been implemented via GTM, you’ll need to set up the trigger, variable, and tag in GTM.
See Setting up GTM to send data to Google Analytics for more information.
Scheduling
Why schedule?
Scheduling is a good option if you would like to time an experience to automatically start and end in line with weekend messages, late night cut-offs, Black Friday messaging, campaigns, or promotions.
|
|
Leading-practice
We give you the flexibility to start an experience ahead of its scheduled start and end an experience ahead of its scheduled end. See Modifying a schedule for details. |
Before adding a schedule to an experience, please review the following points:
Timezone
-
The timezone used for scheduling is taken from the current timezone for the device used to set the schedule. As an example, if a user in London sets a schedule to end at 13:00 GMT, for visitors in Rome, which is in the time zone GMT + 1, the experience will end at 14:00
Start date/time
-
All schedules must have a start date/time–by default this is the current date/time +1 hr
-
There needs to be a minimum of 15 mins between the current time and the scheduled start time
End date/time
-
By default, the end date/time is the current date/start time +1hr
-
There needs to be a minimum of 15 mins between the scheduled start time and the end time
-
If you clear the end date/time, the experience will run continuously until you pause it
-
When the end date/time is reached, the experience will be paused and visible in the Paused view
Add a schedule
Step 1
Open your experience and switch to the Settings tab. Select Edit in the Details card
Step 2
Select a start date using the date picker and use the up, down, right, and left arrow keys on your keyboard to set the start time
Step 3
Select an end date using the date picker and use the up, down, right, and left arrow keys on your keyboard to set the end time
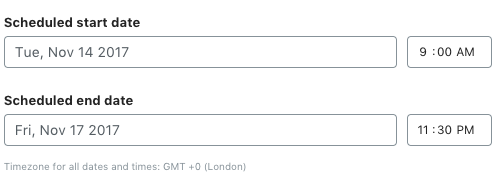
In the following example, the user has scheduled the experience to start at 9 AM on Tuesday 14 November 2017 and end on Friday 17 November at 11:30 PM:
Step 4
Select Save to confirm
The experience will now display in the Scheduled view in Experiences.
To give you a heads-up prior to going live, we’ll notify you 30 minutes before the scheduled start date/time. You can see this notification in the Settings view:

|
|
Note
We’ll also notify you 30 minutes before the scheduled end date/time. |
When the scheduled start date/time is reached, the experience will be automatically published and shown also in the Live view.
Modify a schedule
Before your experience is scheduled to start
If your experience is scheduled to go live and you want to start it earlier, open the experience, select Publish experience and then Start schedule now
|
|
Note
Bringing the schedule forward, ahead of its planned start date/time, does not affect the scheduled end date. |
Before your experience is scheduled to end
If your experience is scheduled to end and you want to end it earlier, open the experience, select Pause experience and then End schedule now
Remove a schedule
You can remove a schedule at any time, even if your experience is live.
Step 1
Open your experience, switch to the Settings tab and select Edit in the Details card
Step 2
Clear the scheduled start date and / or end date and select Save and then Save again to confirm
|
|
Notes
|
Final steps
With the basic setup and configuration done, the final step will be to publish the experience. You can do this by selecting Publish experience. Before doing this, we recommend that you preview it on site to ensure that it fires correctly according to the designed triggers, displays correctly, and crucially that it functions according to your expectations. See Going Live With Your Experience.
When you publish an experience it will be pushed live onto your site or mobile platform. Visitors will be served the experience, of course depending on the conditions established for the experience, including triggers, segmentation, and traffic allocation.
Once an experience is live it will start to generate data, which you will use to interpret the success of the experience against its defined goals. See for details.