Personalized content - tutorial
Personalized content - tutorial
Set up your triggers
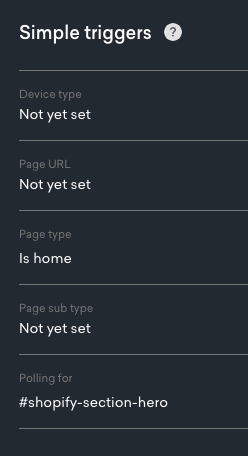
Start by finding a way to target exactly the element that you want to replace.
Here you can use its Id #shopify-section-hero.

Make sure you add that element to the 'polling for' section on the triggers page. You should also add the 'page type' trigger to avoid overriding elements by accident and making requests when not necessary. If you have any questions about triggers, there’s a section on them here.
Don’t forget to add a page type trigger for the page your Placement will be running on, home in this case.

Define your schema
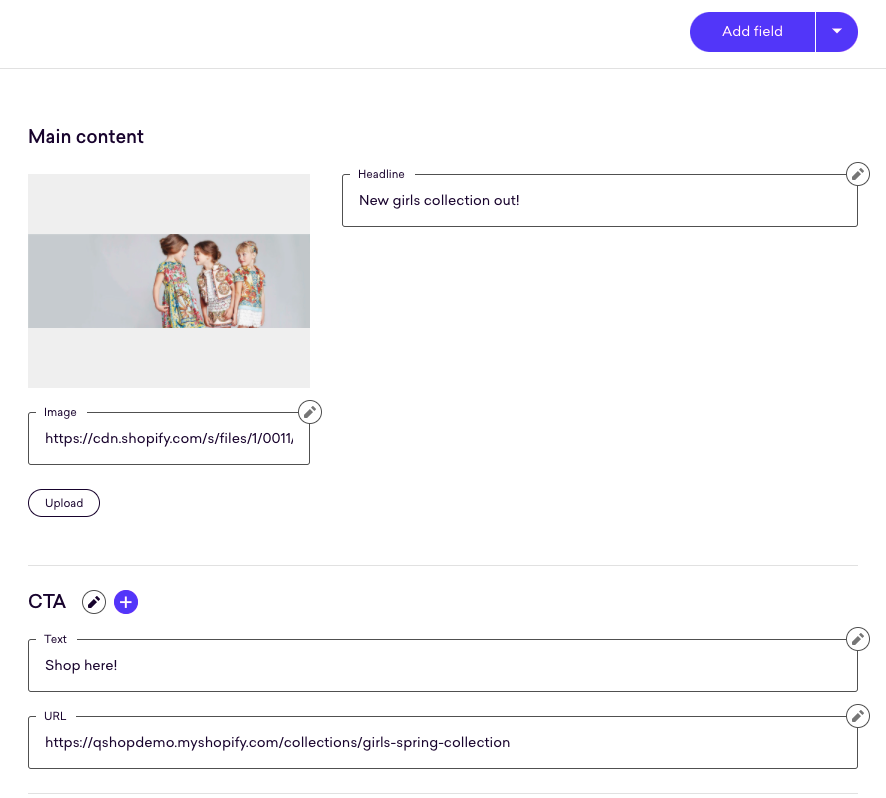
Personalized content Placements don’t have any pre-defined schema, so you’ll need to set up your own. For this tutorial, you’ll need an image for the background, a headline, some text for the CTA and a URL of the CTA to navigate the user to.
This is what the schema looks like with some sample data added to it already:

This gives us a sample payload like the one below, which you’ll use as a guide to develop our Placement. When your merchandiser creates a campaign, its content will have the same format, but probably different values:
{
  "image": "https://cdn.shopify.com/s/files/1/0011/6342/7898/collections/girls_clothes_image-1_1512x.jpg?v=1520948813",
  "headline": "New girls collection out!",
  "cta": {
    "text": "Shop here!",
    "url": "https://qshopdemo.myshopify.com/collections/girls-spring-collection"
  }
}
To learn more about schemas and how to create them, have a look here.
|
|
Note
If you’re using Qubit CLI to develop locally, you’ll need to save the Placement in the UI and pull its new structure to your local project at this point. |
Write some code!
This is what your placement.js file will look like at first:
module.exports = function renderPlacement ({ content, onImpression, onClickthrough }) {
  if (content) {

  } else {

  }
}
To start with, you have to import preact and @qubit/utils, a library that offers some helpful tools for manipulating the DOM.
Next, you should use onRemove and elements (two other arguments available for us in the renderPlacement function) which you can read more about in placement.js arguments.
const React = require('preact')
const {
  style,
  insertBefore,
  onEvent,
  onEnterViewport,
  restoreAll
} = require('@qubit/utils/dom')()

module.exports = function renderPlacement ({
  content,
  onImpression,
  onClickthrough,
  onRemove,
  elements
}) {
  // ...
}
As you can see in the boilerplate code, you’ll divide our code into two parts, content and no-content. However, there are a couple of things you need to do before getting into that split to avoid creating bias in our test:
// The functions provided by @qubit/utils are all linked to the `restoreAll` function,
// which means that when you remove the Placement on the page with `onRemove` (particularly useful for single-page applications),
// it will clean it up after itself and avoid leaking side effects.
onRemove(restoreAll)

// Appending this element to the same spot on the DOM for both control and variant will ensure the test is fair.
// Check out the Impressions and clickthroughs guide in the docs to learn more about this.
const element = document.createElement('div')
insertBefore(target, element)

// Emitting onImpression before branching into control/variant prevents bad splits
onEnterViewport(element, onImpression)
Apart from that, you’ll want to have access to the element you polled for in the beginning, the banner with Id #shopify-section-hero.
You can do so by destructuring the array of elements provided to us.
|
|
Note
If you had polled for more elements or global objects, they would also appear in this array in the order they’re being polled for. |
const [target] = elementsSo far, our placement.js code looks like this:
const React = require('preact')
const {
  style,
  insertBefore,
  onEvent,
  onEnterViewport,
  restoreAll
} = require('@qubit/utils/dom')()

module.exports = function renderPlacement ({
  content,
  onImpression,
  onClickthrough,
  onRemove,
  elements
}) {
  onRemove(restoreAll)

  const [target] = elements

  const element = document.createElement('div')
  insertBefore(target, element)

  onEnterViewport(element, onImpression)

  if (content) {

  } else {

  }
}
Content
Now that you have set up your Placement code and ensured that you’re collecting consistent impression events, you can have a look at actually rendering our new element on the page
// Here you're using destructuring to get our content from the `content` object
const { image, headline, cta } = content

// Note that you will use these classNames to style our banner in placement.css
// For dynamic styles that depend on content, you can use the `style` prop, like you are doing for this background image
React.render(
  <div className='Hero' style={{ backgroundImage: `url(${image})` }}>
    <h2 className='Hero-title'>{headline}</h2>
    {/* Don't forget to give any clickable element the `onClickthrough` callback */}
    <a href={cta.url} className='Hero-button' onClick={onClickthrough}>
      {cta.text}
    </a>
  </div>,
  element
)

// After rendering our banner, you want to hide the banner that was already on the page.
style(target, { display: 'none' })
Now, all you need to do is give it some styles in placement.css. Don’t worry about importing it, it’s all bundled together when you’re serving the Placement.
.Hero {
  height: 300px;
  display: flex;
  flex-direction: column;
  justify-content: center;
  align-items: center;
  padding: 20px;
  background-size: cover;
}

.Hero-title {
  font-weight: bolder;
  font-size: 3em;
  padding: 20px;
}

.Hero-button {
  background: #fafafa;
  border-radius: 8px;
  padding: 12px;
  border: 1px solid rgba(0, 0, 0, 0.2);
  &:hover {
    background: #ddd;
  }
}
The only thing left to do here is to make sure you are capturing clickthrough events for users that don’t see our personalized content.
No content (control)
  // Find all clickable elements in the banner that is already on the page (in this case, only an anchor tag)
  // and make sure you are calling `onClickthrough` whenever it is clicked.
  onEvent(target.querySelector('a'), 'click', onClickthrough)
And that’s it! So this is what the whole placement.js will look like:
const React = require('preact')
const {
  style,
  insertBefore,
  onEvent,
  onEnterViewport,
  restoreAll
} = require('@qubit/utils/dom')()

module.exports = function renderPlacement ({
  content,
  onImpression,
  onClickthrough,
  onRemove,
  elements
}) {
  onRemove(restoreAll)

  const element = document.createElement('div')
  insertBefore(target, element)

  onEnterViewport(element, onImpression)

  const [target] = elements

  if (content) {
    const { image, headline, cta } = content

    React.render(
      <div className='Hero' style={{ backgroundImage: `url(${image})` }}>
        <h2 className='Hero-title'>{headline}</h2>
        <a href={cta.url} className='Hero-button' onClick={onClickthrough}>
          {cta.text}
        </a>
      </div>,
      element
    )
  } else {
    onEvent(target.querySelector('a'), 'click', onClickthrough)
  }
}
And this is what our Placement looks like now, using the sample payload you defined in the beginning:

After you’re done, you can publish your Placement and your merchandiser will be able to target it with some campaigns!
