Build a visitor pulse experience
Build a visitor pulse experience
In this article, we will cover the essential steps that you need to follow to build a Visitor pulse experience for your site.
We will be building a single choice survey as an example.
Getting started
Step 1
Select Experiences from the side menu, select New experience, Visitor pulse, and then Choose
Step 2
Enter a name for the experience and a description, if required, and then select Create
Configuring the survey
Step 1
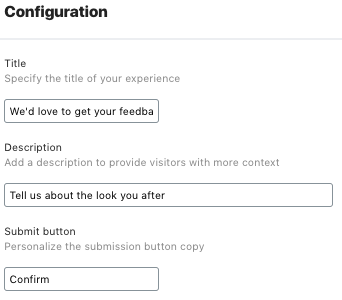
In the Configuration card, make the following changes:
-
In Title, enter We’d love to get your feedback!
-
In Description, enter Tell us about the look you are after
-
in Submit button, change the button text to Confirm

Step 2
-
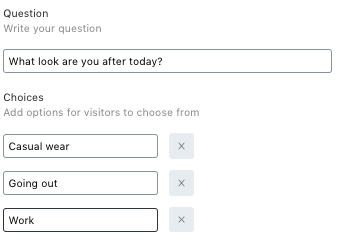
in Choose a question type, select Single choice and select Add. See below for details of the different question types you can choose from
-
For your single choice question, enter What look are you after today? as the question text
-
Enter Casual Wear and Going Out as the first and second choices
-
Add a third choice by selecting Add and then enter Work

-
in Closing text, enter Thanks for your feedback
A focus on question types
To build your survey, you can use four question types. You can create combinations of question types as required:
-
Multiple choice: Users select one or more responses from the list that you define.
-
Single choice: Visitors select only one response from the list that you define.
-
Score: Visitors select a score on a scale of your choice as their response. For example from 1 to 5 where 1 means very bad and 5 means very good.
-
Text area: Visitors enter free text as their response.
|
|
Note
The options available for configuring a question depend on the question type you select. See Details of Visitor Pulse Question Types. |
|
|
Leading-practice
You can drag and drop choices to quickly change the order of choices. You do this by hovering the mouse to the left of the choice and then dragging and dropping. |
Best practice
The more questions you add, the lower the resulting response rate. We recommend keeping the number of questions per survey at 5. Some of the most powerful surveys have only one question, for example a Net Promoter Score (NPS) question that can be further used for targeting experiences.
Previewing the experience
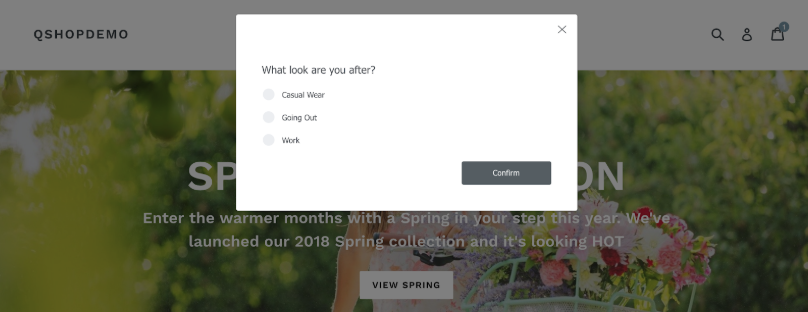
At this point it’s a good idea to preview the experience on the site.
To do this, select Save and Preview. The survey should look similar to the following example:

Customizing the experience
Now that we have a basic survey modal, we can turn our attention to customizing it to improve the design and functionality.
Currently, the experience is displayed on the page as an overlay. We will change this so that is in rendered in page.
Open your Visitor pulse experience, and select 
Now select  in the
 Technical implementation card
Step 1: Editing the variation.js file
Select the variation.js file from the side menu and replace any content in the editor with the following lines:
module.exports = function variation (options) {
  var createVisitorPulse = require('@qubit/visitor-pulse')
  const { $hero } = options.state.get('data')
  $hero.after('<div class="qb-vp-container" />')

  // See the docs for more information - 'https://docs.qubit.com/visitor-pulse-implementation.html'.
  var visitorPulse = createVisitorPulse({
    container: '.qb-vp-container', // The DOM element in which to render the component, or a unique CSS3 selector for that DOM element.
    experienceId: options.meta.experienceId,
    eventHandlers: { // Override event handlers.
      onClose: function () {
        // Set a cookie here to prevent the solution from being shown to people that have closed it, or that have already submitted.
      }
    },
    renderers: {}, // Override question type renderers.
    thankYou: { // Default options for the thank you page. Will be shown on submit unless you override the `onSubmit` handler.
      showFor: 3000,
      fadeOut: 500
    },
    solutionSettings: options.solution
  })

  // Render the solution. Note that you can pass in your own HTML string to this function to override the default template.
  // This will prevent any event listeners from being set if they don't match the default template class names. See 'Default template class names' in the docs.
  visitorPulse.render()
  options.onRemove(() => visitorPulse.destroy())
}
This updated variation code injects a container div after the banner and updates the container selector.
Step 2: Editing the triggers.js file
Select the triggers.js file from the side menu and replace any content in the editor with the following lines:
module.exports = function triggers (options, cb) {
  const $ = window.jQuery
  const elements = [
    '#shopify-section-hero'
  ]

  options.poll(elements).then([hero] => {
    options.state.set('data', { $hero: $(hero) })
    cb(true)
  })
}
This updated trigger code polls for the hero image to make sure it is on the page before we execute the variation.
Select Save,  , and Preview "[variation name]" to see the effect our changes have had on the experience:

Although the experience now displays in page, it is still some way off in terms of design. We will rectify that now by editing the variation.css file
Step 3: Editing the variation.css file
Select the variation.css file from the side menu and replace any content in the editor with the following lines:
.qubit-VisitorPulse-content {
  padding: 0 !important;
}
.qubit-VisitorPulse-questionName {
  text-align: center !important;
}
label.qubit-VisitorPulse-radio {
  display: inline-block;
  width: 200px;
  border: none;
  border-radius: 5px;
  text-align: center;
  margin-right: 20px;
  background-size: cover;
  background-position: center center;
}
label.qubit-VisitorPulse-radio:nth-child(1) {
  background-image: url(https://cdn.shopify.com/s/files/1/0011/6342/7898/products/2526872250_9_1_1_1024x1024@2x.jpg?v=1520948251);
}
label.qubit-VisitorPulse-radio:nth-child(2) {
  background-image: url(https://cdn.shopify.com/s/files/1/0011/6342/7898/products/grey-frill-floral-midi-dress_540x.jpeg?v=1520947227);
}
label.qubit-VisitorPulse-radio:nth-child(3) {
  background-image: url(https://cdn.shopify.com/s/files/1/0011/6342/7898/products/womens-white-poplin-fitted-shirt-with-frill-detail-single-cuff-FFPGA220-N01-22-500px-650px_1024x1024@2x.jpg?v=1520948355);
}
label.qubit-VisitorPulse-radio:last-of-type {
  margin-right: 0;
}
label.qubit-VisitorPulse-radio > input {
  display: none;
}
label.qubit-VisitorPulse-radio > input:checked ~ span {
  border: 6px solid #c1c1c1;
}
span.qubit-VisitorPulse-radioOuter {
  display: none;
}
span.qubit-VisitorPulse-radioText {
  font-size: 18px;
  color: #ffffff;
  font-weight: bold;
  width: 100%;
  height: 100%;
  display: block;
  padding: 50px 20px;
  background: rgba(0, 0, 0, 0.4);
  border-radius: 5px;
  border: 6px solid transparent;
}
.qubit-VisitorPulse-submit {
  align-self: center !important;
}
.qubit-VisitorPulse-thankYou {
  justify-content: center !important;
}
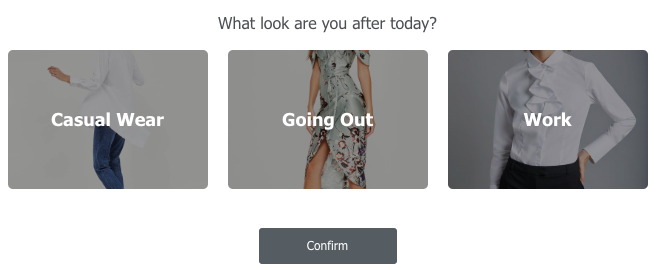
The results
We are now at a point where we can preview the experience.
Select  and Preview "[variation name]":

Next steps
Once the experience has been completed, the next step will be to configure it. This can also be completed by non-technical members of your team and involves adding goals, deciding which segments to target with the experience, and what percentage of your traffic to allocate the experience to. You might also decide to schedule the experience. All this and more can be done in the Settings tab. See Configuring Visitor Pulse Experiences for full details.
With the basic setup and configuration done, the final step will be to publish the experience. You can do this by selecting Publish experience. Before doing this, we recommend that you preview it on site to ensure that it fires correctly according to the designed triggers, displays correctly, and crucially that it functions according to your expectations. See Going Live With Your Experience.
When you publish an experience it will be pushed live onto your site or mobile platform. Visitors will be served the experience, of course depending on the conditions established for the experience, including triggers, segmentation, and traffic allocation.
Once an experience is live it will start to generate data, which you will use to interpret the success of the experience against its defined goals. See for details.