Build a social proof experience
Build a social proof experience
In this article, we will look at the steps involved in creating a Social proof experience.
Step 1: Creating the experience
Select Experiences from the side menu. Then select New experience, Custom, and Choose
Enter a name for your experience in the field provided and select Create
Step 2: Using the Social proof API
Select the triggers.js file from the side menu and replace any content in the editor with the following lines:
module.exports = function triggers (options, cb) {
  require('@qubit/remember-preview')()
  const $ = window.jQuery

  options.poll('window.__qubit.segments.isMemberOf').then(function (isMemberOf) {
    const isMember = isMemberOf(options.data.segment)
    if (isMember || options.meta.isPreview) {
      listen()
    }
  })

  function listen () {
    options.uv.on('ecProduct', function (event) {
      const { eventType, product: { productId } } = event

      if (eventType === 'detail') {
        increaseCount(productId)
        getCount(productId).then(fire)
      }
    }).replay()
  }

  function increaseCount (productId) {
    return $.post(`https://tally-1.qubitproducts.com/tally/${options.meta.trackingId}/ecount/party_views/${productId}/${options.data.window}`)
  }

  function getCount (productId) {
    return $.get(`https://tally-1.qubitproducts.com/tally/${options.meta.trackingId}/ecount/party_views/${productId}`).then(function (data) {
      return Number(data.data)
    })
  }

  function fire (count) {
    if (count >= options.data.threshold) {
      options.poll('body').then(function (body) {
        options.state.set('data', { count, $body: $(body) })
        $('#AddToCart-product-template').click(function () {
          options.emitCustomGoal('add-to-bag:click', {
            description: 'An add to bag event from the PDP'
          })
        })
        cb(true)
      })
    }
  }
}
This checks if the visitor is in a segment and, if so, increases the counter for a specific product Id. The change is done in the triggers.js file as this code should run for all visitors, not just those in the variation.
By retrieving a counter, we can show the current visitor how many other people are looking at the same product if the count is above 5. So only when the page has been viewed 5 times do we show the count.
We also fire off a custom goal add-to-bag:click, which is triggered when the visitor adds to bag.
By doing this, we can see if the social proof message increases the add to bag rate.
Select Save and close the editor
Open the experience Settings and select Edit in the Goals card.
Now select Custom event from the combo box and enter add-to-bag:click in the field provided, retaining the operator is.
Select Save to add the goal
Step 3: Adding package dependencies
Select package.json from the side menu and select Add a package
Add the following packages:
-
@qubit/remember-preview
You can read more about Qubit packages in Packages & Code Re-use.
Step 4: Exposing marketer controls
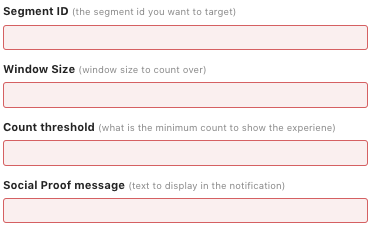
By editing the fields.json file, we can expose some marketer controls that non-technical users can edit to make basic changes to the experience. Importantly, as a developer, you retain control over what can be edited.
For our example, we will expose 4 fields to the marketer.
Select fields.json from the side menu
Replace any content in the editor with the following lines:
{
  "groups": [
    {
      "id": "message",
      "title": "Message",
      "subtitle": "Configure the social proof experience"
    }
  ],
  "fields": [
    {
      "key": "segment",
      "type": "String",
      "label": "Segment ID",
      "description": "The Segment ID you want to target",
      "required": true,
      "groupId": "message"
    },
    {
      "key": "window",
      "type": "String",
      "label": "Window Size",
      "description": "Window size to count over",
      "required": true,
      "groupId": "message"
    },
    {
      "key": "threshold",
      "type": "String",
      "label": "Count threshold",
      "description": "What is the minimum count to show the experience",
      "required": true,
      "groupId": "message"
    }
  ]
}
Once done, select Save, close the editor, and select  .
We can now see the marketer controls we set up:

Enter SG-5182-66507adb as the segment Id
This will ensure that only visitors in this segment will see the counter. In the same window, change:
-
Window Sizeto 15 - This defines how often to update the count -
Count thresholdto 5 - This defines how many visitors must have viewed the page before we start showing the counter
Select Save
Step 5: Showing the counter
Return to the code editor and select variation.js from the side menu
Replace any content in the editor with the following lines:
module.exports = function variation (options) {
  const { count, $body } = options.state.get('data')

  showNotification(count, 'party lovers have viewed this today')

  function showNotification (count, message) {
    const html = `
      <div class='qb-party-lovers'>
        <span>${count} ${message}</span>
      </div>
    `.replace(/>\s+</g, '><').trim()

    $body.append(html)
  }
}
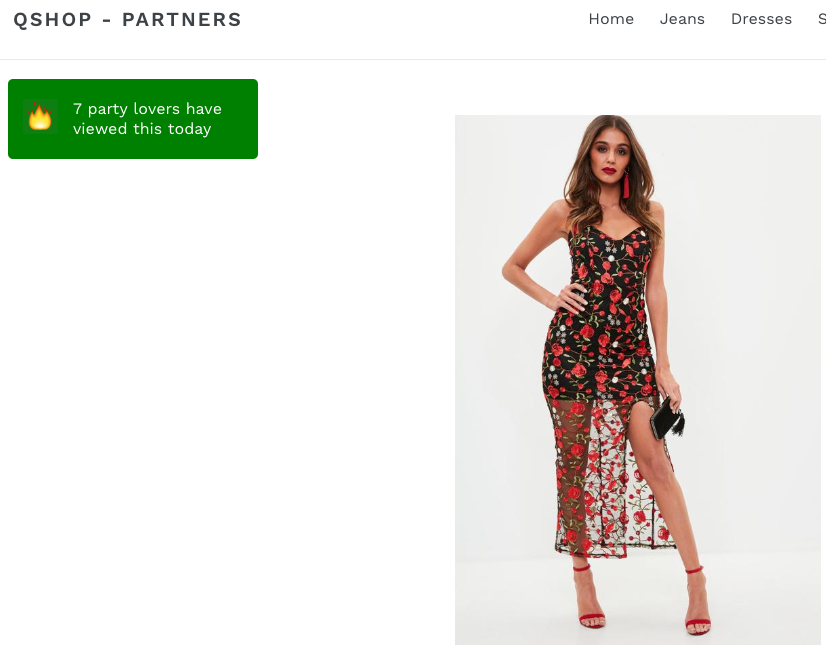
This injects some HTML into the page to show the notification.
Step 6: Styling the counter
Select variation.css from side menu
Replace any content in the editor with the following lines:
.qb-party-lovers {
  position: absolute;
  left: 50px;
  top: 100px;
  width: 250px;
  background: green;
  padding: 20px 20px 20px 65px;
  line-height: 20px;
  color: white;
  border-radius: 5px;
}

.qb-party-lovers:before {
  content: " ";
  position: absolute;
  left: 15px;
  top: 20px;
  font-size: 40px;
  background-image: url(https://d1m54pdnjzjnhe.cloudfront.net/pngineer/06dd6870-423a-11e8-95a0-75c5c055b785.png);
  width: 35px;
  height: 35px;
  background-size: cover;
}
Select Save
The results
We are now at a point where we can preview the experience.
Select  and Preview "[variation name]".
Remember that the counter will only display if the page has been viewed more than 5 times:

To force the experience to display, select  .
.
Next steps
Once the experience has been completed, the next step will be to configure it. This can also be completed by non-technical members of your team and involves adding goals, deciding which segments to target with the experience, and what percentage of your traffic to allocate the experience to. You might also decide to schedule the experience. All this and more can be done in the Settings tab. See Configuring Social Proof Experiences for full details.
With the basic setup and configuration done, the final step will be to publish the experience. You can do this by selecting Publish experience. Before doing this, we recommend that you preview it on site to ensure that it fires correctly according to the designed triggers, displays correctly, and crucially that it functions according to your expectations. See Going Live With Your Experience.
When you publish an experience it will be pushed live onto your site or mobile platform. Visitors will be served the experience, of course depending on the conditions established for the experience, including triggers, segmentation, and traffic allocation.
Once an experience is live it will start to generate data, which you will use to interpret the success of the experience against its defined goals. See for details.