Add a Slack source
Add a Slack source
Slack workspace administrators can index the content of a Slack workspace and make it searchable to workspace members through a Coveo-powered search interface. To do so, you must create a Slack source in your Coveo organization.
You can index messages, including files and attachments, from specific public and private channels. Additionally, you can also choose to index channel and user-profile data as separate items. When a member of your Slack workspace clicks a query result from a Slack source in a Coveo-powered search interface, the user is redirected to the corresponding item in Slack.
Your Slack source provides your Coveo organization with authorization to access your Slack workspace items using an OAuth 2.0 access token. The access token is linked to a Slack bot that you create for use with your source. The Slack bot is installed in your workspace and added to the channels that you want to index.
|
|
Leading practice
The number of items that a source processes per hour (crawling speed) depends on various factors, such as network bandwidth and source configuration. See About crawling speed for information on what can impact crawling speed, as well as possible solutions. |
Source key characteristics
The following table presents the main characteristics of a Slack source.
| Features | Supported | Additional information | |
|---|---|---|---|
Slack version |
Latest version |
||
Indexable content |
Messages, channels, user profiles, files, and attachments. |
||
|
To set an automatic refresh schedule, see Schedule a source update. A rescan or rebuild is required to take account of deleted messages, deleted channels, and deleted user profiles, and to retrieve replies to messages. |
||
|
To set an automatic rescan schedule, see Schedule a source update. Extracts all of the data and indexes new items and existing items with a modified date greater than the date in the index. The data that your source scans depends on your source Messages options. |
||
|
The data that your source scans depends on your source Messages options. |
||
Content security options |
|
||
|
|||
|
|||
Requirements
Before creating a new Slack source, create a Slack bot and add it to your workspace and channels.
Add a Slack source
|
|
Leading practice
It’s best to create or edit your source in your sandbox organization first. Once you’ve confirmed that it indexes the desired content, you can copy your source configuration to your production organization, either with a snapshot or manually. See About non-production organizations for more information and best practices regarding sandbox organizations. |
-
Before you create a new Slack source, ensure that you’ve created a Slack bot for use with your source.
-
On the Sources (platform-ca | platform-eu | platform-au) page, click Add source, and then select Slack.
-
Enter a Name for your source.
 Leading practice
A source name can’t be modified once it’s saved, therefore be sure to use a short and descriptive name, using letters, numbers, hyphens (
-), and underscores (_). Avoid spaces and other special characters. -
Enter the OAuth Access token of the Slack connector bot that you created for your Slack source.
 Note
NoteGet your Slack bot’s OAuth access token from the Slack API website. You can change the access token at any time after creating your source.
-
Use the Project selector to associate your source with one or more projects.
NoteAfter source creation, you can update your Coveo project selection under the Identification subtab.
-
Click Add source.
-
Specify your source settings. Refer to the following sections for detailed information on the source settings:
-
Note
You can save your source settings at any time by clicking Save and rebuild source/Save.
"Configuration" tab
Select the channels to index and what to index from the selected channels. You can also change the access token to link the source to a different Slack connector bot.
"Channels" subtab
This section lists all the Slack channels to which you added the Slack connector bot that’s associated with this source.
Select a channel to index its messages. Your Slack source indexes the messages only for the selected channels.
|
|
Use the Type dropdown menu to filter the list by private or public channels, or search for a specific channel by entering the channel name in the search field. If you don’t see a channel in the list, add the Slack connector bot to the channel in your workspace. |
|
|
Notes
|
|
|
Select the Same users and groups as in your content system content security option to ensure that only members of the private channel have access to the channel’s content in a Coveo-powered search interface. |
"Messages" subtab
Specify the indexing options for the messages that are sent from the selected channels.
Include bot messages
By default, your Slack source indexes messages sent only by workspace members. Enable Include messages sent by bots and integrations in Slack to also index messages sent by bots and integrations.
Index messages sent
Slack channels can contain a large amount of message data. This option limits the amount of data that’s scanned and indexed/re-indexed by your source, which not only accelerates the indexing operation but ensures that your index isn’t cluttered with excessive message data.
Set your source to index a subset of your message history by specifying an indexing window based on a floating time period or a start date. The option you choose depends on your organizational needs and on the amount of message data that’s sent across your indexed channels.
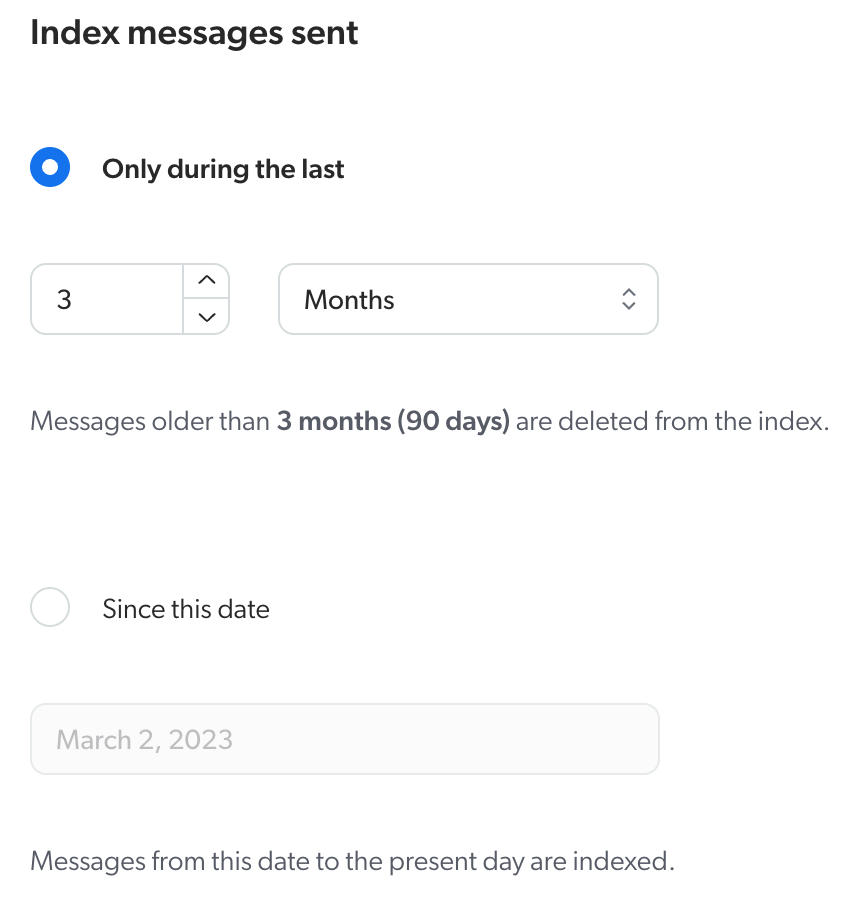
-
Select Only during the last to set a floating time frame for which to index messages.
-
Select Since this date to set a date from which to start indexing messages.
|
|
Note
Your source indexes new and modified message data only if the creation or modified date falls within the indexing window. Messages that were sent or modified before the start of the indexing window aren’t indexed by your source. If a message that was previously indexed no longer falls within the indexing window, the message is deleted from the index during the next rescan or rebuild. As for replies, your source indexes a reply message only if the parent message is also indexed. For example, if a reply is sent during the indexing window, but the parent message was created outside of the indexing window, your source doesn’t index the reply because the parent message isn’t indexed. A source rescan or rebuild is required to index replies to messages. |
|
|
Notes
|
"Additional content" subtab
Specify additional content to index as separate items.
|
|
Note
If you archive a previously indexed Slack channel, your source removes all corresponding data from the index following a rescan or rebuild. |
Channels
Files and attachments
Select this option to index the files and attachments in indexed messages as separate items. This allows users to search for filenames or content within a file/attachment. When a query matches the filename or content of a file, the file appears as a separate result in a Coveo-powered search interface. If this option is disabled, files and attachments aren’t indexed, and therefore aren’t searchable in a Coveo-powered search interface.
Your source is configured to index the most common file types by default, such as .doc, .xls, .pdf, .txt, .html, and .json.
Review your source JSON configuration to view and modify the list of supported item types.
Members
Select this option to index the profiles of your Slack workspace members. When a query matches a name or display name in Slack, the member appears as a separate result in a Coveo-powered search interface. When combined with the Files and attachments option, users can filter search results based on the document author.
If you index member profiles, you can also choose to Include deleted or archived members in your index.
"Authentication" subtab
Your Slack source authorizes the Coveo organization to access your workspace items using your Slack connector bot’s OAuth 2.0 access token. The Slack data that your source has access to is limited to the Slack workspace and channels to which the Slack connector bot is added.
Your Slack source was linked to a Slack connector bot, via an access token, when the source was created. However, you can change the Slack connector bot that’s associated with this source by changing the source access token.
|
|
Note
The Authentication page shows the Slack workspace in which the associated Slack connector bot is installed. |
|
|
If you change the access token for your source, revisit your source’s Channels subtab to select the channels from which to index messages. |
To change the Slack connector bot that’s associated with this source
-
In the Authentication section of your Slack source, click Edit.
-
Paste the access token in the token field.
-
Click Save.
"Identification" subtab
The Identification subtab contains general information about the source.
Name
The source name. It can’t be modified once it’s saved.
Project
Use the Project selector to associate your source with one or more Coveo projects.
"Items" tab
In the Items tab, you can specify how the source handles items based on their file type or content type.
File types
File types let you define how the source handles items based on their file extension or content type. For each file type, you can specify whether to index the item content and metadata, only the item metadata, or neither.
You should fine-tune the file type configurations with the objective of indexing only the content that’s relevant to your users.
Your repository contains .pdf files, but you don’t want them to appear in search results.
You click Extensions and then, for the .pdf extension, you change the Default action and Action on error values to Ignore item.
For more details about this feature, see Customize the indexing process.
Content and images
If you want Coveo to extract text from image files or PDF files containing images, enable the appropriate option. The extracted text is processed as item data, meaning that it’s fully searchable and will appear in the item Quick view.
|
|
Note
When OCR is enabled, ensure the source’s relevant file type configurations index the item content. Indexing the item’s metadata only or ignoring the item will prevent OCR from being applied. |
See Enable optical character recognition for details on this feature.
"Content security" tab
Select who will be able to access the source items through a Coveo-powered search interface. For details on the content security options, see Content security.
|
|
Note
Select the Same users and groups as in your content system option to ensure that workspace content is accessible only by intended users based on your Slack permission system. With this option enabled, an active Slack workspace member has access to message data for all public channels in the workspace, but only for private channels in which they’re a member. |
|
|
When using the Everyone content security option, see Safely apply content filtering for information on how to ensure that your source content is safely filtered and only accessible by intended users. |
"Access" tab
In the Access tab, specify whether each group (and API key, if applicable) in your Coveo organization can view or edit the current source.
For example, when creating a new source, you could decide that members of Group A can edit its configuration, while Group B can only view it.
For more information, see Custom access level.
Build or rebuild your source
You must build the source in order for Coveo to retrieve the source content and apply changes to your source settings. You can build or rebuild your source by doing either of the following:
-
You can choose to build or rebuild when saving the source by clicking Save and rebuild source.
-
You can build or rebuild your source directly from the Sources (platform-ca | platform-eu | platform-au) page by clicking Launch build or Launch rebuild in the Status column for your source. Alternatively, you can click the source, and then click More > Rebuild in the Action bar.
Once the source is built, you can review its content in the Content Browser.
Enable result folding for Slack threads
To display replies from a Slack thread in your search results and group the replies with the original message, enable result folding in your search page. This enhances the end-user experience as users expect query results that belong to the same conversation to be displayed in such a way that the original message is represented as the parent of each subsequent reply.
The following image shows replies in a Slack thread grouped under the parent message in a search page with result folding enabled.

To enable result folding
-
If you’re using a legacy hosted search page or the JavaScript Search Framework for your search interface, use the
FoldingForThreadcomponent to enable result folding in your search page.Your Slack source includes default preconfigured fields (
foldingcollection,foldingchild, andfoldingparent) in your index for use with your result folding implementation.
NoteFor hosted search pages, a
CoveoFoldingcomponent is automatically added to your search page. Open the Interface Editor via the Search Pages (platform-ca | platform-eu | platform-au) page, and then, in the Code View tab, replaceCoveoFoldingwithCoveoFoldingForThread. Folded results are automatically rendered when using the prebuilt Slack result template with hosted search pages. -
If you’re using Headless, Atomic, or REST API for your search interface, refer to the corresponding documentation for information on how to implement result folding in search results:
-
Headless:
FoldedResultList -
Atomic:
atomic-folded-result-list -
REST API: Handle folded results
-
Verify and edit your source fields and mappings
mappings define what Coveo index fields contain for each source item. Your Slack source automatically includes mapping rules for the fields that are indexed.
The default mapping rules are suitable in most instances. However, you can modify the mappings as required.
Do one or both of the following to verify and edit your field mappings:
-
Access the mapping panel for your source, and then review and edit the mappings as required.
-
Build your source, use the Content Browser (platform-ca | platform-eu | platform-au) to inspect the source content, and then edit the mappings as required.
Create additional source fields and mappings (optional)
In certain situations, you may want to create a field in addition to the fields that are created automatically by your source. For example, you may want to create a field that’s used across multiple sources and mapped to different metadata for each source, or you may want to create a field that aggregates multiple metadata for a single source.
To create additional fields and mappings:
-
Add a field to the Coveo index manually.
-
Create a mapping rule in each source that you want to use the new field.
Safely apply content filtering
The best way to ensure that your indexed content is seen only by the intended users is to enforce content security by selecting the Same users and groups as in your content system option. Should this option be unavailable, select Specific users and groups instead.
However, if you need to configure your source so that the indexed source content is accessible to Everyone, you should adhere to the following leading practices. These practices ensure that your source content is safely filtered and only accessible by the appropriate users:
-
Configure query filters: Apply filter rules on a query pipeline to filter the source content that appears in search results when a query goes through that pipeline.
-
Use condition-based query pipeline routing: Apply a condition on a query pipeline to make sure that every query originating from a specific search hub is routed to the right query pipeline.
-
Configure the search token: Authenticate user queries via a search token that’s generated server side that enforces a specific search hub.
Following the above leading practices results in a workflow whereby the user query is authenticated server side via a search token that enforces the search hub from which the query originates. Therefore, the query can’t be modified by users or client-side code. The query then passes through a specific query pipeline based on a search hub condition, and the query results are filtered using the filter rules.
Configure query filters
Filter rules allow you to enter hidden query expressions to be added to all queries going through a given query pipeline.
They’re typically used to add a field-based expression to the constant query expression (cq).
You apply the @objectType=="Solution" query filter to the pipeline to which the traffic of your public support portal is directed.
As a result, the @objectType=="Solution" query expression is added to any query sent via this support portal.
Therefore, if a user types Speedbit watch wristband in the search box, the items returned are those that match these keywords and whose objectType has the Solution value.
Items matching these keywords but having a different objectType value aren’t returned in the user’s search results.
To learn how to configure query pipeline filter rules, see Manage filter rules.
|
|
Note
You can also enforce a filter expression directly in the search token. |
Use condition-based query pipeline routing
The most recommended and flexible query pipeline routing mechanism is condition-based routing.
When using this routing mechanism, you ensure that search requests are routed to a specific query pipeline according to the search interface from which they originate, and the authentication is done server side.
To accomplish this:
-
Apply a condition to a query pipeline based on a search hub value, such as Search Hub is Community Search or Search Hub is Agent Panel. This condition ensures that all queries that originate from a specific search hub go through that query pipeline.
-
Authenticate user queries via a search token that’s generated server side and that contains the search hub parameter that you specified in the query pipeline.
Configure the search token
When using query filters to secure content, the safest way to enforce content security is to authenticate user queries using a search token that’s generated server side. For instance, when using this approach, you can enforce a search hub value in the search token. This makes every authenticated request that originates from a component use the specified search hub, and therefore be routed to the proper query pipeline. Because this configuration is stored server side and encrypted in the search token, it can’t be modified by users or client-side code.
Implementing search token authentication requires you to add server side logic to your web site or application. Therefore, the actual implementation details will vary from one project to another.
The following procedure provides general guidelines:
|
|
Note
If you’re using the Coveo In-Product Experience (IPX) feature, see Implement advanced search token authentication. |
-
Authenticate the user.
-
Call a service exposed through Coveo to request a search token for the authenticated user.
-
Specify the
userIDsfor the search token, and enforce asearchHubparameter in the search token.
|
|
Note
You can specify other parameters in the search token, such as a query |
For more information and examples, see Search token authentication.
Required privileges
You can assign privileges to allow access to specific tools in the Coveo Administration Console. The following table indicates the privileges required to view or edit elements of the Sources (platform-ca | platform-eu | platform-au) page and associated panels. See Manage privileges and Privilege reference for more information.
|
|
Note
The Edit all privilege isn’t required to create sources. When granting privileges for the Sources domain, you can grant a group or API key the View all or Custom access level, instead of Edit all, and then select the Can Create checkbox to allow users to create sources. See Can Create ability dependence for more information. |
| Actions | Service | Domain | Required access level |
|---|---|---|---|
View sources, view source update schedules, and subscribe to source notifications |
Content |
Fields |
View |
Sources |
|||
Organization |
Organization |
||
Edit sources, edit source update schedules, and edit source mappings |
Organization |
Organization |
View |
Content |
Fields |
Edit |
|
Sources |
|||
View and map metadata |
Content |
Source metadata |
View |
Fields |
|||
Organization |
Organization |
||
Content |
Sources |
Edit |