Index Salesforce Sites
Index Salesforce Sites
This article explains how to index the pages of a Salesforce LWR or Aura site using a set of Coveo Web sources.
|
|
Note
To index Salesforce object-based content, use the Salesforce source instead. |
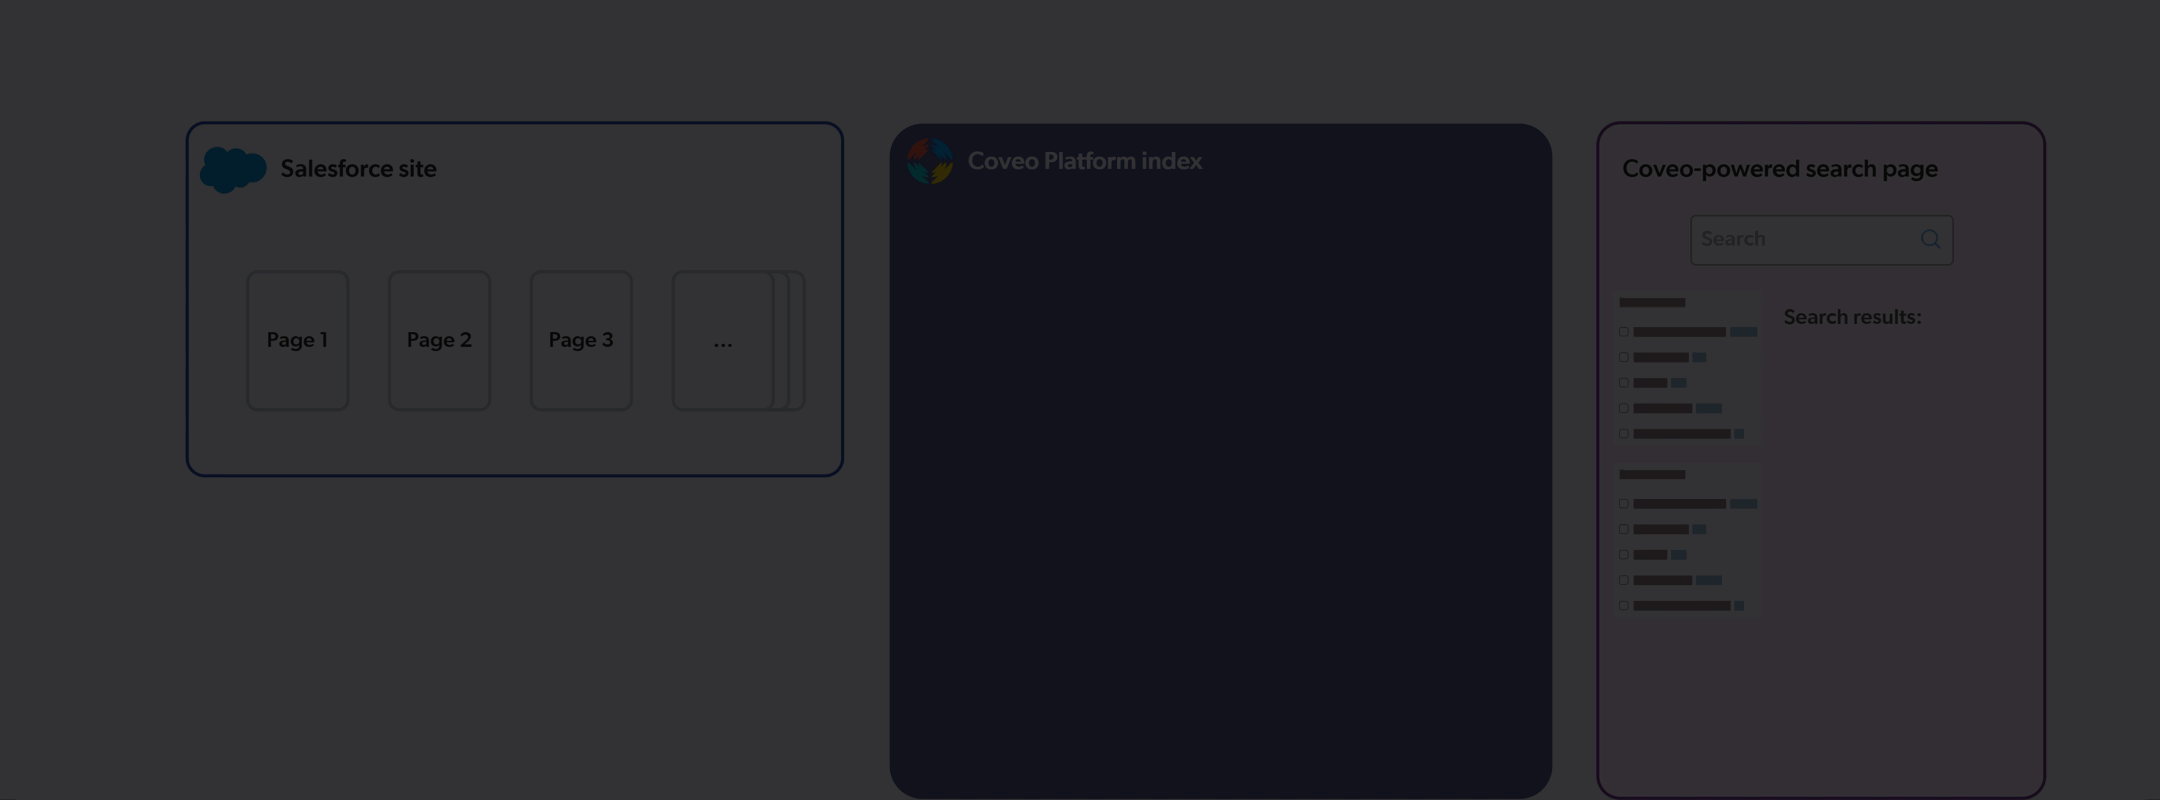
Approach summary
A clear understanding of the indexing approach is essential for a successful and rapid implementation. This section provides a high-level overview. All implementation steps and specifics are detailed starting at the Prerequisites section.
The approach consists of three main aspects:
Site page discovery
Each Web source you’ll create will crawl a LWR or Aura Visualforce sitemap page and index its listed pages.
To create the sitemap page, you must create a Visualforce page, either the LwrSitemap or AuraSitemap page, depending on the type of Salesforce site you need to index.
The Visualforce page uses custom Apex code provided in the Prerequisites section of this article.
Based on the target site basePath query parameter value passed in the URL, the Visualforce page serves as a sitemap, dynamically discovering all the site’s routes and rendering them as a list of clickable links.
Indexing page variations
Each Web source created will authenticate into Salesforce as a crawling user that represents a particular site audience. You should ideally create Salesforce users specifically for this purpose. Each page listed in the sitemap will be crawled and indexed as that crawling user sees the page when it accesses it.
You must therefore establish the sets of page variations to index for the site, the audience that can access each set of page variations, and the crawling user to represent each audience.
|
|
Note
Though variations and their visibility rules are set at the component level in Salesforce sites, the term page variation is used intentionally here. A Salesforce site page is the smallest indexable entity. You must therefore think in terms of how an entire page is presented to a relatively broad audience, and then determine the group of users who should see the page the same way. |
After creating a Web source for one set of page variations, you’ll duplicate it as many times as needed to cover all site audiences, changing the crawling user on each cloned source.
Showing only the proper page variation in search results
A Coveo Web source doesn’t automatically capture Salesforce page variation visibility rules. If your Web sources don’t apply permissions to their items, search results can include a page variation the user shouldn’t see.
To prevent this, you must configure source-level content security on each Web source. The source then applies these permissions to every crawled item.
The entire approach is summarized in the following animation.
Prerequisites
Meeting the following requirements ensures your Coveo and Salesforce organizations are properly set up and that you have all the necessary information to create your Web sources:
-
Having a Salesforce security provider
-
Creating Visualforce sitemap pages
-
Gathering the information for your Web sources
Salesforce security provider
To reference your Salesforce organization identities in your Web source permissions, you must have a Salesforce security provider in your Coveo organization. When you add a Salesforce source in your Coveo organization, a Salesforce security provider is automatically created and listed on the Security Identities (platform-ca | platform-eu | platform-au) page of the Coveo Administration Console.
If you already have a Salesforce security provider in your Coveo organization
On the Security Identities (platform-ca | platform-eu | platform-au) page of the Coveo Administration Console, you’ll see a Salesforce security provider listed.
|
|
Use the Copy to clipboard feature to copy the Salesforce security provider name. You’ll need this information when configuring source permissions. 
|
If you don’t have a Salesforce security provider in your Coveo organization
If you don’t see a Salesforce security provider listed on the Security Identities (platform-ca | platform-eu | platform-au) page of the Coveo Administration Console, you can create one now.
Follow the instructions in Add a Salesforce source to create a Salesforce source in your Coveo organization. Use an administrator account of your Salesforce organization to authenticate the source. You don’t need to fully configure the source. Just provide a source name, authenticate into your Salesforce organization, and click Add source. Adding a Salesforce source automatically creates a Salesforce security provider in your Coveo organization.
|
|
Once your Salesforce source is created, access the Security Identities (platform-ca | platform-eu | platform-au) page. Then, use the Copy to clipboard feature to copy the Salesforce security provider name. You’ll need this information when configuring source permissions.
|
Visualforce sitemap pages
You must create either an LWR or Aura site Visualforce sitemap page, depending on the type of Salesforce site you need to index.
If you plan to index both LWR and Aura sites, follow the steps below twice to create a Visualforce sitemap page for each.
-
Create a new Visualforce page in Salesforce using one of the provided snippets. The following instructions refer to these pages as
LwrSitemaporAuraSitemap. -
Paste the script that corresponds to your target site type (Aura or LWR).
 Script customization may be required
The following scripts are meant to be starting points that should cover most use cases. They might require adjustments to fit your specific site configuration and content.
For an LWR site
<apex:page showHeader="false" standardStylesheets="false" sidebar="false">
<html>
    <head>
        <title>LWR Site Private Routes</title>
        <script>
            document.addEventListener('DOMContentLoaded', function () {
                fetchLWRData();
            });

            async function fetchLWRData() {
                try {
                    let origin = window.location.origin;

                    // Get 'basePath' parameter from the URL
                    let params = new URLSearchParams(window.location.search);
                    var basePath = params.get('basePath');
                    if(basePath  && basePath  != ''){
                        basePath = basePath.replace(/\/$/, '') // trim the '/' at the end since routes start with it already.
                        let siteBaseUrl = (origin + basePath); // Default if not passed
                        let response = await fetch(siteBaseUrl);
                        let responseBody = await response.text();
                        if (responseBody) {
                            extractLWRData(responseBody, siteBaseUrl);
                        } else {
                            document.getElementById("routes").innerHTML = "<li>No data received</li>";
                        }
                    } else {
                        document.getElementById("routes").innerHTML = "<li>Error fetching base path</li>";
                    }
                } catch (error) {
                    console.error('Error fetching LWR site data:', error);
                    document.getElementById("routes").innerHTML = "<li>Error fetching site data</li>";
                }
            }
            function extractLWRData(responseBody, siteBaseUrl) {
                console.log('Extracting LWR routes...');
                let routes = extractLWRDefine(responseBody, '@app/routes');
                let nbRoutes = 0;
                if (routes && routes.length > 0) {
                    let routeList = document.getElementById("routes");
                    routeList.innerHTML = ''; // Clear existing data
                    routes.forEach(route => {
                        // Ensure the route has a valid path and label. Also only index custom pages.
                        if (route.path && route.label && route.path.indexOf(':') == -1 && route.devName.endsWith('__c')) {
                            let fullUrl = siteBaseUrl + route.path;
                            let pageName = route.label;
                            let li = document.createElement("li");
                            let a = document.createElement("a");
                            a.href = fullUrl;
                            a.target = "_blank";
                            a.textContent = pageName;
                            li.appendChild(a);
                            routeList.appendChild(li);
                            nbRoutes += 1;
                        }
                    });

                    console.log('Routes successfully extracted.');
                } else {
                    document.getElementById("routes").innerHTML = "<li>No routes found</li>";
                }
                console.log("Found " + nbRoutes + " routes in the site.");
            }

            function extractLWRDefine(responseBody, moduleName) {
                const pattern = new RegExp(`LWR\\.define\\('${moduleName}',\\s*\\[\\],\\s*function\\(\\)\\s*{\\s*return\\s*(.*?);\\s*}\\);`);
                const match = responseBody.match(pattern);
                if (match && match[1]) {
                    try {
                        return JSON.parse(match[1]); // Convert extracted JSON string to object
                    } catch (error) {
                        console.error(`Error parsing JSON for ${moduleName}:`, error);
                        return null;
                    }
                }
                return null;
            }
        </script>
    </head>
    <body>
        <h2>Available LWR Site Pages</h2>
        <ul id="routes">
            <li>Loading site pages...</li>
        </ul>
    </body>
</html>
</apex:page>
For an Aura site
This script filters out standard pages like Home, Contact Support, Error, and Report Builder.
<apex:page showHeader="false" standardStylesheets="false" sidebar="false" applyHtmlTag="false" applyBodyTag="false"> <head> <script> function processRoutes() { let origin = window.location.origin; let basePath = '/s'; let urlParams = new URLSearchParams(window.location.search); let basePathParam = urlParams.get('basePath'); let debugParam = urlParams.get('debug'); let debugEnabled = debugParam != null && debugParam == 1; if (!debugEnabled){ console.log('To enable logs, add "debug=1" to the url query params.'); } let logger = (message) => { if (debugEnabled) { console.log(message); } } console.log('Fetching routes of site ' + basePathParam); if (basePathParam != null) { if (!basePathParam.includes('/s')) { let message = "Aura base paths usually end with '/s'. If generated links do not work, try with 'basePath=" + basePathParam + "/s'."; console.warn(message); document.querySelector('#warning').innerHTML = message; } basePath = basePathParam; } let domLinks = document.querySelector('#links'); let documentContext = document; //the fetch calls assume that this VF page is running as a logged in user fetch(origin + basePath) .then((response) => response.text()) .then((document) => { logger(document); let bootstrapIndex = document.indexOf('bootstrap.js'); if (bootstrapIndex != -1) { //is an aura template site logger('has bootstrap'); let startIndex = document.lastIndexOf('src="', bootstrapIndex); let endIndex = document.indexOf('">', bootstrapIndex); let boostrapURL = document.substring(startIndex + 5, endIndex); //extract the 'bootstrap.js' script reference from the page logger('Boostrap url: ' + boostrapURL); //execute a GET request for bootstrap.js fetch(boostrapURL) .then((response) => response.text()) .then((bootstrapScript) => { let bootstrapDataTerm = 'Object.assign(window.Aura.appBootstrap,'; let bootstrapDataEndTerm = ');\n;(function()'; let appBootstrapStart = bootstrapScript.indexOf(bootstrapDataTerm); if (appBootstrapStart != -1){ // Seems to be the case after a Salesforce update the week of 06-10-25. logger('Bootstrap found in an "Object.assign" statement.'); } else { // This was the original place working for some time. Keeping it for backward compatibility bootstrapDataTerm = '(window.Aura.appBootstrap ='; bootstrapDataEndTerm = ';\n;(function()'; appBootstrapStart = bootstrapScript.indexOf(bootstrapDataTerm); logger('Bootstrap found embedded in "window.Aura.appBootstrap" directly.'); } let appBootstrapEnd = bootstrapScript.indexOf(bootstrapDataEndTerm); let appBootstrap = bootstrapScript.substring(appBootstrapStart + bootstrapDataTerm.length, appBootstrapEnd); //extract the section of JSON for the appBootstrap let appBootstrapJSON = JSON.parse(appBootstrap); let components = appBootstrapJSON.data.components; let nbRoutes = 0; for (let index = 0; index < components.length; index++) { let component = components[index]; if (component.componentDef.descriptor === 'markup://siteforce:routerInitializer') { let routes = component.model.routes; for (var route in routes) { if (routes.hasOwnProperty(route)) { let routeData = routes[route]; if (routeData.page_type_info.includes('comm__namedPage') // Page is a named page && routeData.dev_name.indexOf('__c') != -1) { // Page is custom logger(route); logger(routeData); let li = documentContext.createElement("li"); let a = documentContext.createElement("a"); let routePath = origin + basePath + route; a.href = routePath ; console.log(routePath); a.innerHTML = routeData.seo_title; li.append(a); domLinks.append(li); nbRoutes += 1; } } } } } console.log('Found ' + nbRoutes + ' routes in the site.'); }); } }); } window.addEventListener('DOMContentLoaded', (event) => { processRoutes(); }); </script> </head> <body> <h1 id="warning"/> <ul id="links"></ul> </body> </apex:page> -
In the Visualforce page settings, enable Available for Lightning Experience, Experience Builder sites, and the mobile app.
-
Save the Visualforce page.
-
Determine the URL of the Visualforce page to be used. Its format is
https://<DOMAIN_NAME>/<COMMUNITY_SITE_PREFIX>/<SITEMAP_PAGE_NAME>?basePath=<SITE_DOT_COM_COMMUNITY_SITE_PATH>-
In Salesforce Setup, open the Custom URLs page for your Experience Cloud site.
-
Identify the following information from the Custom URLs list:
-
The domain name (the
<DOMAIN_NAME>value) under which your Visualforce sitemap page is exposed. -
The
<COMMUNITY_SITE_PREFIX>value. Visualforce pages are exposed under theCommunitysite type. -
The
basePathquery string value (that is,<SITE_DOT_COM_COMMUNITY_SITE_PATH>) which must be passed to the Visualforce page URL. ThebasePathshould target theSite.com Communitysite type.
-
-
Construct the Visualforce page URL.
-
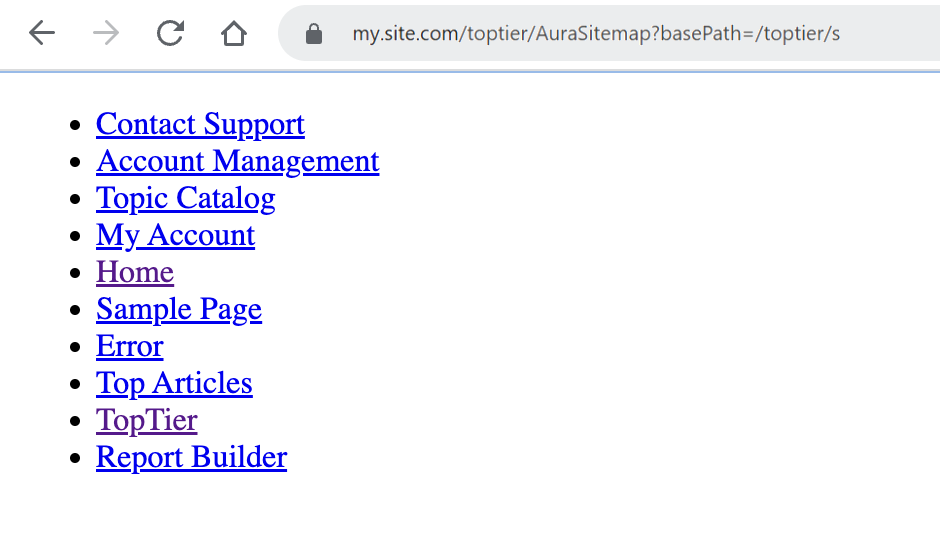
Aura example:
https://my.site.com/toptier/AuraSitemap?basePath=/toptier/s -
LWR example:
https://my.site.com/toptiervforcesite/LwrSitemap?basePath=/toptier
-
-
-
Access the Visualforce page URL in a browser. The page should render a list of site pages similar to the following example.
-
Note the Visualforce page URL to be used for the site.
Information to gather for your Web sources
Establish the different sets of page variations, their corresponding audience identities, and the crawling user to use.
-
Web source names: The instructions in this article suggest naming your Web sources using the
<SALESFORCE_SITE_NAME> - <AUDIENCE_NAME>pattern to easily identify the associated Salesforce site and audience on the Coveo Administration Console Sources (platform-ca | platform-eu | platform-au) page. -
Crawling users: Identify a generic enough crawling user to represent the audience that will be used for each Web source. Keep a private record of the crawling user credentials as you’ll need them when configuring the Web sources. Edit the Salesforce profiles of all crawling users so they can access the LWR or Aura Visualforce sitemap page.
-
Audience identities: Most audience identities you’ll specify in your Web source permissions will actually be a representation of a page visibility rule in Salesforce. If you’ve set a component visibility rule in a Salesforce site page and that rule determines the overall page variation visibility, take a screenshot of that component rule. You can refer to this screenshot when configuring the source permissions later.

On the Security Identities (platform-ca | platform-eu | platform-au) page of the Coveo Administration Console, when you browse the identities of your Salesforce security provider, you’ll notice an identity associated with the visibility rule.
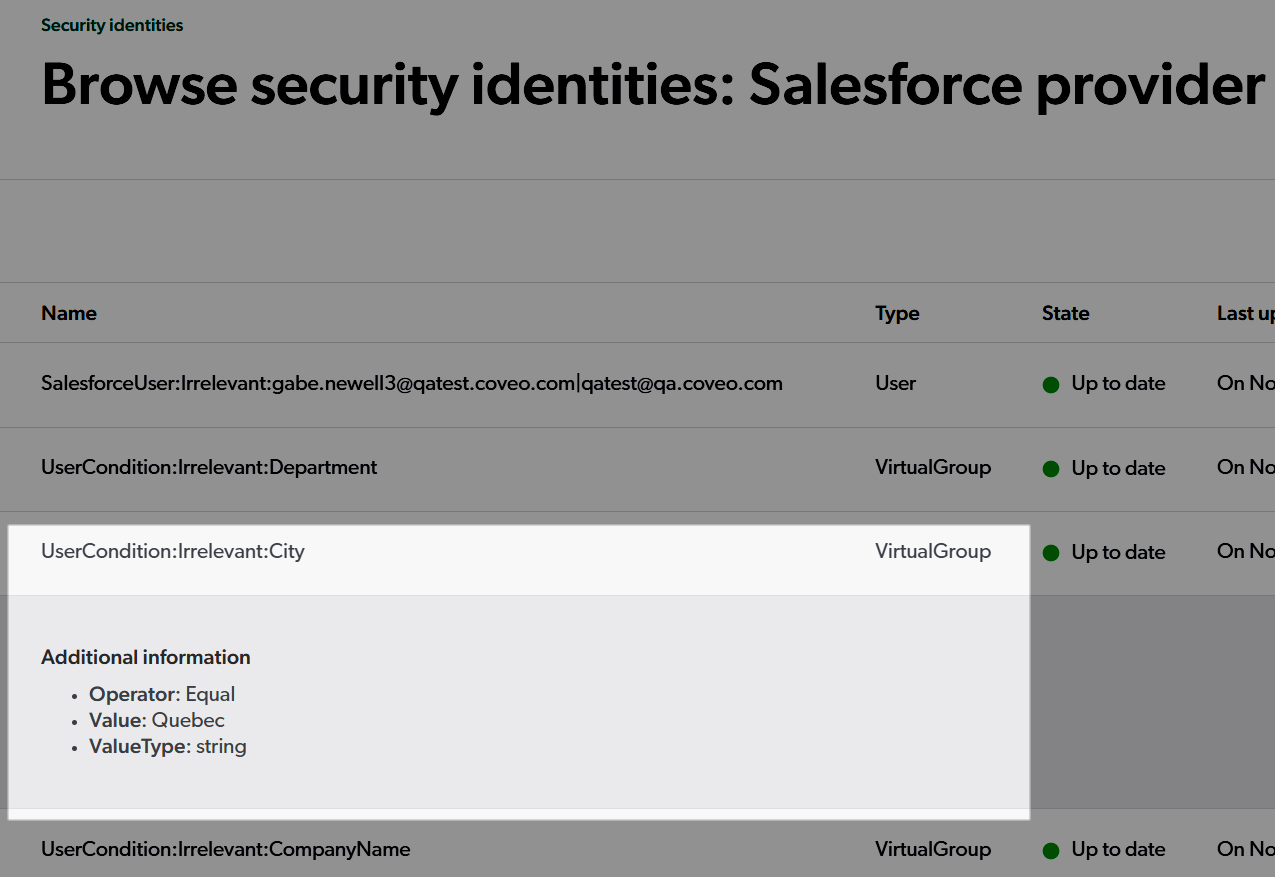
The information highlighted in the previous screenshot is the full identity specification you’ll need to use when setting Web source permissions.
Example of information to gather for a Salesforce site
The following shows an example of the information you would need to gather for a hypothetical Customer Portal Salesforce site:
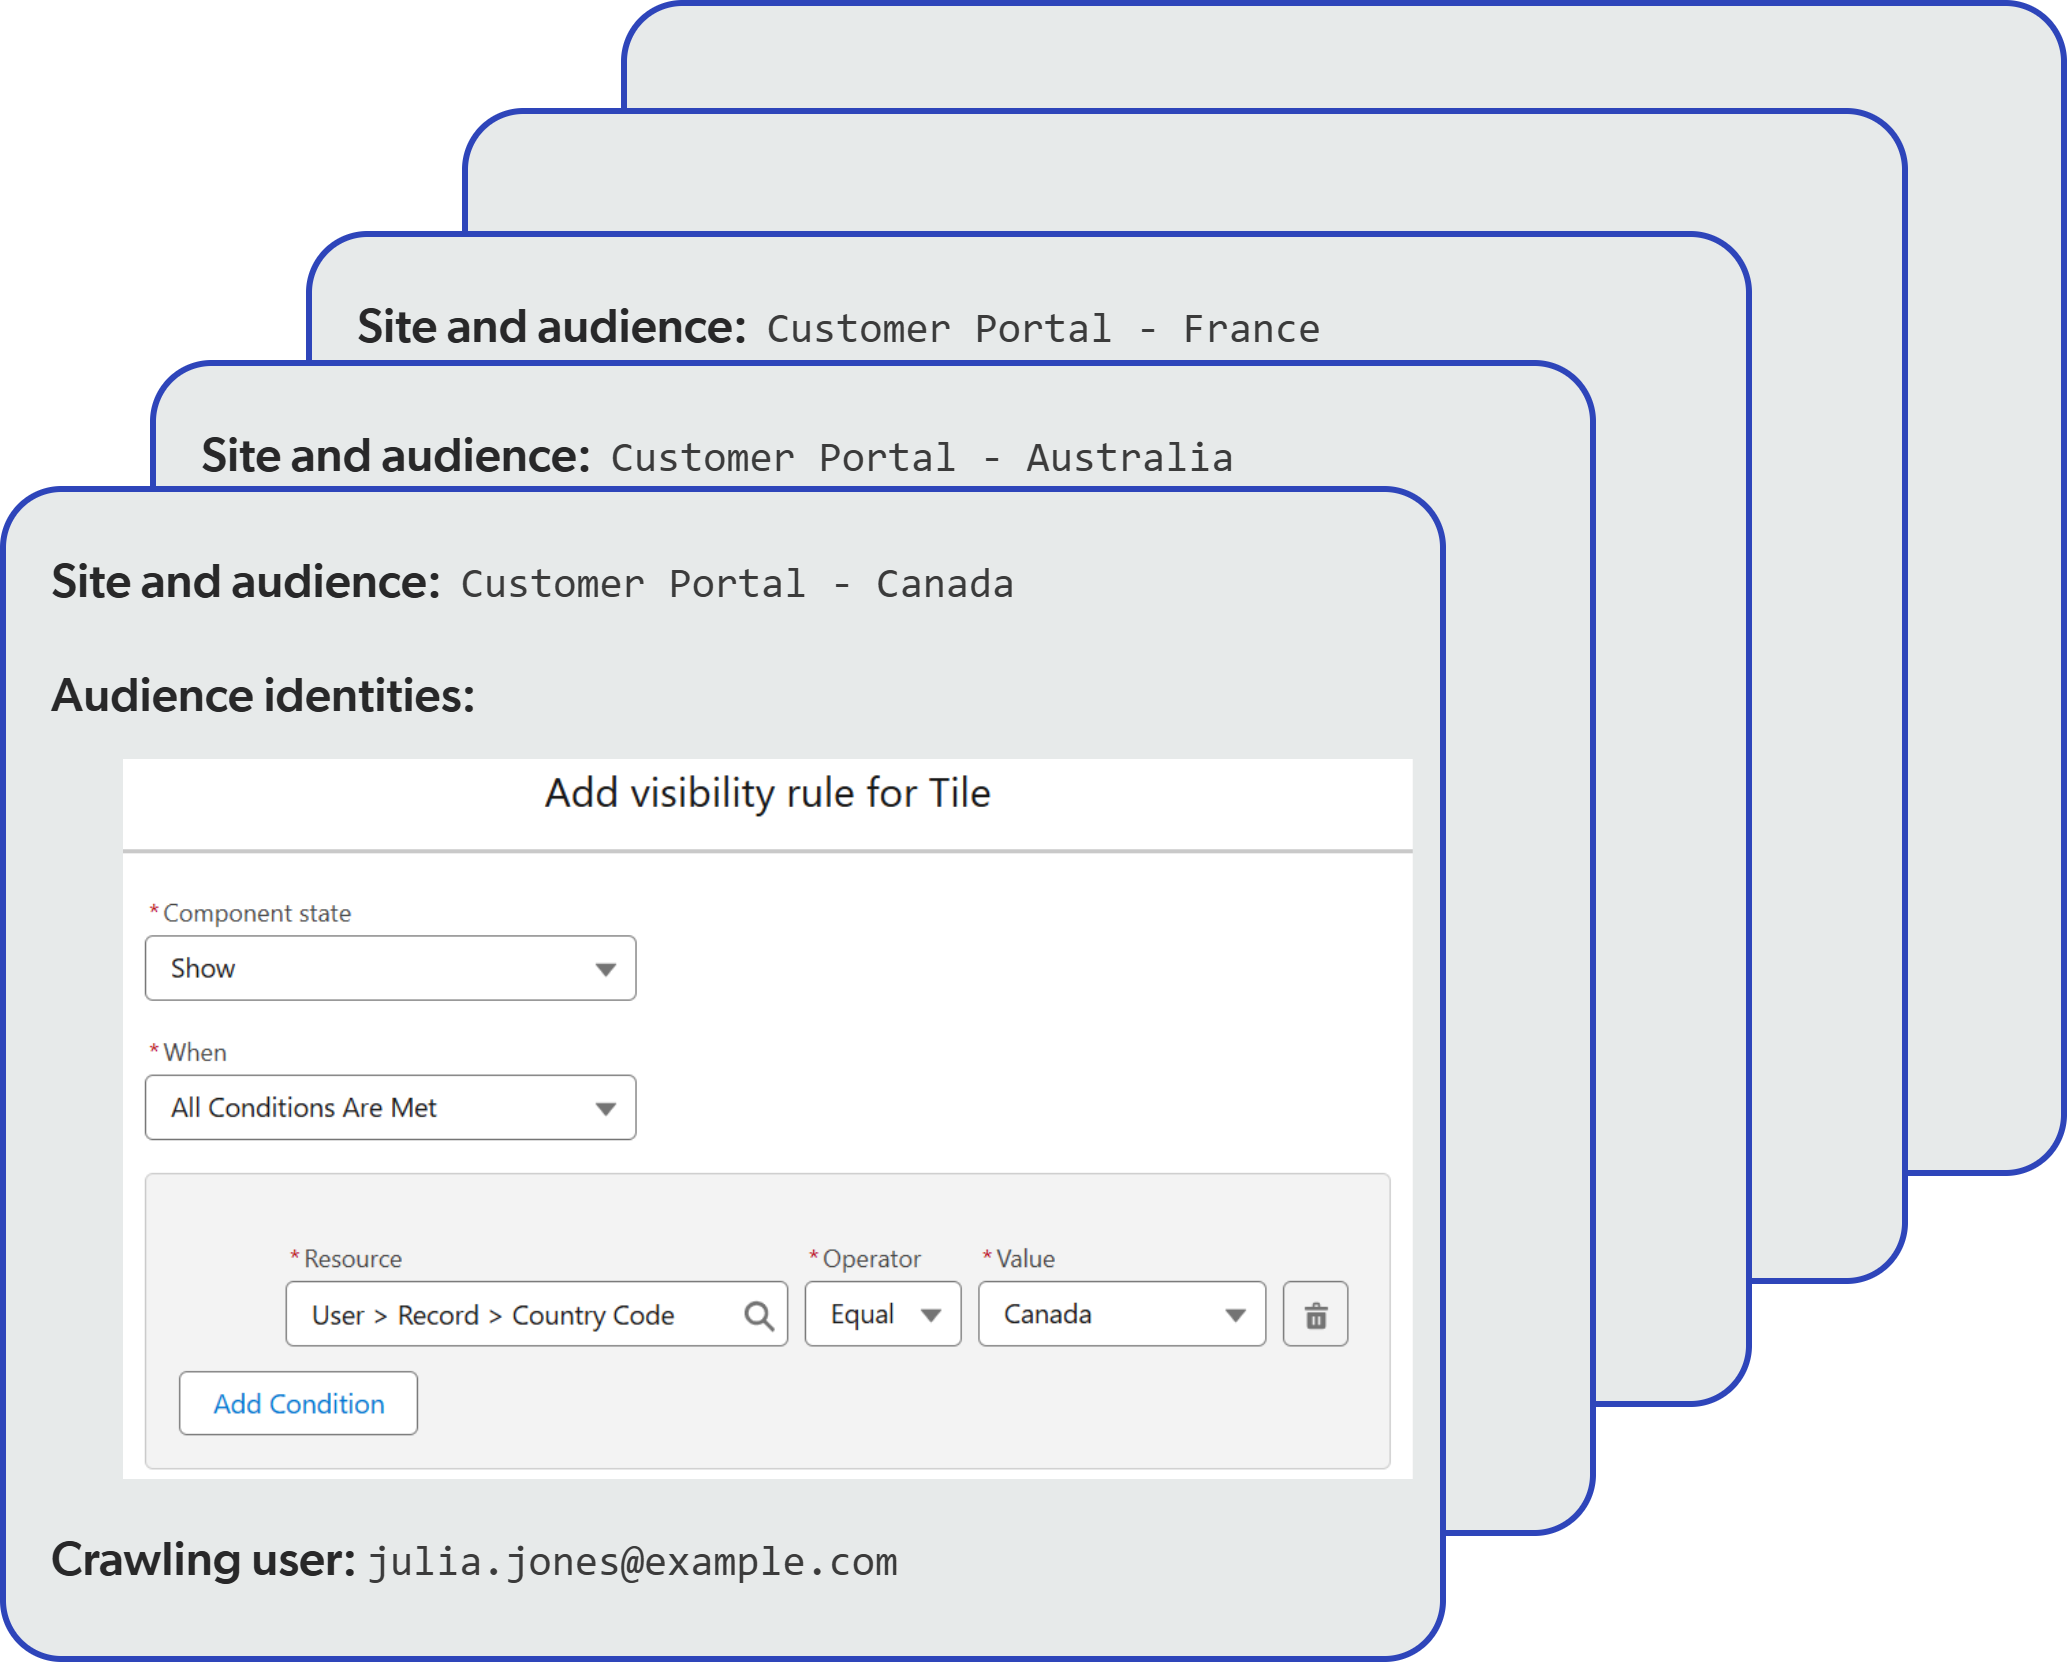
As mentioned earlier, the crawling user credentials should be stored elsewhere, in a private and secure location.
Configure the first Web source
Much of the configuration of the Web sources for a given Salesforce site is basic and common to all sources. Let’s start with the basic configuration of the first Web source, and we’ll cover the specific configurations later.
The configuration of the first Web source assumes that this source will index the set of page variations as seen by one of your authenticated audiences.
Basic configuration
-
On the Sources (platform-ca | platform-eu | platform-au) page of the Coveo Administration Console, click Add source, and then select the cloud (
 ) Web source.
 -
In the Add a new Web source panel, provide a name for your source that reflects the Salesforce site and audience it will index content for (for example,
Customer Portal - AustraliaorCustomer Portal - Europe). -
Specify the Starting URL.
-
If your Salesforce site doesn’t use single sign-on (SSO), enter the Visualforce sitemap page URL, specifying the appropriate
basePathquery parameter value. -
If your Salesforce site uses SSO, consider targeting a Visualforce redirection page. The authentication instructions provided later in this article also include a solution for handling SSO login.
-
-
Click Next.
-
In the Set up security step, select Specific users and groups, and then click Add source. You’ll deal with specifying the permissions later.
-
On the Configuration tab, select the Advanced settings subtab.
-
Under JavaScript rendering, enable Execute JavaScript on pages and set the time for the crawler to wait before considering a page as fully rendered to
1000milliseconds. This should provide enough time for the Visualforce sitemap page to fully render the list of links before the crawler starts indexing them. Increase this value if your Visualforce sitemap page takes longer to render and some links are missing from the indexed content. -
Under Directives overrides, select all four directives.
-
Under Crawl limits, set the Number of levels to crawl from a starting URL to
1. Note
NoteThis setting ensures that the pages listed on the Visualforce sitemap page are indexed but that the crawler doesn’t attempt to follow any links found on those pages.
-
Select the Authentication subtab.
-
Under Select the authentication type required to access your website, select Form authentication.
-
In the Username field, enter the email of the Salesforce crawling user that represents the target audience for this source.
-
In the Password field, enter the password of the Salesforce crawling user.
-
In the Login page address field, enter the target Salesforce site login page URL (for example,
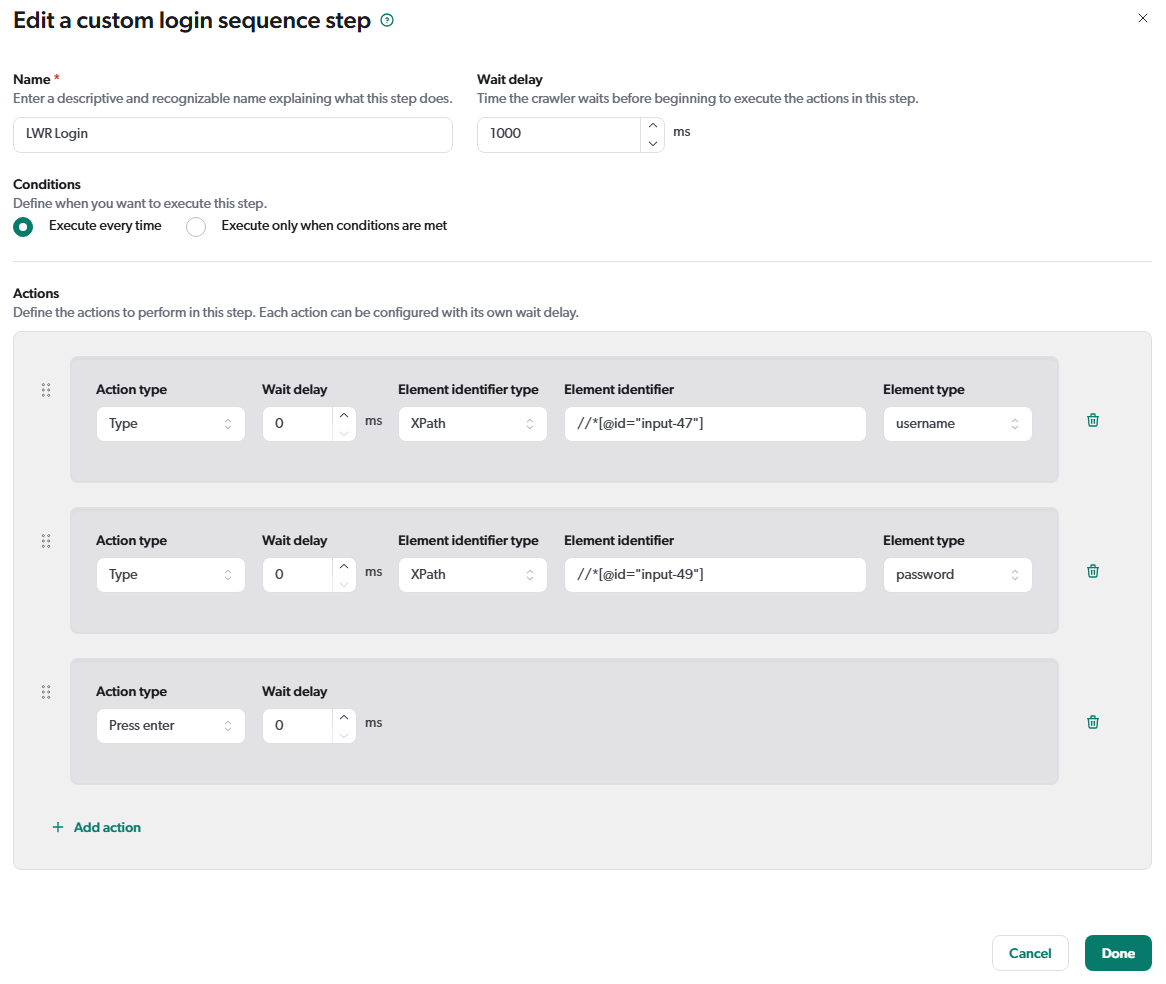
https://my.site.com/somepath/login). If the site login page uses LWR, you’ll need to create a custom login sequence using XPath element identifiers so that the crawler can successfully log in.Custom login sequence example for a LWR login page
-
Set the Loading delay to
1000milliseconds. -
Under Authentication status validation, select
Cookie not foundfor the Validation method, and entersidin the Value field.
NoteSSO might require a different validation method.
-
Click Save.
Permissions configuration
The permissions you set on the Web source determine which end users can view the items indexed by the source when they perform queries. The permissions must reflect the audience associated with the indexed page variations by specifying allowed and denied members.
|
|
Though the source configuration Content security tab features a user interface that allows setting permissions, this feature doesn’t support complex Salesforce visibility rules involving |
To configure the source permissions
-
On the Sources (platform-ca | platform-eu | platform-au) page, click the Web source you just created, and then click More > Edit source with JSON in the Action bar.
-
In the Edit configuration with JSON panel, use the search tool (
 ) to locate the
 permissionsobject.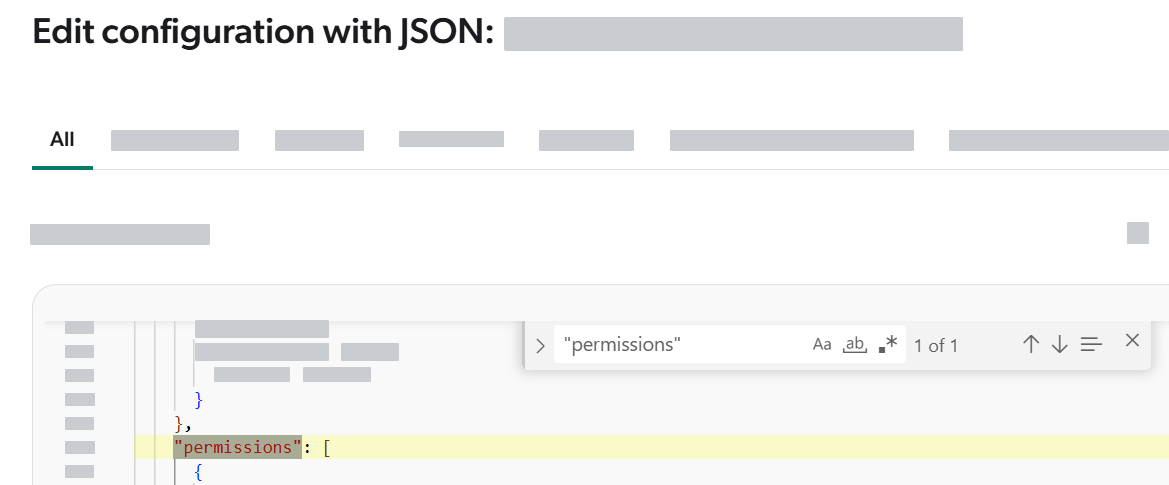
The
permissionsobject is an array of permission levels. Each permission level can contain one or several permission sets. At this point, thepermissionsobject should look similar to the following:"permissions": [ { "name": "Source Specified Permissions",
"permissionSets": [
{
"name": "Source Specified Permissions",
"permissionSets": [
{  "allowedPermissions": [
{
"identity": "someuser@somedomain.com",
"identityType": "User",
"securityProvider": "Email Security Provider"
}
],
"deniedPermissions": [],
"name": "Private"
}
]
}
]
"allowedPermissions": [
{
"identity": "someuser@somedomain.com",
"identityType": "User",
"securityProvider": "Email Security Provider"
}
],
"deniedPermissions": [],
"name": "Private"
}
]
}
]Beginning of first permission level. Beginning of first permission set in the first permission level. -
Update the
permissionsobject to reflect the Web source audience.
-
For the full Coveo identity specification associated with a Salesforce visibility rule, expand and copy the identity information from the Security Identities (platform-ca | platform-eu | platform-au) page.
-
When permissions are set on a Coveo indexed item, members are denied access by default. They must explicitly be allowed on an item to see it in search results. You should typically need to specify only one or a few
allowedmembers. -
You can copy the JSON snippets from the following examples to replace the existing
permissionsobject, using them as a starting point for your own configuration.
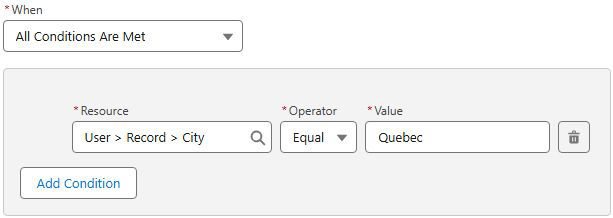
Example 1: Reflecting a
User > Record > City=Quebecvisibility ruleTo reflect a rule where only users that meet a specific condition have visibility, create a permission set with an
allowedPermissionsidentity that represents the visibility rule. For more details on how the permissions are evaluated during searches in this scenario, see the basic search flowchart.Visibility rule in Salesforce:
Required
permissionsobject:"permissions": [ { "name": "Source Specified Permissions", "permissionSets": [ { "name": "Quebec Users",
"allowedPermissions": [
{
"identity": "UserCondition:Irrelevant:City",
"identityType": "VirtualGroup",
"securityProvider": "SALESFORCE-00DgL00000FDj3VUAT",  "additionalInfo": {
"Operator": "Equal",
"additionalInfo": {
"Operator": "Equal",  "Value": "Quebec",
"ValueType": "string"
}
}
],
"deniedPermissions": []
"Value": "Quebec",
"ValueType": "string"
}
}
],
"deniedPermissions": []  }
]
}
]
}
]
}
](Optional) Name of the permission set. Beginning of the allowed member specification (that is, associated with a ShowSalesforce visibility rule).Salesforce security provider name. The Operatorproperty supports the following values:Equal(=),NotEqual(!=),Less(<),LessOrEqual(⇐),Greater(>),GreaterOrEqual(>=),Like(like),NotLike(not like),Includes(in),Excludes(not in)When no denied members need to be specified, leave the deniedPermissionsarray empty. A denied member specification would be required to reflect aHideSalesforce visibility rule.Example 2: Reflecting an
Any Condition Is Met (OR)visibility ruleTo reflect a rule where multiple conditions can grant access to a page variation, create a list of
allowedPermissions, one for each condition. To have page variation visibility, a member must be an identity in at least oneallowedPermissionsobject, and not be an identity in anydeniedPermissionsobject. For more details on how the permissions are evaluated during queries in this scenario, see the basic search flowchart.Visibility rule in Salesforce:

Required
permissionsobject:"permissions": [ { "name": "Source Specified Permissions", "permissionSets": [ {
"name": "Quebec or Montreal users",
"allowedPermissions": [
{
"identity": "UserCondition:Irrelevant:City",
"identityType": "VirtualGroup",
"securityProvider": "SALESFORCE-00DgL00000FDj3VUAT",
"additionalInfo": {
"Operator": "Equal",
"Value": "Quebec",
"ValueType": "string"
}
},
{
"identity": "UserCondition:Irrelevant:City",
"identityType": "VirtualGroup",
"securityProvider": "SALESFORCE-00DgL00000FDj3VUAT",
"additionalInfo": {
"Operator": "Equal",
"Value": "Montreal",
"ValueType": "string"
}
}
],
"deniedPermissions": []
}
]
}
]Beginning of the first and only permission set. Beginning of first allowedPermissionsobject. AnallowedPermissionsobject contains the Coveo identity specification associated with aShowSalesforce visibility rule. See Example 1 for more details.Beginning of the second allowedPermissionsobject.Example 3: Reflecting an
All Conditions Are Met (AND)visibility ruleTo reflect a rule where several conditions must be met to grant access to a page variation, create a permission set for each condition. To have page variation visibility, a member must be an
allowedPermissionsidentity in all permission sets and not be adeniedPermissionsidentity in any set. For more details on how the permissions are evaluated during queries in this scenario, see the permission set analysis flowchart.Visibility rule in Salesforce:

Required
permissionsobject:"permissions": [ { "name": "Source Specified Permissions", "permissionSets": [ {
"name": "Quebec Users",
"allowedPermissions": [
{
"identity": "UserCondition:Irrelevant:City",
"identityType": "VirtualGroup",
"securityProvider": "SALESFORCE-00DgL00000FDj3VUAT",
"additionalInfo": {
"Operator": "Equal",
"Value": "Quebec",
"ValueType": "string"
}
}
],
"deniedPermissions": []
},
{
"name": "Support Users",
"allowedPermissions": [
{
"identity": "UserCondition:Irrelevant:Department",
"identityType": "VirtualGroup",
"securityProvider": "SALESFORCE-00DgL00000FDj3VUAT",
"additionalInfo": {
"Operator": "Equal",
"Value": "Support",
"ValueType": "string"
}
}
],
"deniedPermissions": []
}
]
}
]Beginning of the first permission set. Beginning of an allowedPermissionsobject. AnallowedPermissionsobject contains the Coveo identity specification associated with aShowSalesforce visibility rule. See Example 1 for more details.Beginning of the second permission set. Example 4: Reflecting a visibility rule based on a Salesforce custom permission
The following example shows how to reflect a Salesforce visibility rule based on a Salesforce custom permission named
My Random Permission.Visibility rule in Salesforce:
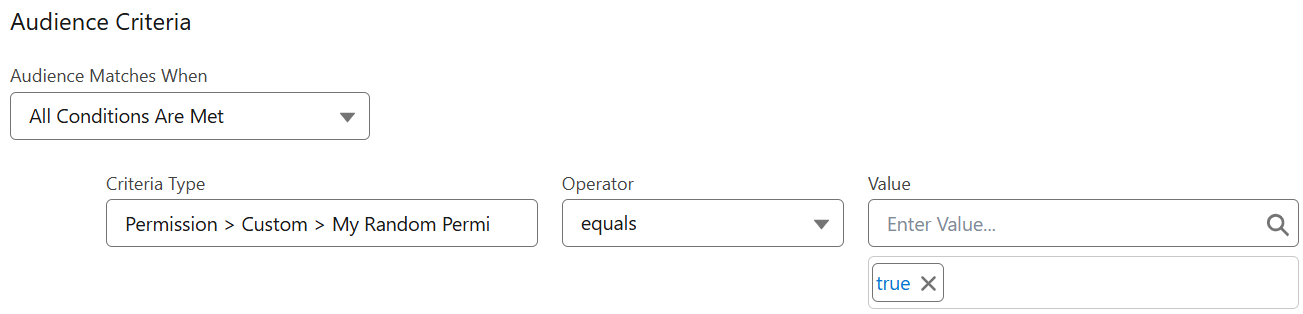
Required
permissionsobject:"permissions": [ { "name": "Source Specified Permissions", "permissionSets": [ { "name": "Quebec Users", "allowedPermissions": [ { "identity": "UserPermission:Custom:My_Random_Permission",
"identityType": "VirtualGroup",
"securityProvider": "SALESFORCE-00DgL00000FDj3VUAT",
"additionalInfo": {
"PermissionName": "My_Random_Permission",
"IsEnabled": "true"
}
}
],
"deniedPermissions": []
}
]
}
]The identityproperty value is theUserPermission:Custom:<CUSTOM_PERMISSION_API_NAME>format, where<CUSTOM_PERMISSION_API_NAME>is the API name of the Salesforce custom permission.The PermissionNameproperty value is the API name of the Salesforce custom permission.The IsEnabledproperty value reflects theValueentered in the visibility rule. -
Handling a post-login popup window
When accessing a Salesforce site, users might be presented with a one-time popup window that requires user acknowledgment before the requested page is accessible. If your Salesforce site behaves this way, configure the Web source to handle the popup window, as a user would, so that the crawler can reach the sitemap page. This is achieved by configuring a Web source post-login action.
For example, after logging into a Salesforce site, you encounter the following Salesforce platform infrastructure popup:
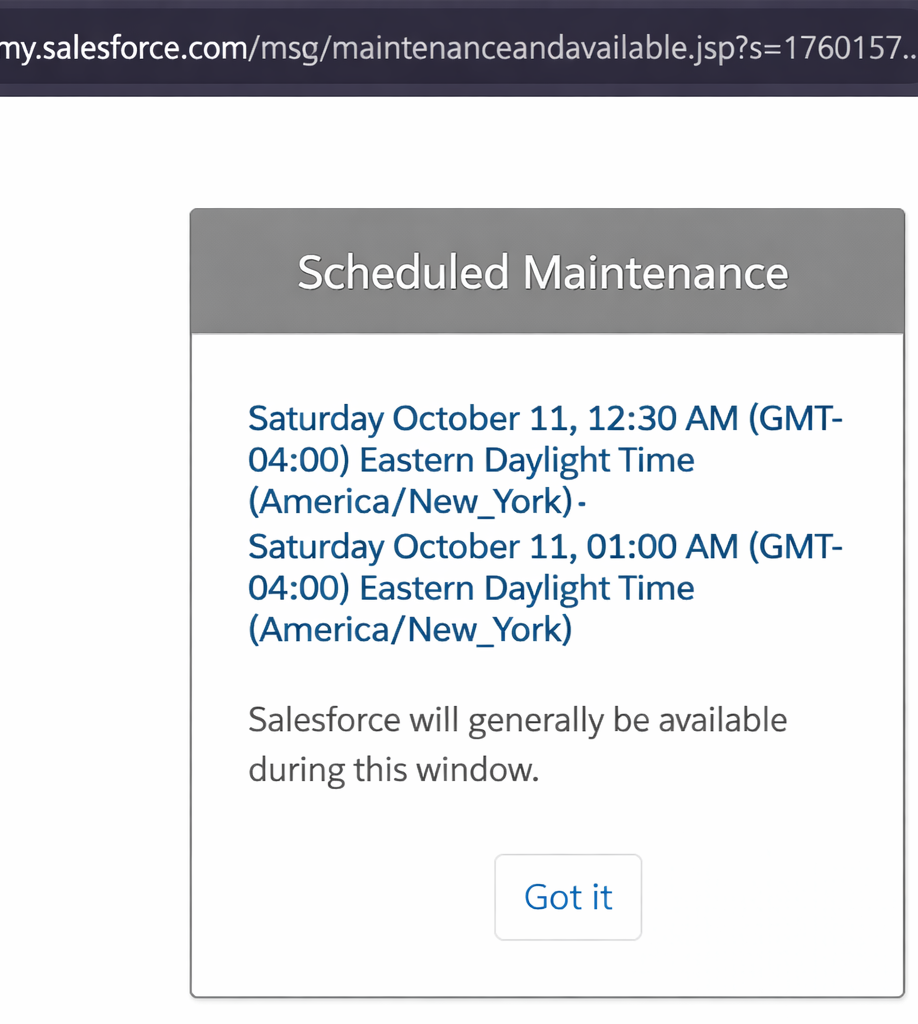
You inspect the button using your browser developer tools and see the following HTML markup:
<button
  type="button"
  class="maintenance-confirm-button"
  onclick="window.history.back();">
  Got it
</button>
To emulate a user clicking Got it, you configure your source as follows:
-
On the Sources (platform-ca | platform-eu | platform-au) page, click your source, and then click More > Edit source with JSON in the Action bar.
-
In the Edit configuration with JSON panel, use the search tool (
) to locate the FormAuthenticationConfigurationparameter. Itsvalueobject currently looks as follows:"value": "{\"authenticationFailed\":{\"method\":\"CookieNotSet\",.....\"customLoginSequence\":{}}" -
Remove the
}"at the end of thevalueobject so that you get:"value": "{\"authenticationFailed\":{\"method\":\"CookieNotSet\",.....\"customLoginSequence\":{} -
Append the following JSON snippet immediately after
\"customLoginSequence\":{}to configure the post-login action:,\"postLoginSequence\":{\"name\":\"Handle maintenance page\",\"url\":\"*\",\"urlContainsValue\":\"maintenanceandavailable.jsp\",\"steps\":[{\"name\":\"Dismiss maintenance modal\",\"waitDelayInMilliseconds\":500,\"actions\":[{\"type\":\"click\",\"elementIdentifier\":{\"identifier\":\"maintenance-confirm-button\",\"type\":\"default\",\"findType\":\"classname\"}}]}]}}"Example: Final FormAuthenticationConfiguration parameter value
"FormAuthenticationConfiguration": {
    "sensitive": false,
    "value": "{\"authenticationFailed\":{\"method\":\"CookieNotSet\",\"values\":[\"sid\"]},\"inputs\":[],\"formUrl\":\"https://somedomain.my.salesforce.com/apex/RedirectPage?siteType=lwr&basePath=/sitesDemo\",\"enableJavaScript\":true,\"forceLogin\":false,\"javaScriptLoadingDelayInMilliseconds\":1000,\"customLoginSequence\":{},\"postLoginSequence\":{\"name\":\"Handle maintenance page\",\"url\":\"*\",\"urlContainsValue\":\"maintenanceandavailable.jsp\",\"steps\":[{\"name\":\"Dismiss maintenance modal\",\"waitDelayInMilliseconds\":500,\"actions\":[{\"type\":\"click\",\"elementIdentifier\":{\"identifier\":\"maintenance-confirm-button\",\"type\":\"default\",\"findType\":\"classname\"}}]}]}}"
  },
This post-login action configuration can be translated as the following instruction to the source crawler: "When a page whose URL contains
maintenanceandavailable.jspis encountered, wait 500 milliseconds, and then click the element with the class namemaintenance-confirm-button."For more details on the post-login action parameters, see Configure an action.
-
Click Save.
Bypassing single sign-on (SSO)
If your Salesforce site uses SSO for authentication, targeting the LWR or Aura sitemap page directly in the Web source Starting URL box won’t work.
A potential workaround is to create a Visualforce redirection page and target that redirection page in your Web source instead.
This alternative has been successful in past implementations and uses the standard my.salesforce.com login page for authentication, which should still be accessible.
For this to work, the crawling user must have an internal Salesforce license, be able to log in to Salesforce, and have the View Setup and Configuration permission.
To create and use a Visualforce redirection page
-
Create a new Visualforce page in Salesforce named
RedirectPage. -
Use the following script for the
RedirectPageVisualforce page content:<apex:page > <script src="/soap/ajax/65.0/connection.js" type="text/javascript"></script> <script src="/soap/ajax/65.0/apex.js" type="text/javascript"></script> <script type="text/javascript"> AURA_SITEMAP_PAGE_NAME = 'AuraSitemap' LWR_SITEMAP_PAGE_NAME = 'LwrSitemap' window.onload = function() { startSiteRedirect(); }; function startSiteRedirect() { // Re-used the logged-in session for following api calls. sforce.connection.sessionId = "{!$Api.Session_ID}"; // Query parameters. var params = new URLSearchParams(window.location.search); var siteType = params.get("siteType"); var sitePrefixUrl = params.get("basePath"); try { // Query to find the site for the specified basePath. var siteQuery = "select Id, MasterLabel,UrlPathPrefix from Site where status = 'active' and sitetype = 'ChatterNetworkPicasso'"; var records = sforce.connection.query(siteQuery).getArray('records'); var siteMasterLabel = null; var allSites = ""; records.forEach(function(record) { var curPath = '/' + (record.get('UrlPathPrefix') ?? ''); allSites = allSites + "," + curPath; if (curPath === sitePrefixUrl){ siteMasterLabel = record.get('MasterLabel'); } }); if (siteMasterLabel === null) { error("No site found with prefix url '" + sitePrefixUrl + "'. Expected on of ["+ allSites +"]") return; } // Using the site master label, find the network id and visualforce url to call the sitemap page. var networkQuery = "select id,UrlPathPrefix from Network where name = '" + siteMasterLabel + "'" var records = sforce.connection.query(networkQuery).getArray('records'); var networkId = records[0].get('Id'); var vforceUrlPrefix = records[0].get('UrlPathPrefix'); // Using 'servlet/networks/switch?networkId=' to re-use the authenticated user session and bypass the site login page (including SSO). var redirectTo = '../' + vforceUrlPrefix + '/apex/'+ (siteType === 'lwr' ? LWR_SITEMAP_PAGE_NAME : AURA_SITEMAP_PAGE_NAME) + '?basePath='+sitePrefixUrl; var strURL = window.location.origin + '/servlet/networks/switch?networkId=' + networkId.substring(0,15) + '&startURL='+redirectTo; window.location.replace(strURL); }catch(e){ console.log('An error has occurred. Error:' +e); error('An error has occurred. Error:' +e); } } function error(message){ document.getElementById("message").innerHTML = message; } </script> <p id="message"></p> </apex:page> -
In the Visualforce page settings, enable Available for Lightning Experience, Experience Builder sites, and the mobile app.
-
Save the Visualforce page.
-
On the Sources (platform-ca | platform-eu | platform-au) page of the Coveo Administration Console, click the Web source, and then click More > Edit configuration with JSON in the Action bar.
-
In the Edit configuration with JSON panel, select the
Parameterstab and locate theIndexExternalPagesparameter. -
Set its
valuetotrue."IndexExternalPages": { "sensitive": false, "value": "true" } -
Click Save.
-
On the Sources (platform-ca | platform-eu | platform-au) page of the Coveo Administration Console, click the Web source, and then click Edit in the Action bar.
-
In your Web source Starting URL box, enter the URL of the
RedirectPageVisualforce page, specifying thesiteType(that is,lwroraura) andbasePathquery parameters. For example:https://somedomain.my.salesforce.com/apex/RedirectPage?siteType=lwr&basePath=/sitesDemo -
If you’re creating the Web source, proceed to the next steps. If you’re editing an existing Web source, click Save.
Build and validate the first Web source
-
On the Sources (platform-ca | platform-eu | platform-au) page of the Coveo Administration Console, click the source, and then click More > Rebuild in the Action bar.
-
When the source build is complete, validate the indexed items.
-
On the Sources (platform-ca | platform-eu | platform-au) page, click the Web source, and then click More > Open in the Content Browser.
-
Verify that the expected number of items were indexed.
-
Verify that the proper page variations were indexed.
-
Click an item, and then click Properties in the Action bar.
-
Click Quick view.
-
-
Verify that the proper permissions were applied to the indexed items.
-
On the Content Browser (platform-ca | platform-eu | platform-au) page, click
 near the upper-right corner, and then select Search as.
 -
Enter an email address of a user that should have access to the indexed items, and then click Search.
-
Repeat the previous step for a user that shouldn’t have access to the indexed items.
-
-
Create the other Web sources
Once the first Web source is configured and working, duplicate it for each remaining audience and update the crawling user and permissions.
-
On the Sources (platform-ca | platform-eu | platform-au) page of the Coveo Administration Console, click the source to duplicate, and then click More > Duplicate in the Action bar.
-
Click the new source, and then click Edit in the Action bar.
-
On the Authentication subtab, update the crawling user credentials to reflect the new audience, and then save your changes.
-
On the Sources (platform-ca | platform-eu | platform-au) page, click your source, and then click More > Edit source with JSON in the Action bar.
-
In the Edit configuration with JSON panel, update the
permissionsobject to reflect the new audience. -
Save the source.
-
Build and validate the new source as you did for the first source.