Data Health Overview
Data Health Overview
The Overview (platform-ca | platform-eu | platform-au) tab of the Data Health (platform-ca | platform-eu | platform-au) page provides a breakdown of data validations performed within your organization. These validations are based on specific criteria and are categorized by rules (for example, syntax rules, commerce-related rules, etc.).
The Overview tab lets you investigate validation errors, their severity levels, and the total number of impacted events accordingly. You can also check the status of each validation criteria, regardless of whether they have passed or failed. This provides you with a broader perspective on your organization data integrity, highlighting the areas that need to be investigated or fixed.
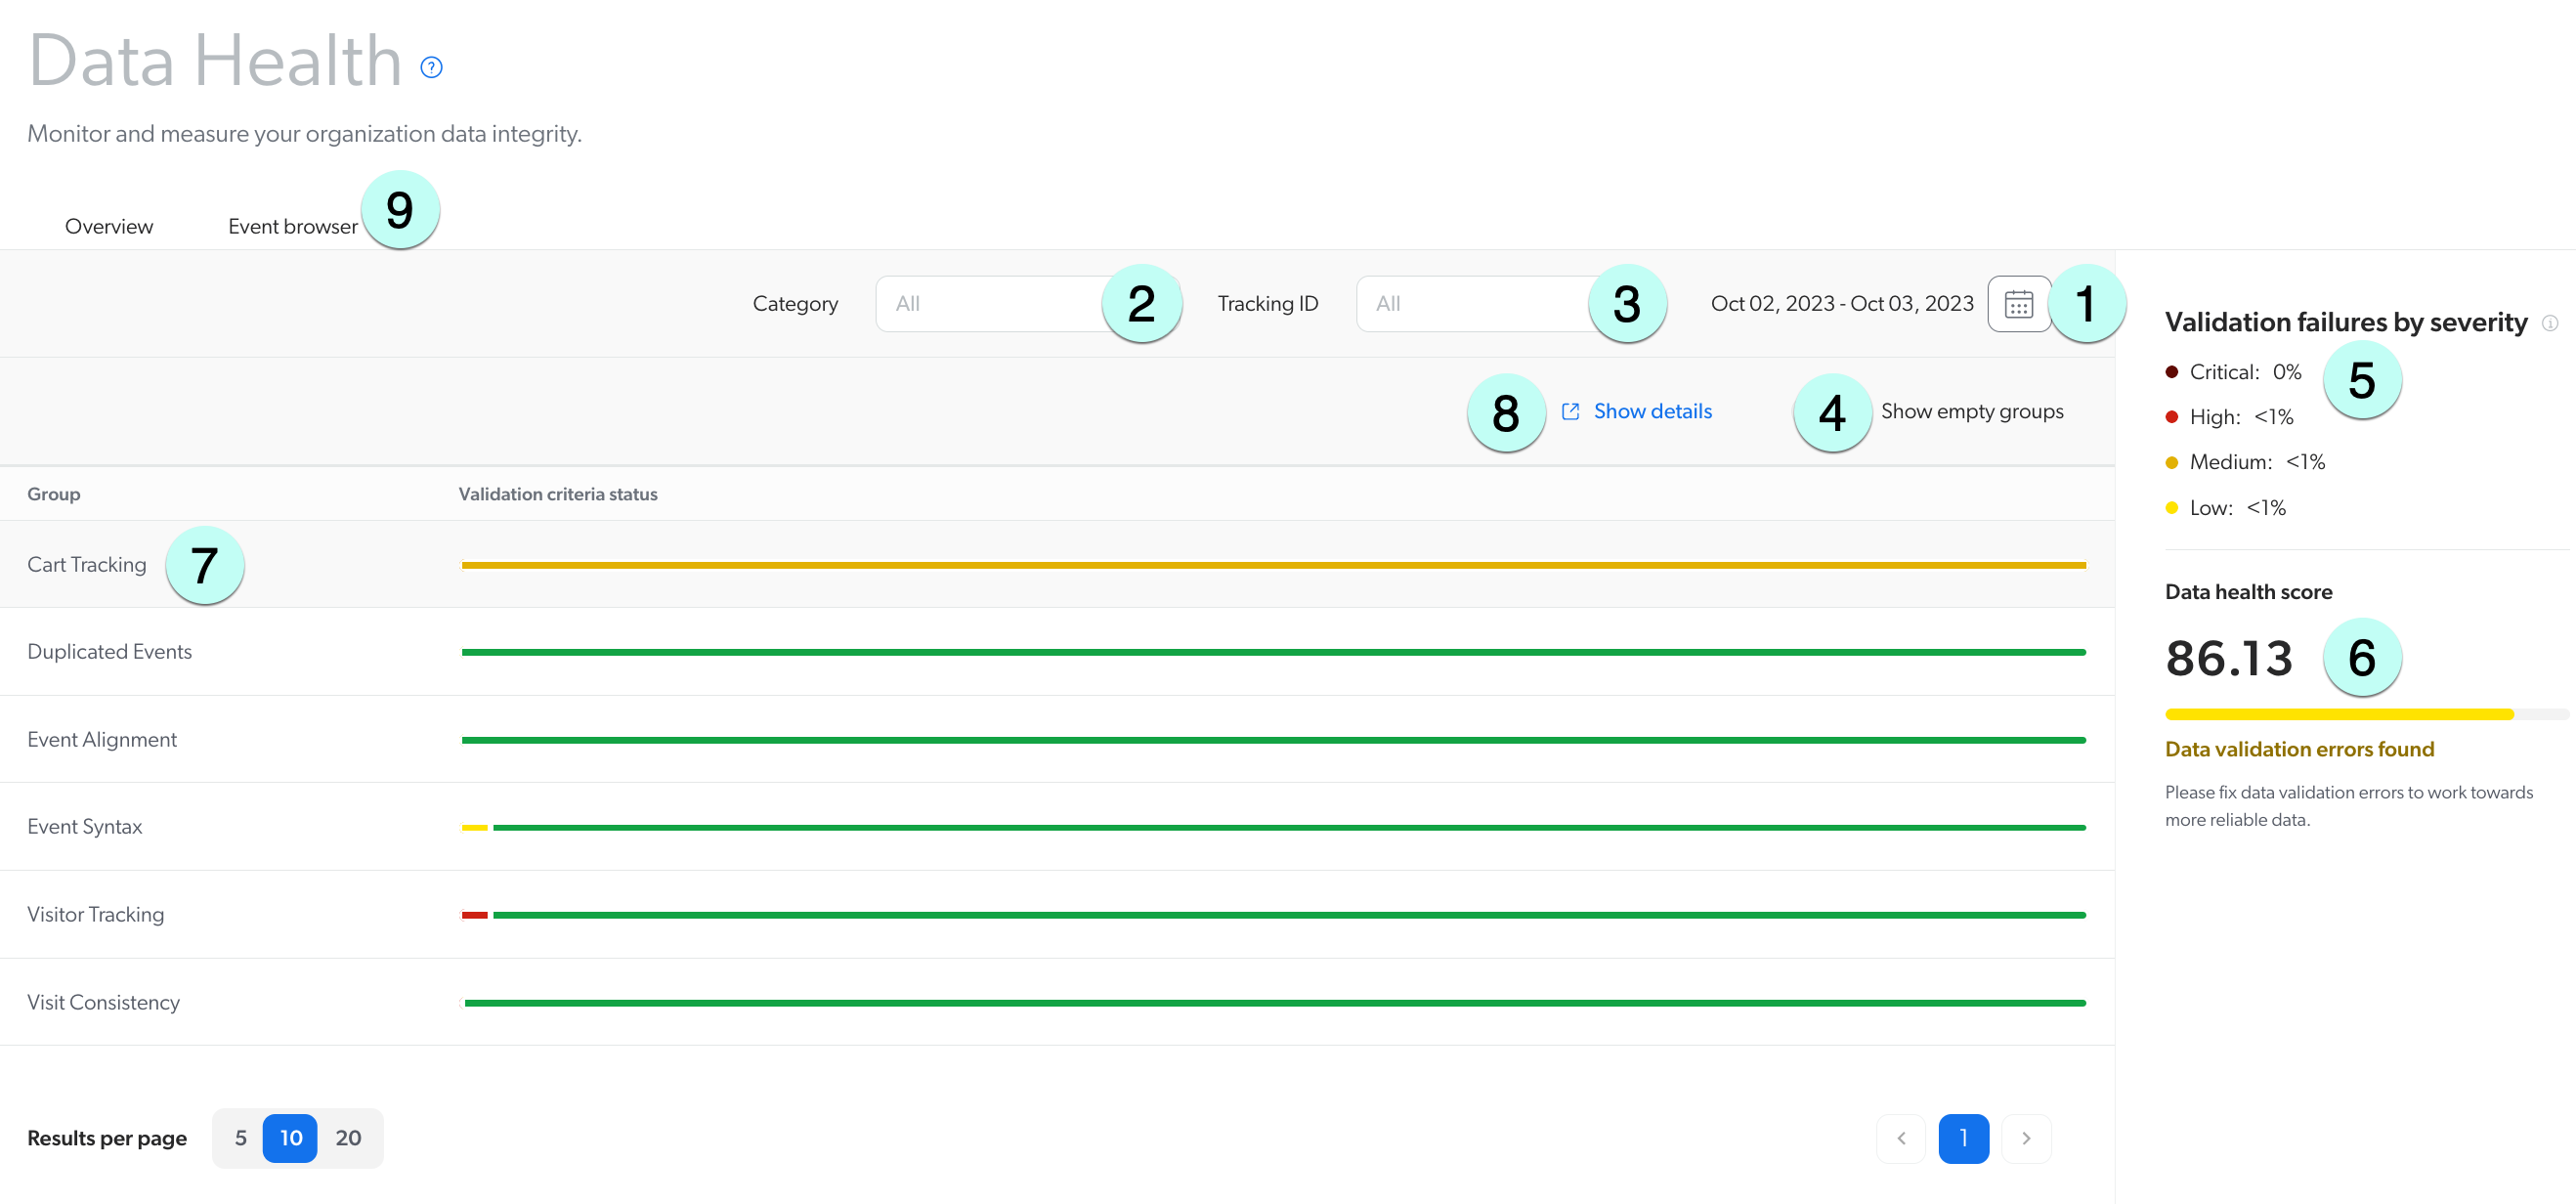
1 Select the date range you want to review.
2 Click the Category dropdown menu, and then select the option applicable to you. This feature is useful if you use multiple Coveo solutions.
3 Click the Tracking ID dropdown menu, and then select a site ID to filter the passed and failed validations.
4 Enable the Show empty groups option to view the groups that don’t have the required events to run their validation check.
5 View the Validation failures by severity section to inspect the breakdown of failed validations and their respective severity levels.
|
|
Note
The percentages shown with each severity level only refer to validations that failed. |
6 Data health score is a summary of your overall data integrity.
7 Click for a specific Group to view its passing and failing criteria.
You can also see an example event payload with the cause, impact, and solution for failing events.
|
|
Note
|
8 Select the Event errors tab for a detailed analysis of failing syntactic validations.
9 Select the Event browser tab to inspect a specific event.
Validation failures by severity
The Validation failures by severity section provides a snapshot of the total percentage of failed validation by severity levels. Severity levels refer to the measure of importance awarded to validation rules. Categorizing validation criteria by severity helps organize data health priorities by concentrating on the most critical issues that can impact your data.
There’s a set level of severity, ranging from critical to low, for each event type-validation criteria combination:
| Severity level | Description |
|---|---|
Critical |
The event is completely worthless if this validation fails. |
High |
An important validation that impacts core functionalities of your Coveo solutions if it fails repeatedly. |
Medium |
This validation impacts the overall quality of your Coveo solutions without breaking core functionalities if it fails repeatedly. |
Low |
This validation mostly impacts your reporting without breaking any core functionalities. |
The Validation failures by severity section gives you an overall view of failed events by severity level.
To view the severity level by individual failed validation criteria, click for the group you want to inspect.
Data health score
The Data health score section provides you with your organization data status at a glance so that you can allot the necessary time and resources to assess and fix any validation errors that may have occurred. The goal is to continuously improve your data so you reach the highest score possible. This ensures consistent accuracy of reported metrics.
The data health score encompasses the entirety of your organization data and is calculated by a weighted average. The following formula is used when computing the score for a single rule. For multiple rules (for example, global score or the score for an entire group), the same formula is used for each rule, and then the average for all the rules is computed.
1 - (severity_constant * number of failed instances / number of validated instances)
-
severity_constantrefers to the weighting factor applied to specific validation criteria. The higher the validation criteria severity, the greater the constant, which in turn impacts the data health score. -
number of failed instancesrefers to the number of events that didn’t meet the validation criteria. -
number of validated instancesrefers to the number of instances subjected to a validation check.
|
|
Notes
|
The calculated score therefore provides a layered assessment of data integrity, as it takes the number of failed events into account, but just as importantly, considers the severity of those events to provide a better context.
How to troubleshoot your organization’s data health
When inspecting your data health, you may come across validation criteria that show a lower data health score. Your score indicates the health of your organization data and if there are validation errors that need to be addressed. The Overview tab can be leveraged to focus on any problem areas in your data so that you can ensure that your search solution is working as it should be.
Although the score may not seem significantly low, it’s still important to assess what may be decreasing it.
Step 1: Adjust the date range
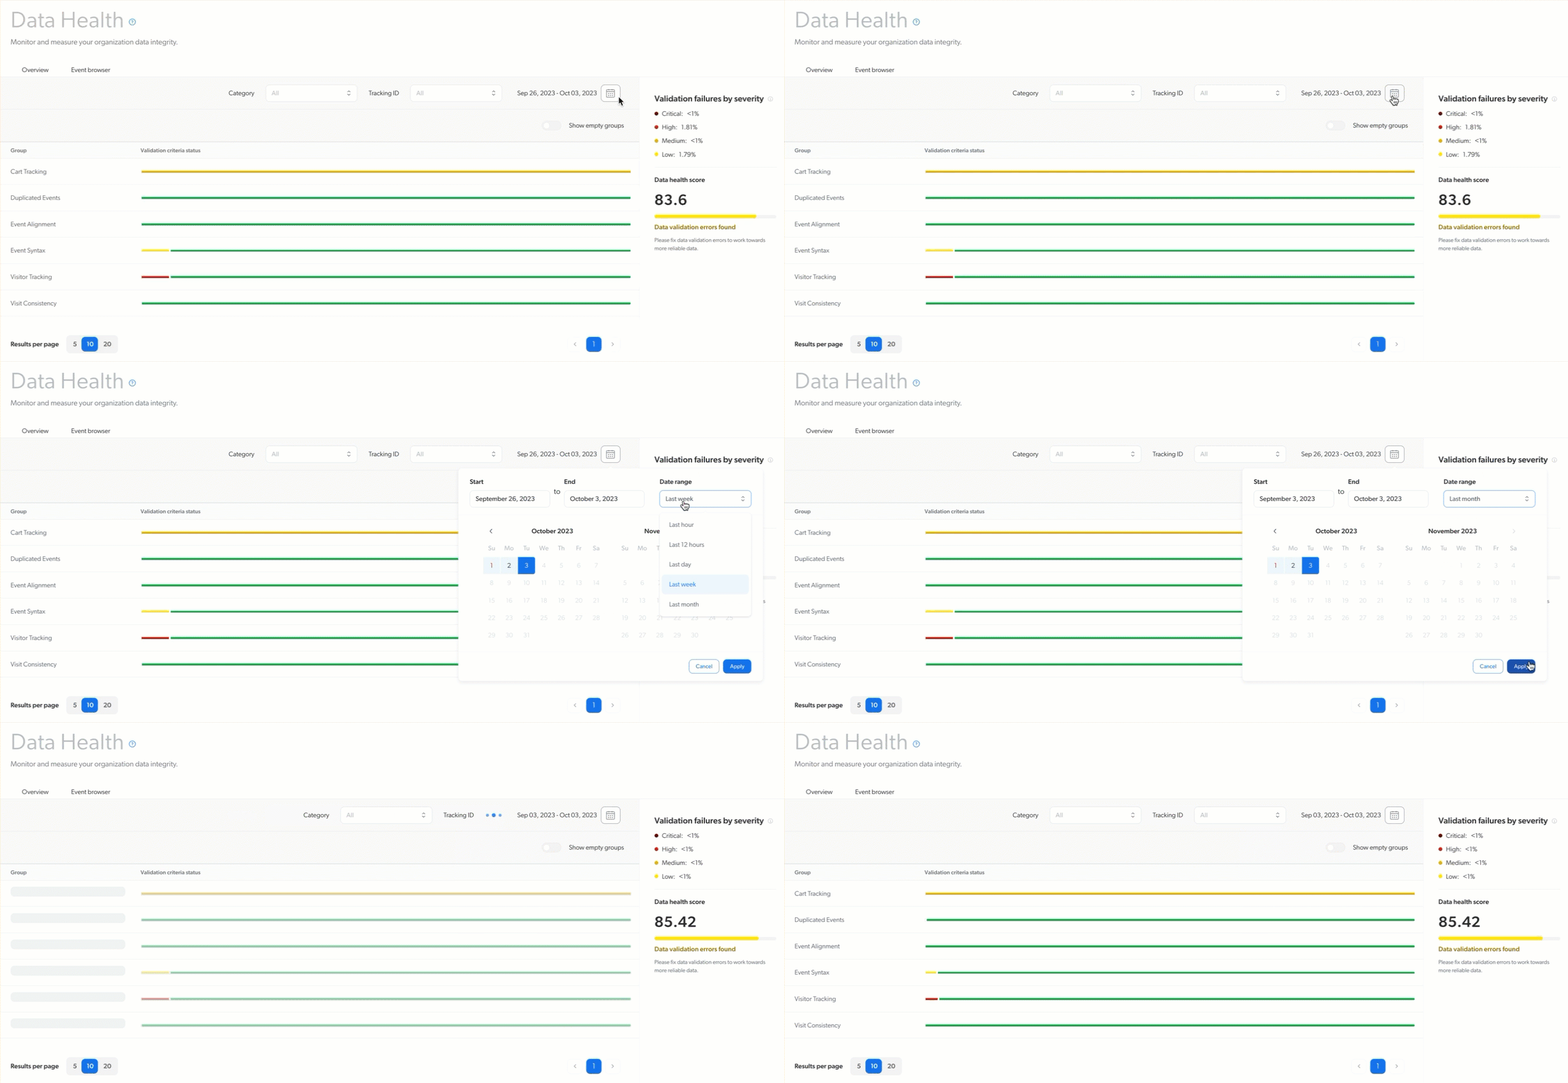
To obtain a better picture of your group scores as well as your overall score, modify the Date range after selecting the date picker. Possible options are focusing on a specific day, or even the last hour. This lets you see how the score may have changed at different periods of time.
|
|
Note
The Overview tab can display data for up to a one-month period, going back from the current date. |
Step 2: Identify the cause
It’s important to identify what may be causing the score to drop.
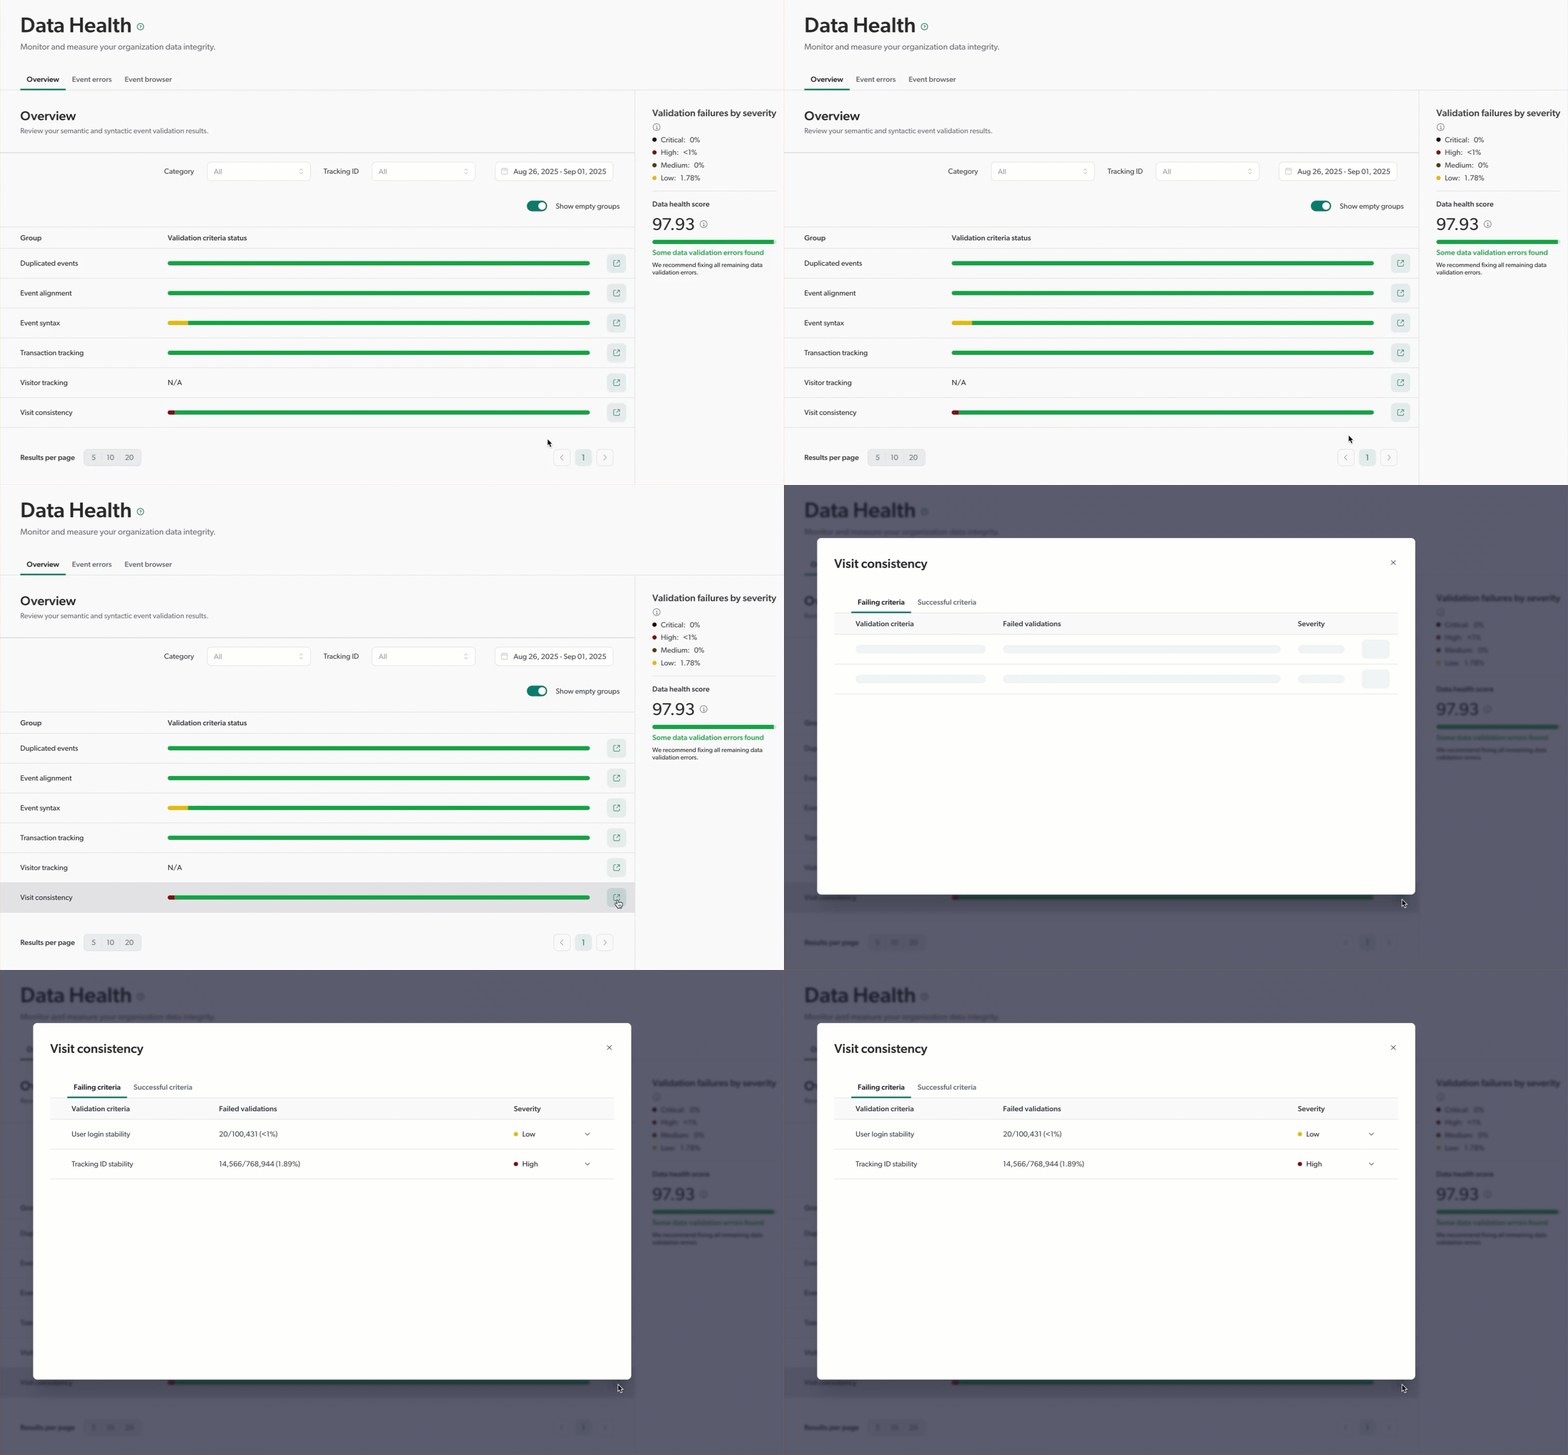
Inspect specific groups with lower scores by clicking .
|
|
Even if the score doesn’t seem significantly low, it’s nevertheless a good idea to get more details to troubleshoot any issues to improve your overall score and maintain data integrity. |
Step 3: View details
To view the details of a specific group, click next to it.
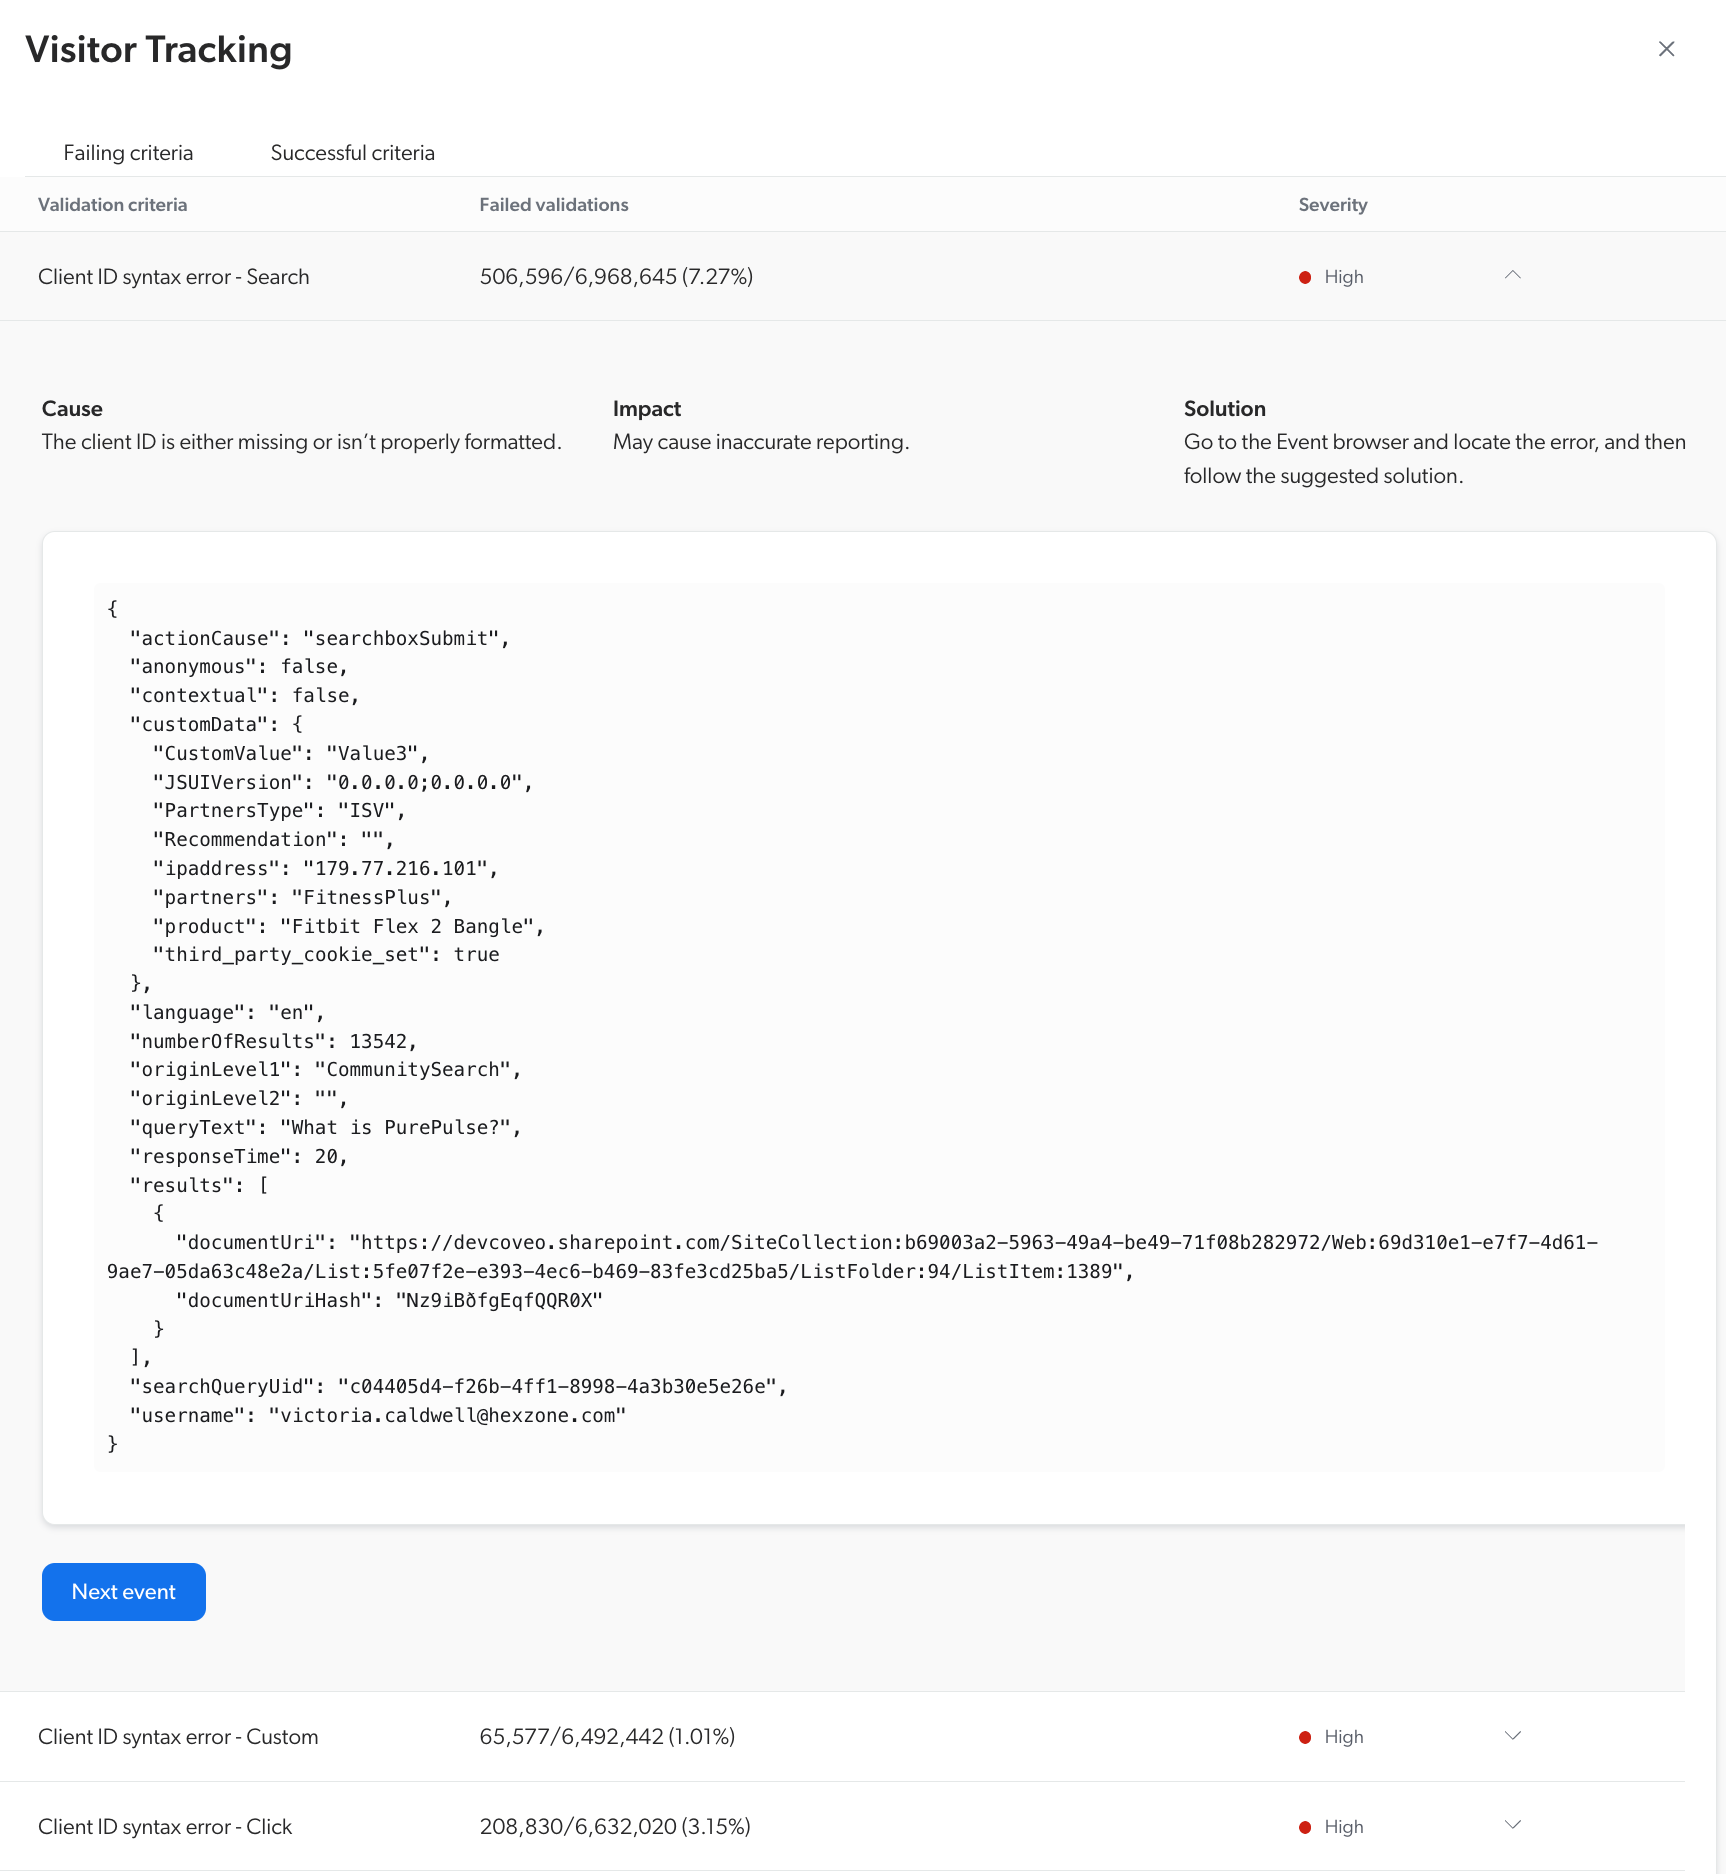
The Failing criteria tab will list the validation criteria that didn’t pass, along with the number of recurrences, and the severity level.
Click a row to expand it. With the cause, impact, and solution visible, you now have a better understanding of what needs to be resolved. The panel also provides an example of the event payload that failed the validation criteria.
|
|
Note
If the validation fails for a visit, the Show visit in Event Browser button will appear in the details modal for that group.
For example, consider a case when there’s a validation issue with user login.
Under Group, you click 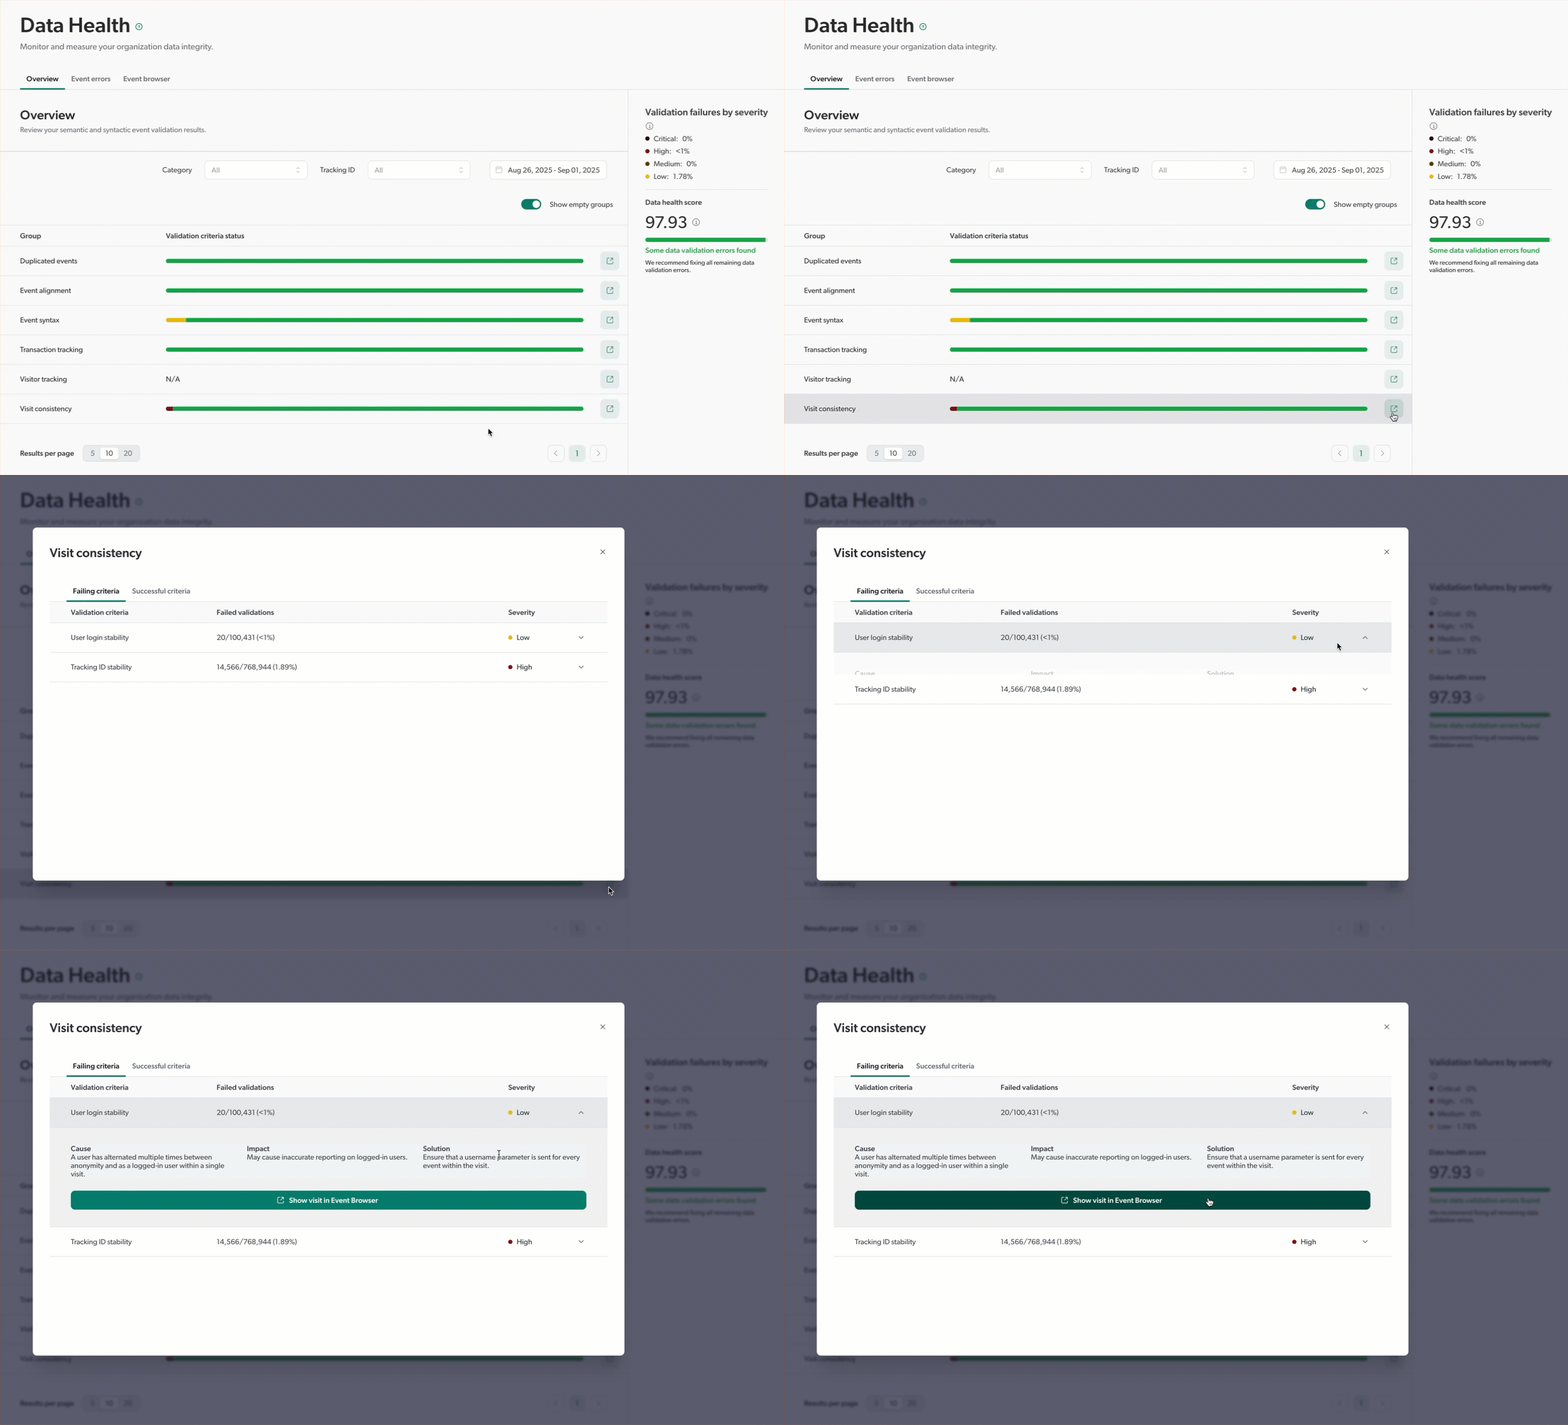
|
Step 4: Go to the Event Browser
Often times, the solution to the validation criteria error will be to use the Event browser to find the error and follow the instructions.
For example, by viewing the details of Visitor Tracking, you can see the error is a search event type.
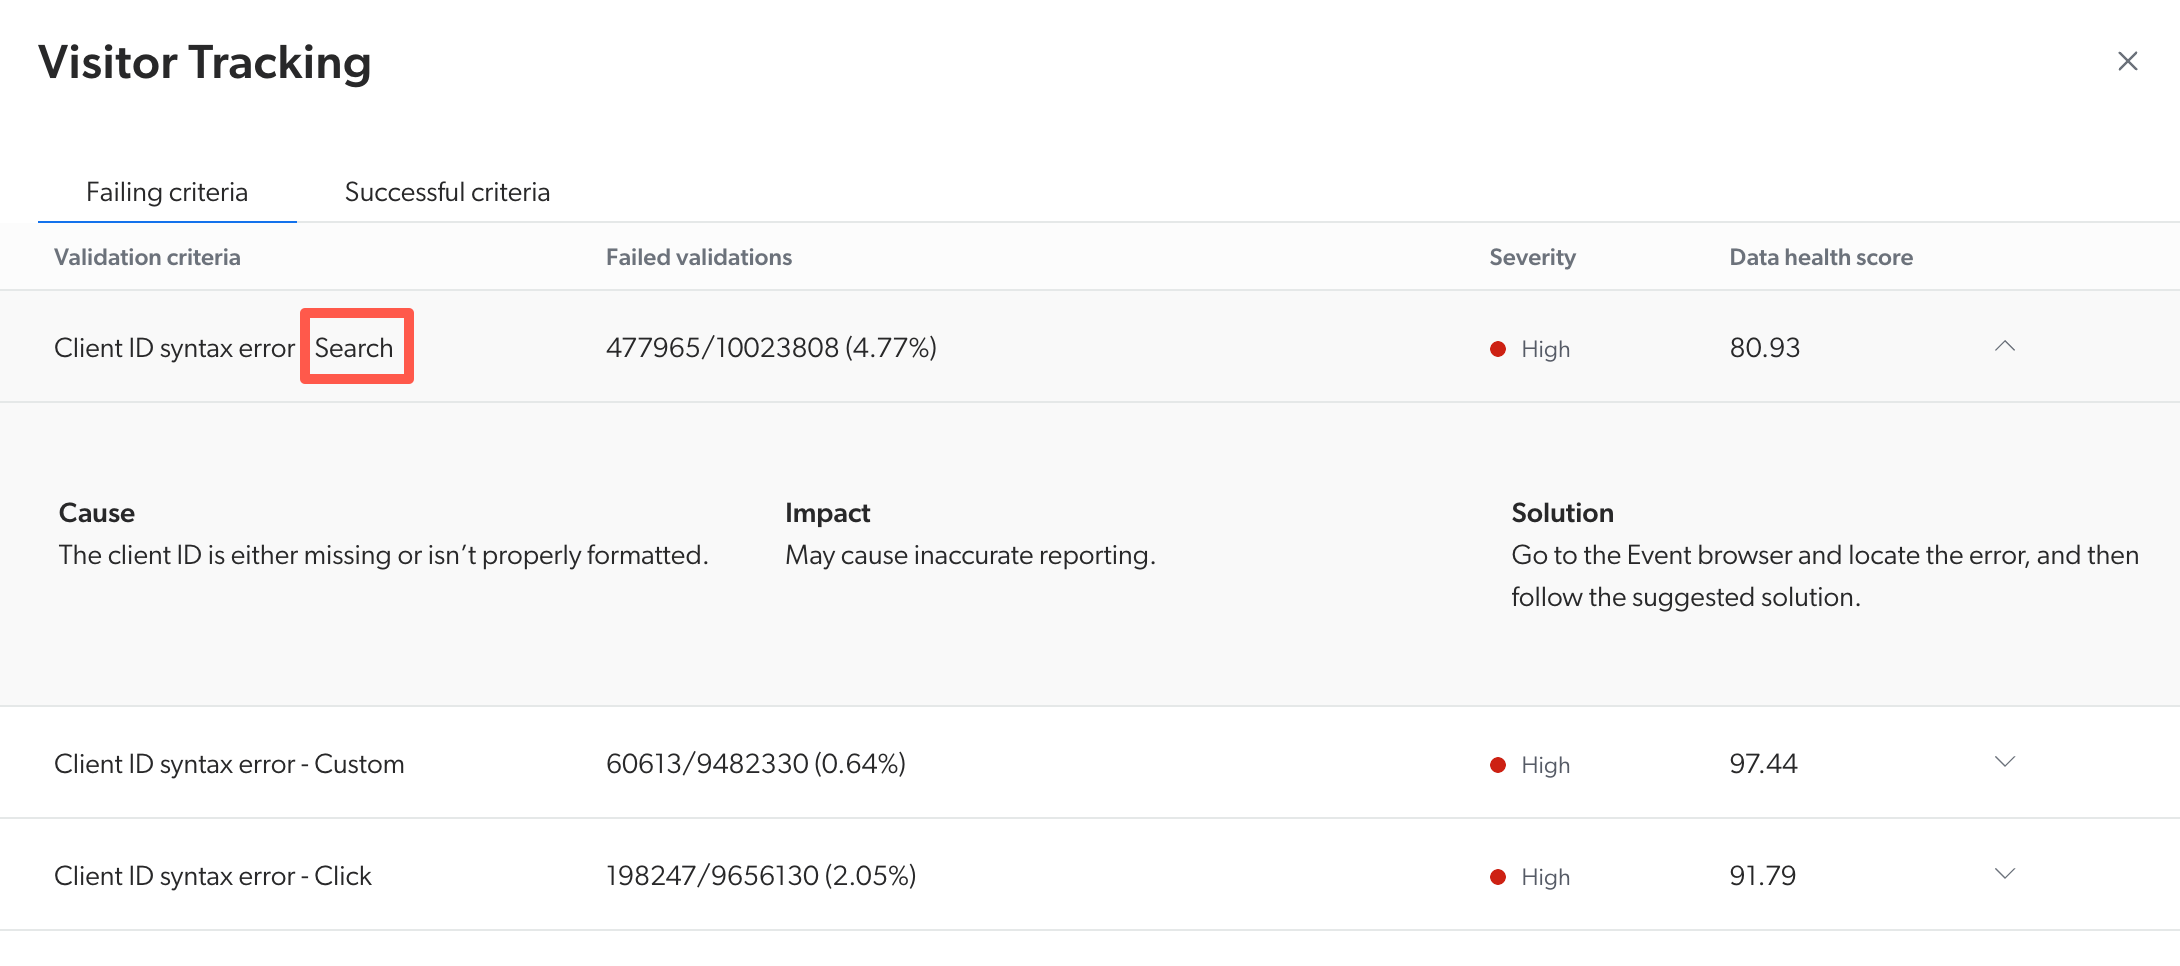
With this information on hand, you can do the following:
-
Go to the Event browser (platform-ca | platform-eu | platform-au).
-
Select the Invalid option from the Status section.
-
Select the search option from Event type section.
-
You can now filter by the client ID and expand a line to view the reason for the error.
-
After expanding a row, you can view the complete event content by clicking Show event content.
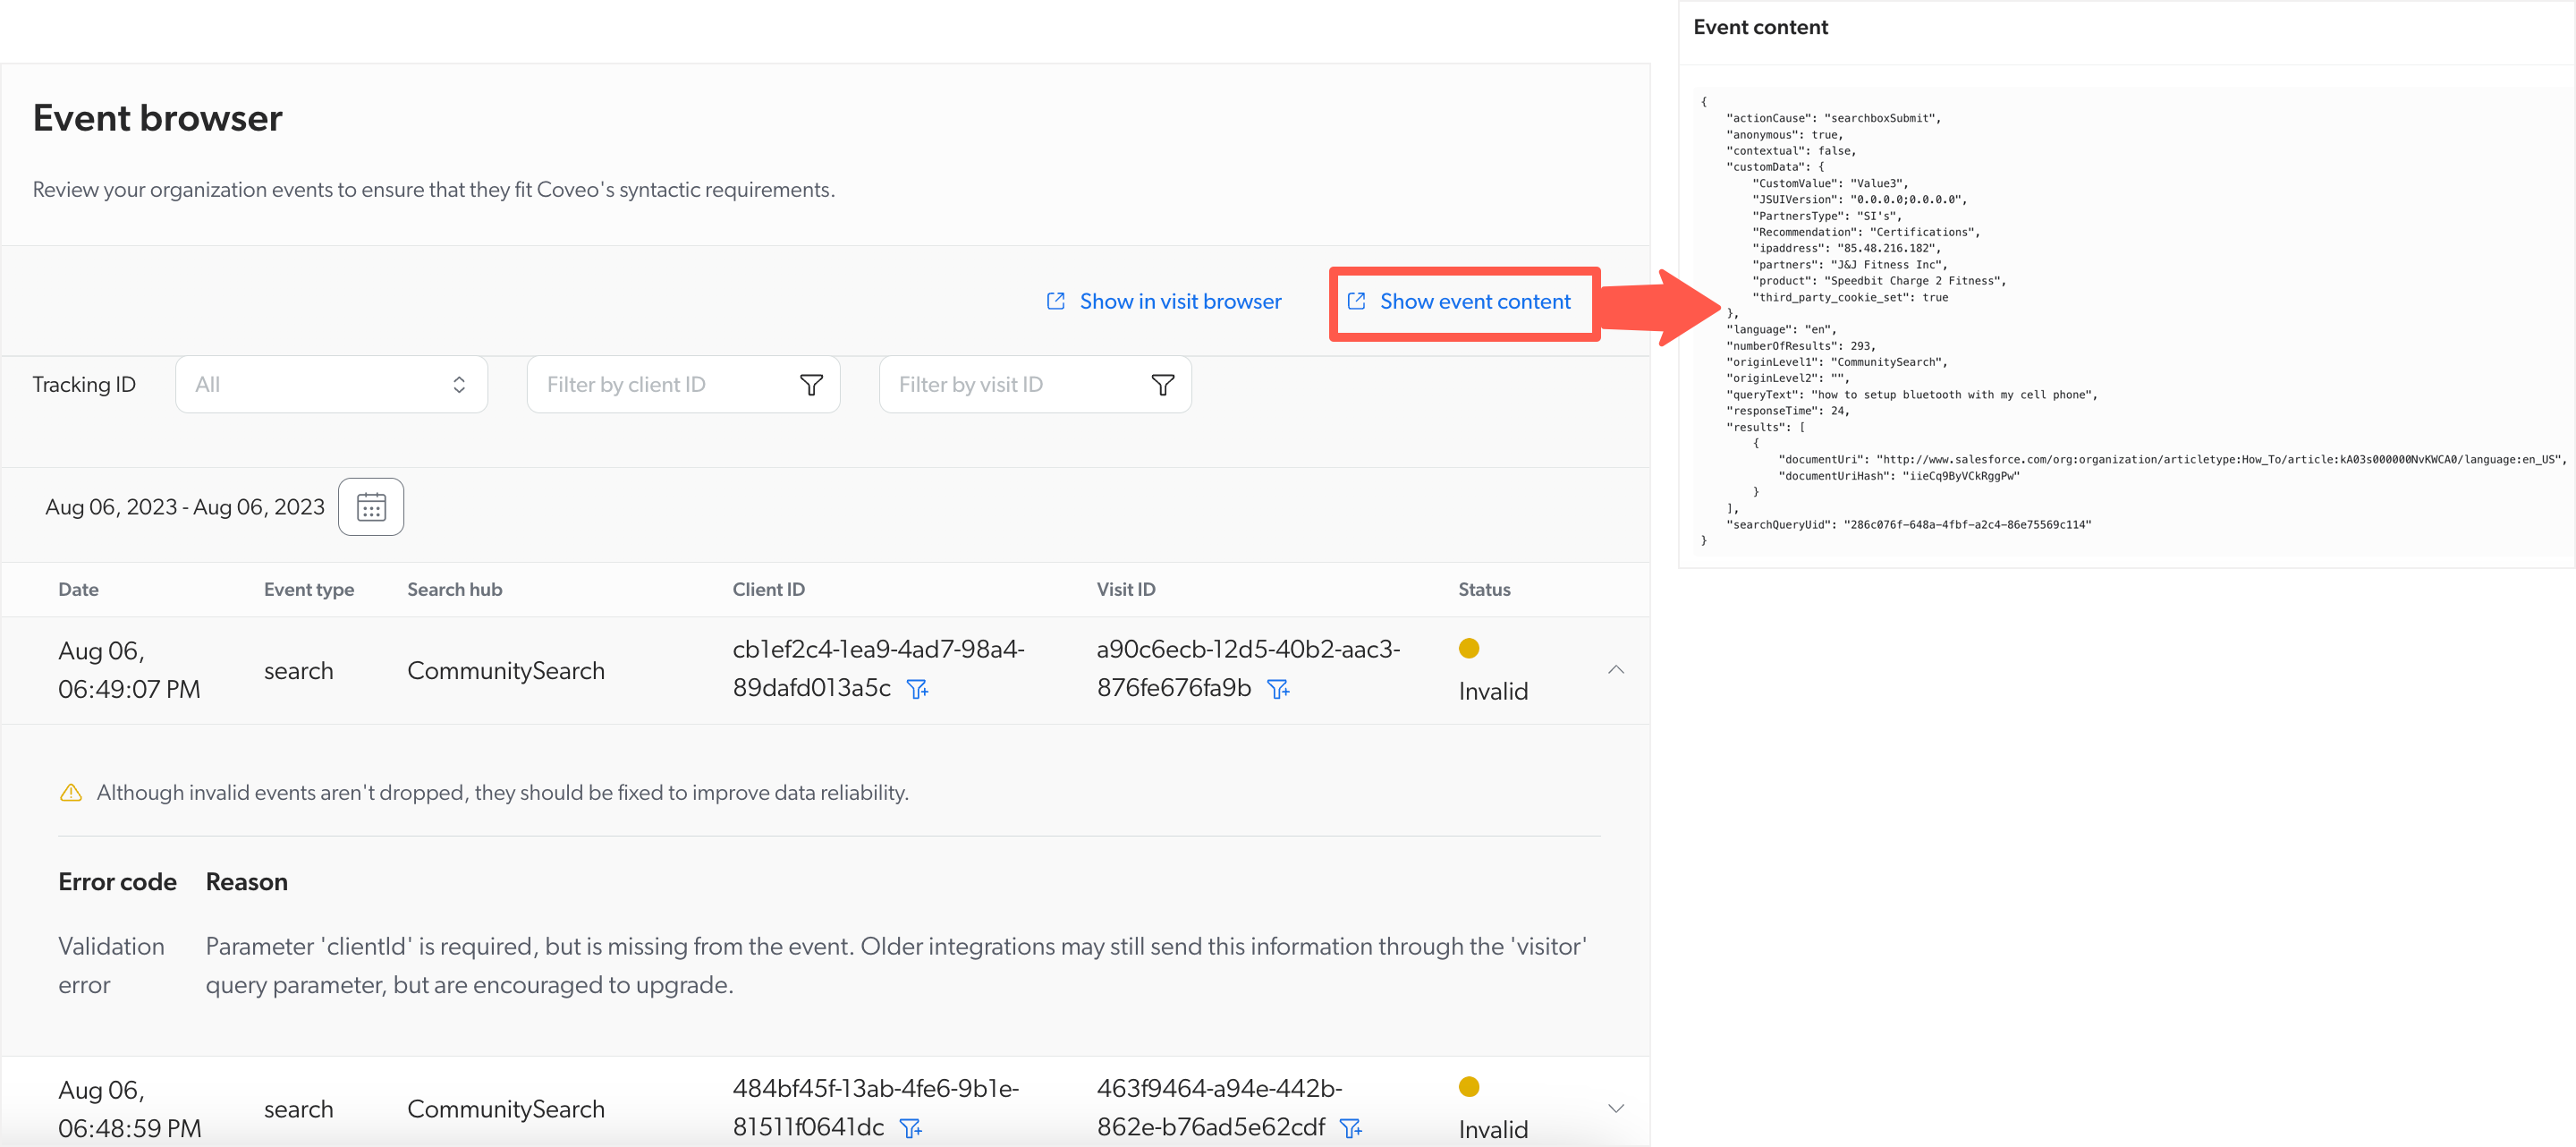
-
You can open the Visit Browser page containing that specific event by clicking Show in Visit Browser. The Visit Browser opens in a separate tab.
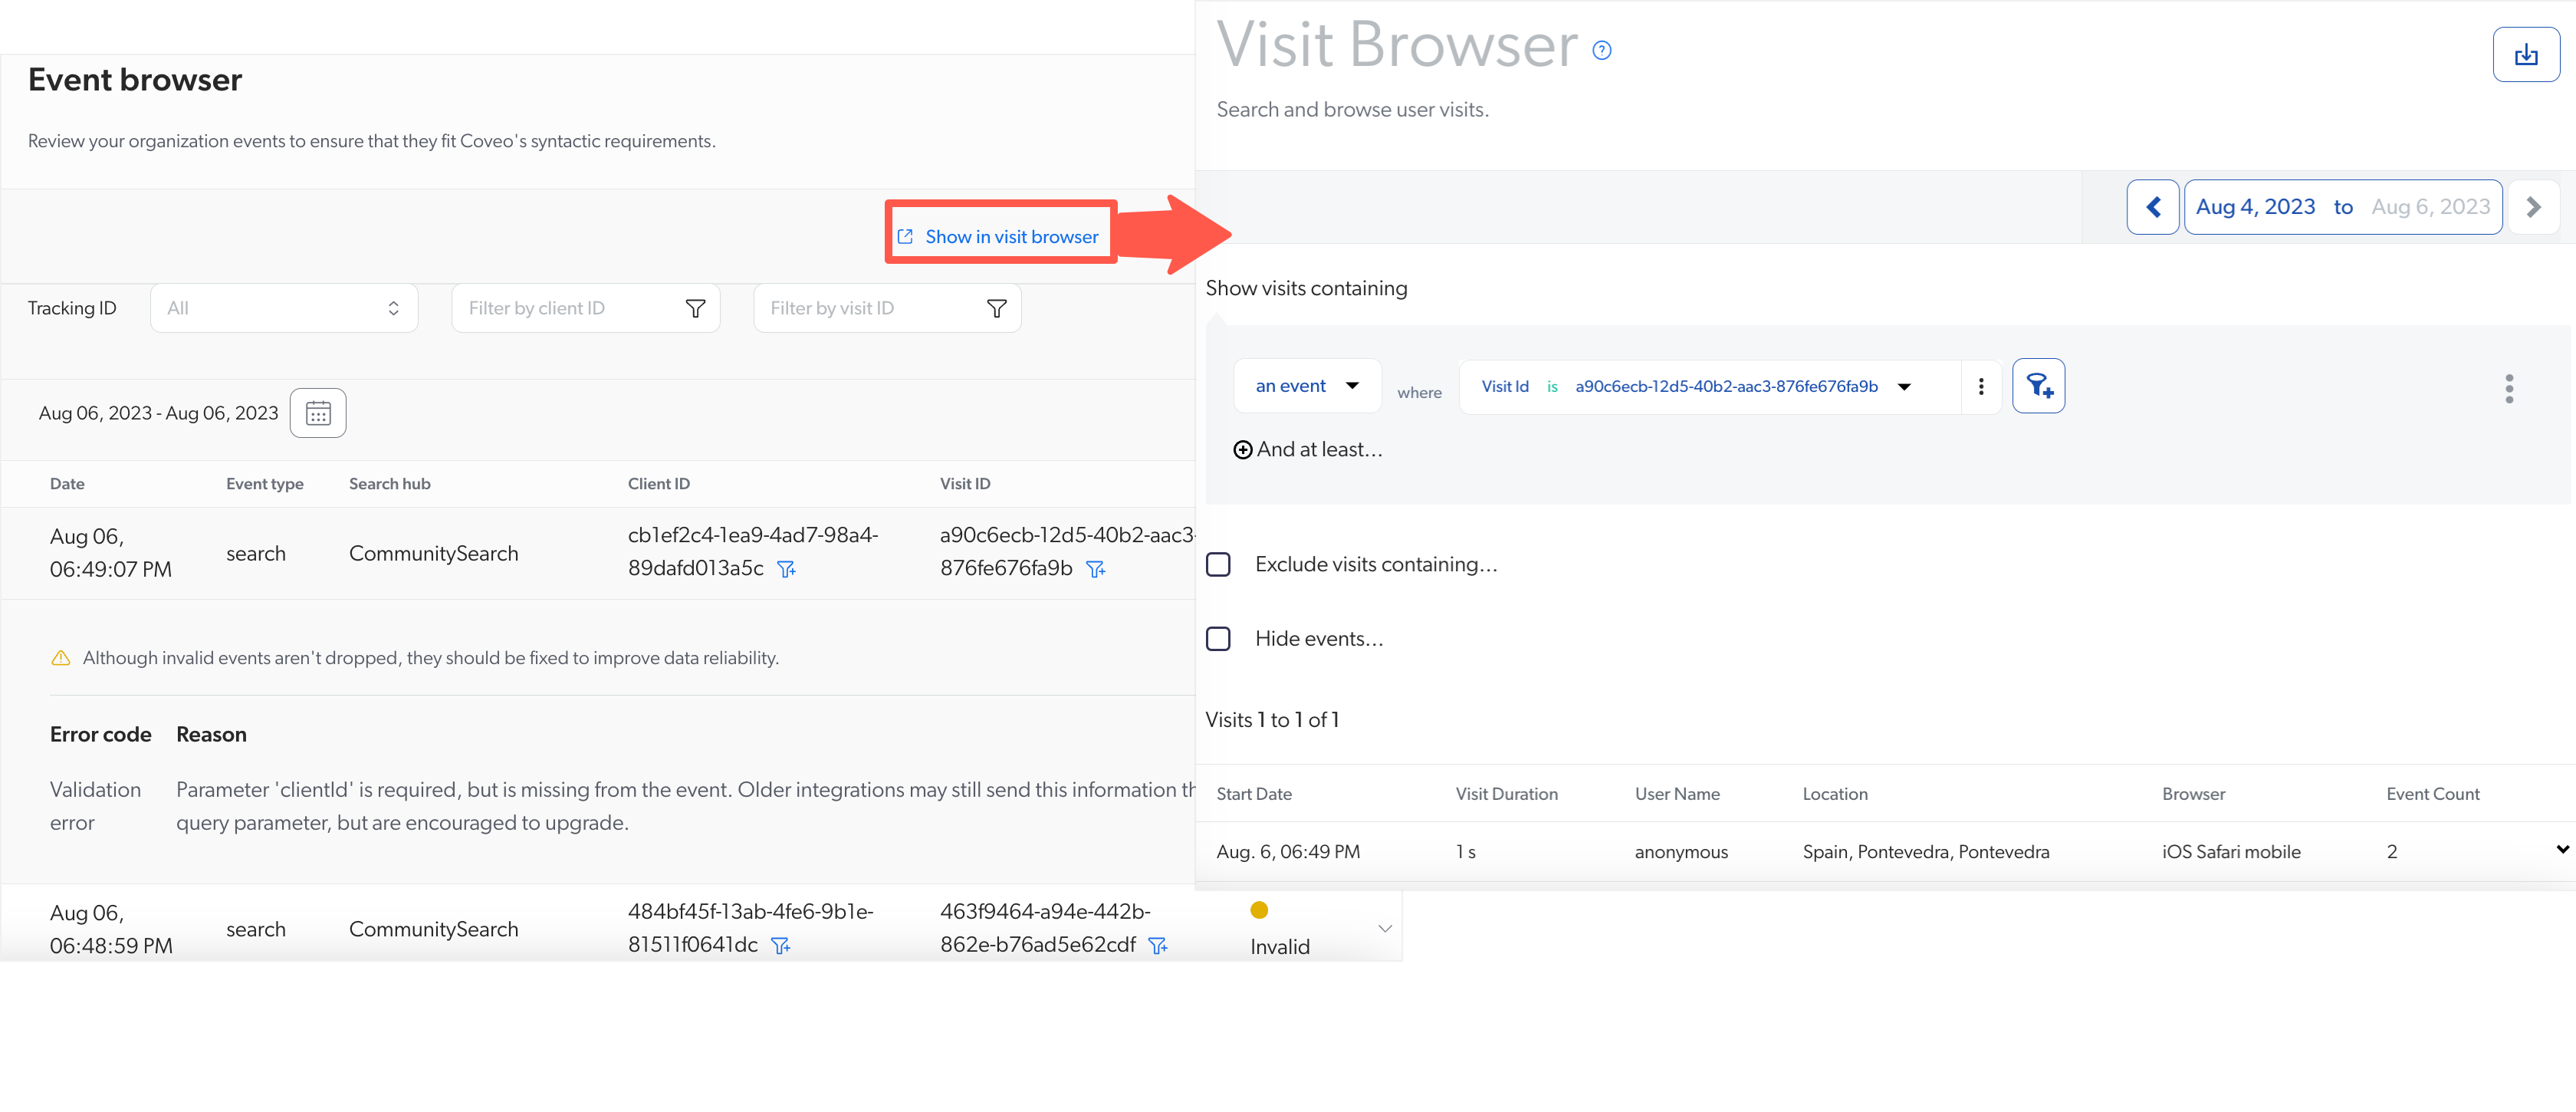
In the context of data health, the Visit Browser is useful for implementers, as it provides a detailed view of individual events within user visits. This enables the recreation of specific issues by identifying recurrences and anomalies, offering a deeper insight into potential problems.
-