Spotlight content rules for product listing pages
Spotlight content rules for product listing pages
|
|
Contact your Coveo representative to enable spotlight content rules in your Coveo organization. |
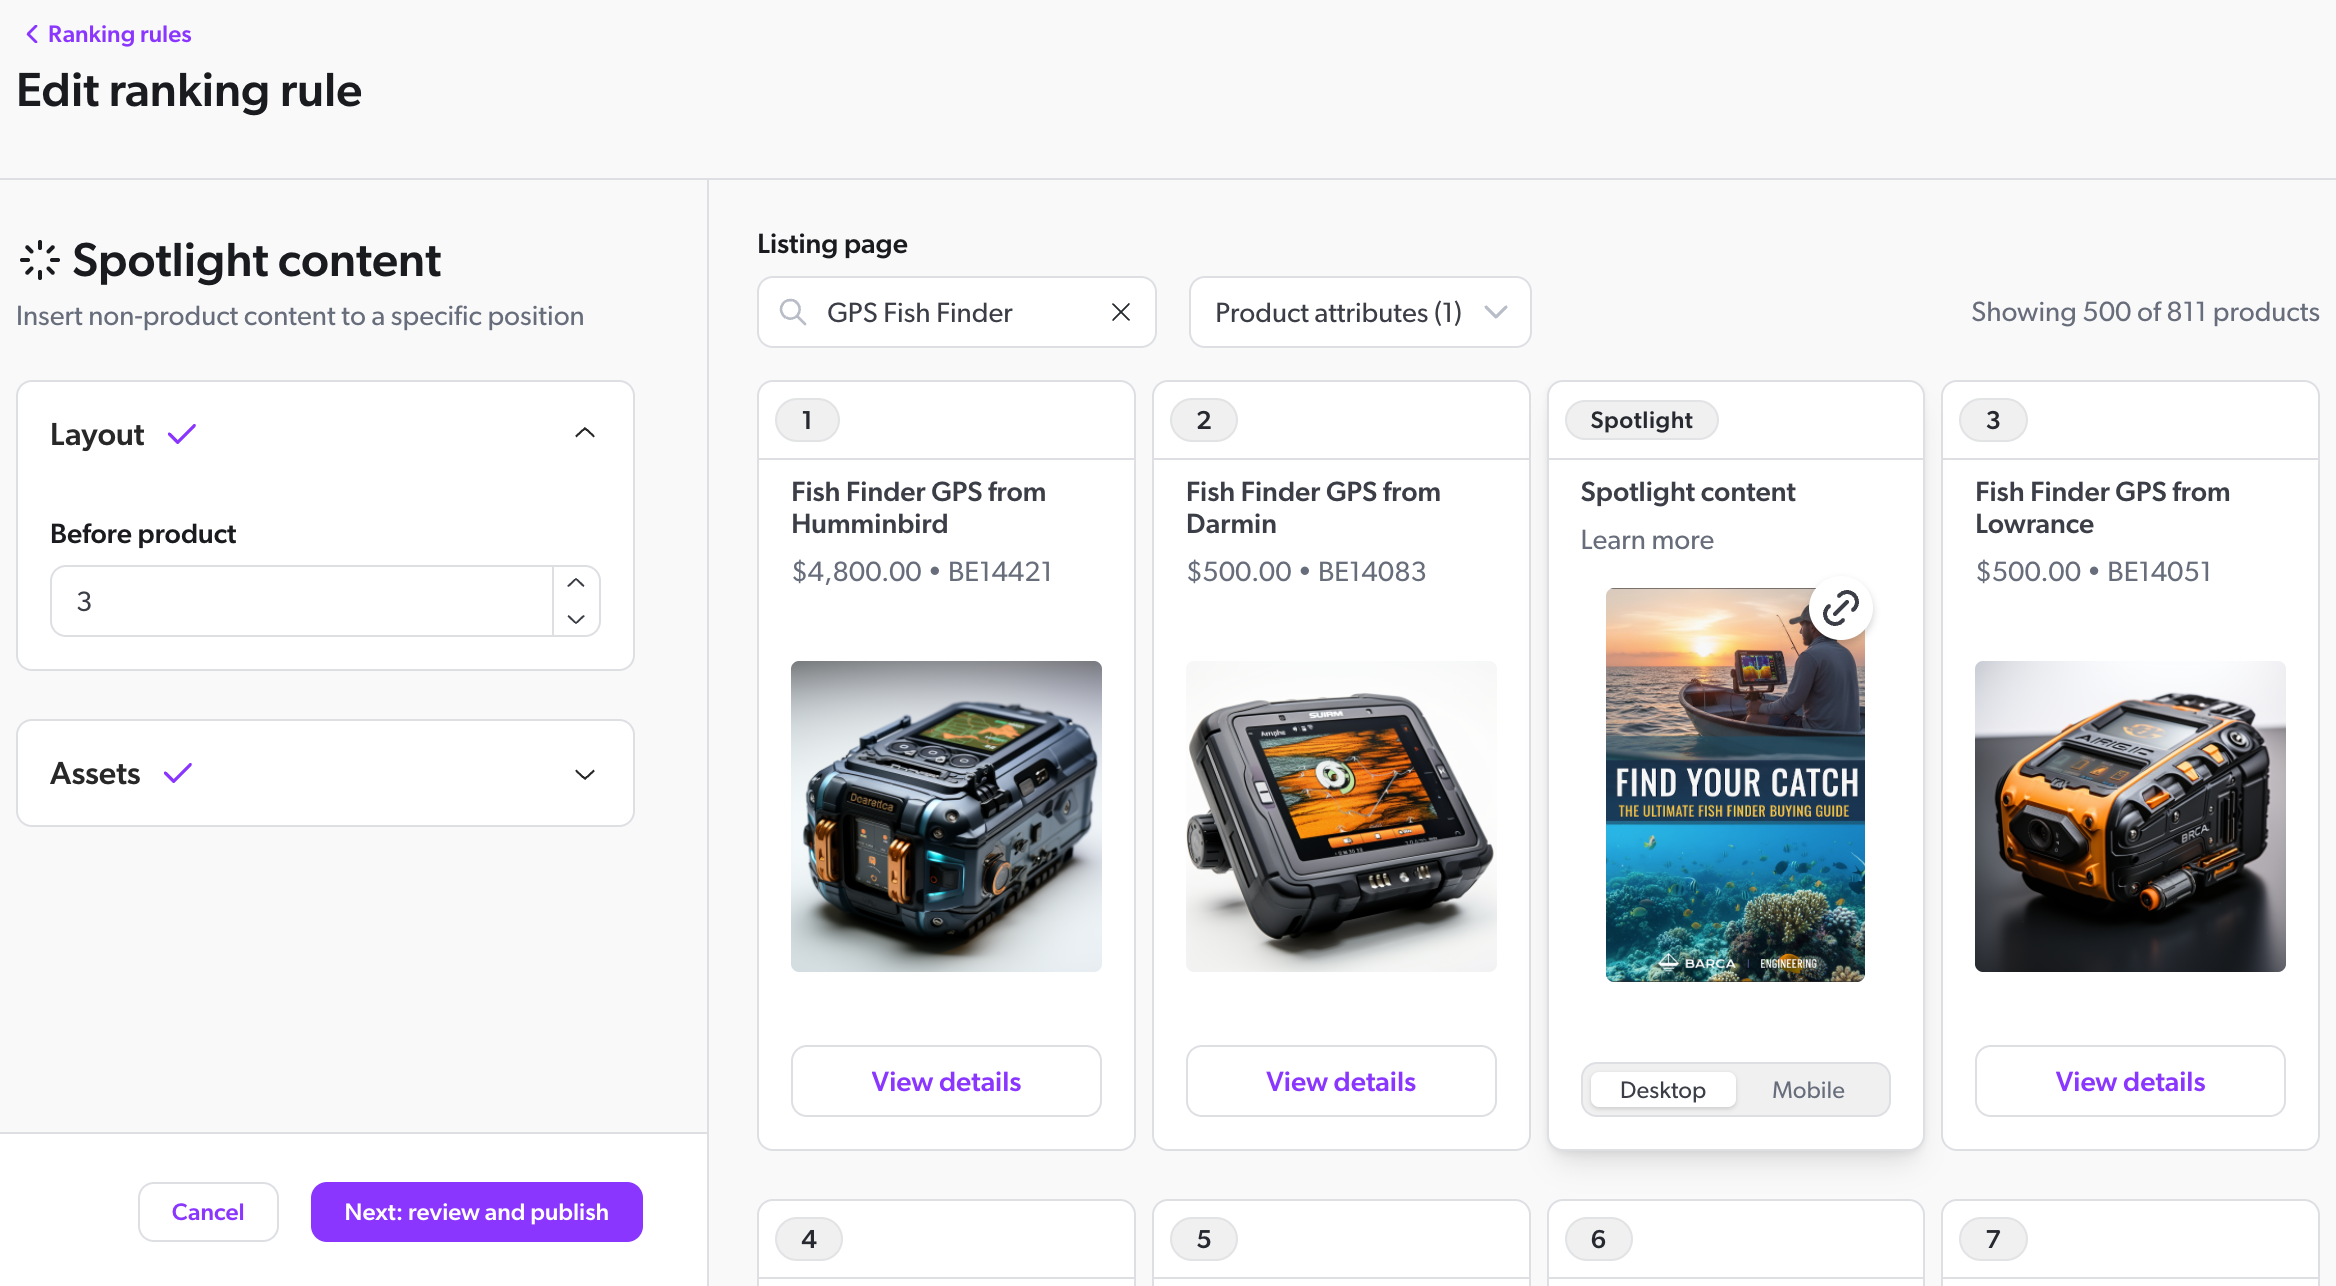
In the Product listings manager of the Coveo Merchandising Hub (CMH), merchandisers can define spotlight content ranking rules to insert non-product content into specific positions on one or more product listing pages (PLPs).
Use case examples
Spotlight content ranking rules help address a variety of use cases. Examples include:
-
Spotlight product-related information: Provide a link to a page with information about a particular product category, such as a buying guide or a sizing guide.
-
Spotlight a specific brand: Provide a link to a product listing page (PLP) that only shows products from a specific brand.
-
Spotlight a site-wide campaign: Provide a link to a page with information about a site-wide promotion or campaign, such as free shipping or a list of payment options.
Spotlight content and pins
Spotlight content rules can affect the visual merchandising of your product listing pages (PLPs) by changing the order of the numbered positions that are reserved by pin rules. Although spotlight content can’t come into direct conflict with a pin, it will “push” a pinned product in a numbered position over from its expected output on the PLP.
These rules don’t reserve specific numbered positions on the PLP because spotlight content isn’t considered a product and doesn’t have a product ranking. Instead, a spotlight content rule creates a new unnumbered position before a particular numbered position and “pushes” the numbered position over by one. That numbered position keeps its ranking number.
The “GPS Fish Finders” PLP includes the following products in these numbered positions:
| 1 | 2 | 3 (reserved) | 4 |
|---|---|---|---|
|
|
|
|
The Navify fish finder is a product that’s pinned at position 3.
You create a spotlight content rule that inserts a fish finder buying guide before product 3.
This creates a new unnumbered position between positions 2 and 3.
| 1 | 2 | 3 (reserved) | |
|---|---|---|---|
|
|
Fish finder buying guide |
|
The Navify fish finder is still pinned at position 3, but on the PLP, the buying guide is the third item and the Navify fish finder is the fourth item.
Prerequisites
Before you create rules in the Coveo Merchandising Hub (CMH):
-
Choose the correct property to ensure that your changes affect the intended listing pages.
Create spotlight content rules
To create spotlight content rules
-
In the CMH, access the Product listings manager.
-
From the navigation tabs, select ranking rules and then click Create ranking rule.
-
Under This rule will apply to, define the scope of the rule.
-
Locale: Select the locale that the spotlight content rule applies to. By default, a rule applies to all available locales.
-
Audiences: Select the audience that the spotlight content rule will target. You can choose between predefined audience profiles or create custom profiles. You can only select one audience profile per rule.

The Audience option is currently in early access. Contact your Customer Success Manager (CSM) to enable this option.
-
All visitors: By default, the rule applies to all visitors.
-
Device & technology: Target visitors visiting a storefront using a specific device type. The device type is determined by the information sent by the visitor's browser, not by the device’s screen size. Available options are:
-
Desktop: Encompasses desktop computers and laptops.
-
Mobile: Encompasses all mobile phones.
-
Tablet: Encompasses all tablets.
-
-
Visitor type: Target the visitors who are logged into the storefront or those who aren’t.
-
Your audiences: Create a custom audience profile that you can reuse in other rules sharing the same property. After a custom audience profile is created, it can’t be changed once the rule is published. If all rules containing a custom audience profile are deleted, the custom audience profile will no longer be available as an option when creating new rules.
-
Visitor URL: Target visitors based on the URL of the storefront page they’re on.
-
Referrer URL: Target visitors based on the URL they came from before landing on the storefront.
For URL-based audiences to function correctly with query parameters (such as campaign tracking parameters like
?brand=barca&model=sp&color=red), you can pass the complete URL including query parameters to Headless or the Commerce API directly. See Navigating between pages (CSR), Build product listing pages (SSR), and Use the Commerce API directly for implementation details.
-
-
-
listing page: Choose whether the spotlight content rule applies to all listing pages or to one or more specific listing pages.
-
To apply the spotlight content rule to all listing pages:
-
Select All listing pages. You won’t be able to select an operator or any specific listing pages.
-
Click Done.
-
-
To apply the spotlight content rule to specific listing pages:
-
Select Specific listing pages.
-
Select an Operator.
-
Is: This operator identifies listing pages that exactly match the specified value. For example, you can use it to create a rule that only targets the listing pageaccessories. -
Page name contains: This operator identifies listing pages where the specified value is found within the full value of the listing page name. For example, you can use it to create a rule that targets all listing pages whose name contains the termaccessories, includingAccessories|BagsandAccessories|Life Jackets. -
Page URL contains: This operator identifies listing pages where the specified value is found within the full value of the listing page URL. For example, you can use it to create a rule that targets all listing pages whose URLs contain the termkayak, includingsports.barca.group/plp/canoes-kayaksandsports.barca.group/plp/canoes-kayaks/kayaks/sea-kayaks.
-
-
Select one or more listing pages that the spotlight content rule applies to.
-
Click Done.
-
-
-
-
Under Choose an action, select Spotlight content.
-
On the Layout card, select the position in which you want to insert the spotlight content. This position is relative to a particular product. For example, if you want the spotlight content to appear in the third position on the listing pages you selected, insert it before product 3.
-
On the Assets card, define the spotlight content that you want to insert:
-
Under Desktop image, enter the URL of an image that you want users on desktop browsers to see. Check the Use same image for mobile box if you want desktop and mobile users to see the same image.
-
(Optional) Under Mobile image, enter the URL of an image that you want users on mobile browsers to see.
-
Under URL, enter the address to which you want to send users when they click the spotlight content.
-
(Optional) Under Heading, enter a heading or title for your spotlight content.
-
(Optional) Under Subheading, enter any other text that you want to appear with your spotlight content.
-
-
Click Next: Review and publish.
-
Review your rule configuration.
 Leading practices
Use the panel on the right to preview how the rule affects the products on the listing page for a given locale.
The preview is an approximate simulation that won’t cover every scenario encountered in a live environment.
-
Click Next: Publish.
-
Under Rule name, enter a meaningful name for your rule.
-
Under Choose when to publish, select one of the following:
-
To apply the rule immediately, select Publish now.
-
To set a schedule for the rule, select Set a schedule, and then select the time frame in which the rule should apply.
-
-
Click Publish now.
The rule now applies or will apply as scheduled.
Modify spotlight content rules
To modify spotlight content rules
-
In the CMH, access the Product listings manager.
-
From the navigation tabs, select ranking rules.
-
Locate the rule that you want to modify.
-
Click
 , and then click Modify.
 -
You can modify the rule’s scope (Locale, Audiences, or listing page) or its configuration by clicking Edit on the relevant card. These are the same settings covered in the rule creation section.
The Audience option is currently in early access. Contact your Customer Success Manager (CSM) to enable this option.
-
When you’ve finished editing the rule, or to modify its publishing settings, click Next: Publish.
-
Update the publishing settings, if applicable, and then click Publish now.
The modified rule now applies, or will apply as scheduled.
Copy spotlight content rules
To copy spotlight content rules
-
In the CMH, access the Product listings manager.
-
From the navigation tabs, select ranking rules.
-
Locate the rule that you want to copy.
-
Click
, and then click Copy to…. -
In the Copy rule modal that opens, you can choose whether to copy the rule to other properties or listing pages. If the rule applies to all listing pages, you won’t see the option to copy the rule to other listing pages.
-
To copy the rule to other properties:
-
Select Property and click Next.
-
Use the dropdown menu to select one or more properties.
-
Click Confirm copy.
-
-
To copy the rule to other listing pages (if applicable):
-
Select listing page and click Next.
-
Use the dropdown menu to select one or more listing pages.
-
Click Confirm copy.
-
-
The rule is copied to the target properties or listing pages.
Delete spotlight content rules
To delete spotlight content rules
-
In the CMH, access the Product listings manager.
-
From the navigation tabs, select ranking rules.
-
Locate the rule that you want to delete.
-
Click
, and then click Delete. -
Click Delete again to confirm.
The rule is deleted.