Manage featured result rules
Manage featured result rules
- Prerequisites
- Common use cases
- Create featured result rules
- Edit featured result rules
- Modify featured result JSON configuration
- Duplicate featured result rules
- Copy featured result rules to another pipeline
- Review information about the rule’s creation or last modification
- Delete featured result rules
- Leading practices
- Reference
Featured result rules make specific items appear at the top of the result list whenever a query satisfies a given condition. You can also use them to make certain items appear at the top of the result list regardless of the query.
With the required privileges, when you have a query pipeline created in your organization, you can set featured result rules on the Result ranking tab of the query pipeline configuration.
You want to promote your best-selling ACME monitor model in a Coveo-powered commerce portal when users search for that specific brand.
Therefore, you create a featured result rule in which you associate your best-selling ACME monitor model with the query ACME.

Prerequisites
Before creating a rule, make sure that you have the following:
-
Access to a search page
You need access to a Coveo-powered search interface to be able to test the rule that you create.
-
An existing query pipeline
The queries from the search page must travel through a specific query pipeline.
-
Required privileges
You need specific privileges to be able to add and edit rules in a query pipeline.
Once you meet these requirements, you can create a rule on the Query Pipelines (platform-ca | platform-eu | platform-au) page. To test the rule, use the A/B test feature to compare the results of the rule with the results of the original pipeline.
Common use cases
Among other things, you can use featured result rules to improve the visibility of new items or to promote items in specific contexts.
|
|
Note
On a case deflection panel, featured result rules aren’t applicable as they use the basic query expression ( Case deflection panels usually query the Coveo index through the Therefore, if there’s no To learn how to configure a featured result that applies regardless of the query, check out Promote items regardless of the query. |
Improve the visibility of new items
A new key knowledge article is available for your support agents.
You want this article to be displayed at the top of the results list whenever an agent’s query contains deflection before Coveo Machine Learning (Coveo ML) Automatic Relevance Tuning (ART) can automatically boost the article.

Promote items in specific contexts
In your sports supplies Coveo-powered commerce interface, you want to liquidate last year’s ACME branded hockey sticks to make room for the new model in your warehouse.
You therefore create a featured result rule to make last year’s ACME hockey sticks appear at the top of the search results whenever a query contains stick or ACME.

Promote items regardless of the query
In your Coveo-powered intranet portal, you want to display the new security policy training that must be completed by all employees before a specified deadline. Therefore, you create a featured result rule to make the document appear at the top of the search results regardless of the employee’s query.

This can be done by creating a featured result rule in which you leave the Use a query-based condition section empty.
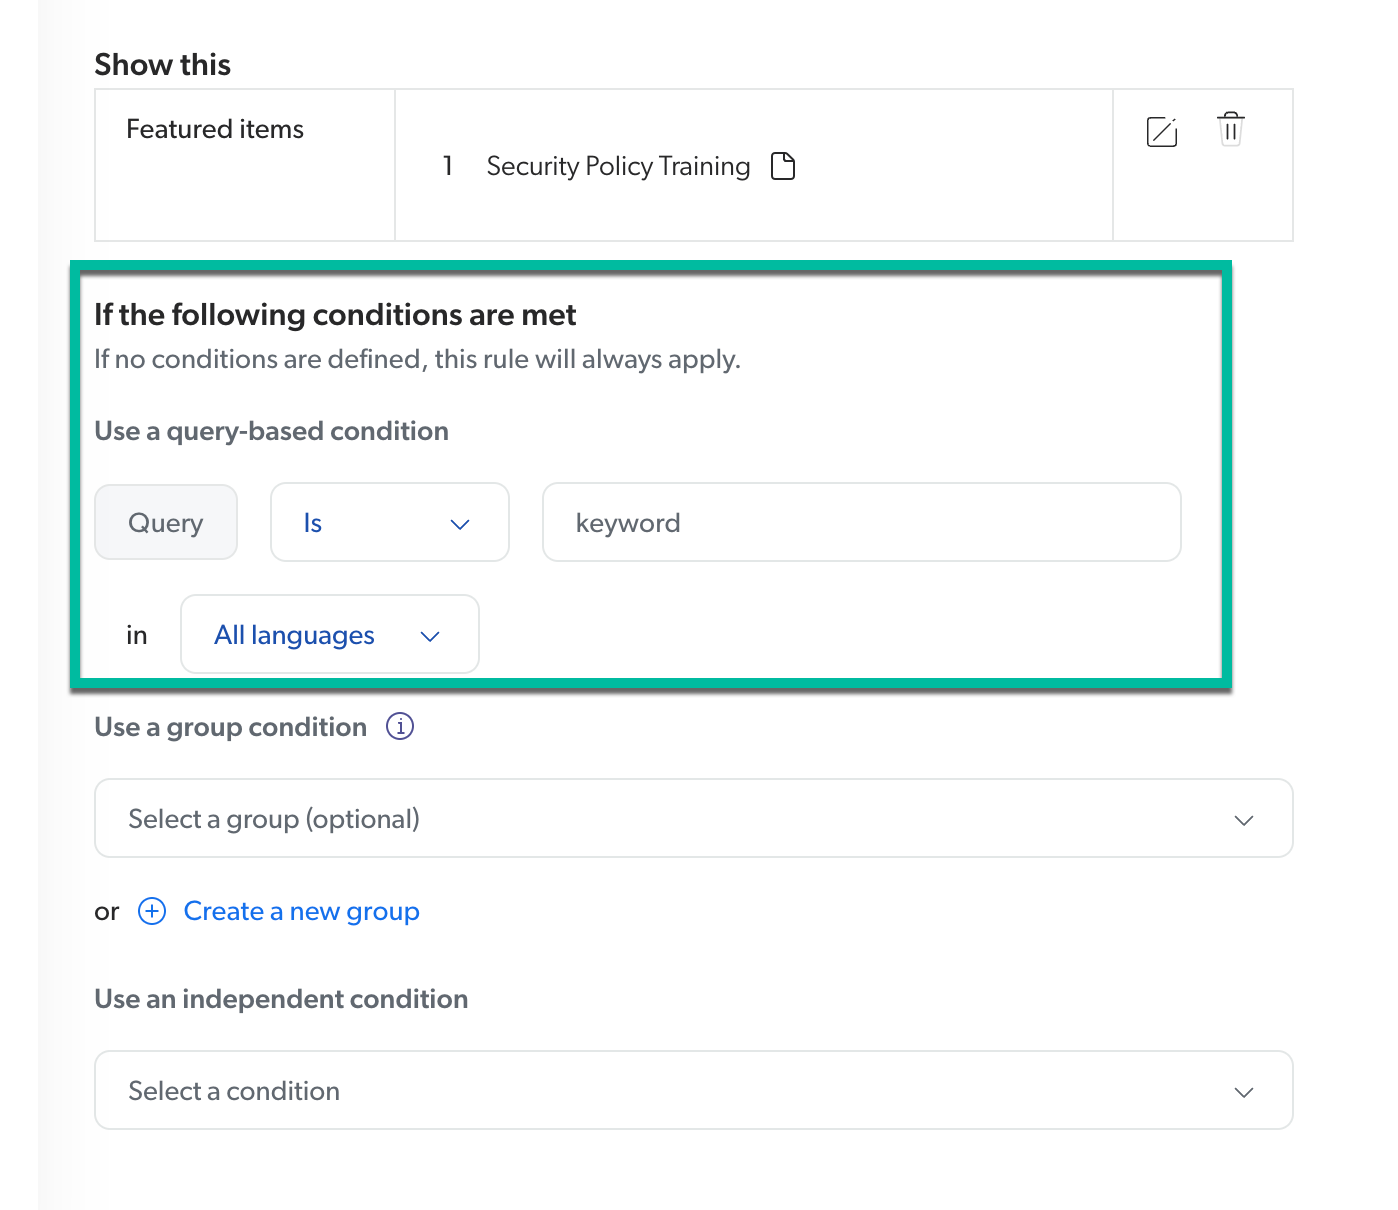
When implementing a featured result rule, we recommend you do the following steps:

-
Select the query pipeline that you want to add the rule to.
-
Create a featured result rule.
-
Add indexed items or query expressions.
-
Define the conditions that will trigger the rule.
-
-
Test the rule in the Preview search interface.
-
Save the new rule.
-
Build, test, and promote your new configuration.
Create featured result rules
-
On the Query Pipelines (platform-ca | platform-eu | platform-au) page, click the query pipeline in which you want to create a rule, and then click Edit components in the Action bar.
-
On the page that opens, select the Result ranking tab, and then, in the upper-right corner, click Add rule.
-
In the Add result ranking rule modal that opens, select Featured result.
-
Under Show this, click Add indexed items, and then click either "Select an Item" to select items to feature at the top of the search results or "Add a query expression" to add a query expression whose matching items will appear at the top of the search results.
-
When you’re done selecting the desired items, click Add items.
NoteThe order of items and expressions in the list is important, as it determines the order in which they will appear in the search results. For more information, see Optimize your results order.
-
Under If the following conditions are met, enter conditions that will trigger the rule.
-
Under Use a query-based condition:
-
Select an operator.
-
In the keyword input, enter an expression (keywords or a regex) that will trigger the rule.
-
Select the language of your expression, or All languages if your expression is susceptible to appear in all languages (for example, a product number).
-
If you want the rule to apply for other queries, repeat the previous steps to create other conditions.
NoteConditions are evaluated using an OR logic, which means that the rule is triggered when only one of the listed expressions is entered by the user.
-
If you want your query to match your expression in other languages, repeat the previous steps with this expression in other languages.
Example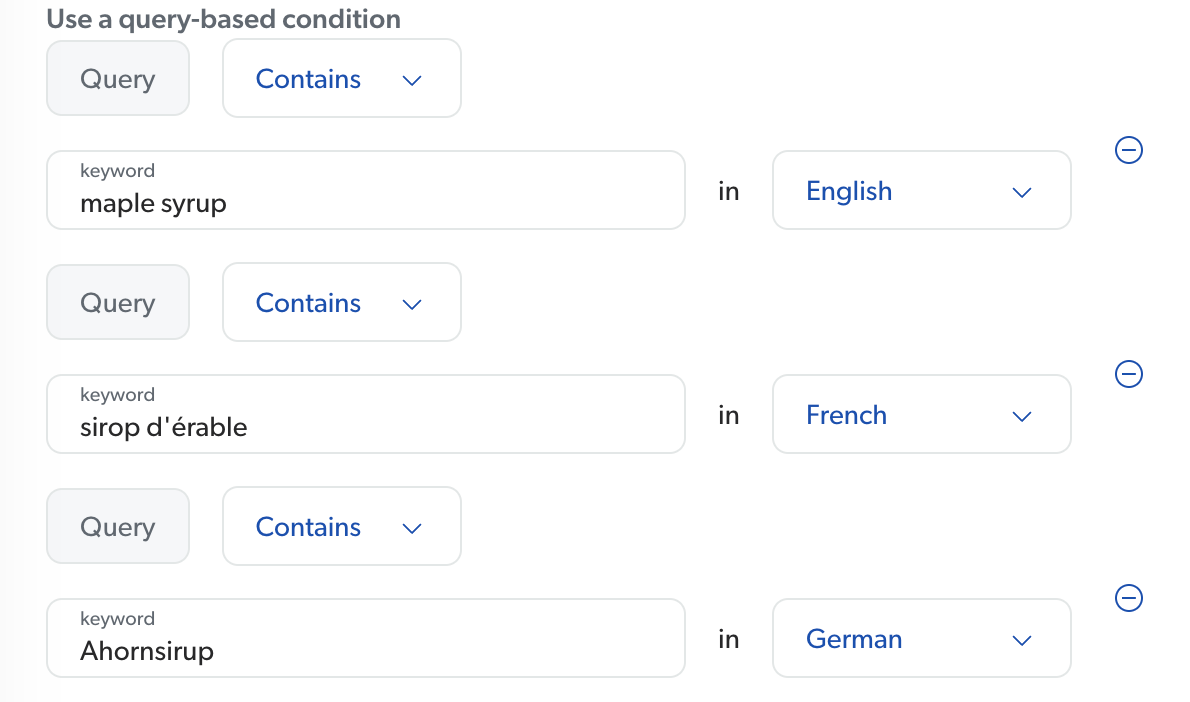
Note that the conditions are evaluated using an OR logic, which means that the rule is triggered when only one of the listed expressions is entered by the user.
-
-
Under Use a group condition, if you want the rule to be part of a group of rules, optionally select the desired group in the dropdown menu. You can also create a new group by clicking Create a new group.
-
Under Use an independent condition, you can optionally select a query pipeline condition in the dropdown menu or create a new one.
-
Under Match advanced query, select True or False to determine whether featured items should only be displayed when matching the advanced query expression (
aq). See Match advanced query.
-
-
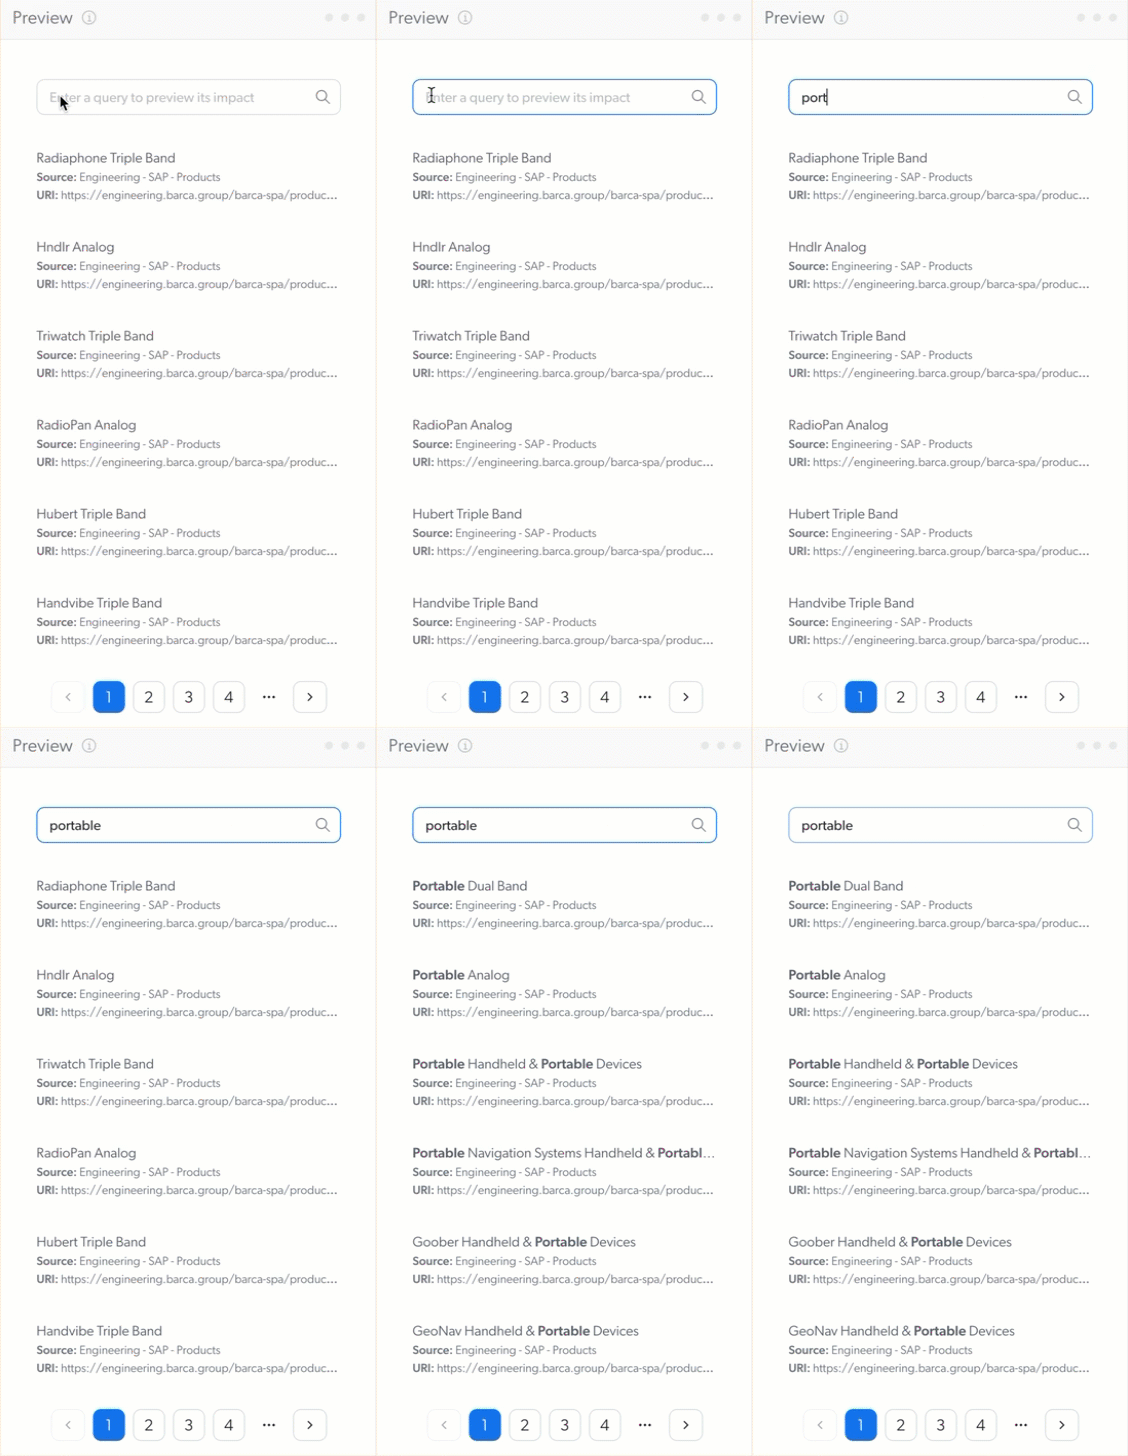
Review your featured result rule on the Preview test search page.
NoteThe customizations you made in the search interface builder (or the Interface Editor, if applicable) don’t apply in this preview.
-
Click Add rule.
-
In the Rule information panel that opens, in the Name your rule input, you can edit the default name that was granted for your rule.
-
In the User note input, optionally enter text with information that could help you and your colleagues manage the rule in the future.
-
Click Add rule.
The new rule is effective immediately.
Edit featured result rules
-
On the Query Pipelines (platform-ca | platform-eu | platform-au) page, click the query pipeline in which you want to edit a rule, and then click Edit components in the Action bar.
-
On the page that opens, select the Result ranking tab.
-
Click the rule you want to edit, and then click Edit in the Action bar.
-
Under Show this, click Add indexed items, and then click either "Select an Item" to select items to feature at the top of the search results or "Add a query expression" to add a query expression whose matching items will appear at the top of the search results.
-
When you’re done selecting the desired items, click Add items.
NoteThe order of items and expressions in the list is important, as it determines the order in which they will appear in the search results. For more information, see Optimize your results order.
-
Under If the following conditions are met, enter conditions that will trigger the rule.
-
Under Use a query-based condition:
-
Select an operator.
-
In the keyword input, enter an expression (keywords or a regex) that will trigger the rule.
-
Select the language of your expression, or All languages if your expression is susceptible to appear in all languages (for example, a product number).
-
If you want the rule to apply for other queries, repeat the previous steps to create other conditions.
NoteConditions are evaluated using an OR logic, which means that the rule is triggered when only one of the listed expressions is entered by the user.
-
If you want your query to match your expression in other languages, repeat the previous steps with this expression in other languages.
Example
Note that the conditions are evaluated using an OR logic, which means that the rule is triggered when only one of the listed expressions is entered by the user.
-
-
Under Use a group condition, if you want the rule to be part of a group of rules, optionally select the desired group in the dropdown menu. You can also create a new group by clicking Create a new group.
-
Under Use an independent condition, you can optionally select a query pipeline condition in the dropdown menu or create a new one.
-
Under Match advanced query, select True or False to determine whether featured items should only be displayed when matching the advanced query expression (
aq). See Match advanced query.
-
-
Review your featured result rule on the Preview test search page.
NoteThe customizations you made in the search interface builder (or the Interface Editor, if applicable) don’t apply in this preview.

-
If you want to edit the rule’s name or note, click the Edit information button to open the Name your rule input. Make the desired changes, and then click Save.
-
Click Save. The edited rule is effective immediately.
Modify featured result JSON configuration
Editing a rule JSON configuration is especially useful when you want to implement a rule that doesn’t fit with the parameters available in the Coveo Administration Console.
|
|
Note
For the complete parameter definitions, see Update a result ranking rule. |
-
On the Query Pipelines (platform-ca | platform-eu | platform-au) page, click the query pipeline for which you want to modify existing query pipeline rules, and then click Edit components in the Action bar.
-
On the page that opens, select the Result Ranking tab.
-
In the Result Ranking tab, click the rule you want to modify, and then click Edit JSON in the Action bar.
-
On the Edit a Featured Result JSON Rule subpage, make the desired modifications.
-
Click Save.
Duplicate featured result rules
When creating featured result rules in a query pipeline, you may want to create a new rule that’s similarly configured to an existing one. An efficient way to do this is to duplicate the existing rule and then modify it as needed.
-
On the Query Pipelines (platform-ca | platform-eu | platform-au) page, click the query pipeline for which you want to duplicate rules, and then click Edit components in the Action bar.
-
On the Result ranking tab, select the rules you want to duplicate within the same pipeline.
-
In the Action bar, click
More, and then Duplicate.
The duplicated featured result rules appear at the bottom of the list in the pipeline component tab.
Copy featured result rules to another pipeline
When you have multiple query pipelines that require similar rules, you can copy featured result rules from one pipeline to another.
-
On the Query Pipelines (platform-ca | platform-eu | platform-au) page, click the query pipeline from which you want to copy rules, and then click Edit components in the Action bar.
-
On the Result ranking tab, select the rules you want to copy to another pipeline.
-
In the Action bar, click
More, and then click Copy to….
-
In the dialog that appears, select the target pipeline to which you want to copy the rules, and then click Copy.
Your copied rules will take effect immediately in the target pipeline.
Review information about the rule’s creation or last modification
You can verify who created or last modified a given featured result rule by inspecting the Details column of the Result Ranking tab. The Details column also indicates the hour and date the rule was created or last modified.
-
On the Query Pipelines (platform-ca | platform-eu | platform-au) page, click the query pipeline containing the rule for which you want to inspect the information of the Details column, and then click Edit components in the Action bar.
-
On the page that opens, select the Result Ranking tab.
-
In the Result Ranking tab, inspect the information of the Details column for the desired rule.
Delete featured result rules
-
On the Query Pipelines (platform-ca | platform-eu | platform-au) page, click the query pipeline that contains the rules you want to delete, and then click Edit components in the Action bar.
-
On the Result ranking tab, select the rules you want to delete.
-
In the Action bar, click
More, and then click Delete.
-
Click Delete to confirm.
Your deleted rules will stop being effective immediately in the target pipeline.
|
|
|
Leading practices
Consider the following leading practices when leveraging featured result rules.
A/B testing
Use the A/B test tab to create a Test scenario version of the pipeline. This lets you test the efficacy of the rule by splitting the traffic between your current pipeline and the test scenario, and then reviewing the outcome.
Test your featured result rules
While adding or editing a featured result rule, you can use the right side of the Preview test search page to check that your rule executes as expected.
Optimize the order of your results
To properly position the featured results, the order of the added indexed items and query expressions is important. At query time, each applicable item or expression receives a higher boost than the previous one.
|
|
Note
The boost value starts at |
You can reorder the items and expressions by dragging them in the list.
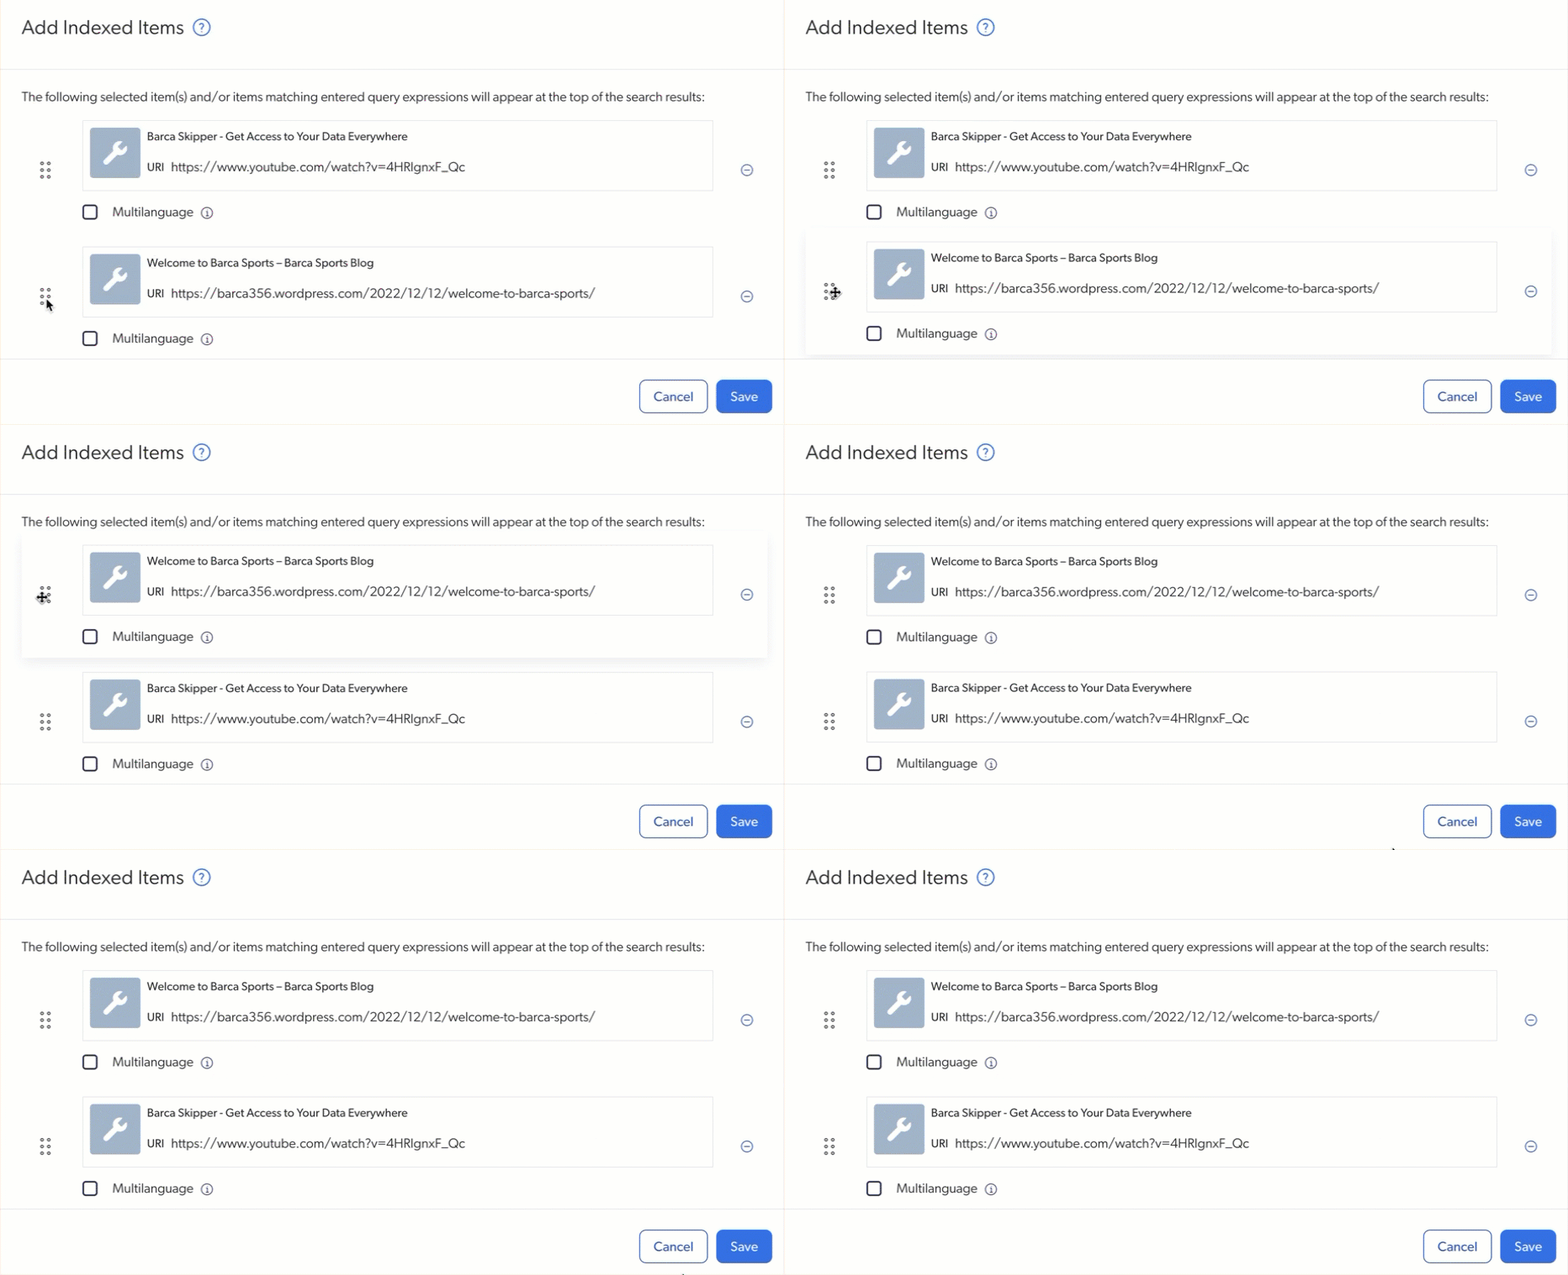
Once you save the changes, the Preview test search page will reflect the new order.
Give visibility to your promoted results
You may want the results promoted by a featured result to be clearly identified in the search result list. You can achieve this by adding result badges to query result items in your search interface.
You can also specify a condition to a specific result template.
Use featured result rules sparingly
When a query pipeline contains Coveo Machine Learning (Coveo ML) models, avoid or minimize the use of featured result rules. These rules are static and can negatively impact Coveo ML models which follow trends.
Choose operators accordingly
Operators are used to define rules and improve the relevance of search results. When setting up featured result rules, it’s essential to choose the operator best suited to your use-case. Depending on the context, certain operators may be more flexible than others and it’s important to consider the nature of your data and your user’s needs, as shown in the following example.
To help users quickly find the information they need to change or remove an administrator, you create a rule where the query matches the following expression .*(change|remove).admin.
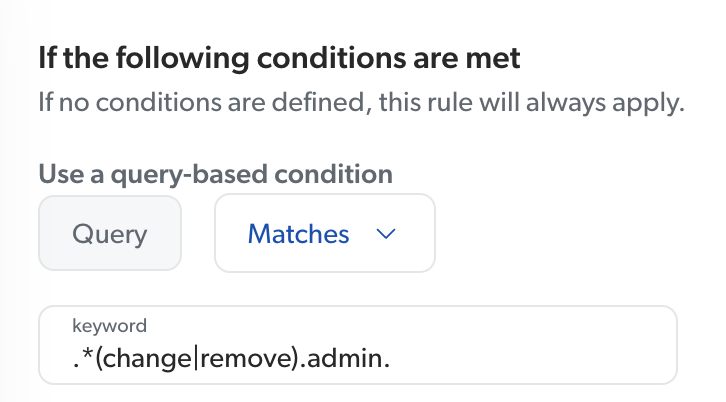
However, when testing out this rule, you notice that it only works when the following queries are executed: how do I change the admin? or how do I remove an admin.
If the queries are modified where the order of the words are changed (for example, admin change), you don’t obtain the desired results.
You make a decision to change the operator because the current "Matches" operator looks for an exact match of the query’s words and the sequence in which the words appear. You therefore consider the following operators:
-
You use the "Is" operator, which looks for an exact match in the query, but unlike the current "Matches" operator, the order of words in the query won’t impact the results. In that case, you would add two featured result rules:
-
query is change admin -
query is remove adminHowever, it’s important to note that with the "Is" operator, additional words in the query will affect the results since it’s looking for an exact match.
-
-
The "Contains" operator offers more flexibility when you want to match multiple words in a query. If you create a rule where the query contains
.*(change|remove).admin, it will match all queries that contain both "change" and "admin," regardless of their order or if there are other words added to the query.
Reference
Operators
Contains
For the featured results to be displayed in the search results of an end user, the expression entered in the Enter keyword(s) input must be part of the end user query.
Is
For the featured results to be displayed in the search results of an end user, the expression entered in the Enter keyword(s) input must be the same as the end user query.
Matches
(For advanced users) For the featured results to be displayed in the search results of an end user, their query must match the regular expression (regex) entered in the Enter keyword(s) input.
You want to always have a specific article at the top of the search results when a user opens your Knowledge Base search page, so you select the Matches operator and provide the following regex: ^$.
"Show this" section
"Select an item" search page
-
On the Select an item search page, find and click the item you want.
|
|
The search page uses an empty pipeline rather than the actual pipeline in which you’re adding the featured result. Therefore, it’s strongly recommended to test your rule on the Preview test search page before adding or saving the rule. |
-
Check the Multilanguage box if:
-
Your index contains several equal versions of the item in different languages.
-
The item isn’t a Salesforce knowledge article for which the multilanguage feature is handled automatically.
-
-
Then, in the Family field dropdown menu, select a field with the Facet option enabled whose value is common to the selected item and its other language versions, and to these items only. This value identifies the corresponding items as a family, that is, a group of identical items in different languages.
-
In the Language field dropdown menu, select a field indicating the language of the item.
Notes-
Only ISO 639-1 language codes are supported (see List of ISO 639-1 codes). The field value may include an additional regional code (for example,
USinen-US), but this information will be ignored as it’s not relevant for this feature. -
In a family of items to feature, if no item has a language field value matching the language of the query, the English version of the item is displayed by default.
-
-
Repeat for each language version of the item.
ExampleYou have a multilanguage ecommerce website on which each product has a page. Each product therefore corresponds to several items in your index, one for each language in which the product page can appear. In your item metadata, the value of the
@productnumberfield is identical for all language versions of a product page, while the value of the@productpagelanguagefield indicates the language of the product page (for example,enstands for English,frfor French, etc).So, for the English item
Maple Syrup Candy, you select@productnumberas the Family field and@productpagelanguageas the Language field. You then do the same for the French versionBonbons au sirop d’érable. Since they represent the same product, these items have the same value in the@productnumberfield, which identifies them as a group of identical items in different languages. The@productpagelanguagefield, however, identifies the language of each item in the family.As a result, when an end user queries
Bonbons au sirop d’érable, the Coveo Search API recognizes this query as a French query, and looks in the corresponding family of product items for the French version to display as a featured result.
"Add a query expression" panel
In the Expression input, enter a query expression for which matching items must be returned as featured results. See About the query expression.
"Match advanced query" section
By default, featured results are typically not distinguishable from other results in search interfaces. If a featured result is an item outside the expected scope, users may be confused or even think that there are bugs in the search interface. Therefore, the Match advanced query parameter is set to True by default.
You have a bicycle part retail website on which you sell parts for mountain, road, and hybrid bicycles.
At the top of your product search page, there are three tabs, which customers can select to see only products related to the type of bicycle they ride.
When a tab is selected, the advanced query expression value changes to @biketype=="mountain", @biketype=="road", or @biketype=="hybrid".
You create a featured result rule to promote your best-selling hybrid tire when customers search for tire.
In this item metadata, the @biketype field has the hybrid value.
Since this product doesn’t suit mountain and road bicycles, it shouldn’t appear in the search results of users riding such bicycles.
You therefore set the Match advanced query parameter to True so that this featured result is displayed only when its value for the @biketype field matches that of the advanced query expression.
In other words, for the featured result rule to apply and this item to appear in the search results, the Hybrid tab must be selected.
As a result:
-
When a user searches for
tirein theMountainandRoadtabs, your featured result doesn’t appear, since it doesn’t match the interface scope. -
When a user searches for
tirein theHybridtab, and then switch to another tab, your featured result disappears, as it’s not relevant in the new interface scope.
For more information on advanced query expressions, see Advanced Query Expression (aq).
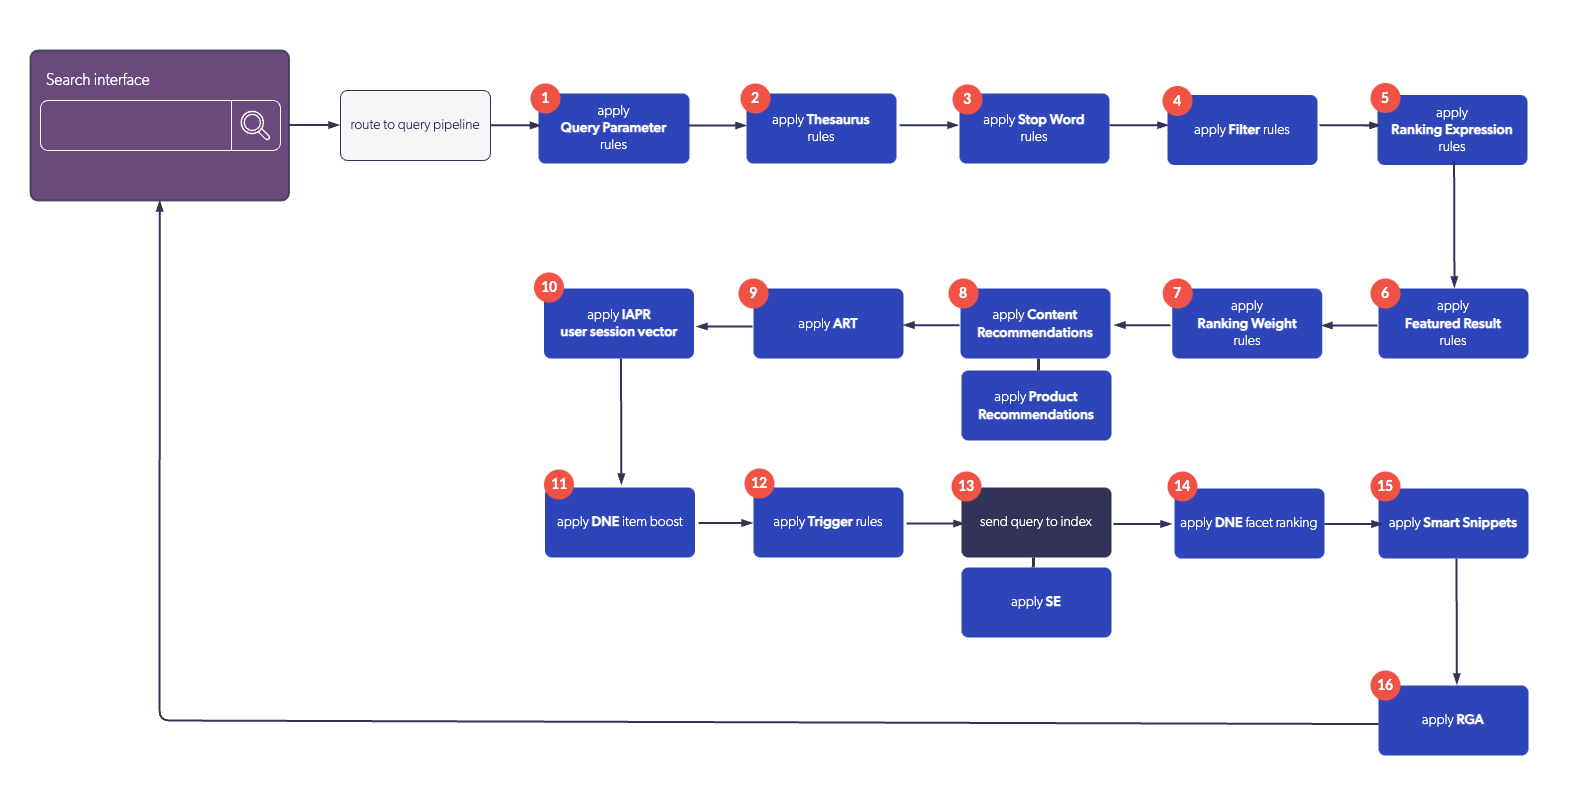
Order of execution
The following diagram illustrates the order of execution of query pipeline features:
Required privileges
The following table indicates the privileges required to view or edit featured results. Learn more about the Privilege reference or how to manage privileges.
| Action | Service - Domain | Required access level |
|---|---|---|
View featured results rules |
Organization - Organization |
View |
Edit featured results rules |
Organization - Organization |
View |
Search - Query pipelines |
Edit |
|
Search - Execute queries |
Allowed |