Optimizely
Optimizely

You can integrate Optimizely with Coveo to index selected published content and metadata through the Optimizely Graph API and make it available in a Coveo-powered search experience.
About Optimizely
Optimizely is a digital experience platform for creating and managing content.
Why use Coveo with Optimizely?
Make selected Optimizely content discoverable alongside content from other systems without changing the Optimizely authoring workflow.
-
Index the items and metadata that are relevant to your users.
-
Once indexed, surface this content alongside content from your other sources. Present it in a single Coveo-powered search interface with filtering, ranking, and personalized results, or make it available to an LLM app or agent through a Coveo MCP Server connection.
Recommended integration architecture
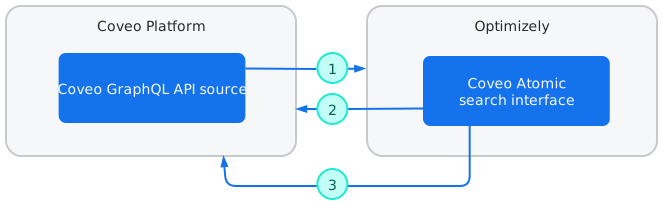
A Coveo GraphQL API source sends requests to the Optimizely GraphQL API and indexes the returned entries and metadata in the Coveo Platform. A Coveo Atomic search interface can present the indexed content in a website built with Optimizely and send analytics data to the Coveo Platform.
The following diagram shows the recommended Optimizely integration components and their interactions.
1 |
The Coveo GraphQL API source retrieves content using the Optimizely GraphQL API. If you don’t need to index item-level permissions, you can also use a Coveo Sitemap source or Coveo Web source. |
2 |
The Coveo Atomic search interface sends requests to the Coveo Search API. The Search API returns results and AI-generated answers back to the interface. Another way to query the Coveo index is through an MCP client and Coveo MCP Server connection. See AI assistants and agents for more information. |
3 |
The Coveo Atomic search interface sends analytics data to the Coveo Platform, where it can support machine learning models that improve relevance. |
Prerequisites
-
You have access to an Optimizely Graph environment that contains the content types you want to make searchable, as well as an Optimizely app key and secret when the Graph endpoint requires authentication.
-
You have a tested GraphQL query that returns the selected entries, their metadata, a unique URL for each entry, and a changed field for every indexed entry.
-
You have a license that allows you to create the required source in your Coveo organization.
-
Your Coveo organization hasn’t reached its source quota. You can review your quotas on the License & Usage (platform-ca | platform-eu | platform-au) page, along with your usage.
-
You have the privileges to create and manage sources.
Integrate Optimizely and Coveo
Follow these steps to configure the Coveo GraphQL API source and verify the indexed content.
Step 1: Create a GraphQL API source
Follow the instructions below to add a GraphQL API source that uses the Cloud content retrieval method.
-
On the Sources (platform-ca | platform-eu | platform-au) page, click Add source.
-
In the Add a source of content panel, select the Cloud (
 ) tab.
 -
Click the GraphQL API tile.
Step 2: Configure your source
Configure the Coveo GraphQL API source in the following sections: Authentication, Content to include, and GraphQL queries. The following instructions explain how to configure each section.
"Authentication" section
For basic authentication, enter the Optimizely app key in the Username field and the app key secret in the Password field.
"Content to include" section
In the JSON configuration box, add the configuration that defines the call to perform against the Optimizely GraphQL API endpoint and how Coveo will handle the response. See GraphQL API source configuration reference for details.
The following configuration shows how the source could be configured to index article items from your Optimizely service account.
{
"Services": [
{
"Url": "https://cg.optimizely.com/content",
"authentication": {
"username": "@username",  "password": "@password",
"forceBasicAuthentication": "true"
},
"Endpoints": [
{
"paging": {
"pageSize": 2,
"offsetType": "item",
"TotalCountKey": "data.ArticlePage.total"
},
"IndexingAction": {
"ActionOnItem": "Ignore",
"Condition": "NOT(%[my_locale] == \"en\")"
},
"Path": "v2",
"Method": "GET",
"ItemPath": "data.ArticlePage.items",
"SkippableErrorCodes": "404",
"ItemType": "Articles",
"Uri": "<YOUR_PUBLISHED_SITE_URL>/%[_metadata.url.default]",
"password": "@password",
"forceBasicAuthentication": "true"
},
"Endpoints": [
{
"paging": {
"pageSize": 2,
"offsetType": "item",
"TotalCountKey": "data.ArticlePage.total"
},
"IndexingAction": {
"ActionOnItem": "Ignore",
"Condition": "NOT(%[my_locale] == \"en\")"
},
"Path": "v2",
"Method": "GET",
"ItemPath": "data.ArticlePage.items",
"SkippableErrorCodes": "404",
"ItemType": "Articles",
"Uri": "<YOUR_PUBLISHED_SITE_URL>/%[_metadata.url.default]",  "ClickableUri": "%[_metadata.url.base]%[_metadata.url.default]",
"Title": "%[articleTitle]",
"ModifiedDate": "%[_metadata.lastModified]",
"Body": "%[articleBody.html]",
"Metadata": {
"author": "%[articleAuthors[0]]",
"ec_images": "%[articleHeroImage.url.default]",
"originalUrl": "%[_metadata.url.base]%[_metadata.url.default]",
"my_locale": "%[_metadata.locale]"
},
"QueryParameters": {
"query": "@MyQuery"
}
}
]
}
]
}
"ClickableUri": "%[_metadata.url.base]%[_metadata.url.default]",
"Title": "%[articleTitle]",
"ModifiedDate": "%[_metadata.lastModified]",
"Body": "%[articleBody.html]",
"Metadata": {
"author": "%[articleAuthors[0]]",
"ec_images": "%[articleHeroImage.url.default]",
"originalUrl": "%[_metadata.url.base]%[_metadata.url.default]",
"my_locale": "%[_metadata.locale]"
},
"QueryParameters": {
"query": "@MyQuery"
}
}
]
}
]
} |
The @username and @password placeholders automatically use the credentials you entered in the Authentication section without exposing them in clear text. |
|
Replace <YOUR_PUBLISHED_SITE_URL> with your actual site URL. |
"GraphQL queries" section
Configure the GraphQL query you want Coveo to execute to retrieve your content.
-
Click Add query.
-
Name your query (for example,
@MyQuery). The GraphQL query field references your query by its name. -
In the GraphQL query field, enter your query. To ensure content freshness, include the
Changedfield in your query so that the source picks up content changes in a timely manner.
To build and test your query, use the Optimizely GraphiQL explorer at
https://cg.optimizely.com/app/graphiql?auth=<YOUR_SECRET_SINGLE_KEY>. Replace<YOUR_SECRET_SINGLE_KEY>with your actual single key.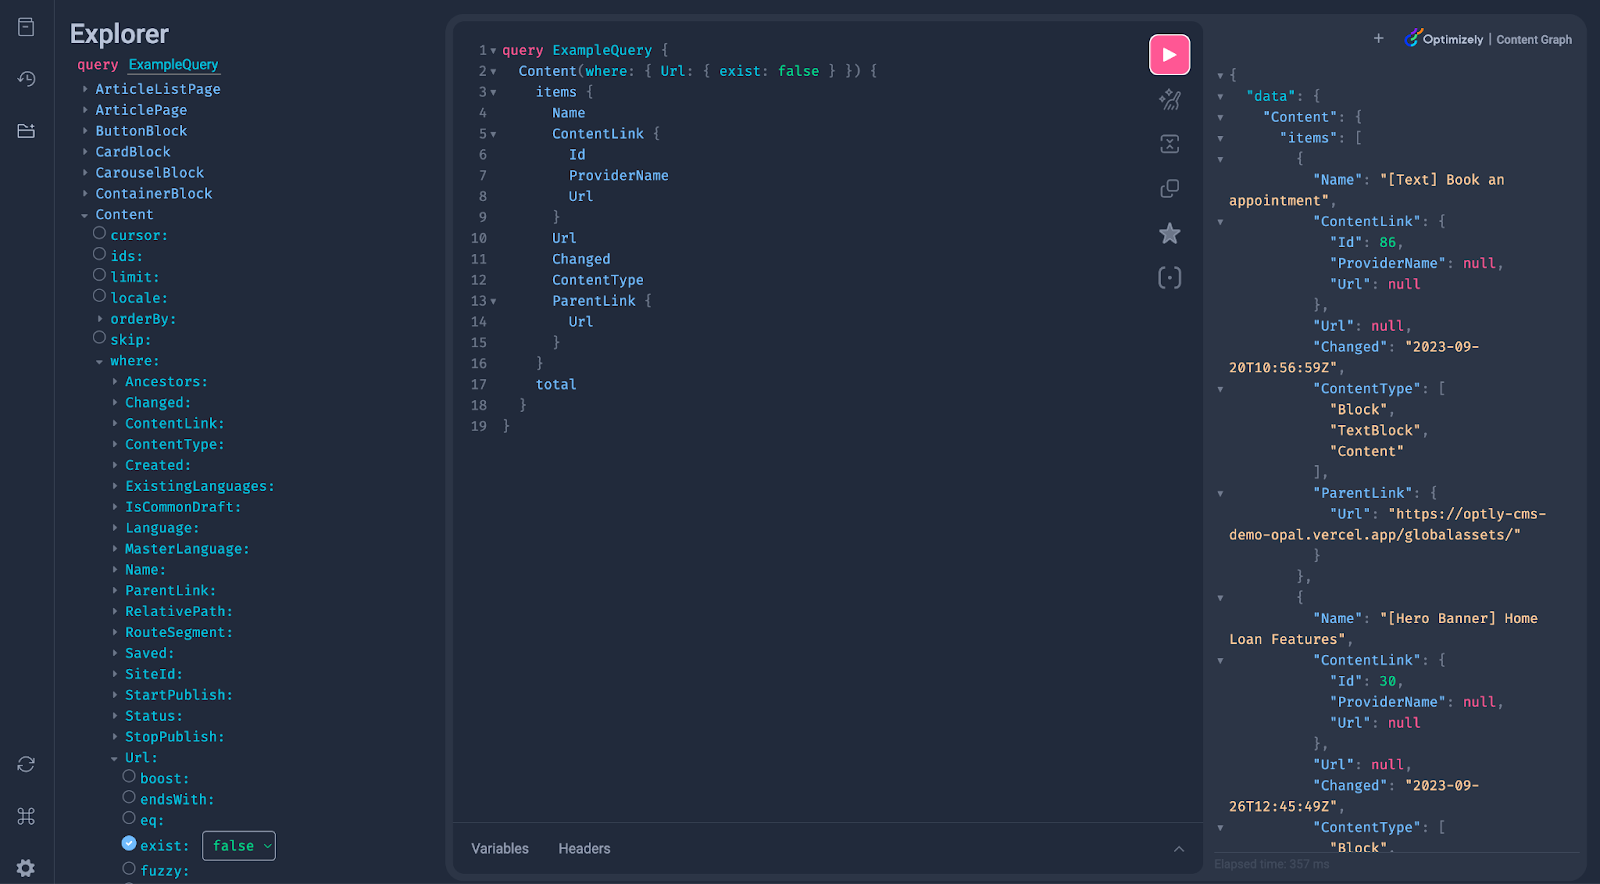
Step 3: Index your Optimizely content
Build the source, then use the Content Browser (platform-ca | platform-eu | platform-au) to verify the indexed items and metadata.
Step 4: Create source mappings and fields
The JSON configuration extracts item metadata from the API response. Create the required source mappings and fields to index the metadata you want to use in search experiences.
Step 5: Build the search experience
-
Confirm that Coveo Atomic is the right approach for the Optimizely search experience by following Choose the right approach.
-
If applicable, follow Atomic getting started documentation to start building the Coveo Atomic search interface.
Create your search interface project using the npm create @coveo/ui command line tool.
Considerations
The provided JSON configuration example doesn’t apply access permissions to the indexed items. To replicate item-level permissions in Coveo, see Retrieve content with Optimizely Graph and GraphQL API source permission configuration.
What’s next?
-
See source update schedules to configure when your source checks for changed content.
-
See Retrieve content with Optimizely Graph and GraphQL API source permission configuration to index permissions for restricted Optimizely content.
-
See Tune relevance to improve the results returned by the search experience.
-
See the integration directory for other Coveo integration opportunities.