Set up and deploy the Coveo Case Classification API action
Set up and deploy the Coveo Case Classification API action
The Coveo Case Classification API action brings real-time case classification to your Agentforce AI agents. Built on the Coveo Machine Learning Case Classification (CC) model, this action uses natural language processing (NLP) to analyze the case subject and description, suggesting the most relevant case classifications directly in the Agentforce chat window.
This article describes how to configure and use the Coveo Case Classification API action in your Salesforce organization. To do so, you must:
Once you’ve completed these steps, you can test the action to confirm it’s working as expected.
Prerequisites
|
|
The Agentforce interface evolves quickly, and updates are added regularly. Although we strive to keep this documentation current, you may encounter discrepancies between this content and the current state of the Agentforce interface. |
Before you start, make sure you have:
-
Installed Coveo for Agentforce in your Salesforce organization.
-
Enabled Prompt Builder in your Salesforce organization.

Assign the Prompt Template Manager permission set to users who create and manage prompt templates in the Prompt Builder, regardless of whether they’re System Administrator users.
-
Created an API key using the Anonymous Case Assist template in the Coveo Administration Console to call the Coveo Customer Service API.
This template includes the Analytics data: Push and Use Case Assist: Allowed privileges.
-
A Coveo Case Assist implementation that includes the Case Classification functionality.
-
A valid Case Assist ID.
-
A valid Coveo organization ID.
Configure the action
Configuring the Coveo Case Classification API Agentforce action is a two-step process. It involves setting up the external credential and API key and creating a custom metadata configuration.
Set up the external credential and API key
-
From the Salesforce Setup menu, in the Quick Find box, enter
Named Credentials, and then select Named Credentials. -
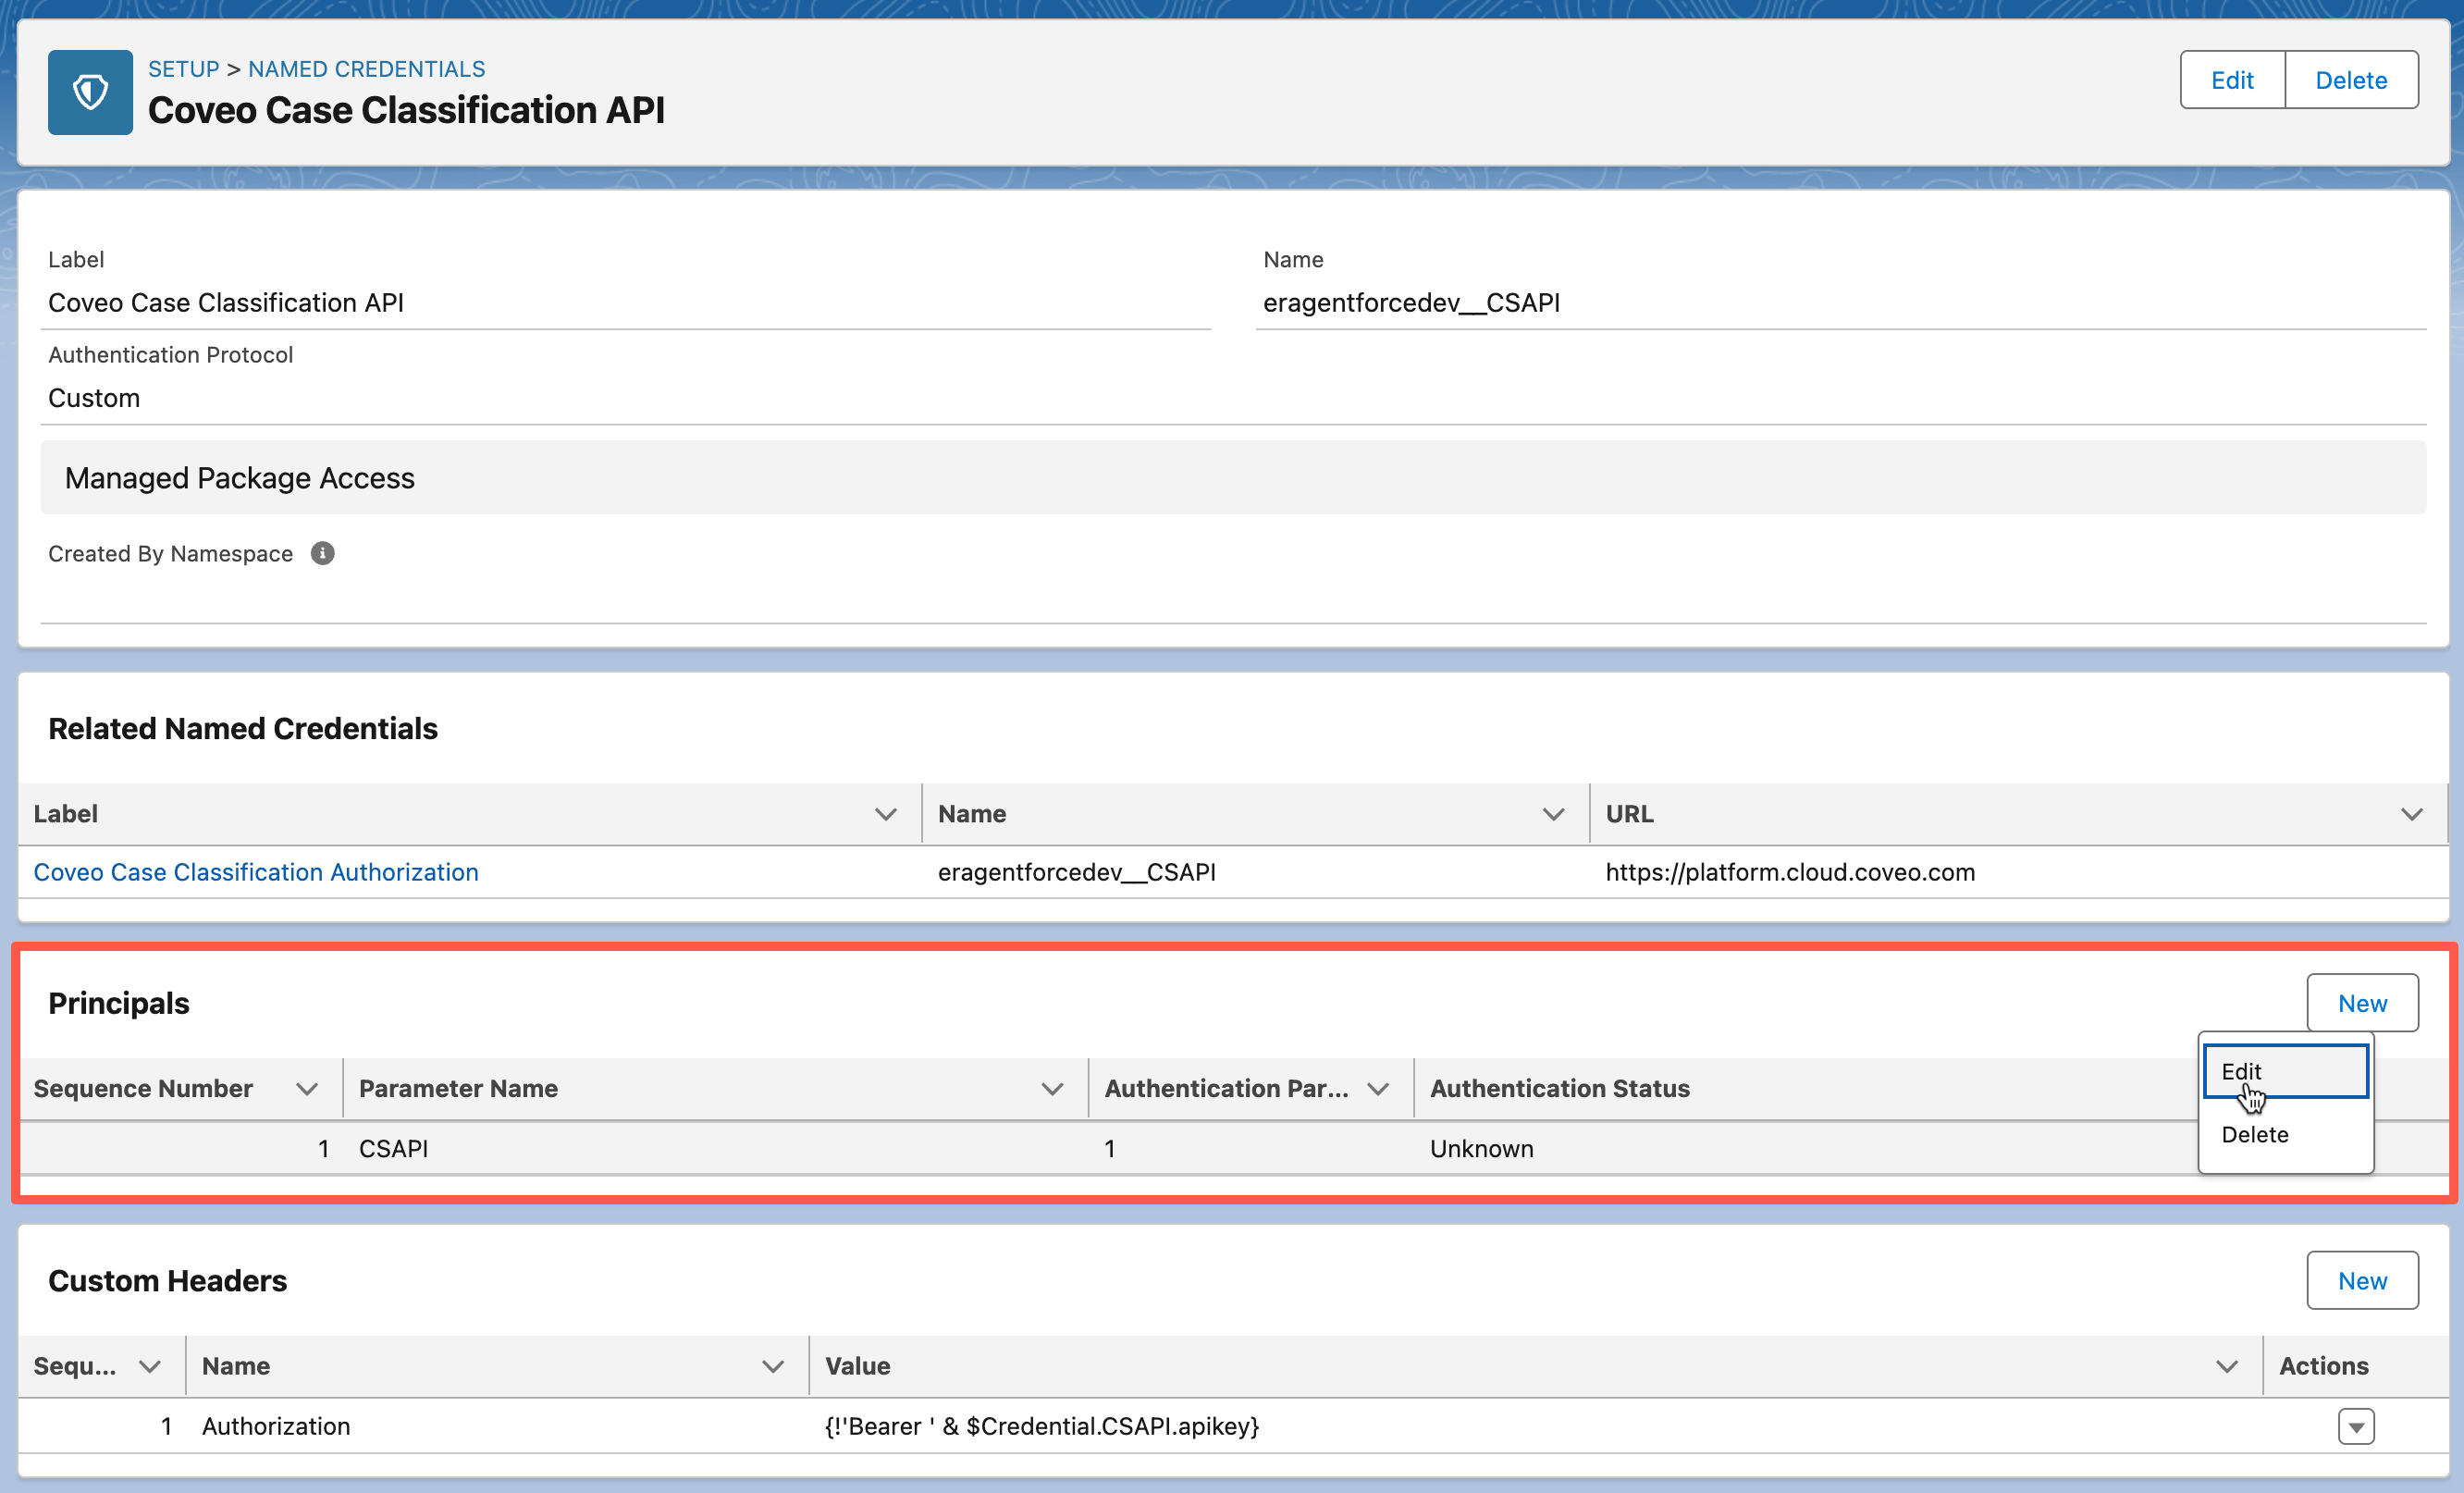
Select the External Credentials tab, and then click Coveo Case Classification API.
-
On the page that opens, go to the Principals section.
-
Find the entry for the CSAPI principal, click
 to access the Actions menu, and then select Edit.
The CSAPI principal must not be deleted. It’s required for the authorization flow to work properly.
-
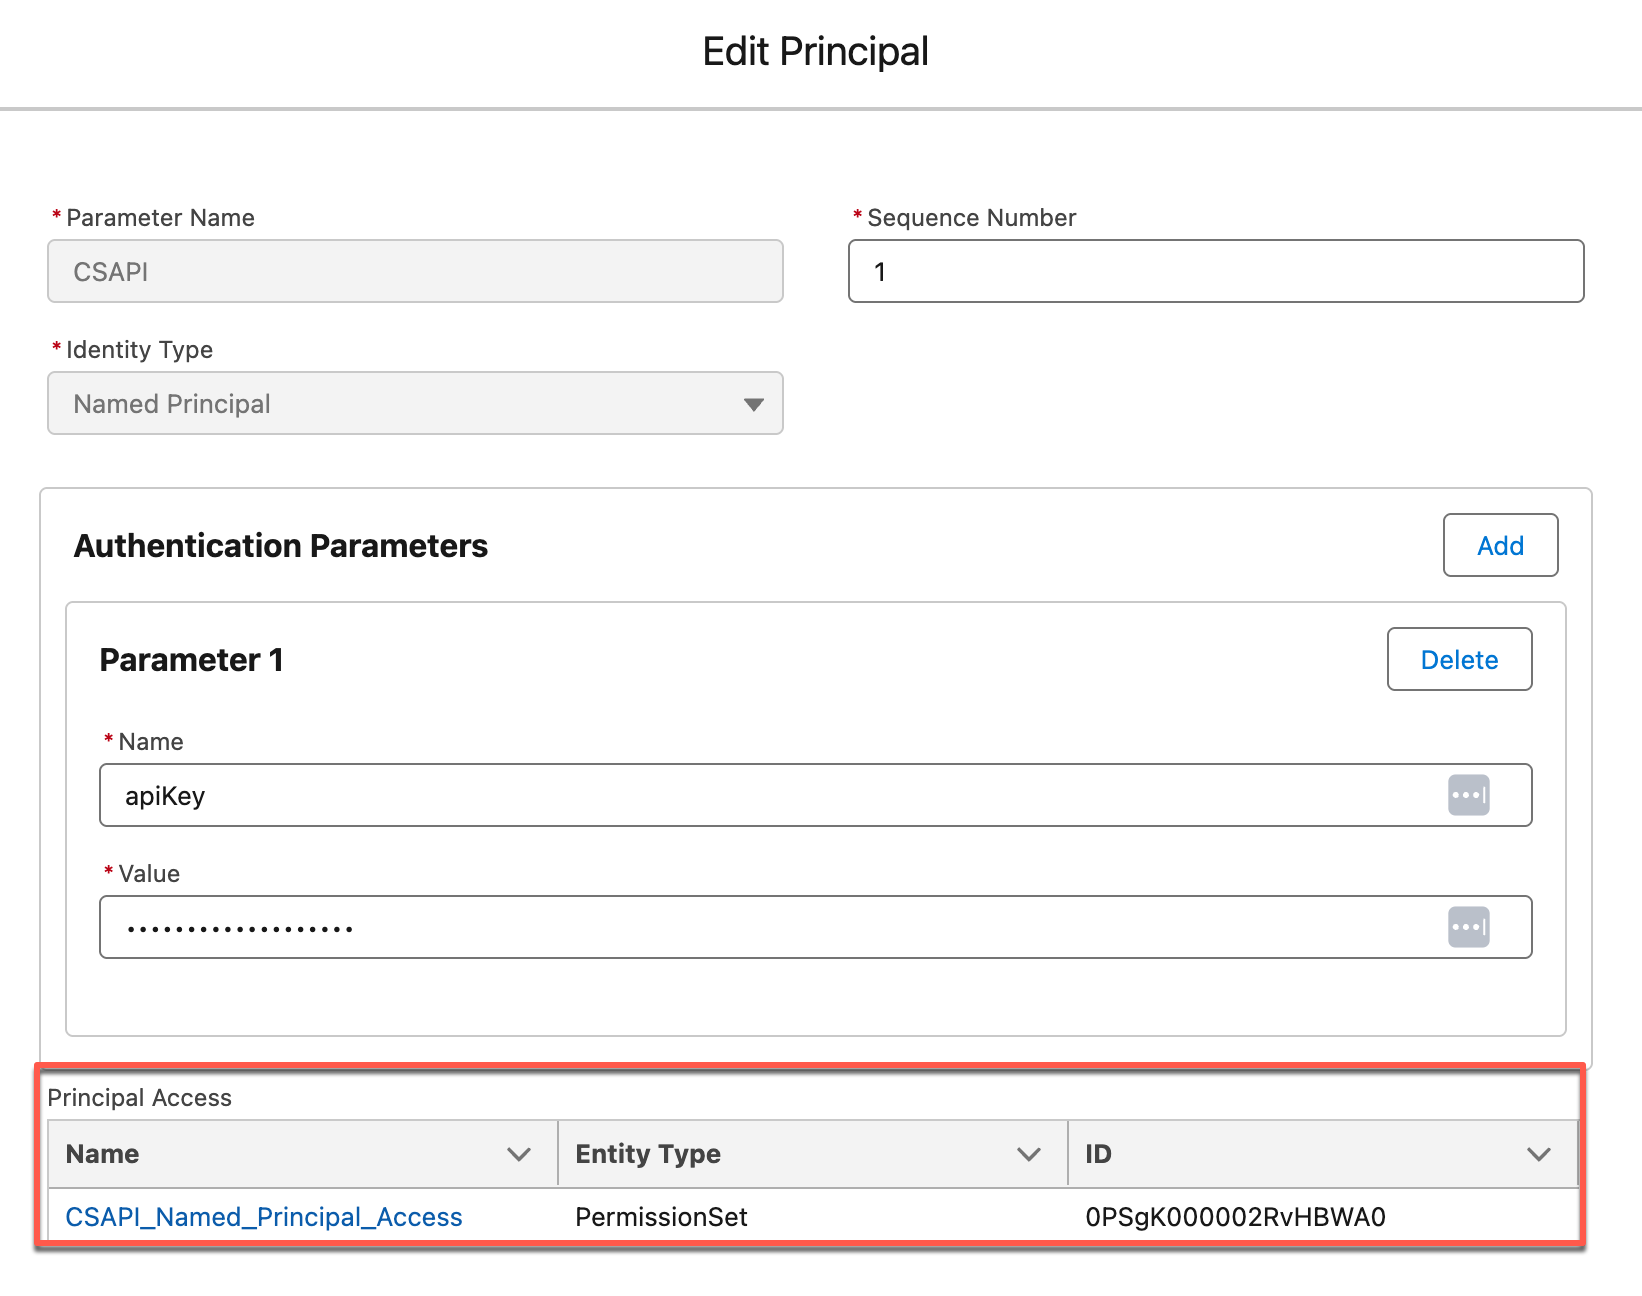
On the Edit Principal page, under Authentication Parameter, click Add to create your authentication parameter.
ImportantThis step assumes that you’ve already created an API key using the Anonymous Case Assist template in the Coveo Administration Console (see Prerequisites). If you haven’t, you must complete this task before proceeding.
-
To reopen the Edit Principal page, find the entry for the CSAPI principal, click
to access the Actions menu, and then select Edit. -
On the Edit Principal page, under Principal Access, right-click CSAPI_Named_Principal_Access, and then select Open Link in New Tab to open the permission set in a new tab.
 Tip
TipThis permission set is included in the Coveo for Agentforce package to simplify granting access to users who will use the Coveo Case Classification API Agentforce action through an Agentforce AI agent.
Granting access to this external credential is therefore required for all users who will be using this Agentforce action. Otherwise, the Agentforce AI agent won’t be able to use the API key to call the Coveo Customer Service API. For additional ways to set external credentials, see Enable User External Credentials.
-
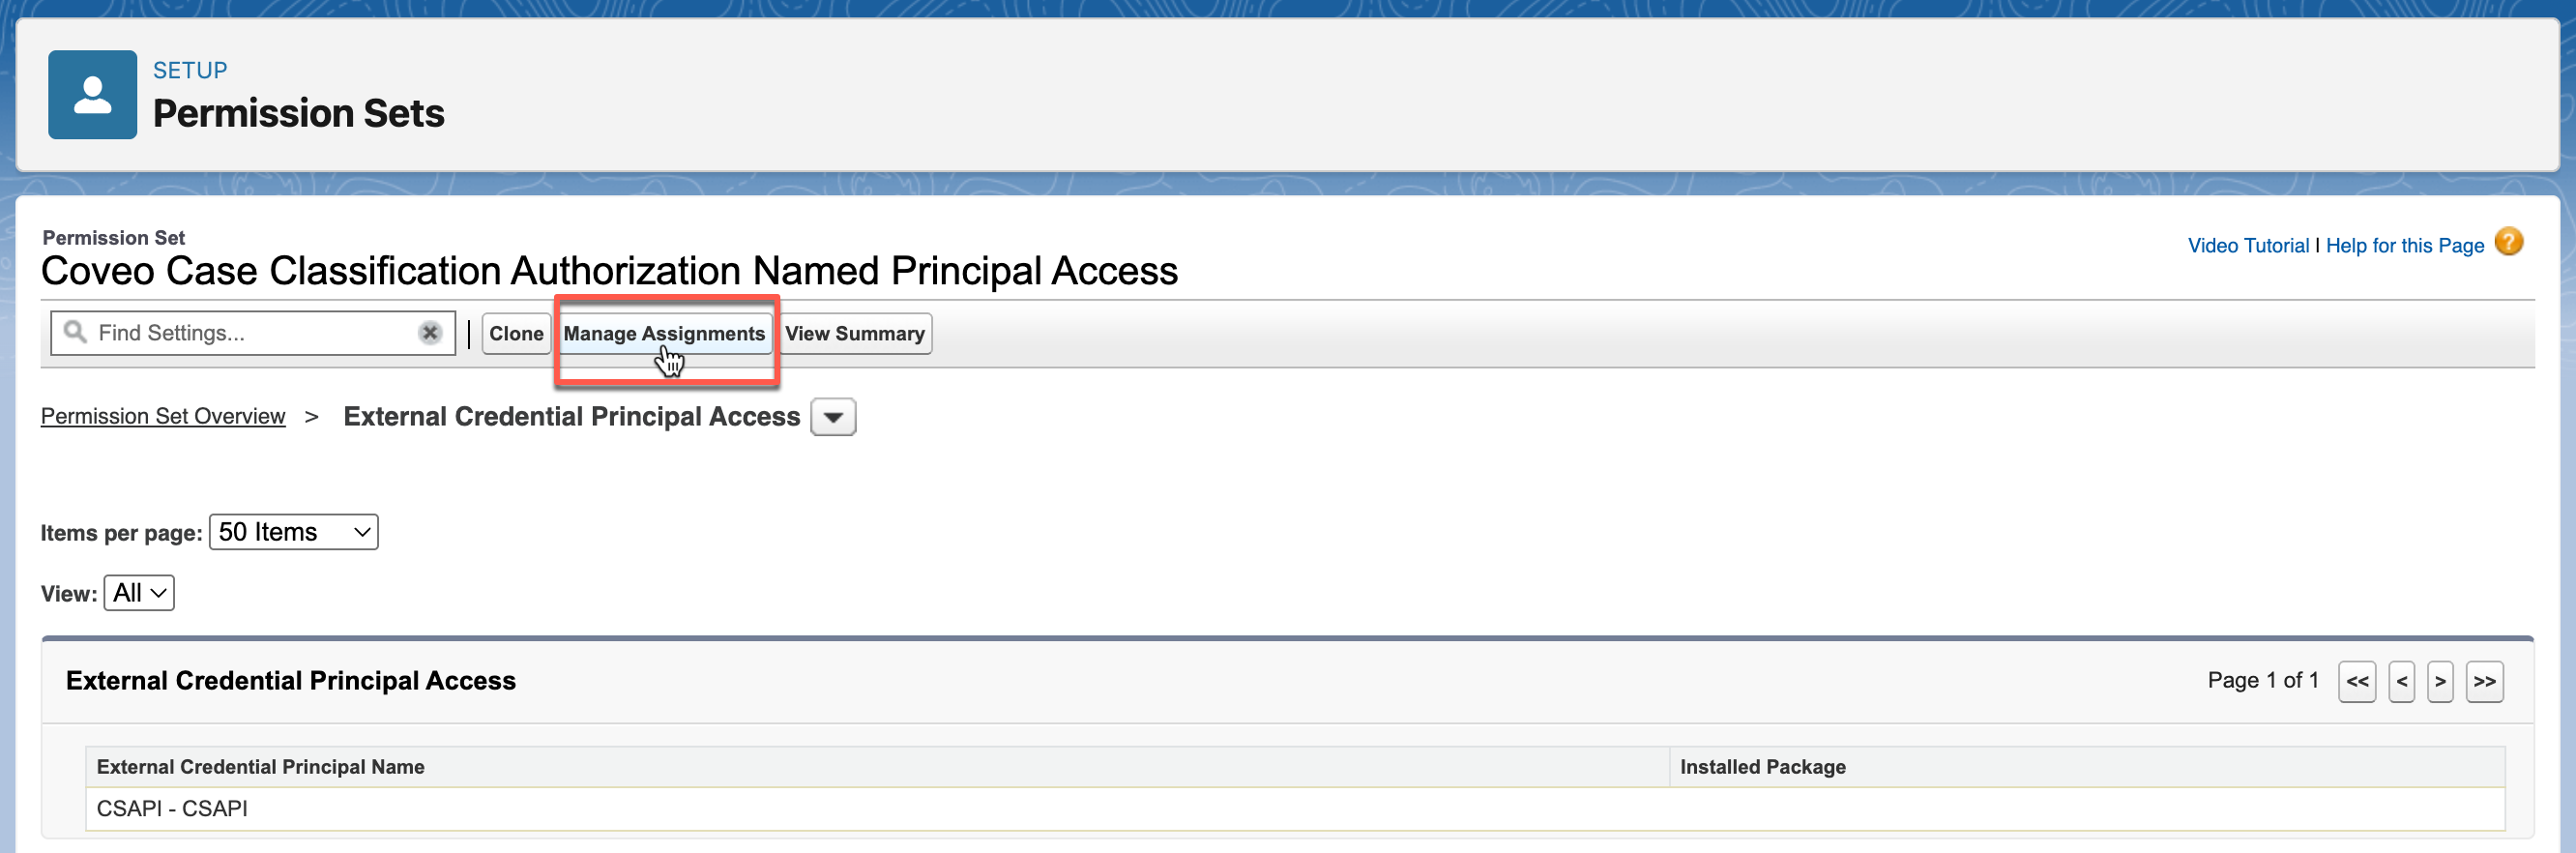
Under Permission Set for the Coveo Case Classification Authorization Named Principal Access, click Manage Assignments to grant users permission to use the Customer Service API key specified in step 5b.
-
The setup of the external credential and API key is now complete. You must now create a custom metadata configuration.
Create a custom metadata configuration
-
From the Setup menu, in the Quick Find box, enter
Custom Metadata Types, and then select Custom Metadata Types. -
On the page that opens, scroll to Coveo Case Classification Configuration, and then click Manage Records.
-
Click New to create a record. This record will serve as a configuration to call the Customer Service API.

-
In the Label field, enter a descriptive name for your configuration (for example,
Case Classification Configuration). -
By default, the Coveo Case Classification Configuration Name field is automatically filled by Salesforce based on the information you entered in the Label field. Don’t modify this value.
TipTake note of the configuration name. Depending on your implementation, you’ll need to specify it when defining your topic instructions for the default Apex action or the custom prompt template action, and when creating your prompt template.
-
In the Case Assist Id field, enter the ID of your Case Assist configuration.
-
In the Organization Id field, enter the ID of your Coveo organization.
-
In the Field Names Mapping field, enter the mapping of the Coveo fields and their corresponding Salesforce fields that will be used to classify cases (for example,
{"sfType":"Type", "sfPriority":"Priority"}).Click to show mapping details
The format for specifying the mapping of Coveo fields is:
{"<coveo-field-1>":"<salesforce-field-1>", …, "<coveo-field-n>":"<salesforce-field-n>"}Where:
-
<coveo-field-1>to<coveo-field-n>are the names of the Coveo fields that will be used to classify cases. Depending on the Case Classification method used in your Case Assist implementation, the Coveo field names can be found either in the Identify fields for classification section of your Case Assist configuration (Case Similarity) or in the Fields to provide suggestions section of your Case Classification (CC) model configuration (Context Recognition). -
<salesforce-field-1>to<salesforce-field-n>are the API names (not the labels) of the fields in theCaseobject in Salesforce. Take note that for custom fields, the Salesforce API names end with__c(for example,{"sfsoftware__c":"Software__c"}). For more information, see About objects and fields.
-
-
Click Save to save your configuration.
-
Deploy the action
To deploy the Coveo Case Classification API action, you have two options:
-
(Recommended) Create a custom prompt template action: Choose this option if you want greater flexibility and control over the action’s behavior.
-
(Out-of-the-box) Use the Apex action: Choose this option to set up the action quickly without extensive customization.
Create a custom prompt template action (Recommended)
To create an Agentforce action using a custom prompt template, you must:
Create a prompt template
-
From the Salesforce Setup menu, in the Quick Find box, enter Prompt Builder, and then select Prompt Builder.
-
In the upper-right corner of the builder, click New Prompt Template.
-
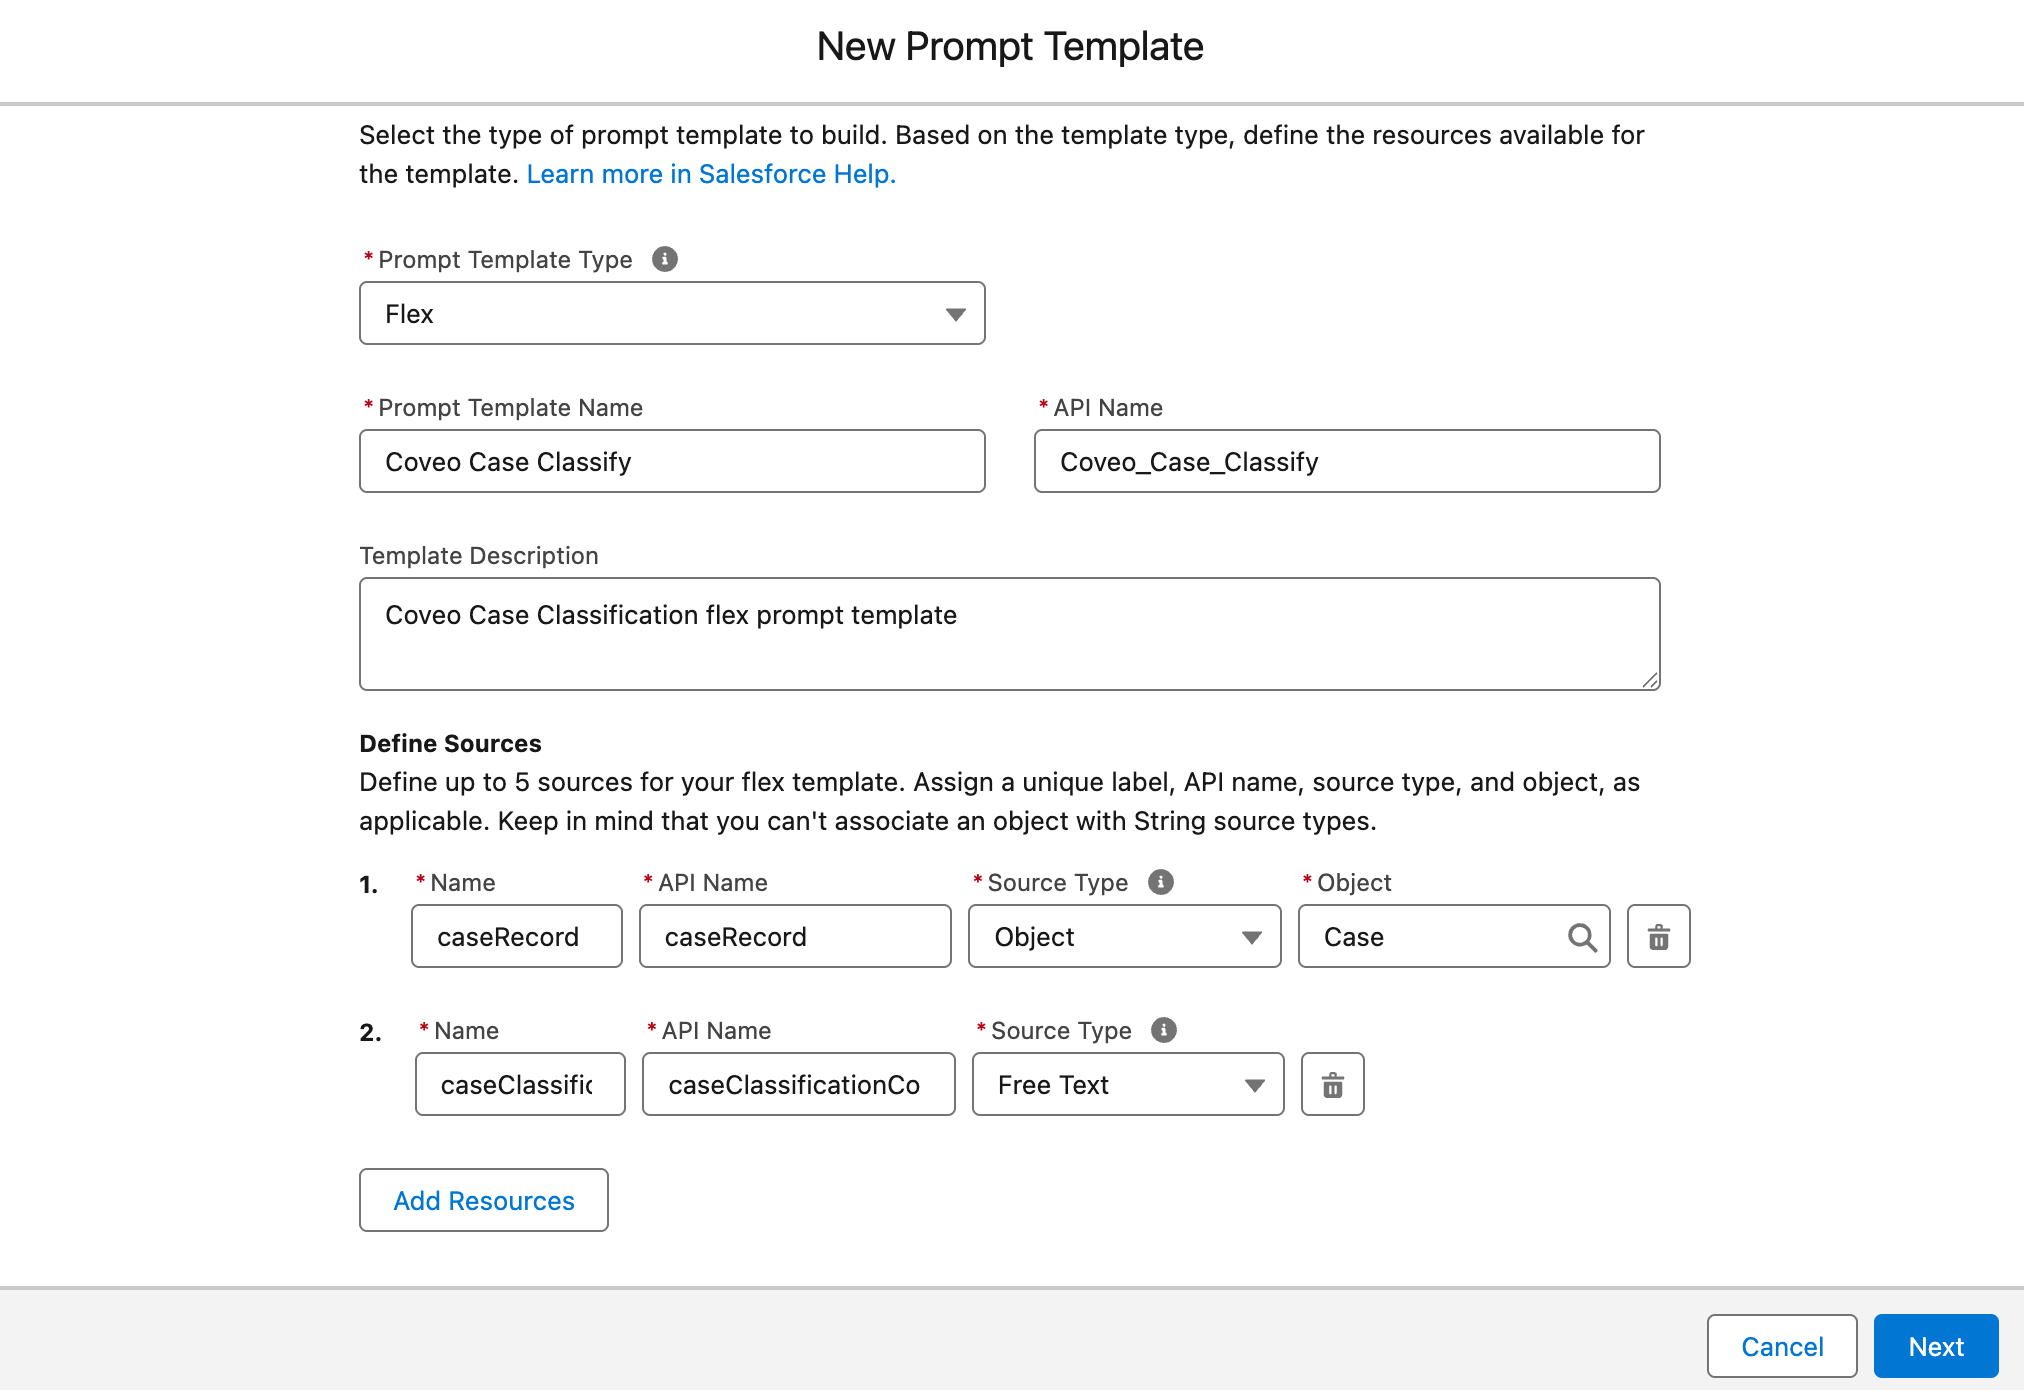
On the New Prompt Template page, specify the following information:
-
From the Prompt Template Type dropdown menu, select Flex.
-
In the Prompt Template Name field, enter a descriptive name for your prompt template (for example,
Coveo Case Classify).The API Name field is automatically filled by Salesforce based on the information you entered in the Prompt Template Name field.
-
(Optional) In the Template Description field, provide a brief description of your prompt template (for example,
Coveo Case Classification flex prompt template). -
Under Define Sources, specify a source for the case record and for the Case Classification configuration:
-
In the Name field, enter
caseRecordas the descriptive name for your case record source. -
The API Name field is automatically filled by Salesforce based on the information you entered in the Name field. Don’t modify this value.
-
In the Source type dropdown menu, select Object.
-
In the Object field, select Case.
-
Click Add Resources.
-
In the second Name field, enter
caseClassificationConfigurationas the descriptive name for your Case Classification configuration source. -
The API Name field is automatically filled by Salesforce based on the information you entered in the Name field. Don’t modify this value.
-
In the Source type dropdown menu, select Free Text.
-
-
Click Next to access the Prompt Template Workspace.
-
-
In the Prompt Template Workspace, enter your prompt template instructions and specify related resources.
Writing prompt template instructions is an iterative process. The information in this section isn’t exhaustive and only provides an example. Adjust the information to fit your specific use case. See Best Practices for Building Prompt Templates for guidelines and recommendations.

You must include the
Apex:CoveoAgentforce__InvocableCaseClassifyFlexTemplateApex class in your prompt template instructions. This class calls the Coveo Customer Service API to retrieve case classification suggestions. The caseSubjectandDescriptionfields must also be specified in your prompt template instructions.All field references (for example,
{!$Input:caseRecord.<fieldName>}) in the following example are links to resources, which must be defined using the Resource field of the Prompt Template Workspace. They must not be pasted in the instructions.ExampleContext: You're a service agent and knowledge expert looking to help agents solve their cases. Your goal is to help agents classify cases more effectively by making it easier to analyze case information, and ultimately improve their efficiency. Agents rely on your suggestions to classify cases but ultimately decide which classification is most appropriate. Instructions: Retrieve the Case Classification suggestions from the Coveo Customer Service API by calling {!$Apex:CoveoAgentforce__InvocableCaseClassifyFlexTemplate.Prompt}. This Apex class has a method that sends the Subject and Description to an external service API and returns a list of suggested case classifications. When making the call, use the {!$Input:caseRecord.Subject} and {!$Input:caseRecord.Description} fields as input, and include the {!$Input:caseClassificationConfiguration} custom metadata record in the Apex class call. As for the output of this action: - Return only the 3 suggestions that have the highest confidence score. - Display each suggestion in the following format: 1. Suggestion value (confidence score: 0.xxxx) (Round the confidence score to 4 decimal places.) - Include a call-to-action button that allows the user to apply their selected suggestion to the corresponding field. Always start the response with the following: Here are the classification suggestions for case {!$Input:caseRecord.CaseNumber}: Always ask the following before the call to action buttons to update the field: Please select a suggestion to apply to the classification field: Always display buttons to apply the chosen classification by the user to the corresponding field. Always provide the response in HTML rich text format with proper formatting: - Return plain HTML output without wrapping it inside code blocks (``` or ```html). - Use `<b>bold</b>` instead of `**bold**`. - Format superscript text using `<sup>number</sup>` instead of `^number^`. - For resolution steps, use the following format: Salesforce Field Name Label 1: 1. Option 1 2. Option 2 3. Option 3 Salesforce Field Name Label 2: 4. Option 1 5. Option 2 6. Option 3 Constraints: You must adhere to the following constraints when generating your response: - Provide brief, declarative sentences using the active voice. - Strictly avoid using filler words, slang, and redundant language. - You must write in English unless otherwise specified. - You must follow the given instructions. You must not address any content or generate answers that you don't have data on or basis for. -
To test your prompt template before activating it:
-
In the Preview section, click the Preview Language dropdown menu, and then select English.
-
Click Test Inputs, and then enter the following values in the Configuration panel on the right:
-
In the caseRecord field, enter a case record ID (for example,
00001027). -
In the caseClassificationConfiguration field, enter the name of your Case Classification configuration. Make sure it matches the name of the custom metadata configuration you created in step 3b.
-
-
Click Save & Preview to save your prompt template and preview the results.
-
-
Once you’re satisfied with the results, click Activate to activate your prompt template.
Access your Agentforce AI agent
-
From the Salesforce Setup menu, in the Quick Find box, enter
Agentforce Agents, and then select Agentforce Agents. -
On the page that opens, find your Agentforce AI agent, such as Einstein Copilot or Agentforce (Default), click
to access the Actions menu, and then select Open in Builder.
You can’t use Coveo-powered Agentforce actions in a Service Agent at this time. Use a different agent type to leverage your Coveo-powered actions.
-
If your Agentforce AI agent is currently active, click Deactivate in the upper-right corner of the Agentforce Builder.
TipYou must always deactivate your Agentforce AI agent to make changes to it.
Create a topic
-
In the Agentforce Builder, select Topics from the left tab.
-
Click the New actions menu, and then select New Topic.
-
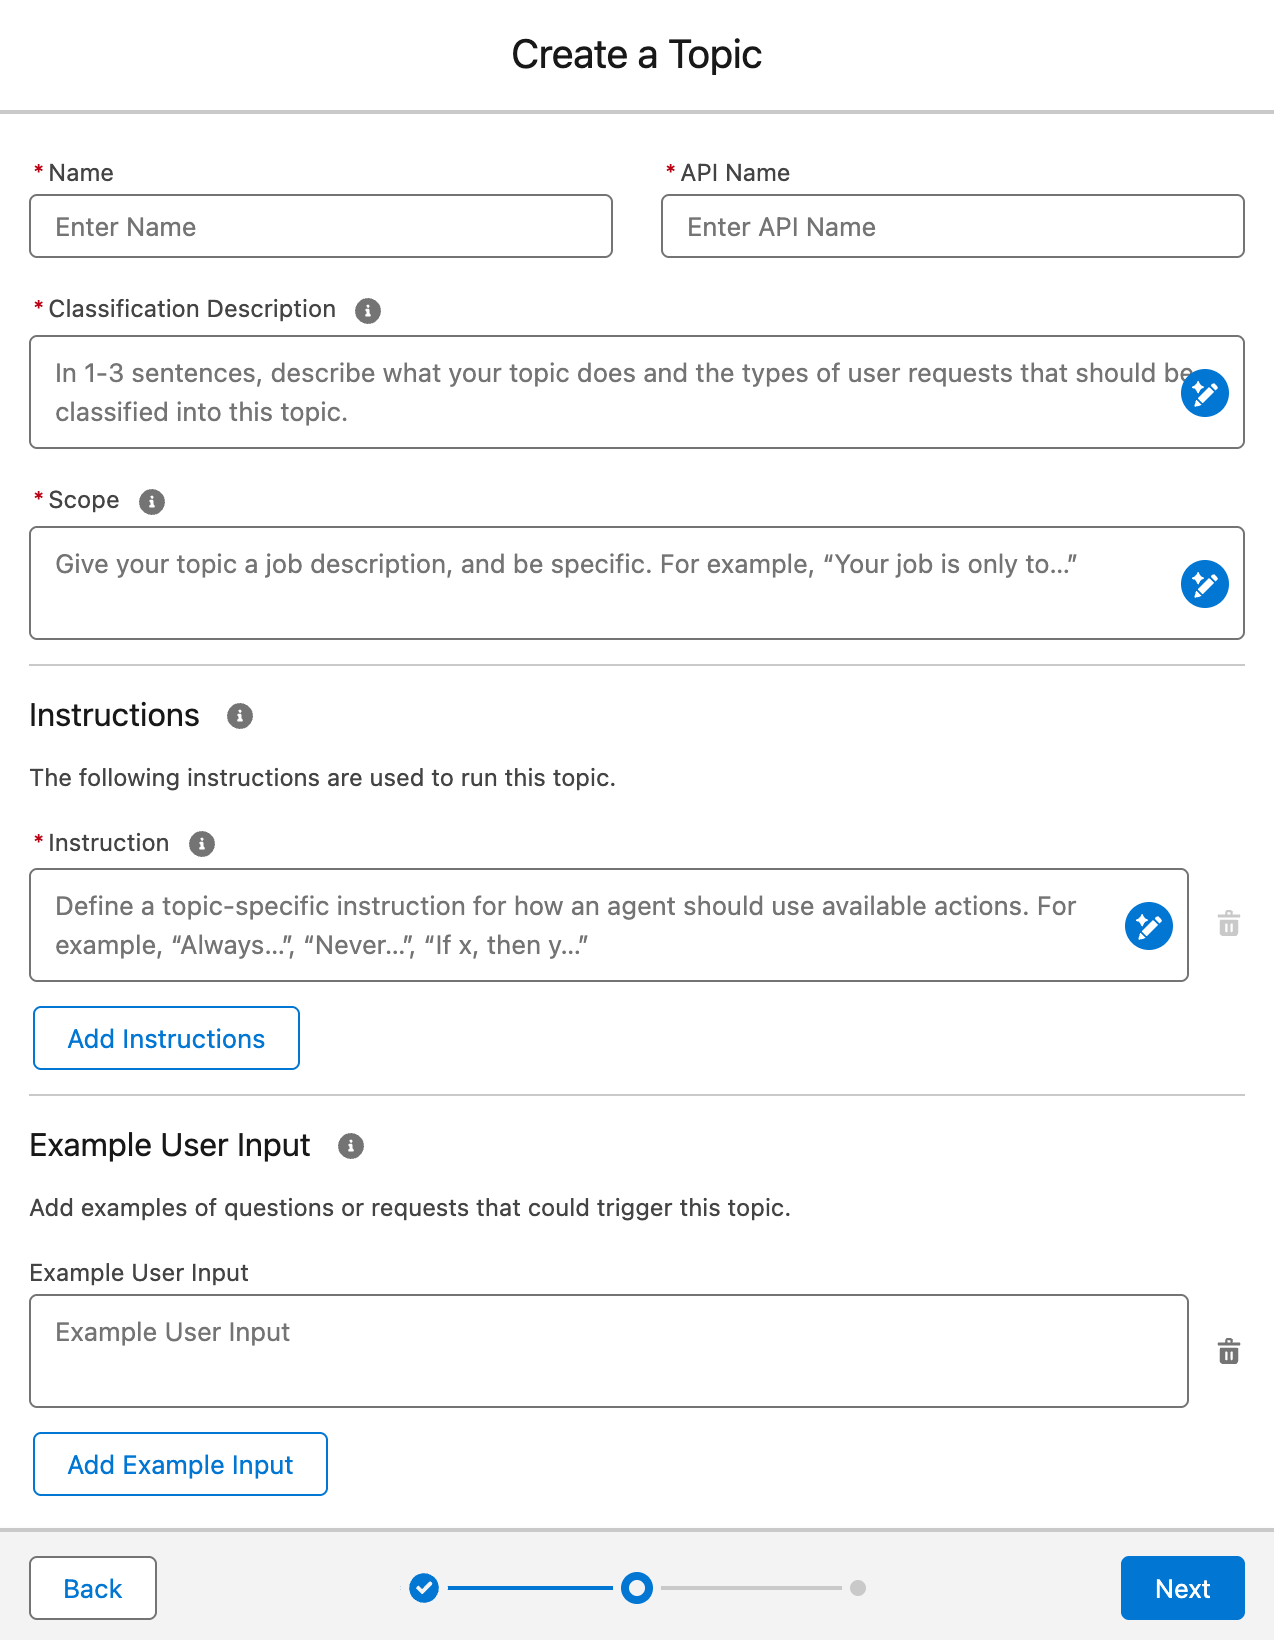
(Optional) In the Create a Topic modal, specify the job you want this topic to perform.
You can skip this step and specify the job you want this topic to perform in the second step of the modal.
-
Click Next.
-
In the second step of the modal, specify the following information:
 Important
Creating a topic is an iterative process. The information in this section isn’t exhaustive and is only meant to provide you with an example. You must adjust the information to fit your specific use case.
-
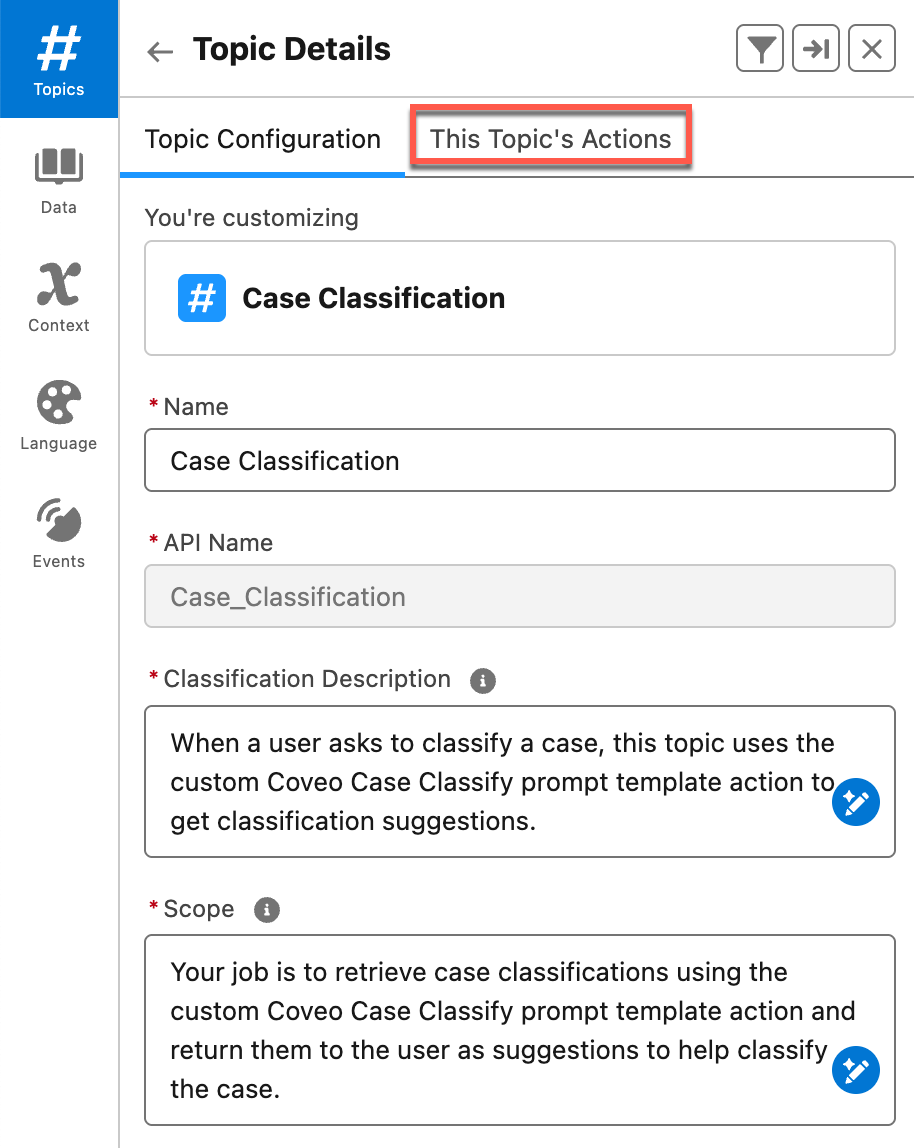
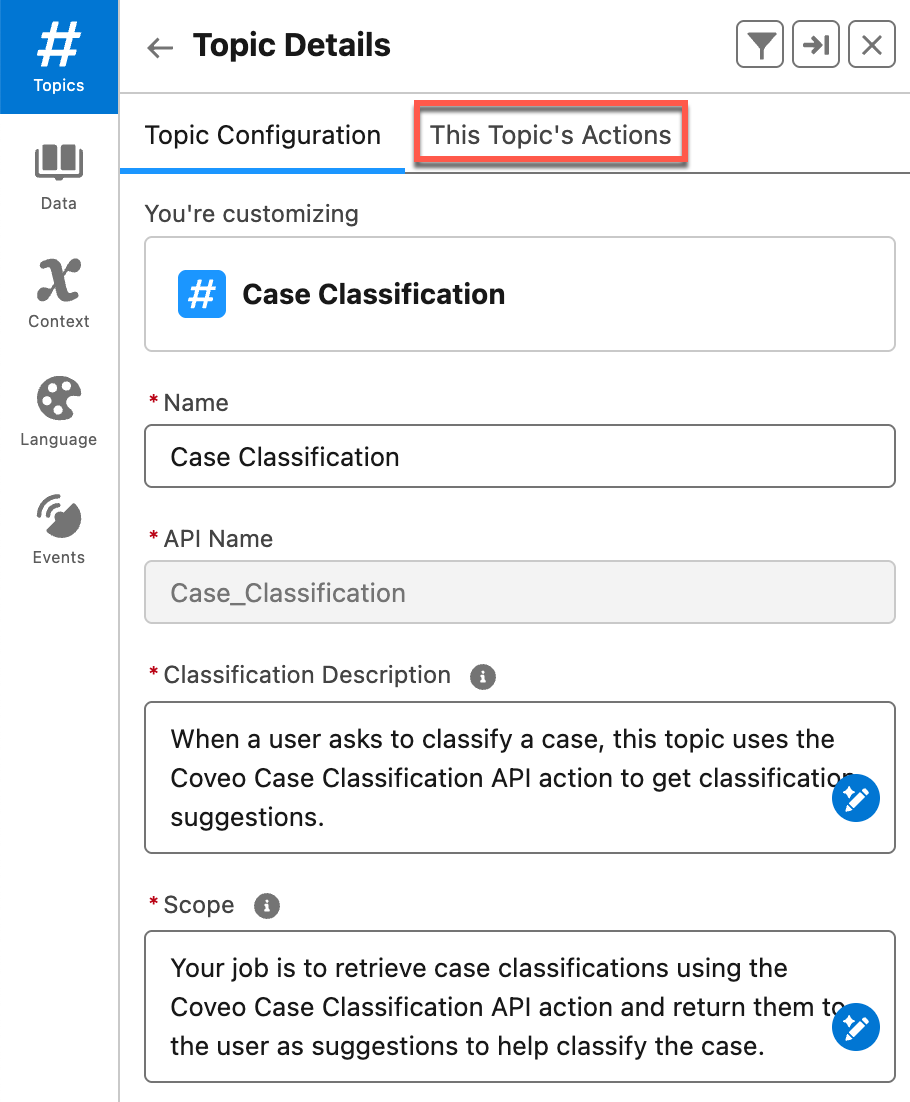
In the Name field, enter a descriptive name for your topic (for example,
Case Classification).By default, the API Name field is automatically filled by Salesforce based on the information you entered in the Name field.
-
In the Classification Description field, provide a brief topic description (1-3 sentences). Enter text similar to the following:
ExampleWhen a user asks to classify a case, this topic uses the custom Coveo Case Classify prompt template action to get classification suggestions.The description should be clear and concise, providing enough context for the topic’s purpose. Agentforce uses this information to determine the topic to use when answering questions.
-
In the Scope field, give your topic a job description. Enter text similar to the following:
ExampleYour job is to retrieve case classifications using the custom Coveo Case Classify prompt template action and return them to the user as suggestions to help classify the case. -
In the Instruction field, instruct Agentforce to use your custom prompt template action to retrieve case classification suggestions.
ExampleAlways use the custom Coveo Case Classify prompt template action to retrieve case classification suggestions. -
In the Example User Input fields, add examples of questions that users might ask.
This section is only available if you’re using the Agentforce (Default) agent. If you’re using a custom agent, you can skip this step.
Example-
Example User Input:
Can you provide classification suggestions for this case? -
Example User Input:
Classify this case.
-
-
-
Click Next.
-
Skip the Select the actions you want to include in your topic step. This task is covered in the next section.
-
Click Finish to finish creating your topic.
If a Topic Overlap Detected warning appears, review your topics to ensure they’re distinct. Make any necessary adjustments to avoid overlap.
Assign Agentforce actions to your topic
-
On the Topics panel, select the topic you created.
-
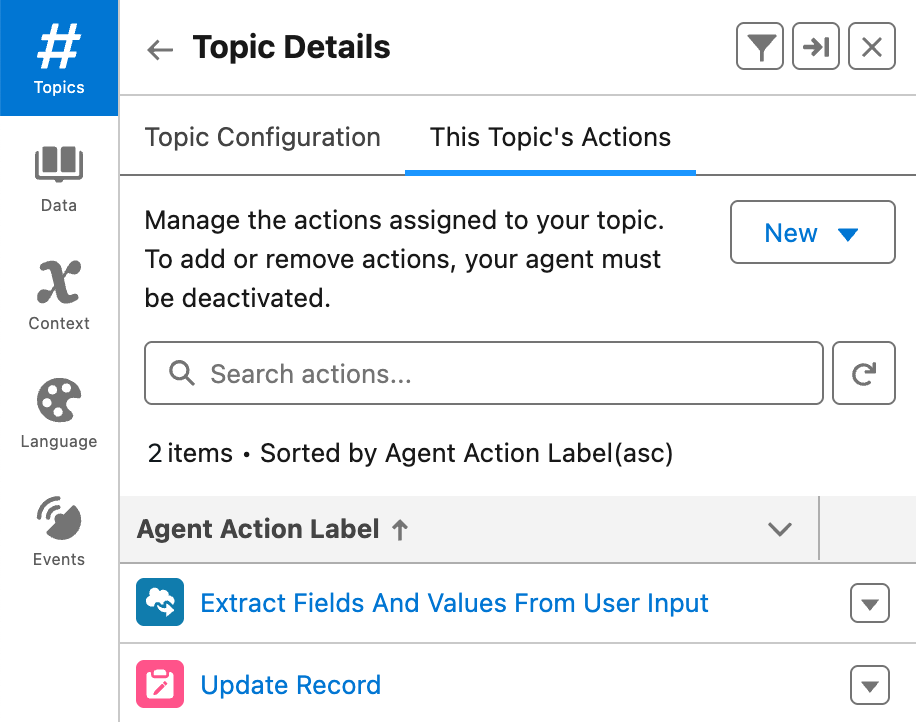
On the Topic Details panel, select This Topic’s Actions.
-
Click the New action menu, and then select Add from Asset Library.
-
From the Add Available Actions panel, select the Extract Fields And Values From User Input and the Update Record actions, and then click Finish.
The This Topic’s Actions tab now displays the actions you added.
-
To add your custom action to the topic, click the New action menu, and then select Create New Action.
-
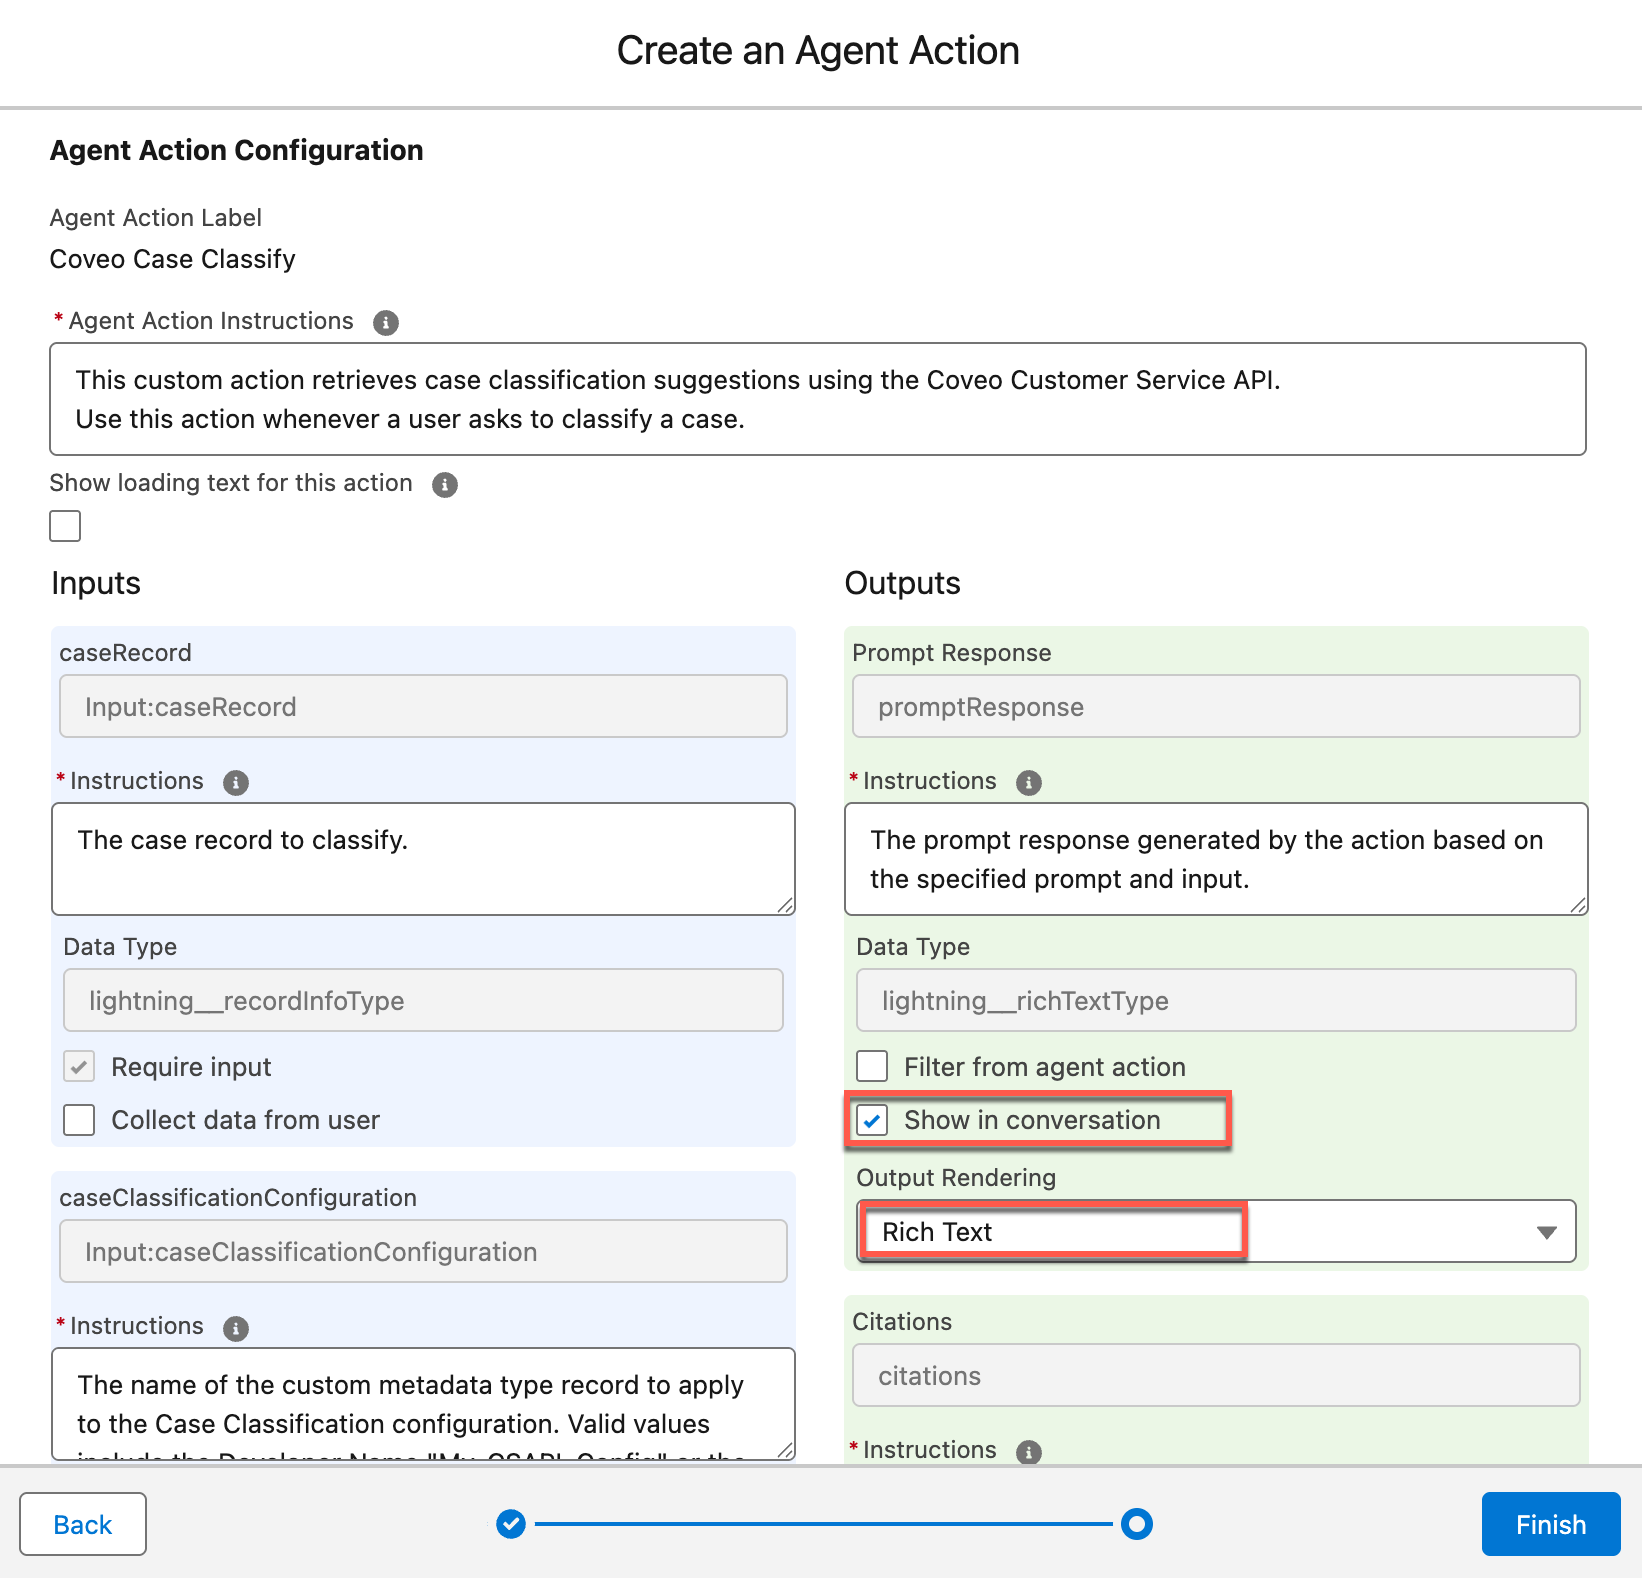
On the Create an Agent Action page, specify the following information:

-
From the Reference Action Type dropdown menu, select Prompt Template.
-
From the Reference Action field, select the prompt template you created (for example, Coveo Case Classify).
The Agent Action Label and Agent Action API Name fields are automatically filled by Salesforce.
-
Click Next and scroll to the Agent Action Configuration section.
-
In the Agent Action Instructions field, enter a description for your custom action.
ExampleThis custom action retrieves case classification suggestions using the Coveo Customer Service API. Use this action whenever a user asks to classify a case. -
Under the Inputs section:
-
Provide instructions for the caseRecord input.
ExampleThe case record to classify. -
Provide instructions for the caseClassificationConfiguration input.
ExampleThe name of the custom metadata type record to apply to the Case Classification configuration. Valid values include the Developer Name "My_CSAPI_Config" or the fully qualified name "MyNamespace__My_CSAPI_Config".Providing instructions for Citation Mode is optional.
-
-
In the Outputs section:
-
Select the Show in conversation checkbox under Data Type.
-
Select Rich Text from the Output Rendering dropdown menu.
Providing instructions for Citation Mode is optional.
-
-
Click Finish to create your action. The This Topic’s Actions tab now displays your custom action.
If you don’t see your custom action in the list, refresh the page.
-
-
Click Activate in the upper-right corner of the builder to activate your AI agent.
-
Test your custom Prompt Template action to confirm it’s working as expected.
You’ve successfully set up and deployed the Coveo Case Classification API Agentforce action using a custom prompt template. Your Agentforce AI agent is now able to classify cases in real time, helping agents categorize support cases more efficiently.
Use the Apex action
To deploy the Coveo Case Classification API action using the default Apex action, you must:
Access your Agentforce AI agent
-
From the Salesforce Setup menu, in the Quick Find box, enter
Agentforce Agents, and then select Agentforce Agents. -
On the page that opens, find your Agentforce AI agent, such as Einstein Copilot or Agentforce (Default), click
to access the Actions menu, and then select Open in Builder.
You can’t use Coveo-powered Agentforce actions in a Service Agent at this time. Use a different agent type to leverage your Coveo-powered actions.
-
If your Agentforce AI agent is currently active, click Deactivate in the upper-right corner of the Agentforce Builder.
TipYou must always deactivate your Agentforce AI agent to make changes to it.
Create a topic
-
In the Agentforce Builder, select Topics from the left tab.
-
Click the New actions menu, and then select New Topic.
-
(Optional) In the Create a Topic modal, specify the job you want this topic to perform.
You can skip this step and specify the job you want this topic to perform in the second step of the modal.
-
Click Next.
-
In the second step of the modal, specify the following information:
ImportantCreating a topic is an iterative process. The information in this section isn’t exhaustive and is only meant to provide you with an example. You must adjust the information to fit your specific use case.
-
In the Name field, enter a descriptive name for your topic (for example,
Case Classification).By default, the API Name field is automatically filled by Salesforce based on the information you entered in the Name field.
-
In the Classification Description field, provide a brief topic description (1-3 sentences). Enter text similar to the following:
ExampleWhen a user asks to classify a case, this topic uses the Coveo Case Classification API action to get classification suggestions.The description should be clear and concise, providing enough context for the topic’s purpose. Agentforce uses this information to determine the topic to use when answering questions.
-
In the Scope field, give your topic a job description. Enter text similar to the following:
ExampleYour job is to retrieve case classifications using the Coveo Case Classification API action and return them to the user as suggestions to help classify the case. -
In the Instructions fields, enter text similar to the following:
Examples-
Instruction 1 (mandatory)
Always use the Coveo Case Classification API action to retrieve case classification suggestions. -
Instruction 2 (mandatory)
When calling the Coveo Case Classification API action, always use the current case record Subject and Description fields as input. -
Instruction 3 (mandatory)
Always use the following as input for the Coveo Case Classification API action:
{"caseClassificationConfiguration":{"<my_configuration>"}}
Where
<my_configuration>is the name of the custom metadata configuration you created in the step 3b. -
Instruction 4 (mandatory)
Always end your response by prompting the user to select one or more suggestions to apply to the case field, separated by a comma. Always use the Update Record action to update the fields with the selected suggestions. -
Instruction 5 (optional)
Always start the response with the following text: Here are the case classification suggestions: -
Instruction 6 (optional)
If no suggestions are returned, say you couldn't find classification suggestions for the case record. -
Instruction 7 (optional)
Always format your response as follows:
Group suggestions by salesforceFieldName.
Sort each group by descending confidence score.
Insert a newline (\n) after each group.
Display no more than 3 suggestions per field.
Use continuous index numbering across all fields (don't restart at 1 for each group)
Round confidence values to 4 decimal places.
Format the output of each suggestion as follows:
<b><salesforceFieldLabel>:</b>\n<index>. <value> (confidence: <confidence>)\n ...
Each suggestion must be on its own line.
-
-
In the Example User Input fields, add examples of questions that users might ask.
This section is only available if you’re using the Agentforce (Default) agent. If you’re using a custom agent, you can skip this step.
Example-
Example User Input:
Can you provide classification suggestions for this case? -
Example User Input:
Classify this case.
-
-
-
Click Next.
-
Skip the Select the actions you want to include in your topic step. This task is covered in the next section.
-
Click Finish to create your topic.
If a Topic Overlap Detected warning appears, review your topics to ensure they’re distinct. Make any necessary adjustments to avoid overlap.
Assign Agentforce actions to your topic
-
On the Topics panel, select the topic you created.
-
On the Topic Details panel, select This Topic’s Actions.
-
Click the New action menu, and then select Add from Asset Library.
-
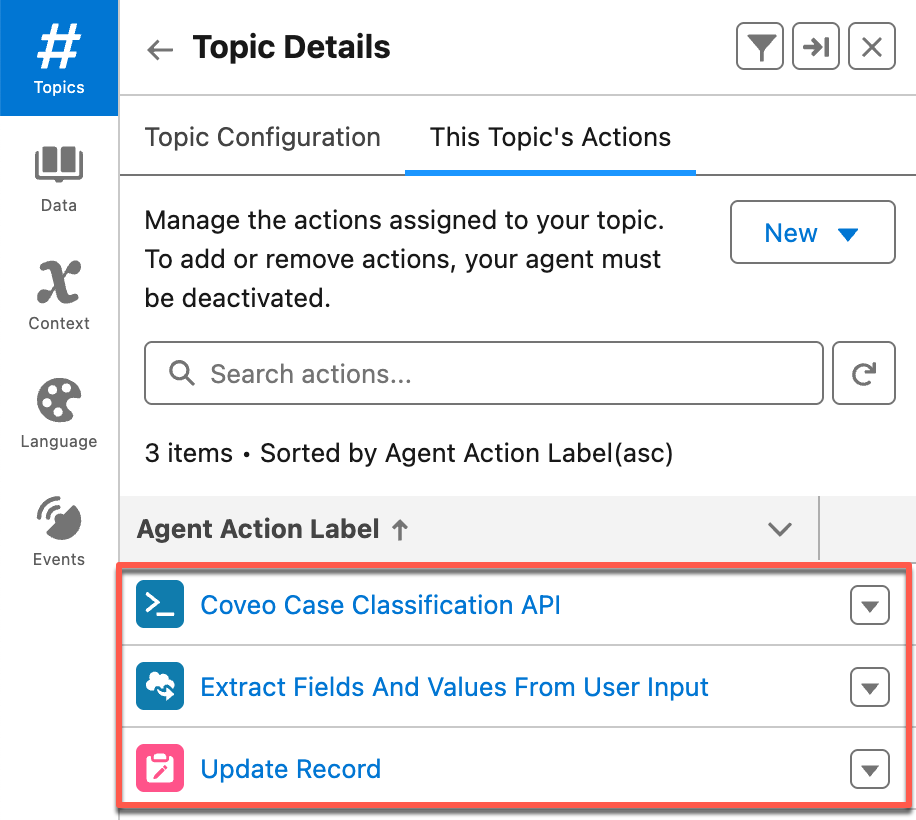
From the Add Available Actions panel, select the Coveo Case Classification API, Extract Fields And Values From User Input, and Update Record actions, and then click Finish.
The This Topic’s Actions tab now displays the actions you added.
-
Click Activate in the upper-right corner of the builder to activate your AI agent.
-
Test your default Apex action to confirm it’s working as expected.
You’ve successfully set up and deployed the default Coveo Case Classification API Apex action. Your Agentforce AI agent is now able to classify cases in real time, helping agents categorize support cases more efficiently.
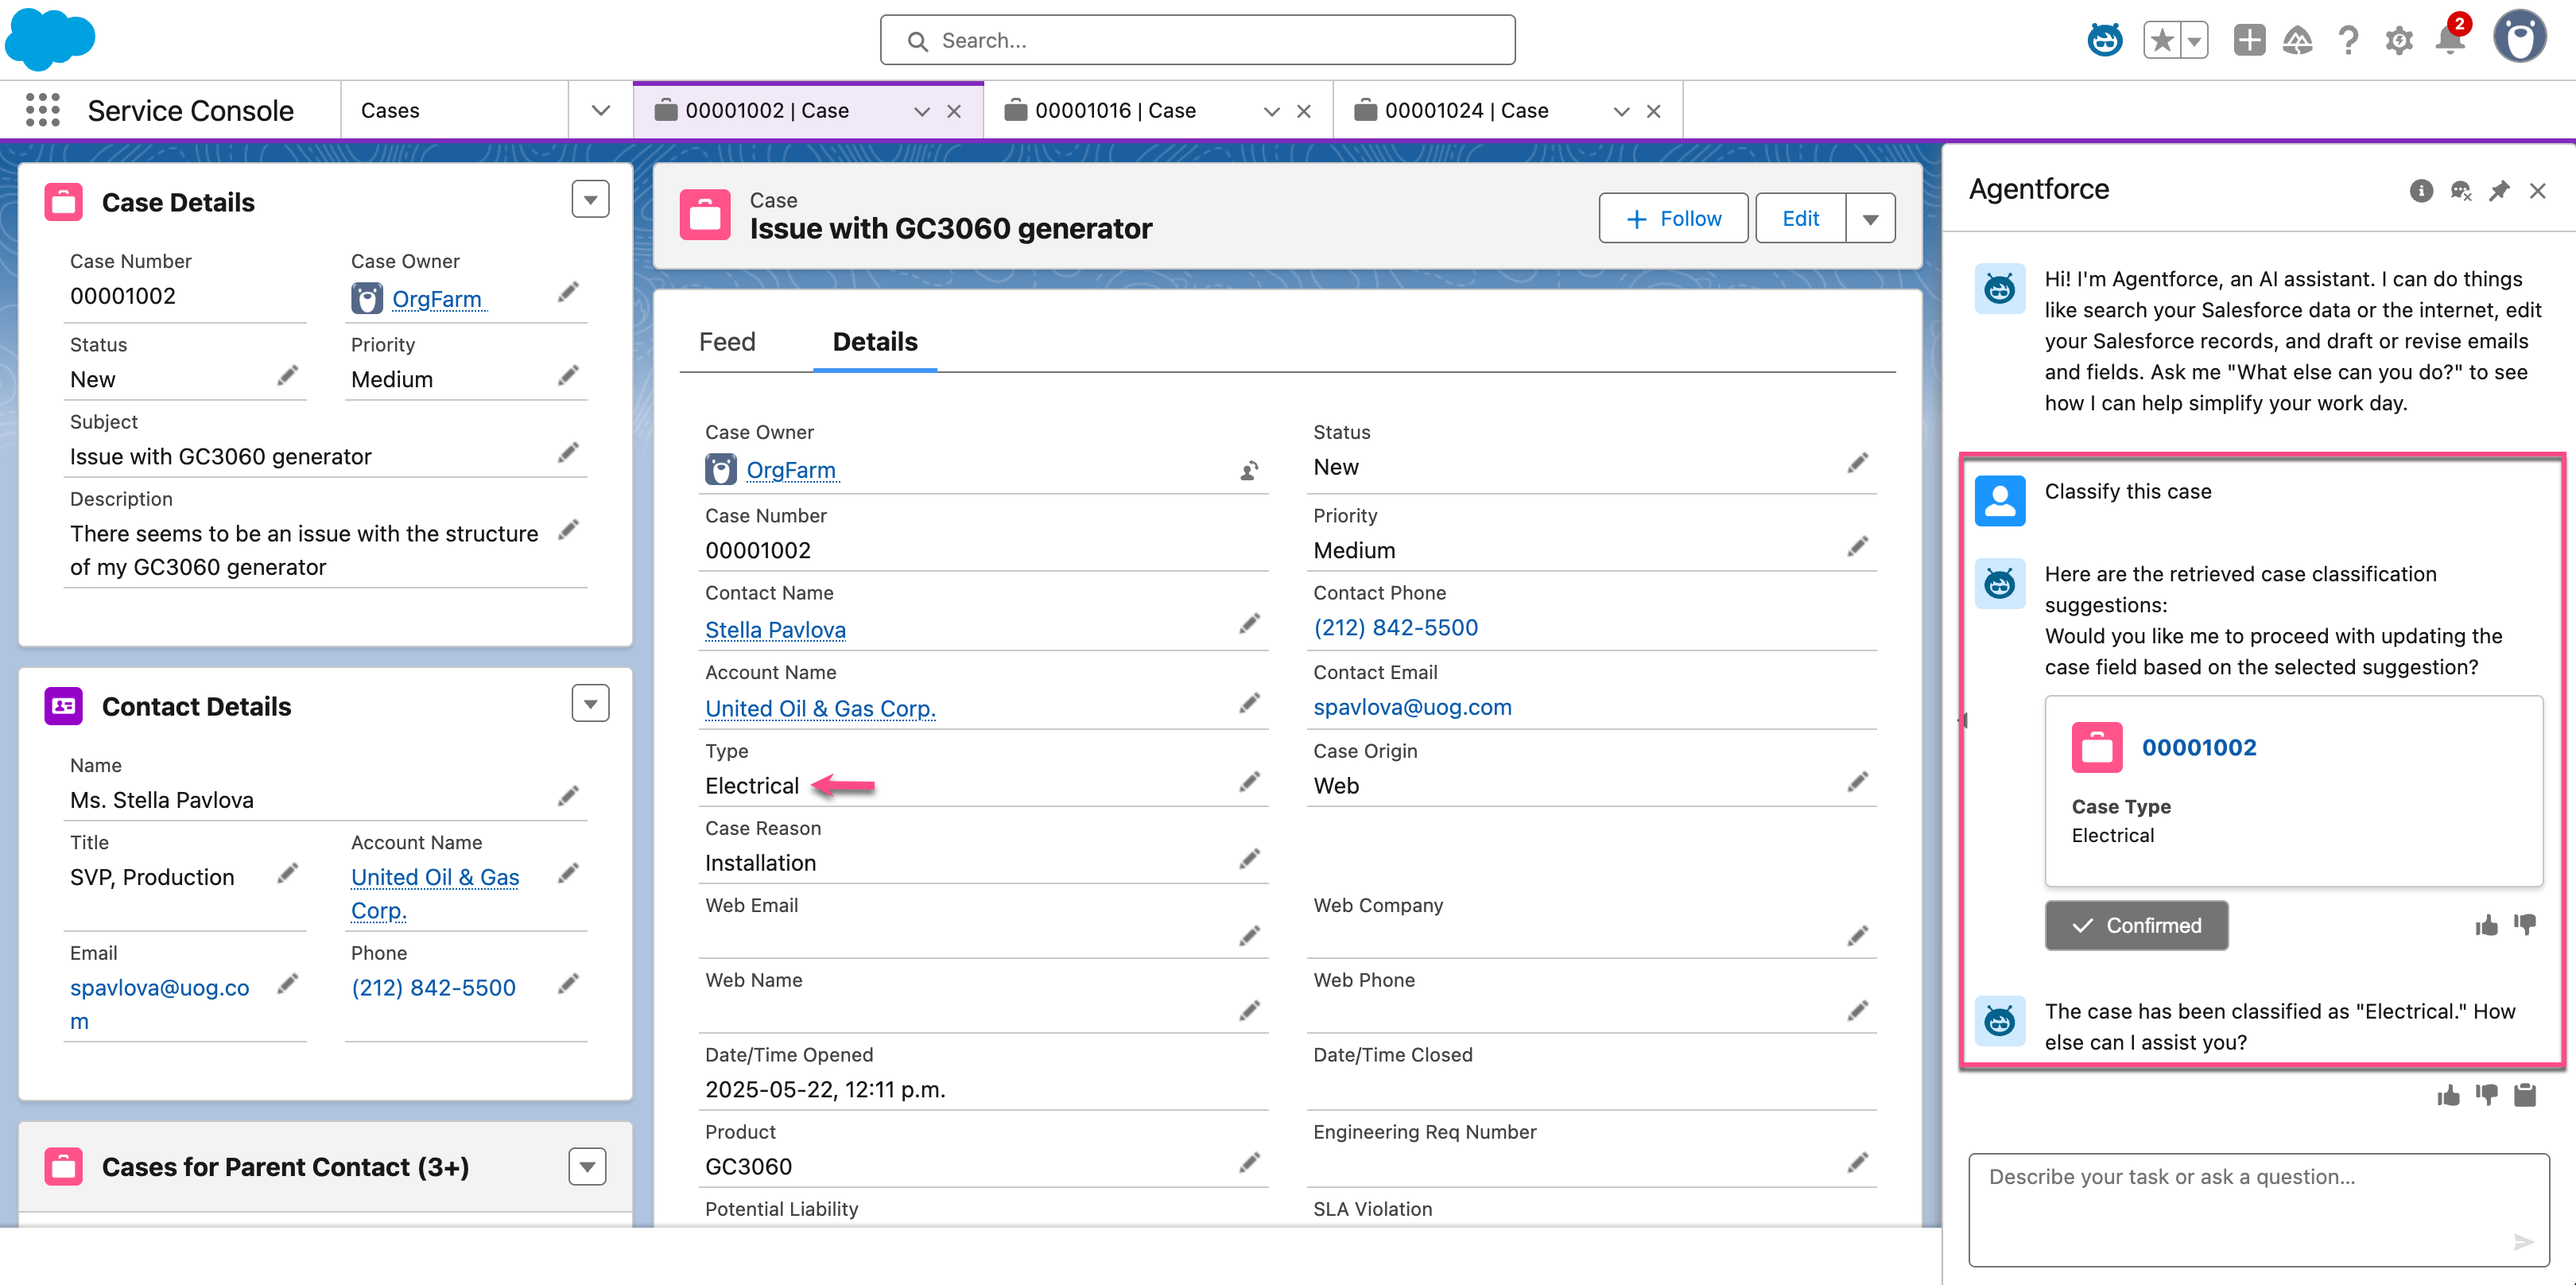
Test the action
-
Open a case record in the Lightning Service Console.
Make sure the record’s Case Details tab includes the field or fields being suggested by the Coveo Case Classification API action. If it doesn’t, use the Object Manager to edit the fields of the Case object accordingly. See Customizing Case Fields for details.
-
Click
 in the upper-right corner of the Lightning Service Console to open the Agentforce chat window.
 -
In the Agentforce chat window, enter a request such as
Classify this case. -
From the list of suggestions provided by the action, specify the classification you deem most appropriate for the case (for example,
1.) -
When prompted to confirm whether you want to apply the selected classification to the field suggested by the Coveo Case Classification API action, click Confirmed.
The field suggested by the Coveo Case Classification API action in the case record is now updated with the selected classification.