Create and manage in-product experiences
Create and manage in-product experiences
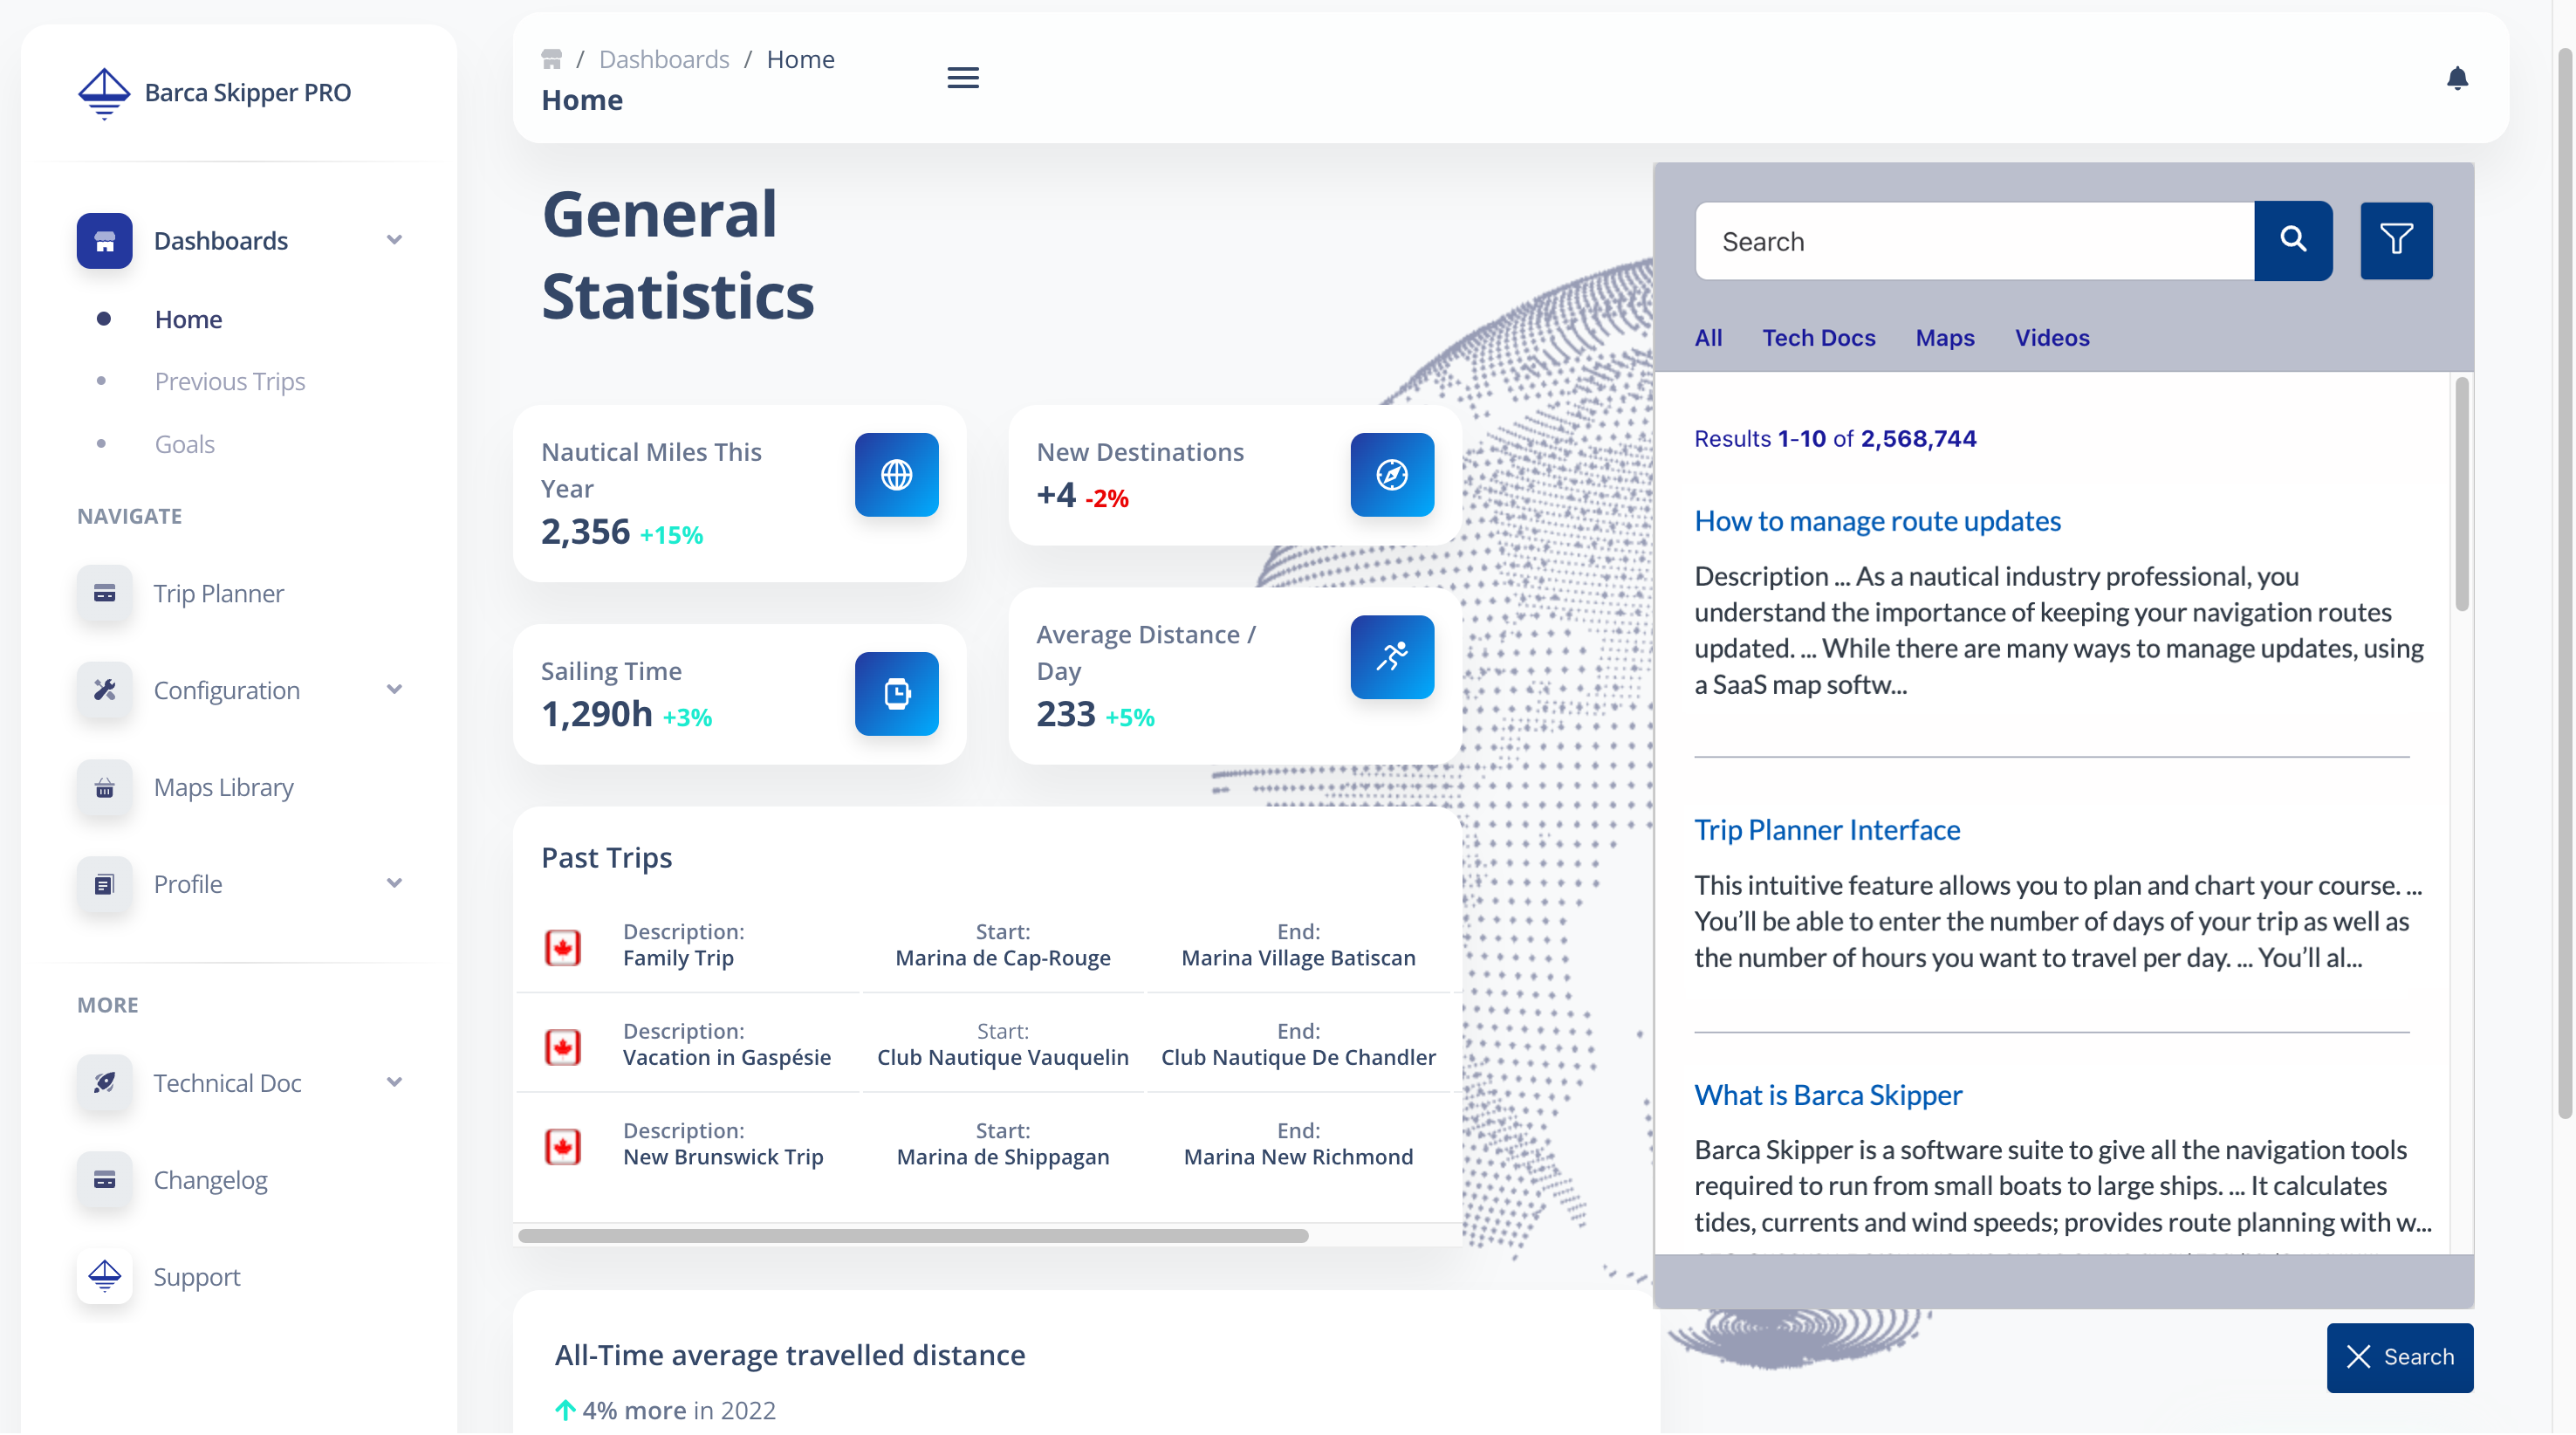
Coveo In-Product Experience (IPX) is a lightweight and feature-rich Coveo search interface that you can quickly add to any of your websites and software-as-a-service (SaaS) applications.
The compact search interface is customizable and provides users with access to relevant content directly from your web pages.
An IPX search interface automatically records Coveo Analytics events. This lets you enhance the relevance of search results in your IPX search interfaces using Coveo Machine Learning (Coveo ML). Usage analytics events also let you generate reports to gain insight on how users are interacting with your IPX interfaces.
Typically, website users access the IPX search interface via a button on the web page. However, you can configure your IPX interface so that it appears in a custom element on your website. Both the IPX button and IPX search interface are customizable.
Deploy an IPX interface (Overview)
To successfully deploy an IPX interface, ensure the following minimum requirements and configuration are met.
Requirements
A Coveo organization with at least one source (preferably a source with content that’s accessible to everyone).
|
|
You can configure your IPX search interface to either use the same generic search token to authenticate all users, or a distinct search token for each authenticated user in your IPX search interface. A generic search token is meant to grant access to publicly available content only. This means that IPX users will only have access to indexed content that’s accessible to everyone, while indexed content that’s secured via a repository’s permissions system won’t appear in search results in IPX. However, you can use a distinct search token for each user if some or all of your indexed content is secured via a repository’s permissions system. This means that each authenticated user sees only the secured content that they’re allowed to access. For more information, see Configure search token authentication. |
IPX configuration
Create an IPX interface
You can create a next-gen IPX search interface using one of the following methods:
|
|
Note
The next-gen IPX search interface is Coveo’s latest IPX solution, and it leverages Coveo’s Headless and Atomic libraries. The previous version of the IPX search interface, which was based on the Coveo JavaScript Search Framework, is now referred to as the legacy IPX interface. Coveo supports existing legacy IPX interfaces, but you can no longer create new IPX search interfaces using the legacy configuration. However, you can still edit an existing legacy IPX interface. Legacy IPX interface configurations appear with a Legacy editor badge on the In-Product Experience (platform-ca | platform-eu | platform-au) page. |
Create an IPX interface from scratch
Create a new IPX search interface using the IPX builder.
|
|
Note
When you create an IPX search interface, the following recommended query pipelines and Coveo ML models are automatically created for your IPX configuration:
The query pipelines and models are created using default settings, and are fully functional with your IPX configuration. However, Coveo highly recommends that you optimize your IPX query pipelines and models to enhance the user experience. For more details, see the automatic query pipeline and model configuration. |
-
On the In-Product Experience (platform-ca | platform-eu | platform-au) page, click Add in-product experience.
-
In the Add an In-Product Experience (IPX) panel, select Simple builder.
-
Enter a descriptive Name for your IPX configuration.

The name that you choose for your IPX configuration will also be used as the search hub value for your IPX interface. The search hub value is the identifier for your IPX interface that’s used for query pipeline routing, usage analytics reporting, and enabling Coveo Machine Learning features. The IPX name and search hub value can’t be modified once the IPX configuration is created.
-
(Optional) Use the Project selector to associate your IPX search interface with one or more projects.
 Note
NoteAfter the creation of your IPX search interface, you can update your Coveo project selection under the Overview tab.
-
Click Add. The IPX builder opens.
NoteYou may be required to log in to the builder using the credentials you used to log in to the Coveo Administration Console.
Duplicate an IPX configuration
Create a new IPX search interface by duplicating an existing IPX configuration. This is useful when you want to quickly create a new IPX configuration that’s similar to an existing one.
Duplicating an IPX configuration creates a new IPX search interface configuration with the same settings as the original IPX configuration, except for the search hub value and loader script, which are unique to every IPX configuration.
|
|
Note
The new IPX configuration doesn’t inherit the version history of the original IPX configuration. |
If the IPX configuration that you want to duplicate includes automatically created query pipelines and Coveo ML models, the query pipelines and models are also duplicated with the same settings. For more information, see What gets created when duplicating an IPX.
To duplicate an IPX configuration
-
On the In-Product Experience (platform-ca | platform-eu | platform-au) page, click the IPX configuration that you want to duplicate.
-
In the Action bar, click Duplicate.
-
Enter a descriptive Name for your IPX configuration.
The name that you choose for your IPX configuration will also be used as the search hub value for your IPX interface. The search hub value is the identifier for your IPX interface that’s used for query pipeline routing, usage analytics reporting, and enabling Coveo Machine Learning features. The IPX name and search hub value can’t be modified once the IPX configuration is created.
-
Click Duplicate. The new IPX configuration is created. Depending on the configuration of the original IPX, the corresponding query pipelines and models may also be created (see What gets created when duplicating an IPX).
-
If required, edit the configuration of the newly created IPX.
What gets created when duplicating an IPX
This section lists what gets created when duplicating an IPX configuration.
-
A new IPX search interface configuration is created with the same settings in the IPX builder as the original IPX configuration, except for the search hub value and loader script, which are unique to every IPX configuration. For more information see, Access the IPX search hub value and loader script.
-
If the IPX that you choose to duplicate uses query pipelines and Coveo ML models that were automatically configured, new query pipelines and models are created for your new IPX configuration as follows:
-
For every query pipeline that was automatically created for the original IPX configuration, a new query pipeline is created. The new query pipeline has the same settings as the original query pipeline, except for the query pipeline condition. The new condition is based on the new IPX configuration name. For more information, see Automatic query pipeline configuration.
-
For each new query pipeline that’s created, an associated model in the original query pipeline that was automatically created is duplicated too. The new model is created with the same settings as the original model, and is associated with the new query pipeline.
Notes-
If the original query pipeline included an association with a model that wasn’t created automatically, the new query pipeline inherits the model association, but that model won’t be duplicated. In this case, that same model is associated with both query pipelines. Only models that were automatically created are duplicated.
-
The query pipelines and models are created using the naming convention detailed in Automatic query pipeline configuration.
-
-
You want to duplicate the IPX Workplace IPX configuration that uses the following query pipelines and models:
-
A
Search pipeline - IPX Workplacequery pipeline that was automatically created, and that has the following model associations: -
A
Recommendation pipeline - IPX Workplacequery pipeline with an associatedIPXRECS model - IPX Workplacemodel, which were both automatically created.
Duplicating IPX Workplace, and naming the new IPX configuration New IPX Workplace, results in the following:
-
A new IPX search interface configuration named
New IPX Workplacethat has the same settings in the IPX builder as the original IPX configuration, except for the search hub value and loader script. -
New
ART model - New IPX Workplace,QS model - New IPX Workplace, andIPXRECS model - New IPX Workplacemodels that inherit the same settings as the original models. -
A new
Search pipeline - New IPX Workplacequery pipeline with associatedART model - New IPX Workplace,QS model - New IPX Workplace, andIPX DNEmodels. TheIPX DNEmodel isn’t duplicated as it wasn’t created automatically, but the new query pipeline maintains the model association of the original query pipeline. -
A new
Recommendation pipeline - New IPX Workplacequery pipeline with an associatedIPXRECS model - New IPX Workplacemodel.
Customize an IPX interface
This section details how to set up and customize an IPX search interface using the IPX builder.
|
|
The builder maintains a version history of your configuration. A new version is generated every time you save changes in the builder, and you can restore a previous version of your configuration. |
|
|
Note
To edit a legacy IPX interface, see Edit a legacy IPX interface. |
From the IPX builder, you can:
|
|
Note
The IPX search interface lists a maximum of 5 item recommendations. If there are less than 5 recommendations available for the given URL, only the available recommendations are shown. |
Access the IPX builder
The IPX builder lets you customize an IPX search interface configuration. After you create an IPX interface, you can access its configuration settings at any time.
|
|
Note
To edit a legacy IPX interface, see Edit a legacy IPX interface. |
-
On the In-Product Experience (platform-ca | platform-eu | platform-au) page, click the IPX configuration that you want to edit.
-
Click Edit in the Action bar.
You may be required to log in to the builder using the credentials you used to log in to the Coveo Administration Console.
Live builder preview
The IPX builder includes a live preview that automatically updates based on the configuration options.
Besides showing you how your IPX interface looks, the preview is also fully interactive so you can perform actions such as searches, click search results, and open and close the IPX interface. Use the preview to see your IPX interface customizations and functionality in real time.

Manage result templates
Result templates set how individual query results appear in the search interface based on certain conditions. For example, you can display results for PDFs and web pages differently.
You can:
Result templates are evaluated in the order they appear on the Search results display tab. This means that if a query result meets the conditions found in multiple templates, the first applicable template in the list is used.
Create and edit result templates
-
In the IPX builder, select the Search results display tab.
-
Do one of the following:
-
To create a new template, click Add template.
-
Click the result template that you want to edit.
-
-
Specify the template settings:
-
Enter a descriptive Name for your template.
-
Under Usage, set the conditions for when to use the template:
-
Click Add condition to add a new condition, or click an existing condition that you want to edit.
-
In the Select a field dropdown menu, select the desired field (for example,
source). -
In the Select a condition dropdown menu, select the desired operator (for example,
Must match). -
In the Values field, specify at least one value (for example,
YouTube). Use a comma-separated list to specify multiple values. -
Click Done to apply your changes.
-
-
Under Colored badge, select what’s displayed for the colored badge above the search result:
-
Select a field to show its data in the badge.

-
Select a color for the badge.
-
-
Under Additional information, set the information to display below the search result:
-
Click Add details to add new information, or click the existing information that you want to edit.
-
Select a field to display the corresponding metadata value.

-
(Optional) To include a label for the selected field, select the Include label checkbox, and then enter a custom label or keep the default field name.
-
Click Done to apply your changes.

Change the order in which the information appears by clicking
 to drag a details card to its new location in the list.
-
-
-
Click Done to save the result template.
-
Click Save at the upper-right corner of the builder to save your IPX interface.
Reorder result templates
Result templates are evaluated in the order they appear on the Search results display tab. This means that if a query result meets the conditions found in multiple templates, the first applicable template in the list is used.
|
|
Note
The Default template can’t be reordered. |
-
In the IPX builder, select the Search results display tab.
-
In the Result templates section, click
on a template card to drag it to its new location in the list. -
Click Save at the upper-right corner of the builder to save your IPX interface.
Delete a result template
-
In the IPX builder, select the Search results display tab.
-
In the Result templates section, click the result template you want to delete.
-
Click Delete.
-
Click Delete again to confirm the action.
Enable Quick view
The Quick view feature adds a ![]() button to each search result.
Clicking the button opens a modal window that contains the body of the search result.
This lets users preview a search result without leaving the current page.
button to each search result.
Clicking the button opens a modal window that contains the body of the search result.
This lets users preview a search result without leaving the current page.

To enable Quick view
-
In the IPX builder, select the Search results display tab.
-
Select the Quick view checkbox.
Manage facets
When facets are enabled, a Filters button appears at the top of the search interface.

Clicking the Filters button shows the Filters screen where the configured facets appear as filter categories.

|
|
Note
By default, an IPX configuration includes the Source, Author, and Item Type facets. |
You can:
Enable or disable facets
When facets are enabled, a Filters button appears at the top of the search interface that, when clicked, shows the Filters screen with the configured facets.
|
|
All existing facets will be permanently deleted if you disable facets and then click Save at the upper-right corner of the builder to save your interface. |
-
In the IPX builder, select the Filtering options tab.
-
To enable or disable all facets, click On or Off respectively in the Facets section.
-
Click Save at the upper-right corner of the builder to save your interface.
Create and edit facets
-
In the IPX builder, select the Filtering options tab.
-
Select the Filtering options tab.
-
Do one of the following:
-
To create a new facet, click Add facet.
-
Click the facet that you want to edit.
-
-
Specify the facet settings:
-
Select the Field to use for the facet (for example,
yearordocumenttype). -
Enter the Name to display for the facet in the search interface.
-
Depending on the selected field, a Display section may appear. If so, select whether to display the facet options As checkboxes or As links.
-
-
Click Done to apply your changes.
-
Click Save at the upper-right corner of the builder to save your interface.
Reorder facets
-
In the IPX builder, select the Filtering options tab.
-
In the Facets section, perform one of the following tasks:
-
To reorder facets and their values based on a user’s query so that the most relevant options appear at the top, select the Use dynamic navigation checkbox.
TipYou can enable this option in advance even if you haven’t yet created a DNE model or associated it with your main query pipeline. However, without a properly configured DNE model, this option has no effect.
To configure a DNE model for use with IPX, see Optimize query pipelines and machine learning for IPX.
-
To reorder facets manually, clear the Use dynamic navigation checkbox, click
on a Facet card, and then drag the card in the desired order.
-
-
Click Save to apply your changes.
Delete a facet
-
In the IPX builder, select the Filtering options tab.
-
Click the facet that you want to delete.
-
Click
 .
. -
Click
again to confirm. -
Click Save at the upper-right corner of the builder to save your interface.
Manage tabs
When enabled, tabs appear at the top of the IPX search interface. Each tab shows a subset of items based on the tab configuration.

|
|
Note
By default, an IPX configuration includes an All tab that can’t be deleted to ensure that all content can be viewed. |
You can:
Enable or disable tabs
|
|
All existing tabs will be permanently deleted if you disable tabs and then click Save at the upper-right corner of the builder to save your IPX interface. |
-
In the IPX builder, select the Filtering options tab.
-
To enable or disable all tabs, click On or Off respectively in the Facets section.
NoteThe All tab can’t be deleted and is provided by default to ensure that all content can be viewed.
-
Click Save at the upper-right corner of the builder to save your IPX interface.
Create and edit tabs
-
In the IPX builder, select the Filtering options tab.
-
Do one of the following:
-
To create a new tab, click Add tab.
-
Click the tab that you want to edit.
-
-
Specify the tab settings:
-
In the Label field, enter the name that will be displayed on the tab in the search interface.
-
Under Usage:
-
Click Add condition to add a new condition for what will appear in the tab.
-
In the Select a field dropdown menu, select the desired field (for example,
source). -
In the Select a condition dropdown menu, select the desired operator (for example,
Must match). -
In the Values field, specify at least one value (for example,
YouTube).
TipTo specify multiple values, use a comma to separate each value.
-
Click Done to apply your changes.
-
-
-
Click Done to save the tab.
-
Click Save at the upper-right corner of the builder to save your IPX interface.
Reorder tabs
|
|
Note
The All tab can’t be reordered. It always appears first as it displays all content. |
-
In the IPX builder, select the Filtering options tab.
-
In the Tabs section, click
on a tab card to drag it to its new location in the list. -
Click Save at the upper-right corner of the builder to save your IPX interface.
Delete a tab
-
In the IPX builder, select the Filtering options tab.
-
Click the tab that you want to delete.
NoteThe All tab can’t be deleted.
-
Click Delete.
-
Click Delete again to confirm.
-
Click Save at the upper-right corner of the builder to save your IPX interface.
Set interface colors and text
You can customize the colors and text of your IPX search interface as desired or to match the site or application in which you’ll add the IPX interface.
-
In the IPX builder, select the Style tab.
-
Under Theme, select the Primary, Secondary, and Background colors for the search interface.
-
Under Text:
-
The Font family CSS property sets the prioritized list of supported generic and specific font families for your search interface. By default, the most common fonts are included in the list. The IPX interface will use the first font in the list that’s supported by your website. If required, modify the font family list to match the site or application in which you’ll add the IPX interface.
NoteThe builder’s live preview won’t display a font if it’s not a font that’s currently available in your web browser.
-
Select the Visited link color for the search interface.
-
For Title, select the color for headings and titles in the search interface.
-
-
Click Save at the upper-right corner of the builder to save your IPX interface.
Set IPX placement
You can choose to display the IPX search interface using the out-of-the-box IPX button, or in a custom element on your website. Use the Placement section to set how to display the IPX search interface.
-
Out-of-the-box IPX button
If you use the out-of-the-box IPX button, the IPX search interface opens and closes via a button on the web page where the IPX is added. Both the button and the IPX search interface appear at the bottom-right of the web page. You can customize the button color, label, and icon, but not the placement of the button or the button’s functionality.
-
Custom element on your website
If you choose to display the IPX search interface in a custom element, the IPX search interface renders and appears in the targeted element on your website. This is done by specifying a CSS selector that targets an existing element on your website, such as a
divelement, where you want the IPX search interface to appear.
-
The IPX loader script doesn’t create the element on your web page in which the IPX search interface renders and appears. You must create the element manually. The CSS selector that you specify in the IPX builder settings simply targets the element you created.
-
When adding an IPX interface in a custom element on your site, it’s important to make sure that IPX doesn’t initialize on every page load, but rather only when a specific action is taken, such as a button click.
When using a custom element, IPX sends a call to the index to retrieve recommendations whenever IPX initializes. This call counts towards the queries per month (QPM) that are allocated to your Coveo organization. Therefore, to avoid using up your QPM entitlement needlessly, ensure that IPX initializes only when it’s required.
-
To set your IPX placement
-
In the IPX builder, select the Style tab.
-
Under Placement, select whether to use the IPX button or a custom element:
-
To use the IPX button:
-
Select Open with a button.
-
Select the Button color.
-
In the Label field, enter the text what will appear on the button (for example,
Search). -
Select the Label color.
-
(Optional) For Button icon, click Upload SVG image to select a custom image to use as the icon in the IPX button when the IPX search interface is closed. By default, a magnifying-glass icon appears.
-
-
To add the IPX search interface in a custom element:
-
Select Show in a custom element.
-
Enter a CSS selector to target the HTML element that you created on your web page where you want your IPX interface to appear.
-
The IPX loader script doesn’t create the element on your web page in which the IPX search interface renders and appears. You must create the element manually. The CSS selector that you specify in the IPX builder settings simply targets the element you created.
-
When adding an IPX interface in a custom element on your site, it’s important to make sure that IPX doesn’t initialize on every page load, but rather only when a specific action is taken, such as a button click.
When using a custom element, IPX sends a call to the index to retrieve recommendations whenever IPX initializes. This call counts towards the queries per month (QPM) that are allocated to your Coveo organization. Therefore, to avoid using up your QPM entitlement needlessly, ensure that IPX initializes only when it’s required.
ExampleYou want the IPX search interface to appear when a user clicks a custom
Helpbutton on your website.To do this, you create a
divelement on your website with an ID attribute ofsidepanelthat opens when a user clicks theHelpbutton.To render the IPX search interface in your custom
divelement, you enter#sidepanelin the IPX builder settings to target the div element on your website. -
-
-
-
Click Save at the upper-right corner of the builder to save your IPX interface.
Configure a footer
You can add a footer section to the IPX search interface where you can add links and logos.
You can:
Enable or disable a footer
|
|
All existing footer elements will be permanently deleted if you disable the footer and then click Save at the upper-right corner of the builder to save your IPX interface. |
-
In the IPX builder, select the Style tab.
-
To enable or disable the footer, click On or Off respectively in the Footer section.
-
Click Save at the upper-right corner of the builder to save your IPX interface.
Add or edit footer links and logos
The footer can contain up to three text links and logos in any combination. A logo can also contain a link.
-
In the IPX builder, select the Style tab.
-
If required, in the Footer section, click On to enable the footer.
All existing footer elements will be permanently deleted if you disable the footer and then click Save at the upper-right corner of the builder to save your IPX interface.
-
Do one of the following:
-
Click Add a link or logo to add a new footer element, and then click Link or Logo.
-
Click the footer element that you want to edit.
-
-
Specify the settings:
-
For links:
-
Enter a Link URL.
-
Enter the Text to display.
-
-
For logo:
-
Click Upload SVG image to select a custom image to add to the footer.
-
(Optional) Enter a Link URL of the logo.
-
-
-
Click Done to apply your changes.
-
Click Save at the upper-right corner of the builder to save your IPX interface.
Reorder footer links and logos
The footer area is separated into three distinct areas (left, center, right). Footer elements appear on the left, center, or right footer area based on the order that the elements appear in the Footer section. The top-most element appears in the left footer area and the lowest element appears in the right footer area. You can reorder your footer elements as desired.
-
In the IPX builder, select the Style tab.
-
In the Footer section, click
on a footer element card to drag it to its new location in the list.
Enable or disable Smart Snippets
The IPX search interface supports Coveo Machine Learning (Coveo ML) Smart Snippets. Smart Snippets provide users with answers to their queries directly on the results page by displaying a snippet of the most relevant result item. For more information, see About Smart Snippets.
|
|
Enabling the Smart Snippets option allows Smart Snippets to appear in your IPX search interface, but only if you have a Smart Snippet model that’s associated with your IPX’s main query pipeline. You can enable this option in advance even if you haven’t yet created a Smart Snippet model or associated it with your main query pipeline. However, without a properly configured Smart Snippet model, this option has no effect. To configure a Smart Snippet model for use with IPX, see Optimize query pipelines and machine learning for IPX. |
To enable Smart Snippets
-
In the IPX builder, select the Settings tab.
-
Under Results page, select the Smart Snippets option.
Enable Relevance Generative Answering (RGA)
Enabling Relevance Generative Answering (RGA) adds the RGA component to your search interface. This component appears above the search results list.
RGA uses generative AI technology to generate answers for natural language queries. The answers are generated based on your enterprise content and permissions, and are displayed in the search interface along with the search results. See About Relevance Generative Answering (RGA) for more information.
-
In the IPX builder, select the Settings tab.
-
Under Result page, select the Relevance Generative Answering option.
-
(Optional) Associate an answer configuration with this IPX search interface.
-
Click Save at the upper-right corner of the builder to save your IPX interface.
|
|
Note
When enabling RGA, you must also associate an RGA model with your IPX’s search query pipeline. |
Expand or collapse a generated answer
The Show more / Show less option allows users to expand or collapse a generated answer. This option is enabled by default, which means that the RGA component collapses the generated answer and displays Show more if the answer exceeds 250 pixels in height, for example:

This is done to limit the height of the RGA component in your search interface. Users can then click Show more / Show less to expand and collapse the generated answer. If the generated answer doesn’t exceed 250 pixels, the answer displays in full and Show more doesn’t appear. If this option is disabled, the RGA component always expands to show the generated answer in full.
Associate an answer configuration
Associate an answer configuration that you’ve created in the Knowledge Hub’s Answer Manager to evaluate and manage the RGA-generated answers for this IPX search interface.
|
|
Note
|
To associate your RGA-enabled search interface with an answer configuration, select the configuration from the Answer Manager configuration list, and then click Save.
See Associate an answer configuration with a search interface to learn about the benefits of associating an answer configuration.
Access the IPX search hub value and loader script
Your IPX interface configuration includes a dedicated search hub value and loader snippet script.
The search hub value is the identifier for your IPX interface that’s used for query pipeline routing and enabling Coveo Machine Learning features. The search hub value is based on the name of your IPX configuration and can’t be modified.
The loader snippet script is required when adding your IPX interface to websites and applications.
To retrieve the search hub value or loader snippet
-
In the IPX builder, select the Settings tab.
-
In the Search hub or Loader snippet section, click
 to copy the search hub value or loader script respectively.
Manage version history
The Version history tab lets you view, manage, and restore earlier versions of your IPX search interface configuration. A new version is generated every time you save changes in the builder.
Specifically, it offers the following capabilities:
-
View a summary of your interface versions and changes.
-
View who made the changes and when.
-
View the date that changes were last made to your current interface (identified with the Current label).
-
Restore an interface version.
View interface versions and changes
-
In the IPX builder, click Version history.
A timeline displaying the last 10 interface versions is displayed.
NoteA new version is generated every time changes to the interface are saved.
TipTo view the next 10 versions, click Show more.
-
To view the changes that apply to a specific version, select it.
The changes for the selected version appear under Activity in the Version details panel.
-
(Optional) In the Comment box, enter a description for the selected version.
TipEntering a description will help you to identify this version in the Version history timeline.
For example:

Restore an interface version
|
|
Restoring a version automatically applies the changes to your live interface. |
-
In the IPX builder, click Version history.
-
Select the version you want to restore from the timeline.
-
(Optional) In the Comment box, enter a description for the selected version.
-
Click Restore this version.
The restored version is automatically applied to your live interface and displayed in the builder preview.
Edit a legacy IPX interface
This section details how to edit a legacy IPX search interface.
|
|
Note
Legacy IPX interface configurations appear with a Legacy editor badge on the In-Product Experience (platform-ca | platform-eu | platform-au) page. Although you can edit an existing legacy IPX interface, you can no longer create a new IPX search interface using the legacy configuration (see Create an IPX interface). |
Edit an IPX legacy configuration
-
On the In-Product Experience (platform-ca | platform-eu | platform-au) page, click the legacy IPX configuration that you want to edit, and then click Edit in the Action bar.
-
On the Configuration tab, fill the Basic settings section.
NoteThe Loader snippet is used to add your IPX interface to a website.
-
Use the Design tab to:
-
Use the Content access tab to:
-
Click Save. Saved changes take effect immediately.
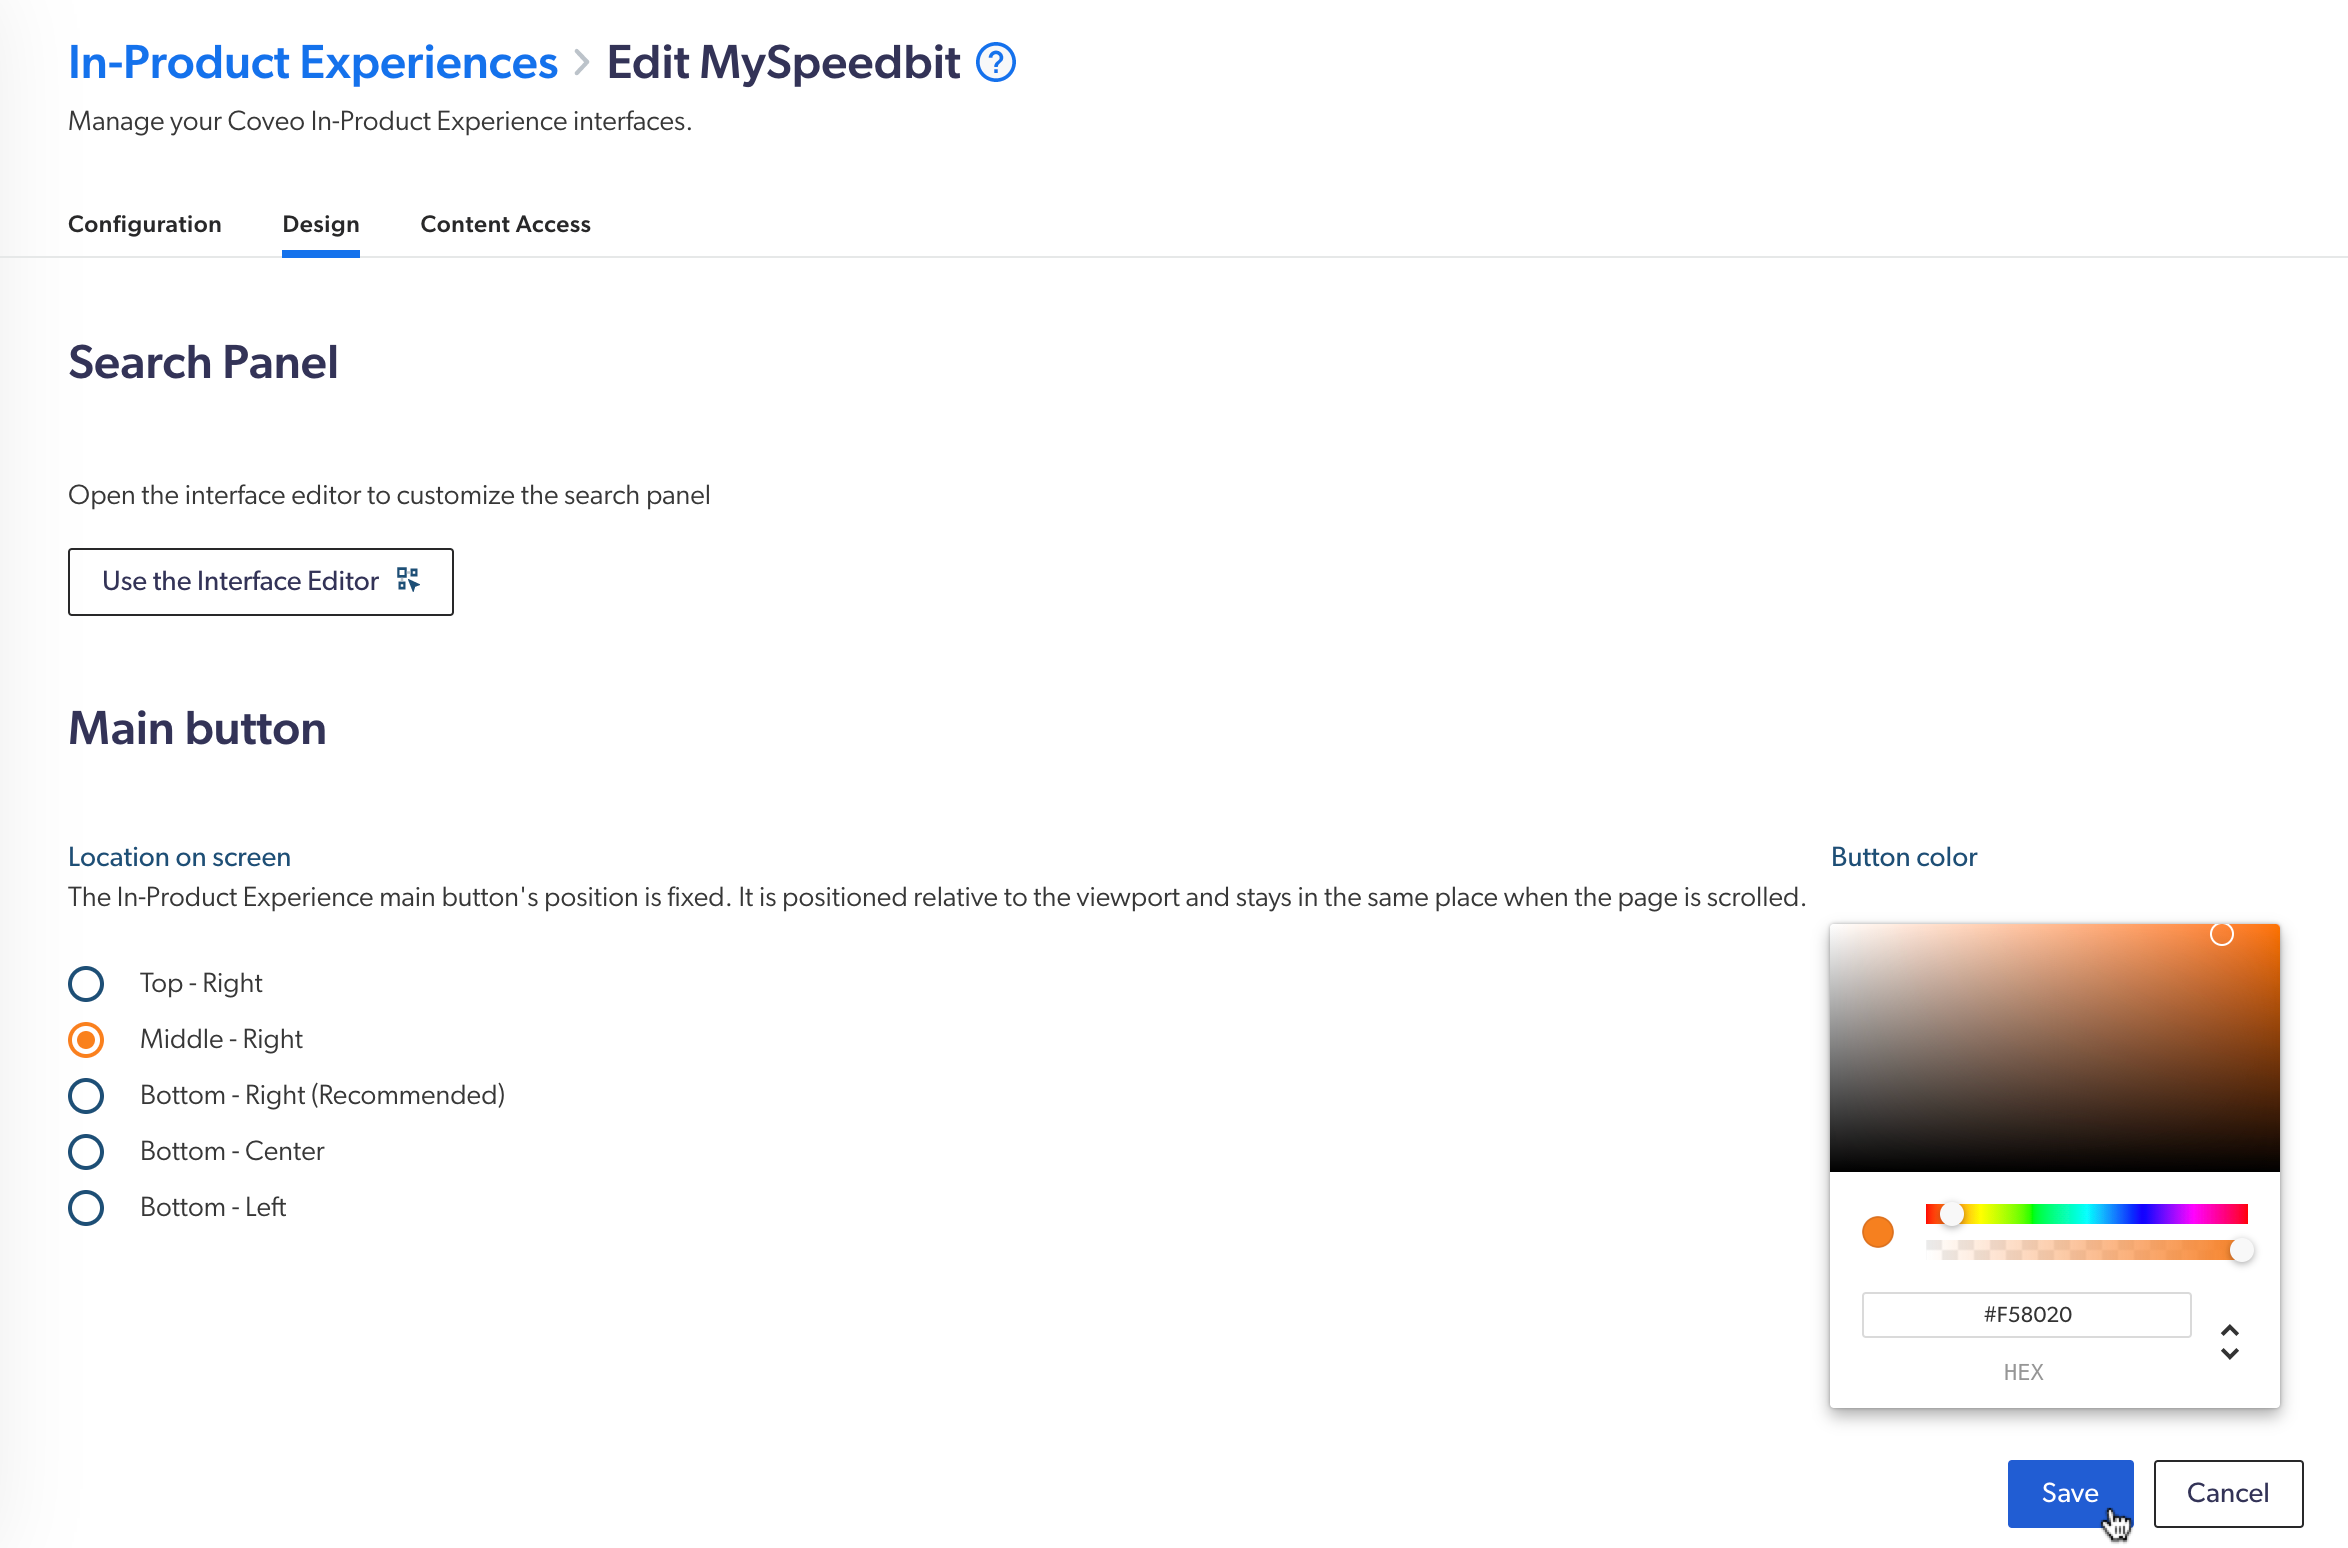
Modify the main button
|
|
Note
This procedure must be executed by a developer who knows how to use the Coveo JavaScript Search Framework. |
-
On your IPX’s configuration page, select the Design tab.
-
In the Main button section, modify the settings as desired, and then click Save.
Advanced main button modification using CSS
For increased flexibility when embedding your IPX in sites and applications, you can use the following elements in the CSS of your web page to modify the style of the IPX button, the button icon, and the button text.
|
|
Note
Modifying the style attributes of the IPX button using the above CSS elements overrides the corresponding settings in the IPX configuration Design tab. For example, if you set the button color on the Design tab, and then specify a different color in the CSS, your IPX interface uses the color specified in the CSS of the corresponding web page. |
-
coveo-in-app-widget-loader::part(button): Modifies the style of the IPX button. -
coveo-in-app-widget-loader::part(button-text): Modifies the style of the text that appears in the IPX button. -
coveo-in-app-widget-loader::part(button-icon): Modifies the style of the icon that appears in the IPX button.
In the CSS of your web page that includes your IPX interface, add one or more of the above elements within a style tag and specify the attributes as required using standard CSS rules.
You want the IPX button width to adjust to the button text.
You add the following style tag to your web page HTML:
<style> coveo-in-app-widget-loader::part(button) { width: inherit; } coveo-in-app-widget-loader::part(button-text) { max-width: unset; } </style>Deploy IPX in a native component (advanced)
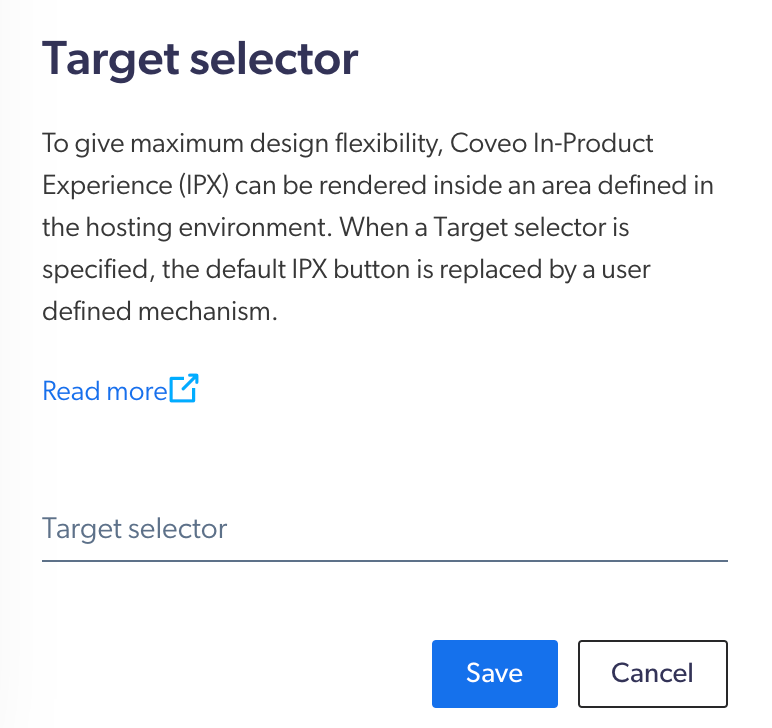
To deploy an IPX interface inside a native component of your website or application instead of attaching it to the default button, you can use the Target selector section.
The Target selector section lets you replace the default IPX button by a custom open/close mechanism integrated within your website or application.
-
On your IPX’s configuration page, select the Design tab.
-
In the Target selector box, enter a CSS selector to the element that should replace the default IPX button (for example,
#myElementId). -
Click Save.
Modify the search panel (advanced)
You can use the Interface Editor in the Administration Console to customize the search panel.
-
On your IPX’s configuration page, select the Design tab.
-
In the Search Panel section, click Use the Interface Editor.

-
In the Interface Editor window, select the Code view tab.
-
Modify the search panel markup configuration as desired, and then click Save.

The changes take effect immediately.
Configure content access (advanced)
When embedding your IPX interface in sites and applications, the IPX interface uses the same generic search token to authenticate all users by default. This token is meant to grant access to publicly available content only. You can modify the information to include in the generic search token directly through the Administration Console.
If you would rather use a distinct search token for each authenticated user to provide access only to the secured content they’re allowed to view, implement advanced search token authentication instead.
Option 1: Modify the default content access settings
|
|
Note
Follow this procedure only to modify the information to include in the search token that gets generated by default for all users of an IPX interface. To allow end users to access the secured content they’re allowed to view in your IPX interface, implement advanced search token authentication instead. |
-
On the configuration page for your IPX interface, select the Content access tab.
-
In the Default settings section, modify the settings as desired, and then click Save.
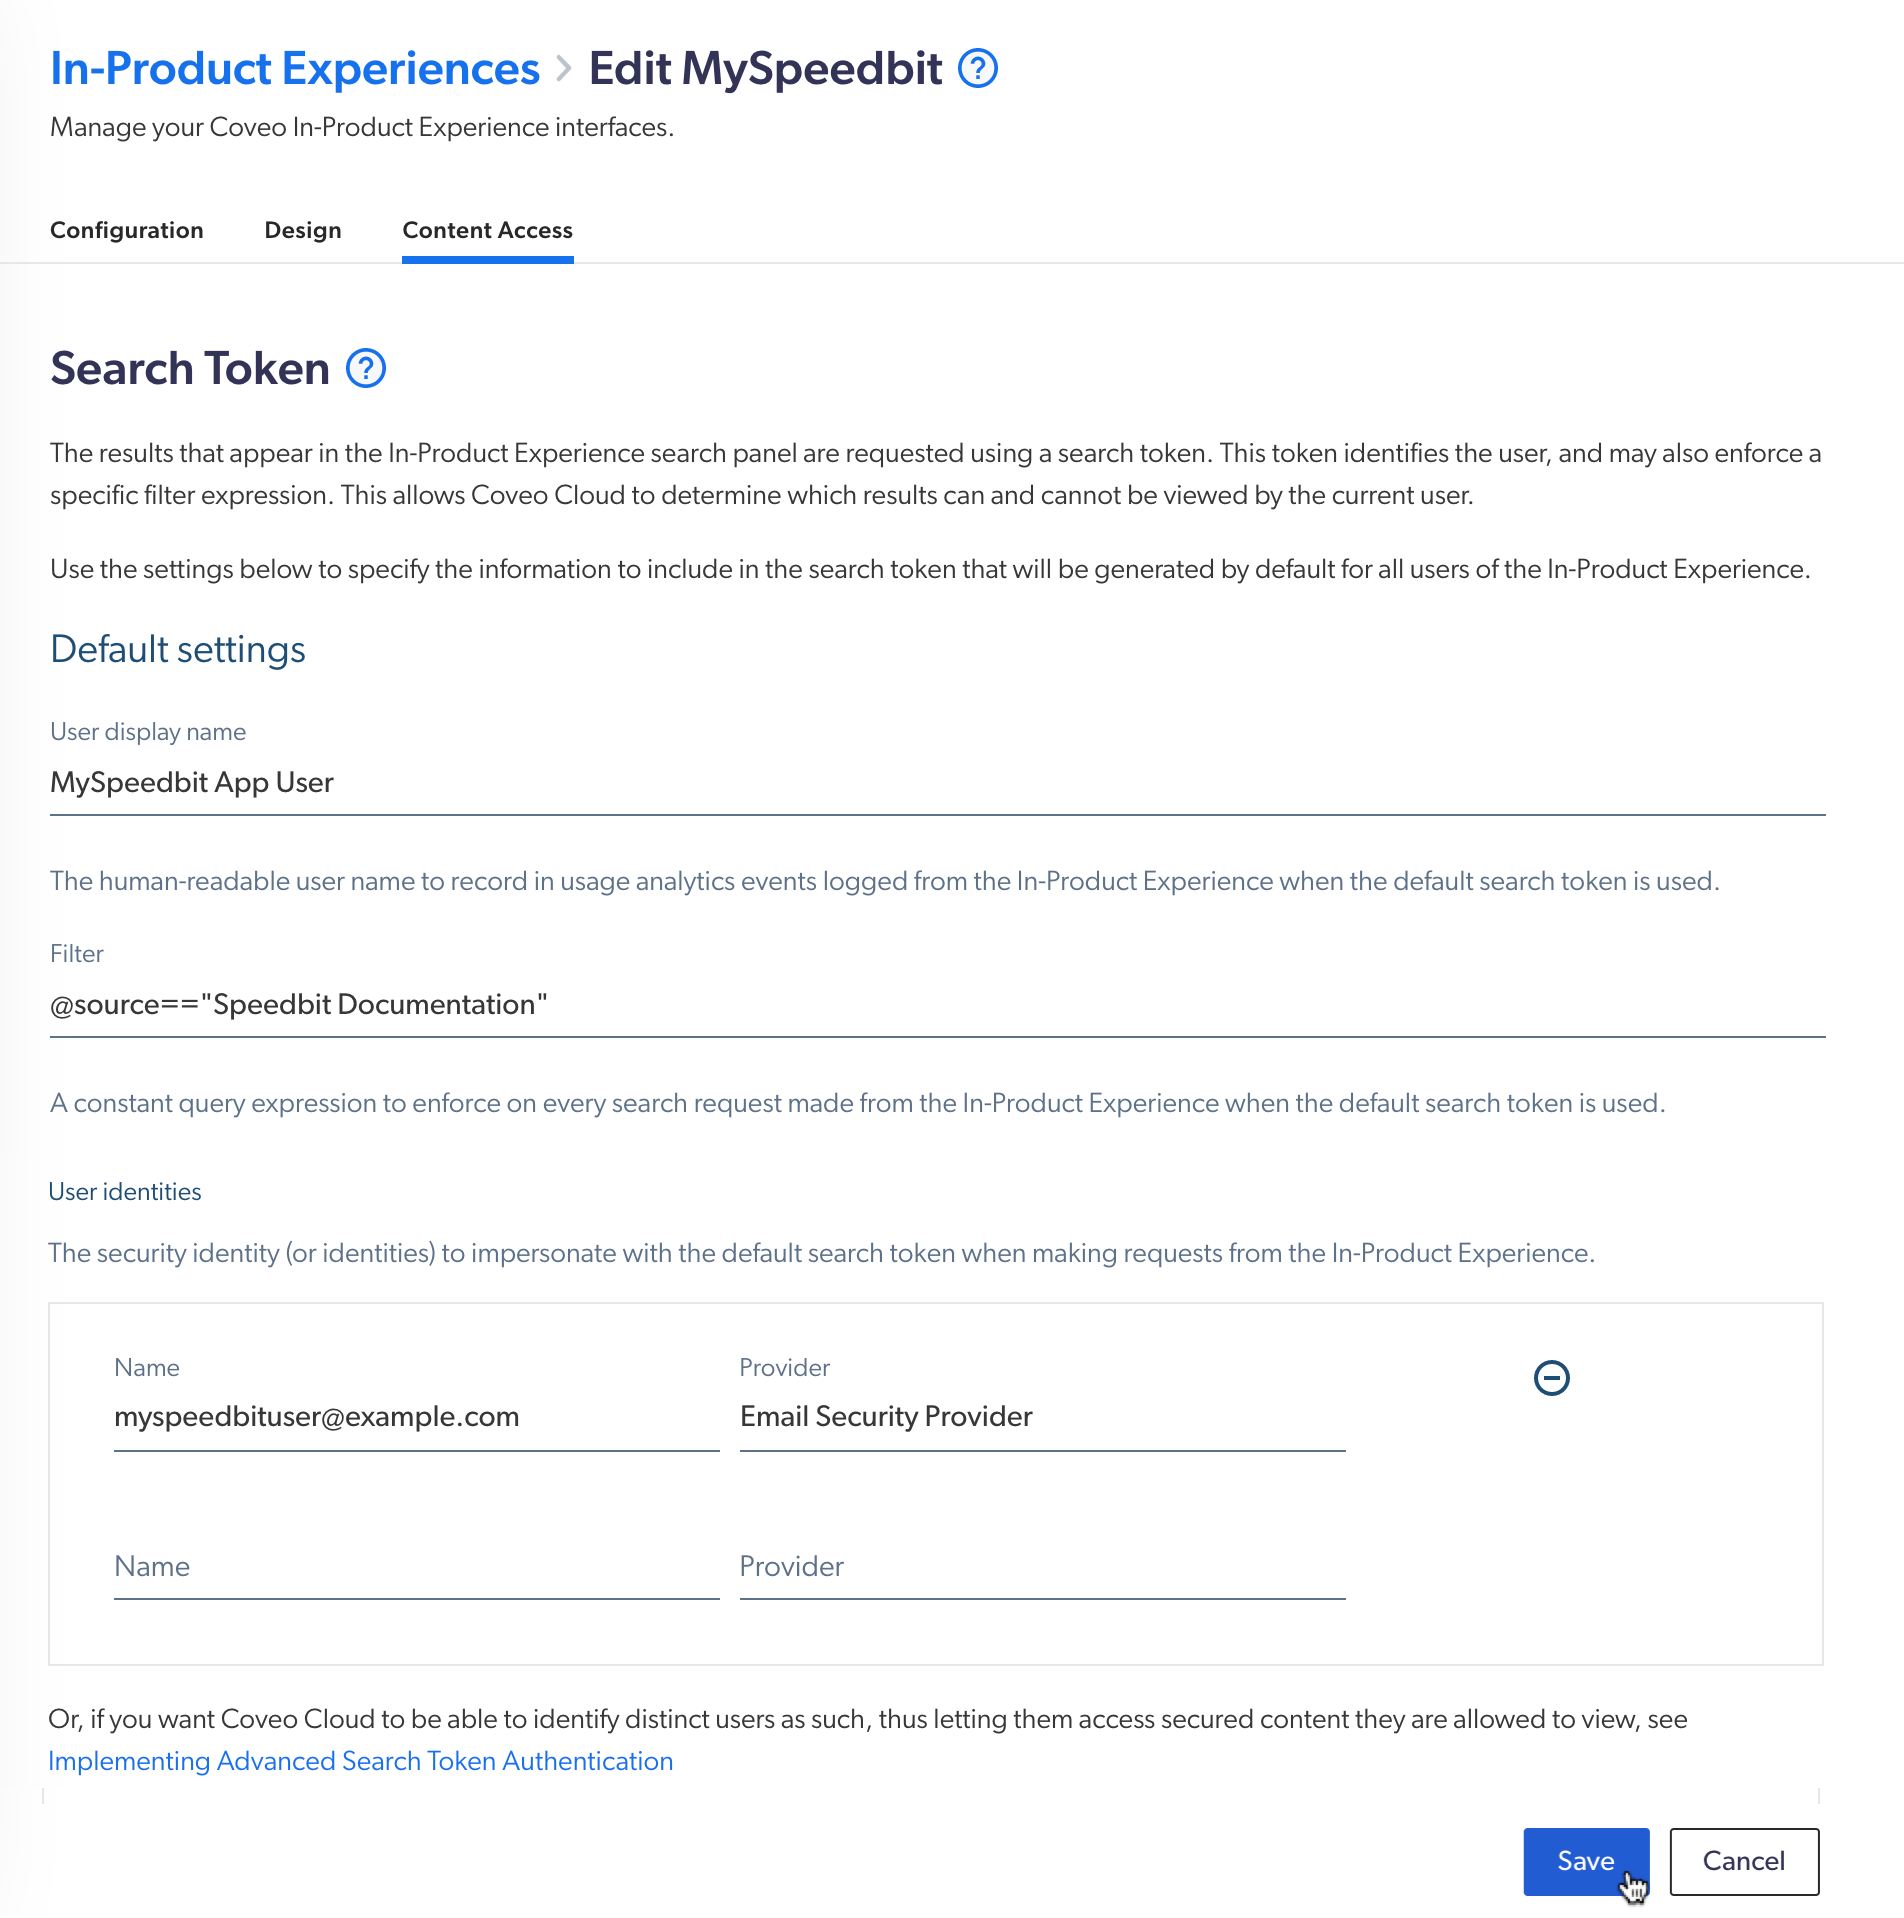
The changes take effect immediately.
Option 2: Implement advanced search token authentication
Implementing advanced search token authentication requires you to add server-side logic to your website or application. Therefore, the actual implementation details will vary from one project to another. This procedure only provides generic guidelines.
|
|
Note
This procedure must be executed by a developer who is allowed to modify code in the target website or application. |
In summary, you must write server-side code that performs the following actions:
-
Authenticate the user.
-
Call a service exposed through Coveo to request a search token for the authenticated user.
POST https://platform.cloud.coveo.com/rest/search/v2/token HTTP/1.1

Content-Type: application/json
Accept: application/json
Authorization: Bearer **********-****-****-****-************
{ "userIds": [ { "name": "asmith@example.com", "provider": "Email Security Provider" } ] } -
In the snippet for the IPX interface to load, inject the
access_token=TOKENquery parameter into the script URL (whereTOKENmust be replaced with the actual search token that was generated for the authenticated user).<!-- Coveo In-Product Experience --> <script type="text/javascript" src="https://platform.cloud.coveo.com/rest/organizations/speedbit1a2b34d5e/pages/abc8ccfe-bf50-42e7-a140-475420cbc543/inappwidget/loader?access_token=eyJhbGciOiJIUzI1NiJ9.eyJ2OCI6dHJ1ZSwib3JnYW5pemF0aW9uIjoic3BlZWRiaXQxYTJiMzRkNWUiLCJ1c2VySWRzIjpbeyJwcm92aWRlciI6IkVtYWlsIFNlY3VyaXR5IFByb3ZpZGVyIiwibmFtZSI6ImFzbWl0aEBleGFtcGxlLmNvbSIsInR5cGUiOiJVc2VyIn1dLCJyb2xlcyI6WyJxdWVyeUV4ZWN1dG9yIl0sImV4cCI6MTU3OTgwMzcxNSwiaWF0IjoxNTc5NzE3MzE1fQ.aPFX20a7IdvtKuw89len98fDqMbSo87ER7isSCn-Q90" async ></script> <!-- End Coveo In-Product Experience --> -
Serve the page, including the snippet in its head.
For more information and examples, see Search token authentication.
Pass custom context (advanced)
|
|
Note
This procedure is only for legacy IPX search interfaces that use the Coveo JavaScript Search Framework. Developer knowledge of how to use the Coveo JavaScript Search Framework is required. If you’re using the next-gen IPX search interface that uses Coveo’s Atomic library, see Add custom context. |
Passing custom context through an IPX interface helps train Coveo ML models to provide more relevant results to users.
To do so:
-
Ensure that your IPX interface contains a
PipelineContextcomponent.
NoteA
PipelineContextcomponent is included by default in all IPX interfaces created after March 10th, 2020. For older IPX interfaces, you can add aPipelineContextcomponent using the Interface Editor. -
Once the
CoveoInProductglobal variable is available, set the custom context as needed by invoking thesetContextValueand/orsetContextmethods.
You want to collect information from the registered users on the Speedbit Dashboard (that is, their subscription level, age group, and which Speedbit products they already own) to better provide suggestions as to what they may need next.
Assuming you’ve implemented the getSubscriptionLevel, getAgeGroup, and getOwnedProducts functions to retrieve the target values, you can use them to pass custom context as follows:
<head>
   <!-- ... -->
   <!--  Pass custom context to IPX  -->
   <script>
      // Wait for IPX interface to load...
      window.addEventListener('load', () => {
         CoveoInProduct.setContext({
            "subscriptionLevel": getSubscriptionLevel(),
            "ageGroup": getAgeGroup(),
            "ownedProducts": getOwnedProducts()
         });
      });

      function getSubscriptionLevel() { /* Implementation here... */ }
      function getAgeGroup() { /* Implementation here... */ }
      function getOwnedProducts() { /* Implementation here... */ }

   </script>
   <!-- End pass custom context to IPX -->
   <!-- ... -->
</head>
Delete an IPX
|
|
If you delete an IPX configuration for which query pipelines and ML models were automatically created, the corresponding query pipelines, ML models, and conditions will also be deleted. Make sure they’re not used by other search interfaces before deleting the IPX configuration. Deleting an IPX search interface configuration is irreversible. |
-
Ensure that the loader snippet for the IPX interface you want to delete is no longer included in any page of your website or application. Otherwise, the console will display a 404 error when the browser attempts to load the script.
-
On the In-Product Experience (platform-ca | platform-eu | platform-au) page, click the IPX interface you want to delete, and then click Delete in the Action bar.
-
Click Delete to confirm.
Project association prompts
An IPX is a resource you can associate with a project. Resources associated with a project can require confirmation when you modify them. These confirmation prompts help prevent accidental changes that could affect a Coveo implementation.
Deleting a resource always requires confirmation, whether it’s associated with a project or not. When the resource is associated with projects, the confirmation prompt lists those projects.
Required privileges
The following table indicates the privileges required to view or edit elements of the In-Product Experience (platform-ca | platform-eu | platform-au) page and associated panels (see Manage privileges and Privilege reference).
In-Product Experiences must be enabled in your organization license.
| Action | Service | Domain | Required access level |
|---|---|---|---|
View In-Product Experiences |
Organization |
Organization |
View |
Search |
Search pages and IPX |
View |
|
Create, edit, and test In-Product Experiences |
Content |
Fields |
View |
Organization |
Organization |
View |
|
Search |
Execute queries |
Allowed |
|
Search pages and IPX |
Edit |