Add product badging
Add product badging
The product badging campaign lets you highlight aspects of a product that you want to stand out. Follow the steps below to add product badging to Placements on your website.
Step 1: Choose where to apply product badging
Before you continue, you’ll need to familiarize yourself with what a Placement is.
|
|
Leading-practice
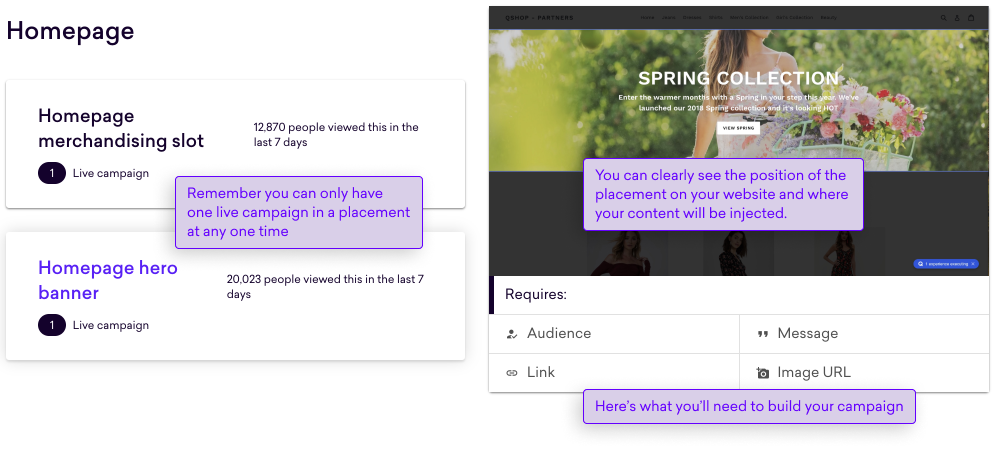
Each of your campaigns must be added to one of the Placements available to you. You can only have one active campaign in a Placement at any one time. |
Create a new campaign
On the home page, create a new Product badging campaign.
-
Click Home from the sidebar.
-
On the Product badging card, click Create now.
Choose a Placement
Select a Placement you’re interested in using.
By hovering over a Placement, you’ll see a preview of what it will look like on your site in order to visualize which part of the page you’re personalizing. In addition, the preview indicates what content you may need to add.
This "Homepage merchandising slot" Placement requires an audience, message, a link, and an image:
|
|
Note
If the preview isn’t working, it’s possible that your dev team didn’t upload images of your site during the onboarding process, so it’s worth checking in with them. If everything checks out on your side, reach out to your CSM at Coveo. |
Step 2: What products to badge and for whom
In this step, you’ll learn how to set up badges, how to create rules to define which products to badge, what your badge should look like, and how to create an audience to determine who will see the badging.
Setting up your badges
To get started, select Add badge.
Adding a catalog
|
|
If your property only has one catalog, you can skip this step. |
This step lets us know which set of products are eligible for a visitor, using their specific language and currency. You can assign one or more catalogs to a badge.
|
|
Note
We will only show badges to users whose language and currency match the catalogs you’ve selected. Select multiple catalogs with the same language to reuse text such as the badge message. |
To review the catalogs set up for your property, refer to the product catalog viewer.
Adding an audience
An audience is the group of customers that you’re looking to target with your experience. If you want to display your experience to every visitor, choose All visitors.
If an audience was already created for another campaign types, you could re-use them, or create a new one.
To use an existing audience, select it from All audiences or search for it.
To create a new audience
-
Click Create audience and give it a name.
 Leading-practice
To help others in your team find audiences, it’s recommended that you use a name that describes what sort of people you want to target. For example, "People that have fewer than five conversions that are viewing jackets and are in London."
-
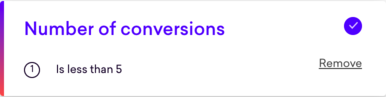
Select the attributes you want to use and enter any details required by the attribute like
is less thanand a value to go with it, like 5.Here’s an example for the first part of our audience:

-
Audience attributes form a combined
ANDcondition.
For example, only people with less than five conversions
ANDwho has less then five sessions will see the experience. -
If an attribute has multiple conditions, they form an
ORcondition within that attribute.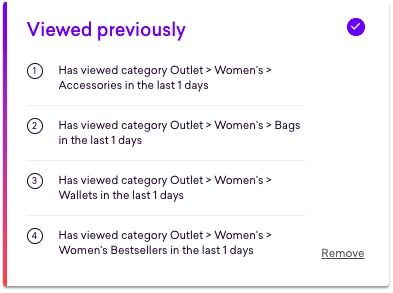
For example, visitors who have viewed the first category OR the second category OR etc., will see the experience.
In addition to using predefined attributes to target audiences in general, you can also target specific users directly by uploading a CSV file that contains the targeted users emails, user IDs or visitor IDs. All of this is done in the section displayed below:
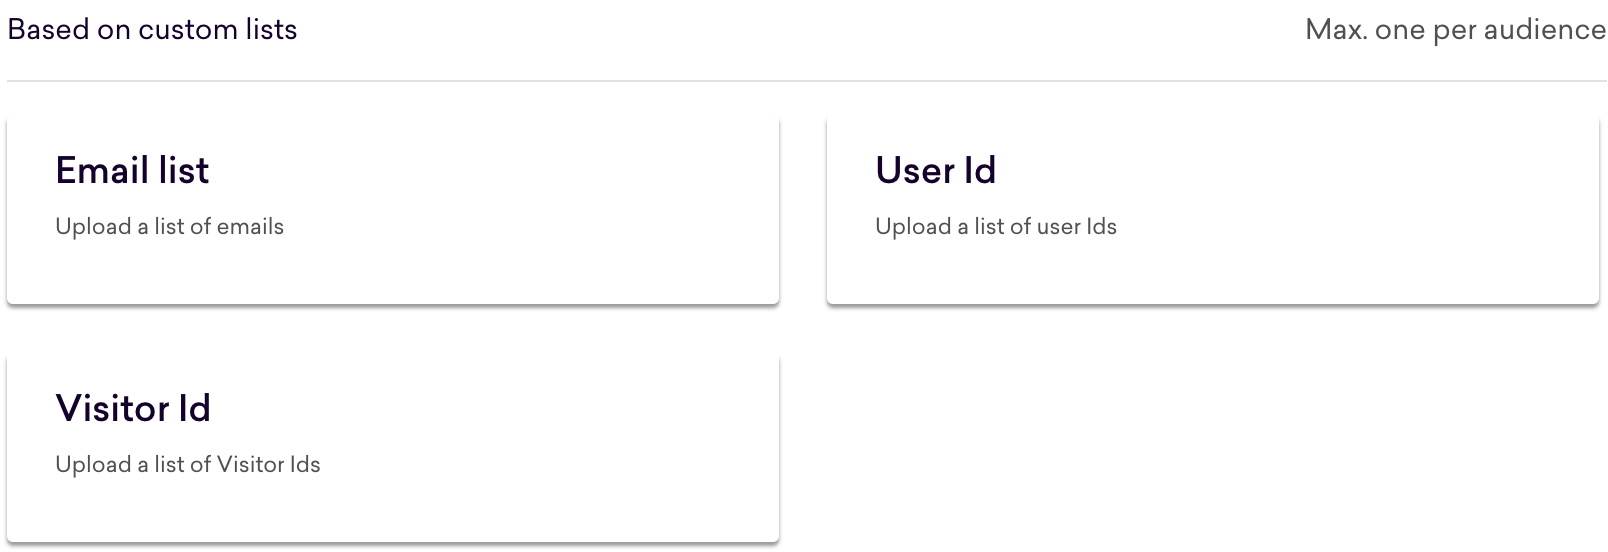
The format of the CSV file containing the user information should be:
<header>
value1
value2
value3
An example of what a CSV file will look like for an email list is:
user_email abc@def.com ghi@jkl.com -
-
Click Save when done. You can always edit or remove the attribute later.
-
To finish creating the audience, click Next.
Badging rules
Once you’ve configured your badge's catalog and audience, you must define the rules that will determine when and where your badge will appear. Three types of badging rules exist:
|
|
Note
You can combine different rule types in a single badge. |
Dynamic rules
Dynamic rules let you use live data from your site, and the actions taken by your customers, such as views, purchases, and adds to basket, to determine which products to badge.
Product attribute-based rules
Product attribute-based rules let you use data from your product catalog such as category, brand, and price to restrict the range of products your badge applies to.
You can also upload a .CSV file of less than 25 MB containing the details of the products you want to badge. This is a great way to target custom groups of products that may not be reflected in the product category, brand, or price.
For all rules other than Product List, select the More than or Less than operator, enter a threshold, for example, 10, and a timeframe, for example, past hour:
For the Product List rule, upload a .CSV file of no more than 25 MB containing the details of the products you want to badge.
Here’s an example of five products IDs we want to badge:
| product_id |
|---|
6152962932928 |
6152962605248 |
6183047430336 |
6134817423552 |
6183059554496 |
Select Save.
Add more rules as necessary and click Next to customize your badge.
Once you’ve customized your badge, you can add additional badges as required.
Visibility rules
Visibility rules let you control how often a badge appears in a multi-product badging placement. You can achieve this by either limiting the number of badges displayed or by limiting the percentage of products that receive a badge.
|
|
Note
If you specify both a number and a percentage, the visibility rule will prioritize the value that affects fewer products.
For example, if you chose a number of |
A visibility rule must be combined with at least one dynamic or product attribute-based rule.
These controls are unavailable (and unnecessary) on single-product badging placements, such as those on product detail pages (PDP).
Customizing your badge
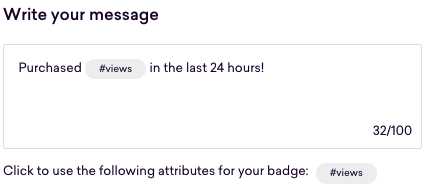
Write your message
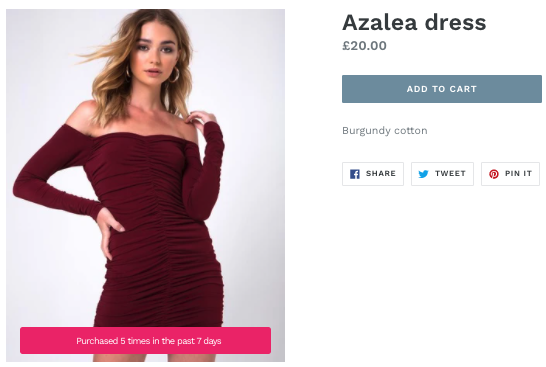
When creating your message, you can use attributes that we will replace with actual product data. Your message can be up to 100 characters in length. Tailor the message to the badging type you chose and the rule you created. Enter your message, using the available attributes to build it.
-
Viewed #views times in the last 7 days
-
Bought #purchased times in the last 24 hours
-
Almost gone
-
Free shipping
-
Bundle & Save
-
New!
-
Hot today!
-
Hard to find
Choose an icon
There are two ways you can include an icon with your badge:
-
You can do this either by providing the URL of the image (if stored online) or by uploading it.
OR
-
Click Upload an icon and navigate to the local or shared storage location. This is similar to the first option but more suitable if you need to search for the image.
|
|
Note
You can provide both a message and an icon for your badge, but you’re required to provide only one of the two. |
Additional fields
If your placement has custom fields added to it, you’ll be able to populate them at this stage.
When the badge is ready, click Create badge.
Combining rules
Rules determine which products to badge. Rules can be combined at the time you’re setting up your badging rules or after you’ve created your badge by clicking Edit rules (see the bottom-left of the image below).
You can add a single rule, for example, "Badge products viewed more than 10 times in the past hour" or combine with another rule for a more flexible approach, "Badge products purchased more than 10 times in the past hour" or "Added to basket more than 20 times in the past 24 hours."
The badge isn’t applied if none of the products on your site match the conditions established by those rules.
For greater control and flexibility, you can create additional badges with a new set of rules. These rules can be different from the rules in the first badge. Equally, the message, icon, and audience can also be different.
These additional badges work much like a fallback so that if a product doesn’t match the rules in the first badge, you can badge products based on a different set of rules in a second badge.
|
|
Note
The Coveo Experience Hub follows the same fallback process when evaluating the rules on a multi-product badging placement. Each rule is applied sequentially to the list of products in the placement. A product stops being evaluated against once it has qualified for a badge. |
In this example, we’ve decided to badge products that meet the conditions in the first set of rules with the message "Hot right now!"
If a product doesn’t match those conditions, we’ll badge products from an uploaded list:
For both sets of rules, we’ve left the default audience "All visitors." We won’t show badges on products that don’t meet the rules in either badge.
|
|
Leading-practice
Once you’ve created your badge, you may decide that you would like to swap their positions. You can do this by dragging the badge. |
Replacing your control
On a technical level, we combine badging rules, a message, icon, and audience into an experience, much like a personalized content or product- recommendations experience.
In the Experience Hub, in addition to comparing your badging experiences against your default website content, you can also choose to replace your default content with another experience.
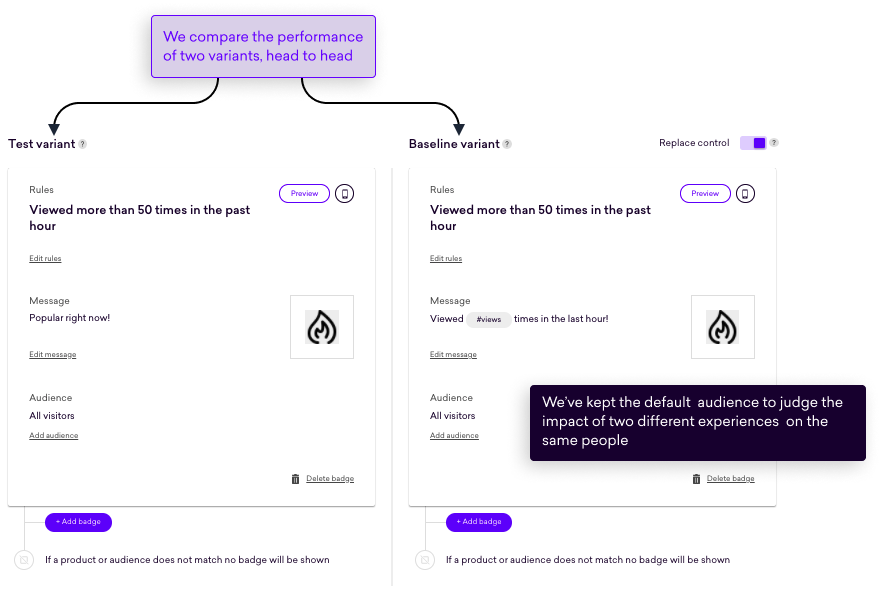
In this mode, rather than comparing the badging experience to your control, we’ll compare two badging experiences head to head. The first of the two experiences is your test variant (this is the experience you’ve already built). The second one is your baseline variant (this is a second experience that you’ll need to build).
Typical use cases
Let’s imagine that you want to test the effectiveness of a badge. In the standard build flow, you create your new content in the Experience Hub and retain your default content. As people visit your site and see either your product badges or your control, we can analyze performance and determine whether your product badge outperformed your control.
Let’s now imagine that you have two different versions of your badge—this might be a different icon or message—and you would like to understand which one resonates more with your visitors.
Rather than comparing each version in two separate and non-concurrent campaigns (remember you can only have one active campaign in the same placement at any one time), we give you the option to replace your default website content with the second version, and keep track of how each one is performing within a single campaign:
In this scenario, people visiting your site will be split between the two versions or variants rather than between a variant and your control.
What’s more, you have two options, depending on your goals:
-
Create two versions of your badge and target the same audience to understand which variant resonates more with the same group of people.
-
Use identical badges and target two different audiences to understand how different groups of people respond.
|
|
Note
When replacing your control, you can select either 50%, 95%, or a custom visibility. It’s impossible to set visibility to 100% because this would mean that none of the people visiting your site will see your baseline variant. As a result, we wouldn’t have a basis for performance comparisons. |
How to replace your control
-
Click the Replace control toggle.
-
Add one or more badges to your baseline variant.
As a starting point, you can duplicate the badges from the test variant by clicking Duplicate from test variant. Once done, you can delete any you don’t need and make any changes required.
You can also add experiences from scratch by clicking Add badge.
Previewing your badge
Previewing is a great way to test your campaign by replicating the customer journey. When you preview, you can see the campaign as one of your customers would see it.
Coveo Experience Hub offers two ways to preview:
-
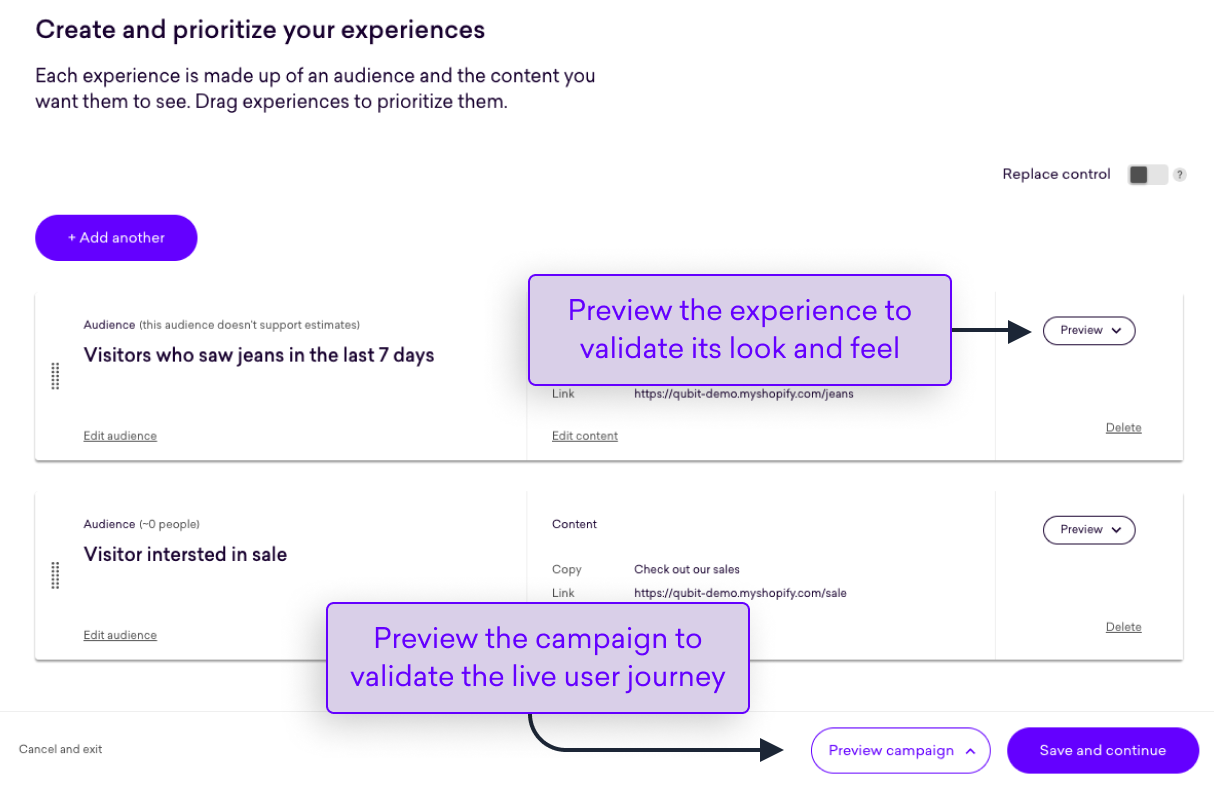
Preview an experience. This bypasses any audience conditions and rules and shows you how the experience will look to a visitor in the experience. This is a great way to validate the look and feel of your experience.
Click Preview on an experience card to preview the experience.
For mobile, click …on mobile and scan the QR code with the mobile device you want to preview on.
 Note
NoteIt can be confusing to preview your experiences when your audience condition targets URLs. This is because you use the Placement’s default preview URL, which may not match your audience conditions. The "Preview campaign" button is a great way to validate that URL matching conditions are working as expected.
-
Preview the entire campaign. This is a great way to validate the live user journey and is fully representative of the final user experience. You will only see content if you match the configured audience conditions and rules
Click Preview campaign to preview your campaign.
 Note
NoteThe counter you see in your preview is a placeholder that will be replaced with actual data from your site once your campaign goes live.
Step 3: Set visibility for your badges
In this step, you’ll learn how to choose how to decide what percentage of an audience sees your campaign. The Coveo Experience Hub will provide useful information about each option to help you select the most appropriate option.
Controlling visibility
You might not always want all of the people in your audiences seeing the campaign you’ve built. This might be because you are not confident in the result, and you need to manage that risk, or because you are looking to A/B test a campaign. So in this step, you’ll learn how to decide what percentage of an audience sees the campaign.
|
|
Note
The people that don’t see the campaign will see your default website content, often referred to as the control. FYI, if you’re going to use the correct term, the campaign would be the variation. |
Let’s look at the choices.
-
50% - this is a good choice for campaigns when you are trying out something completely new for your website. This might be a new style of messaging, new promotions that you’ve never run before, etc. 50% of the people in the audience will see the campaign, and 50% the control
-
95% - this is a good choice for campaigns when you need to reach out to as many people as possible, especially when you are trying to deliver on actions that came out of your weekly trade meeting, but still need to monitor your campaign’s performance against goals. 95% of the people will see the campaign and 5% the control
-
100% - this is a good choice for campaigns when you want to reach out to all of the people in an audience and are confident that your campaign will have a positive impact on goals. With this option, there’s no A/B testing and therefore no performance comparisons
|
|
Note
You cannot select 100% when you have chosen to replace your control because it would mean none of your visitors would see your baseline variant. |
Go ahead and select one of the available audience splits. Click Save and continue to move to the final step in the build flow.
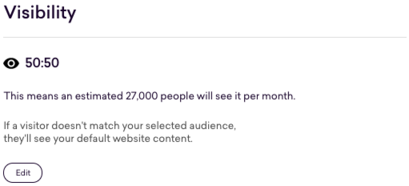
Reviewing estimated campaign exposure
When you make a selection, the Experience Hub will estimate the number of people that will see the campaign each week. This estimate is based on the last seven days of data from your property and the attributes you’ve defined for your audiences. In this example, you can see that the estimation is 27,000:

|
|
Note
It’s worth considering that the narrower the focus of an audience, the lower the number of people that will see your campaign will be. You can confirm this by reviewing the estimation for each of the audience splits. |
Step 4: Decide when to make your badges visible
In this step, you’ll learn how to use a schedule to start and pause a campaign automatically.
Scheduling your campaign
Scheduling is a good option if you would like to time a campaign to automatically start and end in line with weekend messages, late-night cut-offs, Black Friday messaging, or other promotions you might be running.
Before adding a schedule, it’s a good idea to review the following points:
-
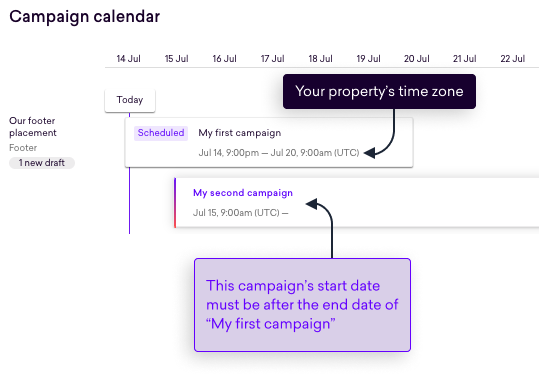
The time zone used for scheduling is the time zone configured for your property. You can see this in the
Scheduling calendar. -
The start date/time is optional, but it must be in the future and before the end date if set. Without a start date/time, you’ll have to launch it manually.
-
The end date/time is optional, but it must be after the start date/time if set. Without an end date/time, your campaign will run until you pause it manually.
-
Schedules for campaigns in the same Placement can’t overlap. Of course, you’ll be notified if this happens.
-
Once live, as with all the options you’ve chosen for your campaign, you can make changes to your schedule and even end it before its scheduled end date/time.
In the following example, you can see that the user has added a second campaign, "My second campaign," with a schedule that overlaps with "My first campaign":
Adding a schedule
Entering a start date/time
Remember that you’ll have to start your campaign manually if you don’t enter a start date/time.
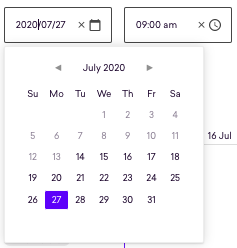
Make a selection from the date picker
Enter a start time and make sure you select either am or pm
In the example, the start date is 27 July 2020 at 9 AM:
Entering an end date/time
Remember that you’ll have to pause your active campaign manually if you don’t enter an end date/time.
Follow the same steps to enter an end date/time
Editing and removing a schedule
You can review your schedule in the final build step. You can make any changes necessary by selecting Edit:
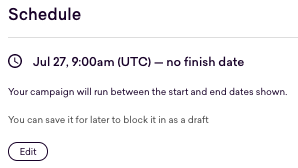
You can also edit any active campaign and make changes to the schedule, pause it manually to end it ahead of its scheduled end date or remove the end date to allow it to run continuously.
Step 5: Review and launch
In this step, you’ll learn how to name your campaign, perform a final review, and launch it on your website.
Naming the campaign
All campaigns need a name, not least because it will help you and others in your team find it in your dashboard.
Enter a name in the field provided. It’s always a good idea to stick to any conventions you work with when naming campaigns.

Reviewing the campaign
Before launching your campaign, it’s always recommended that you review it.
All the information you need to do this is shown in Campaign summary.
Coveo Experience Hub shows you the Placement you chose, the audience split, and the content in your experience. For each of these campaign elements, you can use the Edit button to make changes:
|
|
Leading practice
To include a team member in the review process, you can send them a direct link to your campaign. To do this, select Copy page link and then fire it over to them. Following the link, they’ll land right on the review step. Pretty handy, huh? |
Previewing the campaign
If you haven’t already done so, now is the final chance you’ll get to preview your campaign before launching it. You should be checking the basics:
-
Make sure the campaign displays where you intended it to
-
Review the content you added
-
Check images render correctly and any links work
-
Review your audiences
The Coveo Experience Hub offers two ways to preview:
-
Preview an experience with the "Preview" button in each experience card. This bypasses any audience conditions or rules, and shows you how the experience will look to a visitor in the experience. This is a great way to validate the look and feel of your experience
-
Preview the entire campaign with the "Preview campaign" button. This will show you the actual campaign a visitor would see. This is a great way to validate the live user journey and is fully representative of the final user experience. Content will only show if you match the configured audience conditions and rules.
Launching the campaign
When you are happy with what’s been set up in the campaign and you, and perhaps others, have reviewed it, you have the green light to launch it.
Select Launch campaign. Your campaign will be launched immediately for your customers to see.
|
|
Note
Of course, it will take some time for you to see whether the campaign is doing well or not. As a minimum, for campaigns with a 50:50 or 95:5 split, you’ll need to see 500 converters in the control and variation (your campaign) before you can start to provide feedback. |
Next steps
If this is your first campaign in the Experience Hub, congratulations. That was relatively straightforward, don’t you think?
Pretty soon, you’ll be able to see how your campaign is doing, and then, when you’re confident about the results, the Experience Hub will make a suggestion about how you can supercharge your campaign–this might be a recommendation to expose your campaign to people, for example.
While you’re waiting for the results to come in for this campaign, you can check in with your other campaigns to see how they’re performing and the wider impact your campaigns are having on your website.
Select Campaigns from the side menu to get the sitewide impact of all your campaigns
We’ll look at understanding the impact of your campaign in See how your campaigns are performing.