Implementing Abandonment recovery emails
Implementing Abandonment recovery emails
Before Abandonment recovery emails can be sent, there are a number of steps that need to be completed:
-
Collect your requirements for the campaign
-
Integrate with the Email Service Provider
-
Configure the parameters for ESP integration in the Qubit platform
-
Create the Abandonment recovery experience
This article outlines the implementation procedure and the steps to set up new campaigns. You may find that not all steps here are fully self-service.
Don’t hesitate to contact Coveo Support for assistance.
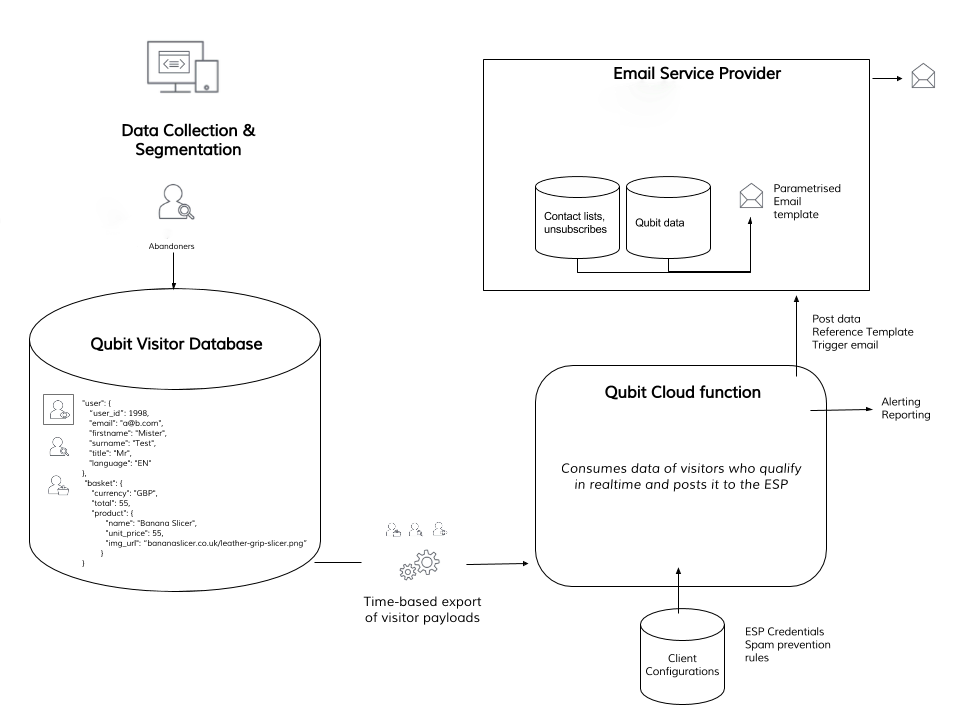
The diagram below presents the high-level technical stack for abandonment recovery:

This system is a real-time data pipeline for qualifying segments of visitors and passing their information to an ESP, which then triggers personalized emails off this data.
The pipeline has several key steps:
-
Data collection and segmentation: Qubit’s Experiences platform executes segmentation logic on all the web data collected by Qubit
-
Storage of visitor data: relevant visitor data is saved to the Qubit Visitor database. Stored data includes, for instance, the basket contents of a visitor who has abandoned
-
Time-based export: when an expiry timestamp is reached, for example, 4 hours after the user’s last pageview, this record is sent through the pipeline to a server side cloud function run by Qubit
-
Communication to the Email Service Provider: the Qubit Cloud Function passes the information contained in the time-based export to the relevant email service provider
-
Firing of email: The ESP must be setup before it can accept data from Qubit and and trigger an email upon reception
Data requirements
In this section, we will cover the data requirements for a generic abandonment recovery email.
Consider any custom dynamic content requirements that fall outside this generic use case. Ensure that all necessary data can be obtained from the suggested data points below.
QProtocol data requirements for Abandonment recovery
The following events and fields represent our recommended implementation of the Abandonment recovery experience in the retail vertical.
For details of the eGaming and travel variants of these events, refer to Setup For eGaming and Setup for Travel.
For a more complete description of these events, and more information about QProtocol, QP events, and setting up Qubit on your website or mobile app, see QProtocol events reference.
ecUser
-
email
-
firstName
-
lastName
ecBasketItem
-
product.sku
-
product.productId
-
product.name
-
product.price
-
product.originalPrice
-
product.url
-
product.images
ecBasketItemTransactionSummary
-
transaction.id
-
basket.total.value
UV data requirements for Abandonment recovery
user
-
email
-
name
basket
-
line_items[x].product
-
sku
-
id
-
name
-
unit_price
-
unit_sale_price
-
url
-
image_url
transaction
-
id
-
total
Implementation steps
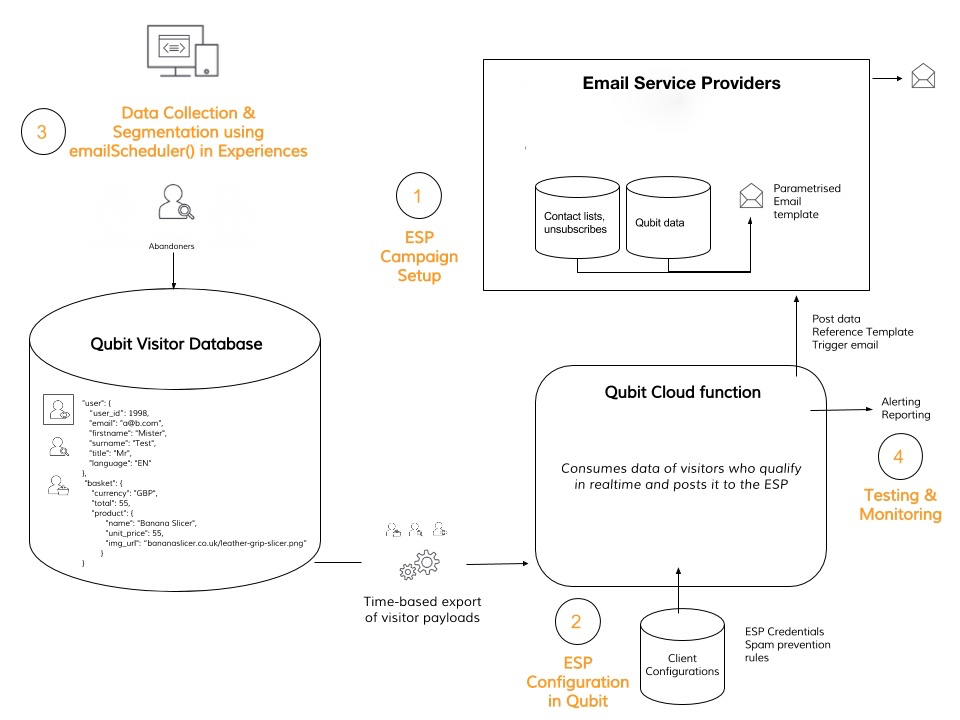
The four key steps of implementing Abandonment recovery emails are shown in the following diagram:

Gathering requirements and setting up an ESP campaign
There are two parts to this step. Firstly, collecting your requirements for the campaign and secondly, setting up the ESP.
Collecting campaign requirements
You should complete this step in collaboration with Qubit. The following questions should be considered:
-
What should be rendered in the emails?
-
How long after abandonment should emails be triggered?
-
Where on site should email addresses be collected?
-
Will opt outs be offered to all users?
To ensure nothing is missed, refer to our requirements template.
Having implemented these campaigns for a number of clients, Qubit may recommend certain best practices:
Setting up the ESP to satisfy the requirements
In collaboration between Qubit and the Email Service Provider (ESP) you must create the email templates that capture the information to show in Abandonment recovery emails and data tables to hold this information on an per-visitor basis.
The templates and tables will be posted by the Qubit cloud function via API.
Qubit requires the following from the ESP:
-
API credentials to be able to make calls to the ESP and pass visitor data
-
Names of any tables in which to place the records, not applicable to all ESPs
-
A sandbox account for testing the successful transfer of data from Qubit to the ESP
-
Names of the columns in any tables, and which values from UV should be in them, not applicable to all ESPs
-
Any other information the ESP needs us to send them, for example, a reference to the email template
The ESP is responsible for processing the data received from Qubit and parsing it into email templates.
Qubit has built integrations for a number of ESPs. Refer to the following list:
-
Experian CCMP
-
Mandrill
-
Communicator
-
Dotmailer
-
ExactTarget
-
OtherLevels
-
Silverpop Engage
-
Silverpop Transact
-
Mailchimp
-
Selligent
Several others are in the process of being built.
ESP configuration
This step, typically a one-time process, involves setting up credentials and verifying the connection between Qubit and the Email Service Provider (ESP). Testing this may be challenging, so don’t hesitate to reach out for assistance.
Step 1
Select Experiences from the side menu, select against the Abandonment recovery experience you wish to configure, and select Edit:

Step 2
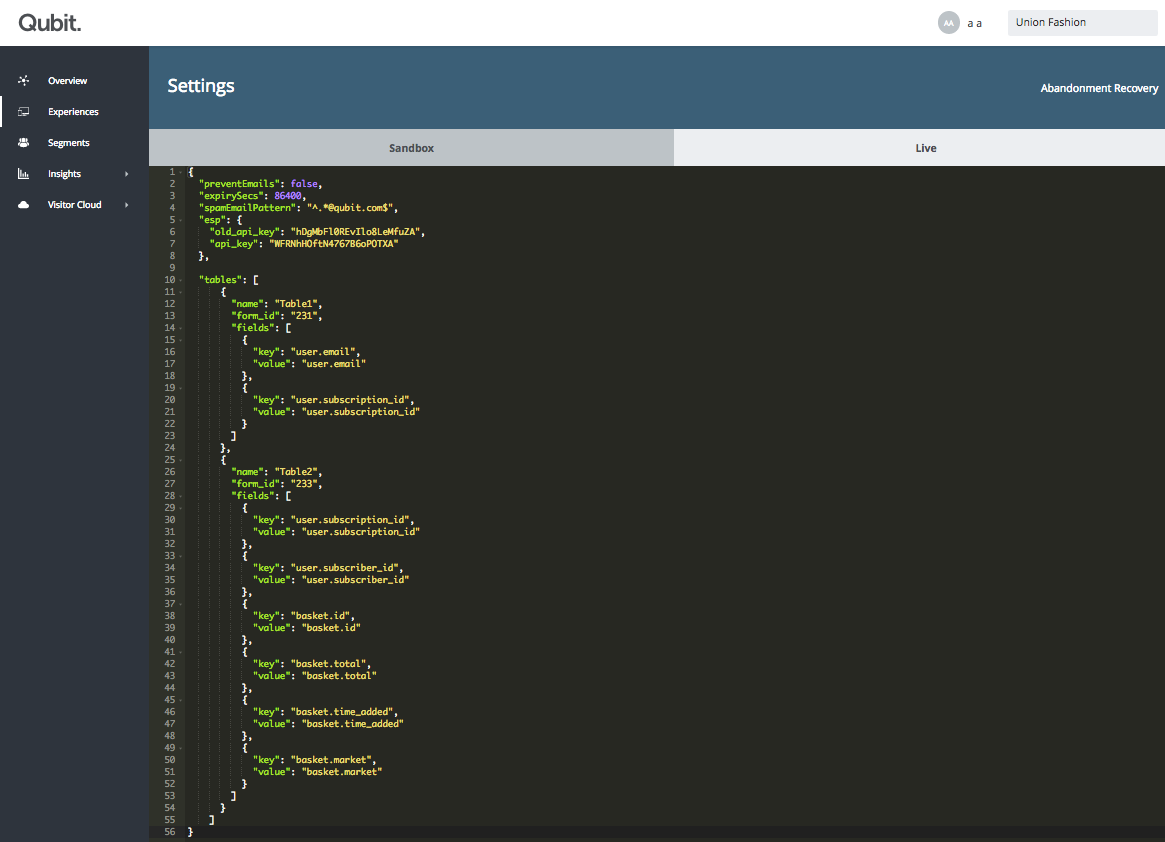
Select Edit this experience’s Global Configuration settings and edit the following settings as required:
-
preventEmails: If set to true, no posts will be made to the ESP. This can be used for pausing. -
expirySecs: The cooling-off period in seconds after an email has been sent. During the cooling off period no further emails will be sent to the same recipient and campaign combination. -
spamEmailPattern: The email address pattern which is exempt fromexpirySecs. -
cancelOnConversion: Whether to cancel the email if the user converted. -
esp: The configuration for your ESP. Refer to the examples below. -
esps: An alternative toespwhen multiple ESP configurations are required. Refer to the examples below.
esp configuration examples:
Example 1:
{
  "esp": {
    "name": "experian",
    "grant_type": "password",
    "auth": {
      username: "my username",
      "password": "XXXXXXXXXXXXXXXXXXX",
      "grant_type": "password",
      "client_id": "84139"
    },
    "cust_id": "92118",
    "tables": [
      {
        "name": "User Info",
        "submissionSequence": "0",
        "form_id": "1",
        "fields": [
          {
            "key": "user.email",
            value: "user.email"
          }
        ]
      }
    ]
  }
}
Example 2:
{
  "esp": {
    "name": "communicator",
    "auth": {
      username: username,
      "password": "password"
    },
    "tables": [{
      id: 12421,
      "operationType": "Upsert",
      "columns": [{
        "columnId": 193311,
        value: "user.user_id"
      }]
    }]
  }
}-
esps configuration example**:
{
  "esps": {
    "default": {
      "name": "communicator",
      "auth": {
        username: username,
        "password": "password"
      },
      "tables": [{
        id: 12421,
        "operationType": "Upsert",
        "columns": [{
          "columnId": 193311,
          value: "user.user_id"
        }]
      }]
    },
    "browsingAbandonment": {
      "name": "communicator",
      "auth": {
        username: username,
        "password": "password"
      },
      "tables": [{
        id: 8888999,
        "operationType": "Upsert",
        "columns": [{
          "columnId": 88911,
          value: "user.user_id"
        }]
      }]
    }
  }
}
The configuration may also contain information on how the visitor data matches to tables and columns in the ESP. An illustrative example of this is shown below:

An example configuration for a Mandrill connection is:
{
  "preventEmails": false,
  "expirySecs": 86400,
  "cancelOnConversion": true,
  "spamEmailPattern": "^.*@qubit.com$",
  "esp": {
    "api_key": "WFRNhHOftN4767B6oPOTXA"
  }
}
Experience implementation
In the experience, make sure to include the @qubit/messages package for scheduling and canceling emails.
When done, implement your experience based on the following template:
module.exports = function execution (options) {
  const { uv } = options
  const messages = require('@qubit/messages')(options)

  function schedule (user, items) {
    messages.schedule({
      recipientId: user.email,
      key: 'basket-abandonment-2h',
      delay: '2h',
      window: '09:00-21:00', // optional
      data: { user, items } // see documentation for data the integration expects
    })
  }

  function cancel (user) {
    messages.cancel({
      recipientId: user.email,
      key: 'basket-abandonment-2h'
    })
  }

  let user = null
  let items = []

  uv.on('ecUser', event => {
    user = event.user
  }).replay()

  uv.on('ecBasketItem', (event) => {
    items.push(event.product)
  }).replay()

  uv.on('ecBasketSummary', (event) => {
    if (user && user.email && items.length) {
      // we found a non empty basket, schedule an email
      schedule(user, items)
    } else {
      // an empty basket, cancel the email
      // in case one has been scheduled
      cancel(user)
    }
  }).replay()

  uv.on('ecBasketTransactionSummary', () => {
    if (user && user.email) {
      // transaction! cancel the email
      // in case one has been scheduled
      cancel(user.email)
    }
  }).replay()
}
For full details on the usage of @qubit/messages package see @qubit/messages package documentation.
Data collection and segmentation
This involves correctly qualifying visitors and sending relevant information through the data pipeline described above.
Testing and monitoring
Testing
Once the above has been set up, both on the ESP side and the Qubit experience, the testing phase can commence.
In this phase, real end users will be qualified using the experience trigger and variation, but the emails that would be sent out to these end users get rerouted to a test mailing list such as esp-test-CLIENTNAME@qubit.com.
This can be done by overriding uv.user.email in the variation code by adding something like universal_variable.user.email = 'esp-test-CLIENTNAME@qubit.com' to the solutionOptions.transformData function.
This mailing list will be set up by Qubit and used to review the emails that would have gone out to end users, to ensure that there are no rendering issues, and that the emails generated match the on-site activity correctly (e.g does abandonment cause an email in the right time frame, does checking out cancel the email, etc).
Monitoring
Once the campaign has been signed off, alerting is set up on the Qubit side to flag:
-
Sudden email send volume hikes or drop offs
-
Authentication failures
Following the go-ahead, the campaign can go live to end users (using their uv.user.email value).
Reporting
Throughout this pipeline, QProtocol QMail events are generated in the following scenarios:
-
An email is scheduled for a visitor. This typically means that the visitor has entered their email address and has performed an on-site action that may qualify them for an email such as adding products to their basket.
-
An email is rescheduled for a visitor. This means that the visitor continued browsing the site or basket contents have changed and the pending email has been rescheduled further into the future.
-
An email is canceled for a visitor. This could be because the visitor has made a purchase, making it unnecessary to send an email.
-
An email request is invalid. This means the request to schedule or cancel an email has missing or incorrect data.
-
An email failed. This means there was an issue passing data to the ESP.
-
An email is prevented. This means the visitor qualified, that is, the visitor abandoned products and didn’t check out. However, we prevented the email from being sent because they had already received an email within the cooling-off period or had converted.
-
An email is sent. This means we successfully posted the information to the ESP and a personalized email going was sent.
By querying this event in Live Tap we can answer a number of pertinent questions, including:
-
How many emails have been sent out over time?
-
Which email campaigns lead to the most conversions?
-
What are the click through rates of each campaign?
The full event schema for QMail is shown in the following table:
| Field | Description | Type | Available in browser | Example |
|---|---|---|---|---|
eventName |
The event status. |
string |
Yes |
scheduled |
integration |
The name of the ESP integration. |
string |
Yes |
mandrill |
environment |
The environment where the experience is running. |
string |
Yes |
production |
campaign |
The campaign name. |
string |
Yes |
abandon-basket-1-hour-en_GB |
experienceId |
The experience ID. |
Long |
Yes |
|
iterationId |
The ID of experience iteration. |
Long |
Yes |
|
variationId |
The ID of the experience variation. |
Long |
Yes |
|
variationMasterId |
The ID of the experience control. |
Long |
Yes |
|
The visitor’s email address if available. |
String |
john.smith@example.com |
||
expiryTime |
Integer |
Yes |
||
delayTime |
The number of minutes between a visitor abandoning a site and a personalized email being sent. |
Integer |
Yes |
|
timeRange |
The time range, in 24 hour clock format, in which emails are allowed to be scheduled. |
StringArray |
Yes |
[“8”, “23”] |