---
title: Authenticate via search token
slug: ladf0004
canonical_url: https://docs.coveo.com/en/ladf0004/
collection: coveo-for-commerce
source_format: adoc
---
# Authenticate via search token
This article explains how to employ [Coveo search token authentication](https://docs.coveo.com/en/56/) in an SAP Commerce Cloud project.
Using this authentication method provides better security, as it doesn't require exposing the API key in the front-end code.
## Prerequisites
Make sure your configuration meets the following criteria:
* The [Apache Ant](https://ant.apache.org/) utility is installed on your machine.
* You added an [Omni Commerce Connect (OCC)](https://help.sap.com/docs/SAP_COMMERCE_CLOUD_PUBLIC_CLOUD/3476714bba0b4cb9b3eb58c270e44439/8c19ab00866910148f87bf32d4a60d38.html) extension to your project.
* You have a Coveo-powered search UI embedded in your SAP Commerce Cloud storefront. See [Use Coveo Search in SAP Commerce Cloud Composable Storefront](https://docs.coveo.com/en/ladf0003/).
## Back-end configuration
### Step 1: Add an OCC extension
To use search token authentication, you must add a new API to the OCC extension of your project.
Whereas you can do so by building a new extension from scratch, you should use the prebuilt extension published on Coveo GitHub: https://github.com/coveo/coveo-sap-commerce-connector
. Go to your SAP project directory.
. Navigate to the `hybris/bin/custom` directory.
. Clone or download [the extension repository](https://github.com/coveo/coveo-sap-commerce-connector/tree/v4/coveo/coveocc).
This would create a new directory named `coveocc`.
. In the project directory, open the `hybris/config/localextensions.xml` file and add the `coveocc` extension:
```xml
```
. Save the file.
### Step 2: Build and run the server
. From the root of your project directory, run the following command:
```shell
ant clean all
```
. After the command execution, navigate to the `hybris/bin/platform` directory.
. Run the `hybrisserver.sh` script:
```shell
./hybrisserver.sh
```
### Step 3: Specify credentials
The Coveo credentials should be set through the graphical interface of the
[Backoffice Administration Cockpit](https://help.sap.com/docs/SAP_COMMERCE/5c9ea0c629214e42b727bf08800d8dfa/8c16979286691014abe6f41434c7614a.html).
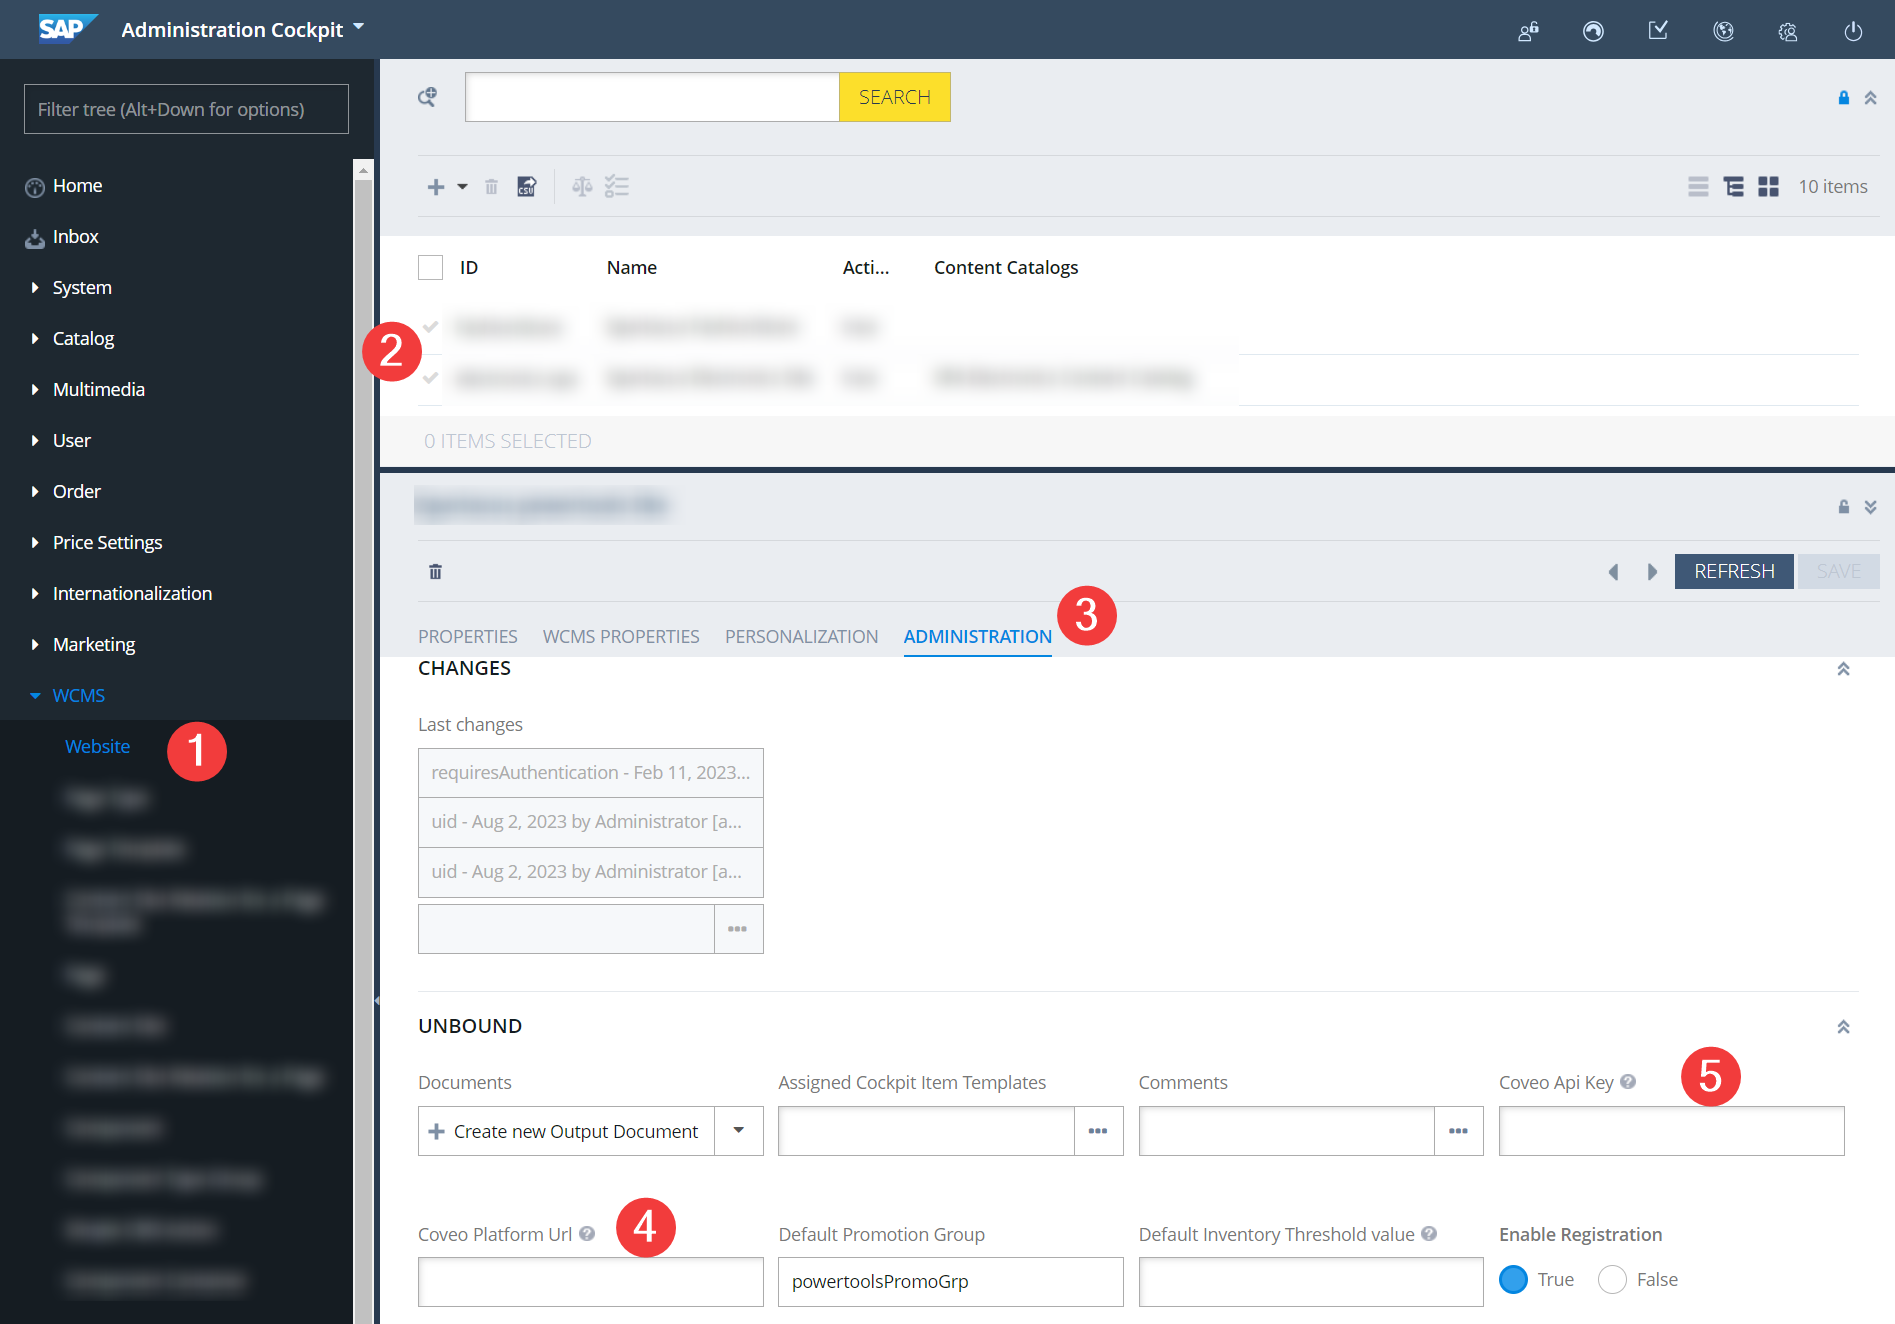
. In the Administration Cockpit, go to the **WCMS → Website** page.
. In the list of sites, double-click the required website.
. Switch to the **Administration** tab.
. Fill in the following fields:
** **Coveo Platform URL**. For production, it must be `https://platform.cloud.coveo.com/`.
** **Coveo** [**API Key**](https://docs.coveo.com/en/1718/).
[Create an authenticated search API key](https://docs.coveo.com/en/1718#create-an-api-key), and then paste the key in the field.
### Local testing
To test retrieving a search token, you can use a Swagger UI that's available when you're running the `hybrisserver.sh` script.
By default, your local server would use ports 9001 (http) and 9002 (https).
The Swagger UI is available at `https://localhost:9002/occ/v2/swagger-ui.html`, where you can find and test the `/coveo/token/` endpoint.
This endpoint returns a JSON object with the `token` property that contains the search token.
Depending on the user type, the endpoint returns a JWT token for a logged-in user or an anonymous user.
> **Note**
>
> Your implementation may use **price** groups to manage user-specific pricing.
> Price groups can be attached to a user group or directly to the user.
>
> Either way, JWT tokens will contain all the price group IDs that are associated with a logged-in user.
>
> See more about user groups in the [SAP documentation](https://help.sap.com/docs/SAP_COMMERCE_CLOUD_PUBLIC_CLOUD/aa417173fe4a4ba5a473c93eb730a417/8c797311866910149debcebff02be567.html).
## Front-end configuration
### Step 1: Add a new file
. Navigate to the root of your angular application (for example, `src/app` directory).
. Create a new service for token management, `coveo/services/search-token-service/search-token.service.ts`:
```tsx
import { CommerceEngine } from '@coveo/headless/commerce';
import { loadConfigurationActions } from '@coveo/headless';
import { Injectable, EventEmitter } from '@angular/core';
import { EventService, LoginEvent, LogoutEvent, AuthStorageService } from '@spartacus/core';
import { environment } from '../../../../environments/environment';
@Injectable()
export class SearchTokenService {
public newTokenGenerated: EventEmitter = new EventEmitter();
private TOKEN_PREFIX: string = `coveo-jwt`;
constructor(
private events: EventService,
private authStorageService: AuthStorageService) {
this.events
.get(LogoutEvent)
.subscribe( () => {
removeAccessToken(this.TOKEN_PREFIX);
this.emitEvent();
});
this.events
.get(LoginEvent)
.subscribe(() => {
this.emitEvent();
});
}
getToken() {
return getAccessToken({
prefix: this.TOKEN_PREFIX,
hybrisToken: this.authStorageService.getItem('access_token'),
});
}
refreshToken() {
return getAccessToken({
prefix: this.TOKEN_PREFIX,
refresh: true,
hybrisToken: this.authStorageService.getItem('access_token'),
});
}
reloadSearchEngineWithToken(engine: CommerceEngine, token: string) { <1>
if (engine) {
const {updateBasicConfiguration} = loadConfigurationActions(engine);
const action = updateBasicConfiguration({accessToken: token})
engine.dispatch(action);
}
}
private async emitEvent() {
this.newTokenGenerated.emit(await getAccessToken({ <2>
prefix: this.TOKEN_PREFIX,
hybrisToken: this.authStorageService.getItem('access_token')
}));
}
function removeAccessToken(prefix: string) {
for (let i = 0; i < localStorage.length; i++) {
const key = localStorage.key(i);
if (key && key.startsWith(`${prefix}`) && !key.startsWith(`${prefix}-guest`)) {
localStorage.removeItem(key)
}
}
}
interface GetAccessTokenOptions {
prefix: string;
refresh?: boolean;
hybrisToken: string;
}
async function getAccessToken(options: GetAccessTokenOptions) {
const { prefix, refresh = false, hybrisToken } = options;
const usertype = hybrisToken ? 'user' : 'guest'; <3>
const cache = createTokenCache(prefix, usertype);
const cachedToken = cache.get();
if (cachedToken && !refresh) return cachedToken;
const token = await generateAccessToken(hybrisToken);
if (token) cache.set(token);
return token;
}
function createTokenCache(prefix: string, usertype: string) { <4>
const key = `${prefix}-${usertype}`;
const get = () => localStorage.getItem(key);
const set = (token: string) => localStorage.setItem(key, token);
return { get, set };
}
async function generateAccessToken(hybrisToken?: string | null) { <5>
const url = getCoveoAccessTokenUrl();
const headers: Record = {};
if (hybrisToken) {
headers['Authorization'] = `Bearer ${hybrisToken}`;
}
const requestOptions: RequestInit = {
method: 'GET',
headers: headers,
};
try {
const response = await fetch(url, requestOptions);
const data = await response.json();
return data.token || '';
} catch (error) {
console.error('Request failed:', error);
return '';
}
}
function getCoveoAccessTokenUrl() {
const base = environment.occBaseUrl;
const baseSiteId = ''; <6>
return `${base}occ/v2/${baseSiteId}/coveo/token`;
}
```
<1> `reloadSearchEngineWithToken` updates the engine configuration with the new JWT token when a user changes its authentication status.
Once a user logs in or logs out, the `emitEvent` method is called to emit a new token.
<2> The service uses the `emitEvent` method to inform the app about the generation of a new token and retrieve it.
<3> `getAccessToken` checks if checks if there's a token in the localStorage.
If not, it check whether it's a logged-in user or an anonymous user and creates a cache token based on the user type.
Finally, it calls `generateAccessToken` to create and retrieve a new token.
<4> `createTokenCache` creates a cache object that exposes `get` and `set` methods to retrieve and store the token in the localStorage.
<5> `generateAccessToken` calls the `getCoveoAccessTokenUrl` function which returns the URL of OCC extension that retrieves the token.
<6> Saves the ID of your site into a `baseSiteId` variable.
The site ID is the one that you configured in the Backoffice Administration Cockpit.
### Step 2: Update `app.component.ts`
Update the `src/app/app.component.ts` file to use the `getAccessToken` method:
```tsx
import { AfterViewInit, Component, ViewChild } from '@angular/core';
import { SearchTokenService } from './coveo/services/search-token-service/search-token.service';
import {
CommerceEngine,
StandaloneSearchBox,
buildCommerceEngine,
buildSearch,
buildStandaloneSearchBox
} from '@coveo/headless/commerce';
@Component({
selector: 'app-root',
templateUrl: './app.component.html',
styleUrls: ['./app.component.scss'],
providers: [
SearchTokenService
]
})
export class AppComponent implements AfterViewInit {
@ViewChild('searchinterface')
title = 'powertoolsstore';
commerceEngine!: CommerceEngine;
state: any;
constructor(
private searchTokenService: SearchTokenService
) {
this.searchTokenService.newTokenGenerated.subscribe((value) => { <1>
const engine = this.commerceEngine;
if (engine) {
this.searchTokenService.reloadSearchEngineWithToken(engine, value);
} else {
this.initializeCommerceEngine(value);
}
});
}
async ngAfterViewInit() {
const accessToken = await this.searchTokenService.getToken();
this.missingAccessToken = !accessToken;
if (this.missingAccessToken) {
return;
}
this.initializeCommerceEngine();
// ... <2>
}
private initializeCommerceEngine(accessToken: string) {
this.commerceEngine = buildCommerceEngine({
configuration: {
organizationId: '', <3>
accessToken,
renewAccessToken: () => this.searchTokenService.refreshToken(),
},
});
}
private initializeCommerceEngine(accessToken: string) {
this.commerceEngine = buildCommerceEngine({
configuration: {
organizationId: '',
accessToken: accessToken,
renewAccessToken: () => this.searchTokenService.refreshToken(),
analytics: {
trackingId: 'sports'
},
context: {
currency: 'USD',
country: 'US',
language: 'en',
view: {
url: 'example.com'
},
}
},
});
if (this.commerceEngine) {
// ... <4>
const search = buildSearch(this.commerceEngine);
search.executeFirstSearch();
}
}
}
```
<1> Subscribe to the `newTokenGenerated` event to reload the engine with the new JWT token.
<2> Once the Commerce engine is initialized, you can use it to create subcontrollers.
**Example**
Declare a `StandaloneSearchBox` controller as a property of the `AppComponent` class.
```tsx
export class AppComponent implements AfterViewInit {
@ViewChild('searchinterface')
controller!: StandaloneSearchBox;
// ...
}
```
Then, in the `ngAfterViewInit` method, initialize the controller and subscribe to its state changes.
```tsx
this.controller = buildStandaloneSearchBox(this.commerceEngine, {
options: {
redirectionUrl: '/search',
numberOfSuggestions: 5
},
});
this.controller.subscribe(() => {
this.state = this.controller.state;
});
if (this.controller.state.value) {
this.controller.clear();
}
```
To reflect the changes in the UI and handle user input, you can add the following event handler:
```tsx
onTextChange(event: Event): void {
const target = event.target as HTMLInputElement;
this.controller.updateText(target.value);
}
```
<3> Pass the following parameters:
* ID of your Coveo organization
* Access token
* `renewAccessToken` method that renews the token if it's expired.
See [Initialize the Commerce engine](https://docs.coveo.com/en/o6r70022#initialize-the-headless-commerce-engine) for more details.
<4> You can further specify the engine configuration before executing the first search. See [ConfigurationActions (Commerce Engine)](https://docs.coveo.com/en/headless/latest/reference/interfaces/Commerce.ConfigurationActionCreators.html).
From now on, your storefront will use the search token to authenticate the search requests.