Install alongside Sitecore in Azure PaaS
Install alongside Sitecore in Azure PaaS
The following article contains instructions and general information regarding the deployment of Coveo for Sitecore alongside a Sitecore 9.1/10.0/10.1 instance in a Microsoft Azure PaaS environment using WDPs (Web Deployment Packages).
|
|
Installing Sitecore and Coveo for Sitecore simultaneously on Azure using WDPs comes with the following limitations:
|
Prerequisites
The deployment of Sitecore and Coveo for Sitecore WDP packages on Azure PaaS requires:
-
an Azure account access with the necessary deployment resources uploaded to it
-
a computer with the Sitecore Azure Toolkit and its dependencies to run the PowerShell deployment commands locally.
In more detail, here are the prerequisites for both.
Your Azure account prerequisites
You need 5 WDPs:
-
the Sitecore site WDP

To ensure special characters in queries don’t lock up your search pages, changes to the
Content/Website/Web.configfile are required before uploading the WDP to your Azure account (see Ajax error 500 when using special characters in a query - Workaround). -
the Sitecore xConnect site WDP
-
Sitecore Identity Server WDP, matching the Sitecore version to be installed
-
the Sitecore Bootloader module WDP (provided in the Sitecore Azure Toolkit in the
\resources\<SITECORE_VERSION>\Addonsfolder) -
the Coveo for Sitecore module WDP (use the WDP for the latest build accessible through the Releases and downloads page).
You must also have 2 JSON deployment parameters files, one for the Sitecore Bootloader module and one for the Coveo for Sitecore module:
-
bootloader.json: It’s available in the Sitecore Azure Quickstart Templates GitHub repository. Select your Sitecore version followed by the topology. Thebootloader.jsonfile is located in theaddonsfolder. -
coveoforsitecore-module.json: To download it, click here.
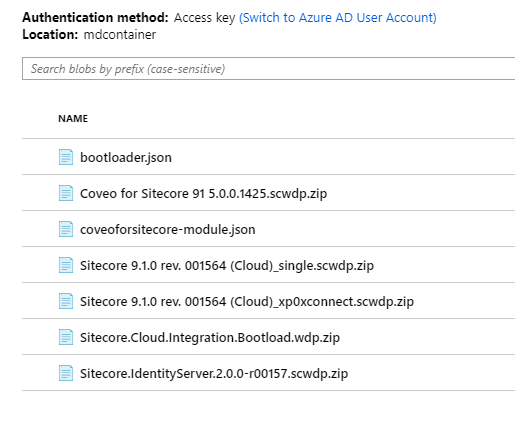
In summary, your Azure storage needs to contain the seven resources below for deployment:
Additionally, you’ll need to generate a Shared Access Signature token in your storage account. You will append the generated query string to your Azure resources references in the deployment configurations.
Your local computer prerequisites
On the computer you will use to run the Sitecore Azure Toolkit commands to deploy the WDPs, you need to install the following:
-
the Azure PowerShell module (see Install the Azure PowerShell module)
-
the latest version of the Sitecore Azure Toolkit
Additionally, you want a working folder structure such as the following before launching deployment:
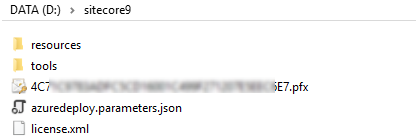
where
-
The
resourcesandtoolsfolders are copies of the Sitecore Azure Toolkitresourcesandtoolsfolders respectively. -
The
.pfxfile is a Sitecore authentication certificate.pfxfile. You’ll need the client certificate password in the deployment configurations. -
The
azuredeploy.parameters.jsonfile is the deployment configuration file matching the version of your Sitecore WDP, which you have copied/downloaded and edited (see Editing the azuredeploy.parameters.json file). -
The
license.xmlfile is the Sitecore license file.
Editing the azuredeploy.parameters.json file
The azuredeploy.parameters.json file configurations determine the way a given Sitecore version topology and its modules are deployed.
The base azuredeploy.parameters.json files available in the GitHub Sitecore Azure Quickstart Templates repository apply only for deployments of vanilla instances of Sitecore.
The azuredeploy.parameters.json file must be edited to deploy Coveo for Sitecore, as a Sitecore module, along with Sitecore.
-
In the Sitecore Azure Quickstart Templates repository, select the Sitecore version that matches the Sitecore WDPs you have uploaded to Azure (see Sitecore-Azure-Quickstart-Templates).
-
Select the folder that matches your Sitecore WDP version.
-
Select the folder that matches your Sitecore WDP topology.
-
Click the
azuredeploy.parameters.jsonlink. -
Click Raw.
-
Note the URL in your browser address box. You’ll need it for a variable value in the PowerShell deployment script.
-
Save the displayed content as
azuredeploy.parameters.jsonin your working folder, in accordance with the suggested folder structure (see Your local computer prerequisites). -
Open the
azuredeploy.parameters.jsonfile in a text editor. -
Set the base
azuredeploy.parameters.jsonparameter values.Parameter Value deploymentId
Leave blank (It will be set by a PowerShell script.)
location
The geographic region of the current deployment (for example, East US)
sitecoreAdminPassword
The new password for the Sitecore admin account (at least 8 characters)
licenseXml
Leave blank (It will be set by a PowerShell script.)
sqlServerLogin
User name of the SQL system administrator account to be created
sqlServerPassword
The password for the SQL administrator account (requires a number and a special character)
siMsDeployPackageUrl
The concatenation of the uploaded Sitecore Identity SCWDP URL and the Shared Access Signature token query string (for example,
https://<URL_OF_THE_SITECORE_IDENTITY_SCWDP>?<TOKEN>)singleMsDeployPackageUrl
The concatenation of the uploaded Sitecore SCWDP URL and the Shared Access Signature token query string (for example,
https://<URL_OF_THE_SITECORE_SCWDP>?<TOKEN>)xcSingleMsDeployPackageUrl
The concatenation of the uploaded Sitecore xConnect SCWDP URL and the Shared Access Signature token query string (for example,
https://<URL_OF_THE_SITECORE_XCONNECT_SCWDP>?<TOKEN>)authCertificateBlob
Leave blank (It will be set by a PowerShell script.)
authCertificatePassword
The password you chose when creating the client auth certificate
All machineLearning* parameters
Leave blank if you don’t want Sitecore Cortex
-
With the Sitecore XP topology, add an
allowInvalidClientCertificatesparameter to the file with a value oftrue. This parameter is available for the XM topology."allowInvalidClientCertificates": { "value": true } -
Add the Coveo for Sitecore and Bootloader modules configurations.
-
Add a
modulesparameter with the following content to the list of parameters."modules":{ "value":{ "items":[ { "name": "coveoforsitecore", "templateLink": "", "parameters": { "singleMsDeployPackageUrl" : "" } }, { "name": "bootloader", "templateLink": "", "parameters": { "msDeployPackageUrl" : "" } } ] } } -
Set the Coveo for Sitecore module parameter values.
Parameter Value templateLink
The concatenation of the uploaded Coveo for Sitecore module JSON file URL and the Shared Access Signature token query string (for example,
https://<URL_OF_THE_COVEO_FOR_SITECORE_MODULE_JSON>?<TOKEN>)singleMsDeployPackageUrl
The concatenation of the uploaded Coveo for Sitecore SCWDP and the Shared Access Signature token query string (for example,
https://<URL_OF_THE_COVEO_FOR_SITECORE_SCWDP>?<TOKEN>) -
Set the Bootloader module parameter values.
Parameter Value templateLink
The concatenation of the uploaded Sitecore Bootloader JSON file URL and the Shared Access Signature token query string (for example,
https://<URL_OF_THE_SITECORE_BOOTLOADER_MODULE_JSON>?<TOKEN>)msDeployPackageUrl
The concatenation of the uploaded Sitecore Bootloader WDP and the Shared Access Signature token query string (for example,
https://<URL_OF_THE_SITECORE_BOOTLOADER_WDP>?<TOKEN>)
-
-
Save the file.
Creating the PowerShell deployment script
|
|
Note
The script variable values below pertain to a Sitecore 9.1 installation. |
-
Create a new file in a text editor.
-
Paste the following script in your new file.
$SCSDK="D:\sitecore9\tools" $SCTemplates="https://raw.githubusercontent.com/Sitecore/Sitecore-Azure-Quickstart-Templates/master/Sitecore%209.1.0/XPSingle" $DeploymentId = "<AZURE_DEPLOYMENT_ID>" $ResourceGroup = "<AZURE_RESOURCE_GROUP_NAME>" $LicenseFile = "D:\sitecore9\license.xml" $CertificateFile = "D:\sitecore9\<CERTIFICATE_FILE_NAME>.pfx" $SubscriptionId = "<AZURE_SUBSCRIPTION_ID>" $Location="East US" $ParamFile="D:\sitecore9\azuredeploy.parameters.json" $Parameters = @{ "deploymentId"=$DeploymentId; "authCertificateBlob" = [System.Convert]::ToBase64String([System.IO.File]::ReadAllBytes($CertificateFile)) } Import-Module $SCSDK\Sitecore.Cloud.Cmdlets.psm1 Add-AzureRMAccount Set-AzureRMContext -SubscriptionId $SubscriptionId Start-SitecoreAzureDeployment -Name $ResourceGroup -Location $Location -ArmTemplateUrl "$SCTemplates/azuredeploy.json" -ArmParametersPath $ParamFile -LicenseXmlPath $LicenseFile -SetKeyValue $Parameters -Verbose -
Edit the script variable values per the information below.
Variable Value $SCSDK
The location of the
toolsdirectory that was copied from the Sitecore Azure Toolkit$SCTemplates
The ARM Template URL of the
azuredeploy.parameters.jsonfile you saved, without the file name and the trailing slash (for example,https://raw.githubusercontent.com/Sitecore/Sitecore-Azure-Quickstart-Templates/master/Sitecore%209.1.0/XPSingle)$DeploymentId
The prefix that will be added to all resources created in Azure (can be anything up to 60 characters long)
$ResourceGroup
The name of the Azure Resource Group to install the services in (one resource group per Sitecore installation)
$LicenseFile
The location of your
license.xmlfile$CertificateFile
The location of your client authentication certificate file
$SubscriptionId
The Azure account subscription ID
$Location
The same Azure geographic location as your
azuredeploy.parameters.jsonfile and blob storage$ParamFile
The location of your
azuredeploy.parameters.jsonfile -
Save your file.
Running the PowerShell deployment script
-
Run PowerShell as an administrator.
-
Copy-paste the deployment script from your text file into your PowerShell window.
-
Run the script.
What’s next?
You’re now ready to configure and activate Coveo for Sitecore (see Configuration and activation options).